BitLocker Recovery Explained – Restore your access NOW!
 Reviewed by Muhammad Zubyan
BitLocker recovery is the process of regaining access to a drive that’s protected by BitLocker, especially when you’re unable to access it as you normally would.
Options Available to Restore Access:
During BitLocker recovery, several options can help you regain access to your drive:
- Entering the recovery password: During recovery, you can provide the recovery password (a 48-digit code) to unlock the encrypted drive. If your organization allows, you may print or save this password, and sometimes you can use a Microsoft account to retrieve it online. This option is available for non-domain-joined PCs. By logging in with your Microsoft account, you can enter the recovery password, whether you saved it on a USB drive, printed it, or saved it to your Microsoft account.
- Using data recovery services: Professional data recovery companies can access encrypted drives using their credentials. For operating system drives, they must first mount the drive as a secondary data drive on another computer before unlocking and recovering data. This approach ensures data is handled securely without affecting the original system.
- Active Directory Domain Services (AD DS): If your PC is part of a domain and recovery passwords are stored in AD DS, a domain administrator can unlock the drive. It’s recommended to store recovery passwords in AD DS. To enable this, adjust your BitLocker group policy settings as described in the Local Group Policy Editor: Go to Computer Configuration > Administrative Templates > Windows Components > BitLocker Drive Encryption > Operating System Drives. Enable the settings for storing recovery passwords in AD DS to ensure IT administrators can retrieve them when needed.
What Causes BitLocker Recovery to Appear?
BitLocker may require recovery in certain situations when attempting to boot the operating system drive, including:
TPM-Related Issues
- On TPM 1.2 devices, changing the BIOS or firmware boot device order may trigger BitLocker recovery. However, TPM 2.0 devices typically do not start recovery after a boot device order change, as TPM 2.0 considers this less of a threat.
- Entering the PIN incorrectly too many times activates the TPM’s anti-hammering logic, which temporarily blocks further attempts. This security measure helps prevent brute-force attacks.
- The TPM can be disabled or cleared, leading to recovery.
- Updating TPM firmware may also cause recovery to be required.
- Some BIOS/UEFI settings can make the TPM invisible to the operating system, which may trigger BitLocker recovery if enabled.
- Changing the TPM validation profile’s Platform Configuration Registers (PCRs) can make BitLocker more sensitive to BIOS changes, possibly forcing recovery, even for non-critical BIOS parameter changes.
- Replacing the motherboard (with a new TPM) will require recovery.
- If the TPM fails its self-test or does not meet manufacturer standards, BitLocker may require recovery.
- Making a non-zero change to the TPM’s storage root key authorization can prompt BitLocker for recovery.
General Issues
- The computer may enter recovery mode if an attack is detected, or after repeated failed login attempts. Admins can set login attempt policies in Group Policy or manage them via Intune ActiveSync policies.
- Changing the boot sequence (such as booting from CD/DVD before the hard drive) and inserting or removing a CD/DVD can cause BitLocker to require recovery.
- Using a different keyboard (with a mismatched layout or mapping) can prevent correct PIN entry and lead to recovery mode.
- Moving the BitLocker-protected drive to a new computer may trigger recovery.
- Losing the USB drive that contains the startup key will require you to use the recovery password.
- Changing boot manager settings, such as test signing or code integrity checks, can trigger recovery. Learn more here.
- Pressing keys to access BIOS or changing BIOS options during startup can also activate recovery mode.
- Updating or adding/removing hardware (like add-in cards or network cards) may prompt BitLocker recovery.
- Disabling USB support from BIOS/UEFI if you use a USB startup key can block access and require recovery.
- Improper partition table changes—adding, deleting, or resizing—on the NTFS drive.
- Docking or undocking a portable computer, depending on the BitLocker and hardware configuration.
- Updates to BIOS/UEFI firmware or option ROMs can result in new early startup metrics and trigger BitLocker recovery.
- Forgetting the PIN (when PIN protection is enabled) will require the recovery password.
- Removing, inserting, or fully discharging a laptop’s smart battery may lead to recovery.
- Changes to the master boot record or boot manager may result in BitLocker requiring recovery.
In planned situations, such as hardware or firmware upgrades, you can temporarily suspend BitLocker to avoid entering recovery. Suspending BitLocker does not remove encryption; it just keeps your drive accessible for trusted changes. Afterward, you can resume BitLocker protection and reseal the encryption key without needing to re-enter your recovery key.
By enabling the BitLocker Network Unlock feature, organizations can allow automated unlock for systems that do not require on-premises user input, which is especially useful during maintenance or software updates that require rebooting.
While BitLocker recovery often follows unexpected events, it can also be triggered intentionally for security or access control—such as when reassigning company laptops to different employees.
Testing BitLocker Recovery
Before deploying a full BitLocker recovery strategy, it’s a good idea to test the process for both users and administrators. Testing ensures users understand what to do and admins can help retrieve recovery passwords efficiently. You can use the manage-bde.exe command line, specifically -forcerecovery, to simulate recovery and validate your procedures.
How to Force the Recovery for a Local Computer?
- Click the Start button and type “cmd” in the search bar.
- Right-click “cmd.exe” or “Command Prompt” and select “Run as administrator”.
- When the command prompt window opens, enter this command:
manage-bde.exe -forcerecovery <BitLockerVolume>
How to force the recovery for a remote computer?
- Click the Start button and type “cmd” in the search bar.
- Right-click “cmd.exe” or “Command Prompt” and choose “Run as administrator”.
- When the command prompt opens, enter the following command:
manage-bde.exe -ComputerName <RemoteComputerName> -forcerecovery <BitLockerVolume>
Preparation for the Recovery Process
Before starting BitLocker recovery, always check your company’s most recent guidelines about accessing sensitive data. Make sure you’re familiar with procedures for handling forgotten Windows passwords and resetting smart card PINs. Rely on available resources, such as IT staff and documentation, to help establish a solid BitLocker recovery process.
For organizations using BitLocker Drive Encryption and BitLocker To Go across multiple computers and removable drives, it’s recommended to use the Microsoft BitLocker Administration and Monitoring (MBAM) Tool version 2.0. MBAM, which is part of the Microsoft Desktop Optimization Pack, makes deployment and management easier, enables policy configuration, and securely stores recovery keys for all protected drives—streamlining the recovery process.
During recovery, you’ll need to decide which self-service and admin-assisted options users should have for retrieving recovery passwords.
When planning your process:
- Understand how users can obtain or retrieve recovery passwords:
- Self-recovery
- Recovery password retrieval by IT staff
- Plan for what to do after recovery, including investigating causes and rotating recovery passwords if necessary:
- Post-recovery analysis
Self-recovery
Sometimes, users may have a printout or a USB flash drive with the recovery password and can unlock their drive themselves. Organizations should have a policy for self-recovery to ensure users know what’s expected. If self-recovery involves a USB flash drive, warn users not to keep it with their device—especially while traveling. Keeping both together makes it easy for unauthorized people to get access.
Another useful policy is to require users to contact the Helpdesk before or after self-recovery, so the issue can be logged and verified for security and support reasons.
Recovery Password Retrieval by IT Staff
If the recovery password is not readily available to the user, it can often be retrieved online, provided the organization has set up backup solutions. Companies using domains can store recovery passwords in Active Directory Domain Services (AD DS). Be sure to configure group policy settings to enable this backup before activating BitLocker.
To adjust BitLocker group policy settings, go to Computer Configuration > Administrative Templates > Windows Components > BitLocker Drive Encryption in either the Local Group Policy Editor or the Group Policy Management Console (GPMC). These settings define recovery options for operating system drives, fixed drives, and removable drives.
To ensure recovery details are stored in AD DS, enable “Save BitLocker recovery information to Active Directory Domain Services”. To prevent users from turning on BitLocker until the recovery info is backed up, select “Do not enable BitLocker until recovery information is stored in AD DS”.
IT staff can use the BitLocker Recovery Password Viewer for Active Directory Users and Computers tool to find recovery passwords by computer name.
You can base your helpdesk recovery process on steps such as:
- Identifying the user’s computer name.
- Verifying the user’s identity.
- Searching for the password in AD DS.
- Recording information about the recovery event.
- Providing the password to the user securely.
1. Note the User’s Computer Name
Help users find their computer name by checking the Drive Label mentioned during BitLocker setup. This can make AD DS searches easier.
2. Verify the User’s Identity
It is essential to confirm the person requesting recovery is the rightful user of the computer, to prevent unauthorized access:
- Check user ID and ownership of the device.
- Cross-verify with company records, if needed.
3. Search for the Computer Object in AD DS
Find the machine in AD using the computer name. This works across multiple domains by searching the global catalog.
Multiple Recovery Passwords
If several recovery passwords are stored, each has a creation date. Ask the user for the displayed eight-character password ID from their recovery screen. Use this ID to identify the exact recovery password in AD DS and give them the correct one.
4. Collect Data to Determine the Cause of Recovery
Before providing the password, collect information on what may have triggered recovery. Recording this early can help IT staff with later troubleshooting and to prevent similar situations.
5. Give the Recovery Password to the User
Since the recovery password is 48 digits long, it may be easier for the user to write it down or type it using another device.
If your company uses MBAM or Configuration Manager BitLocker Management, the recovery password will be pulled from a secure database, enhancing security and minimizing misuse.
Post-Recovery Analysis
When a drive is unlocked using a recovery password, two things happen: an event is logged in Windows event logs, and the current TPM platform validation values are updated.
If an administrator finds that a computer continually asks for recovery, it’s a good idea to investigate the root cause. Performing a post-recovery review ensures more secure and seamless use in the future.
- Identify why recovery was triggered.
- Resolve the root issue to avoid further problems.
Root Cause Analysis
Investigate the problem by asking:
- Does the user need to bring their device in for a hands-on check?
- Which BitLocker authentication method is active? (TPM only, TPM + PIN, TPM + key, or key only?)
- Did the user lose a startup key or forget their PIN?
- Was the recovery triggered by a system or boot file update?
- Could a recent firmware update or possible malware be responsible?
- What was the last known good startup?
- Has suspicious or unauthorized software been used or installed?
Use the BitLocker status tool for help:
manage-bde.exe -status
Check event logs for recovery-related events. These checks can also be performed remotely.
Fixing the Root Issue
After identifying the cause, reset BitLocker protection as needed to prevent repeated recovery events. If malicious software or a rootkit is suspected, follow your organization’s best-practice antivirus policies.
Common situations include:
- Unknown PIN
- Lost startup key
- Changes to boot files
Unknown PIN
If the user has forgotten their PIN, use the recovery password to unlock the drive and then reset the PIN while logged in.
- Unlock the machine with the recovery password.
- Right-click the drive and select Change PIN (admin credentials may be required).
- Enter and confirm the new PIN.
- The user can now use the new PIN for unlocking the drive.
Lost Startup Key
If the USB startup key is lost, the user must unlock the drive with the recovery password and then save a new startup key to a different USB drive:
- Log in as an administrator.
- Open Manage BitLocker.
- Insert a clean USB drive, choose “Duplicate startup key,” and follow prompts to save the new key.
Changes to Boot Files or Firmware
Firmware changes can cause recovery prompts. Best practice is to temporarily disable BitLocker protection before making firmware changes. After changes, reactivate it. If changes were made without disabling BitLocker, use the recovery password to unlock, then the validation profile will be adjusted.
- Disable BitLocker before making firmware changes.
- Re-enable BitLocker after any changes.
- Suspend BitLocker during updates to prevent triggering recovery.
- If prompted, use the recovery password to unlock the drive.
This workflow maintains BitLocker security while ensuring a smoother update process.
Windows RE and BitLocker Device Encryption
If the Windows Recovery Environment (Windows RE) has been changed—for example, if the TPM is disabled—BitLocker-protected drives will remain locked until the correct recovery key is provided.
When you choose “Remove everything” in Windows RE on a device using TPM + PIN or password protection, the recovery key will also be requested. For keyboardless devices, Windows RE (rather than the boot manager) asks for the key. Enter the recovery key to access troubleshooting tools or start Windows as normal.
The BitLocker recovery screen within Windows RE has accessibility features such as a screen reader (Narrator) and on-screen keyboard. To activate Narrator, press Windows + Ctrl + Enter. To open the on-screen keyboard, tap any text input area.
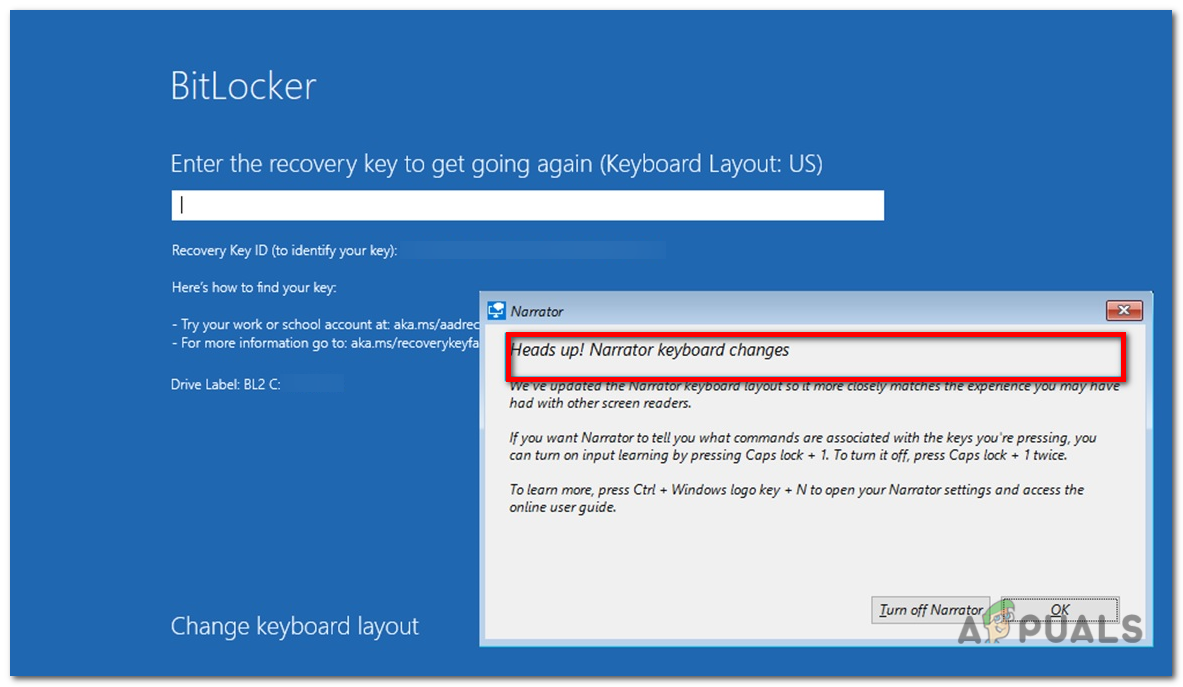
These features help users access and enter recovery information, even if a standard keyboard isn’t available.
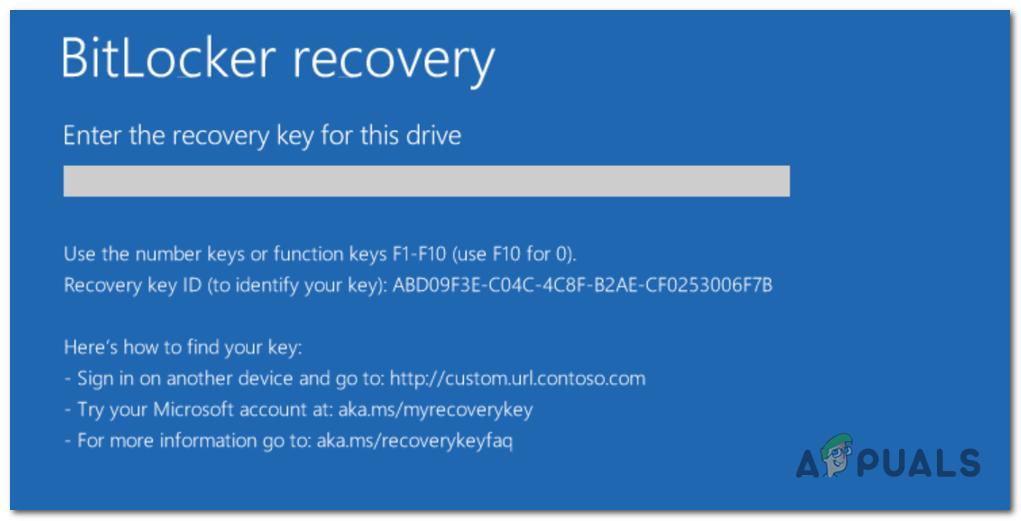
BitLocker Recovery Screen
During BitLocker recovery, Windows shows a recovery message to help users find where their recovery key is stored. This guides users through the process of unlocking their data.
Customised Recovery Message
Since Windows 10, version 1511, you can use BitLocker Group Policy settings to add a custom recovery message and URL. For example, you could give users the self-service portal, your IT helpdesk website, or a phone number for support.
In Group Policy, go to Computer Configuration > Administrative Templates > Windows Components > BitLocker Drive Encryption > Operating System Drives > Configure pre-boot recovery message and URL.
You can also use mobile device management (MDM) tools like Intune for this configuration:
<LocURI>./Device/Vendor/MSFT/BitLocker/SystemDrivesRecoveryMessage</LocURI>
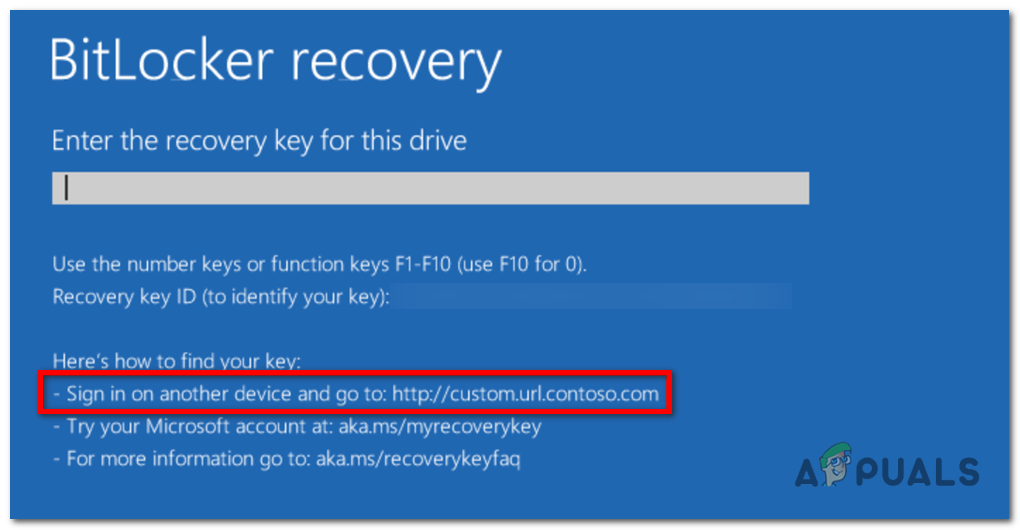
These customization options help ensure users get relevant and helpful information during recovery.

Example of a customized recovery screen:
Hints for BitLocker Recovery Keys
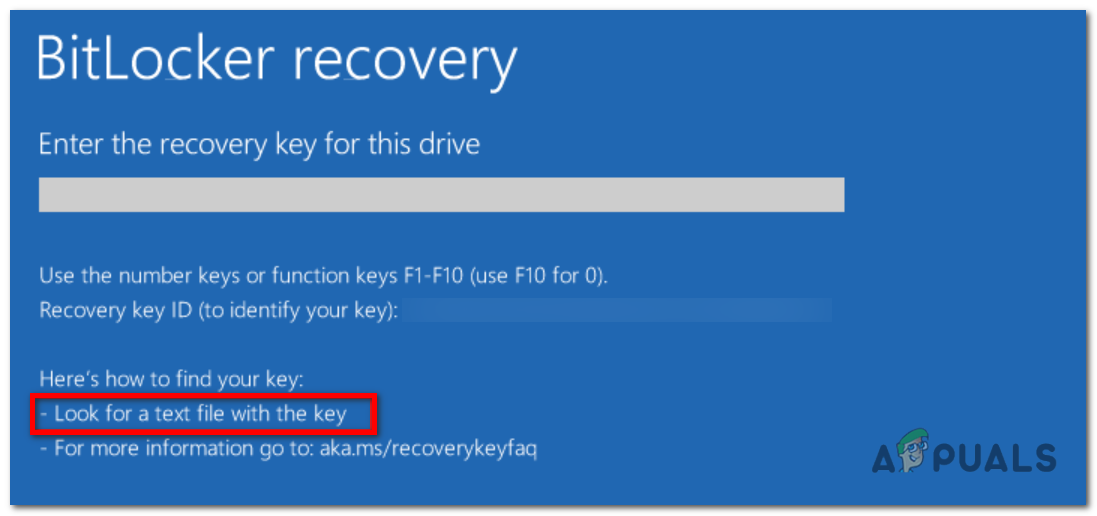
Starting in Windows 10, version 1903, BitLocker adds more recovery key information, including when and where backup was set up. This info isn’t visible through normal apps or settings, but during recovery, Windows will display hints to help you locate your recovery key.
For example, the recovery screen might say if the key was saved to your Microsoft account, printed out, or backed up to your organization.
Rules for displaying hints:
- If a custom recovery message is set, it’s always shown.
- There is always a generic hint included.
- If multiple recovery keys exist, the most recently and successfully backed-up key is shown first.
- Keys that were backed up are prioritized over those never backed up.
- Remote backup hints follow this order: Microsoft Account, Azure AD, Active Directory.
- If a key was printed and saved to file, you’ll see a combined hint.
- If you performed several backups of the same type, the latest backup is shown.
- There’s no specific hint for on-premises Active Directory; instead, a generic message or custom message is used.
- If there are two recovery keys but only one is backed up, Windows asks for the backed-up one, even if the other is newer.
These hint rules help increase the chances users will find their recovery key easily.
—
This guide aims to provide you with practical steps and clear explanations, so you can troubleshoot BitLocker recovery confidently, even if you’re not an IT expert.
Reviewed by Muhammad Zubyan


