How to Fix AirTag Not Working/Connecting to iPhone?
AirTag connection problems usually happen when you don’t see the setup animation, or your iPhone gets stuck on the “Connecting” screen. This often means the AirTag is still linked to another Apple ID, or it can’t connect to your iPhone using Bluetooth. The most common reason is that the AirTag wasn’t fully removed from the previous owner’s iCloud account, even if they tried to unpair it remotely.

Other possible causes include Bluetooth being turned off, the AirTag battery being almost dead, or problems with your iPhone’s iCloud syncing.
In this article, we will discuss different ways to solve this problem.
1. Turn Bluetooth Off and On Again
If there are issues with Bluetooth connectivity, you might notice that the connection drops whenever you try to use your AirTag. To test if Bluetooth is working fine, try connecting your iPhone to other Bluetooth accessories, like AirPods. If the audio quality or connection isn’t good, you might have a Bluetooth issue on your phone. Here’s what you can do:
- Go to Settings > Bluetooth.
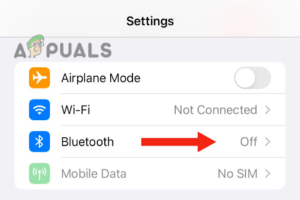
Go to the Bluetooth option - Turn the Bluetooth toggle off, then turn it back on.

Re-enable the Bluetooth option - Tap on your AirTag device.

Tap on the AirTag device - Select Forget This Device.

Tap on Forget this Device - Tap ‘Forget This Device‘ again to confirm.
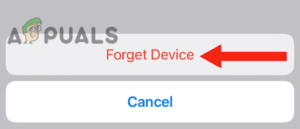
Select Forget Device - Reconnect the AirTag as you did the first time.
- After reconnecting, turn the Bluetooth toggle off and back on once more. Now check if the AirTag is working.
2. Unpair Other Bluetooth Devices and Turn Off ‘Find My iPhone’
If you have several Bluetooth devices paired at the same time, they can sometimes interfere with each other, or there could be a compatibility issue. This can also happen if the AirTag has a network issue.
To see if this is the problem, try unpairing all Bluetooth devices and follow these steps:
- Go to Settings and tap on your Apple account.
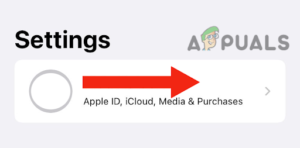
Go to your account - Tap on Find My iPhone.
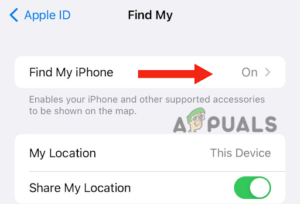
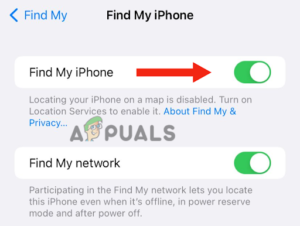
Go to Find My iPhone - Turn off the Find My iPhone toggle.
Turn off the toggle for Find My iPhone - Go back to Bluetooth and unpair all other Bluetooth devices.
- Turn Find My iPhone back on.
- Now, in Bluetooth, connect only to your AirTag. Don’t connect to any other device until the AirTag is paired successfully.
- Once the AirTag is connected, you can reconnect your other Bluetooth devices as needed.
3. Force Restart Your iPhone
If your iPhone still won’t connect to your AirTag, performing a force restart can help. This shuts down all running apps, clears your RAM, and resolves temporary software glitches or temporary files that might be causing connection problems. This can fix network-related issues that sometimes prevent the AirTag from working properly.
3.1. For iPhone SE (2nd/3rd generation), 6, 7, or 8
- Press and hold the side button until the power-off slider appears.
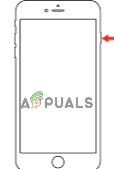
Press and hold the side button til you see the power-off slider - Drag the slider to turn off your iPhone.
- Wait for 30 seconds, then press and hold the side button again until the Apple logo appears on the screen.
3.2. For iPhone X or Later
- Press and hold the volume down button and side button together until you see the power-off slider.
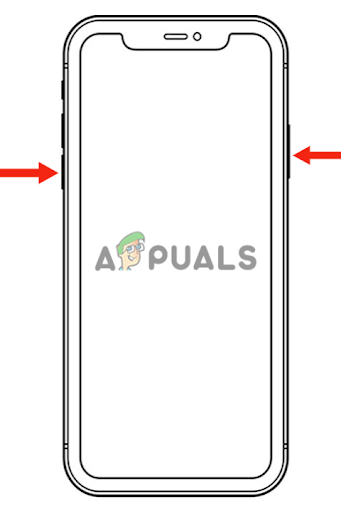
Press and hold the volume down button and the side button - Drag the slider to turn off your iPhone.
- Press and hold the side button again until the Apple logo appears, then release it.
4. Update Your iPhone to the Latest Version
Updating your iPhone to the latest iOS version can resolve many issues—lots of users have found that a quick update fixed their AirTag connection problems.
- First, create a backup of your device to keep your data safe.
- Plug your device into the charger.
- Connect to a Wi-Fi network.
- Go to Settings, then tap on General.
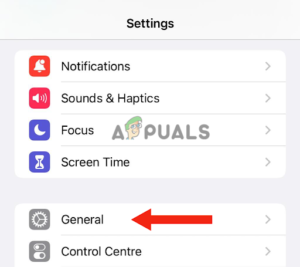
Select General - Tap on Software Update.
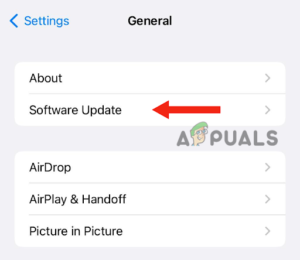
Tap on Software Update - Select the latest software update if one is available.
- Tap Install Now.
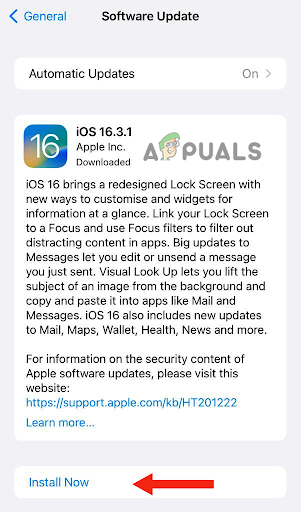
Tap on the Install Now option - Enter your passcode if prompted. If there’s a pop-up to Download and then Install, choose Download and then tap Install Now when ready.
After updating, try connecting to your AirTag again. This should solve the problem for most users.
5. Reset Your AirTag
If you’ve tried all the above but your AirTag still isn’t working, the issue might be with the AirTag itself. Sometimes, software issues or previous connections cause it not to pair or work properly. Resetting the AirTag often resolves this.
Also, if your AirTag was previously used with another device and is out of Bluetooth range from that device, you’ll need to reset it before you can use it. Here’s how:
- First, remove the cover by pressing down on the polished stainless steel battery cover of your AirTag. Then, rotate it counterclockwise until it stops.
- Remove the battery, then put it back in.
- Press down on the battery until you hear a sound—this means the battery is connected.
- When the sound finishes, remove and reinsert the battery four more times, listening for the sound each time. On the fifth time, the sound will be different, letting you know the AirTag is ready to pair.
- Replace the cover, press down, and rotate it clockwise until it stops.
All these troubleshooting steps have been tried and tested by other users. However, if none of them work, you should contact Apple Support and explain your issue—their team can offer more specialized help. If your devices are still under warranty, you might also be eligible for a replacement.