Fix: Activation of Network Connection Failed in Linux
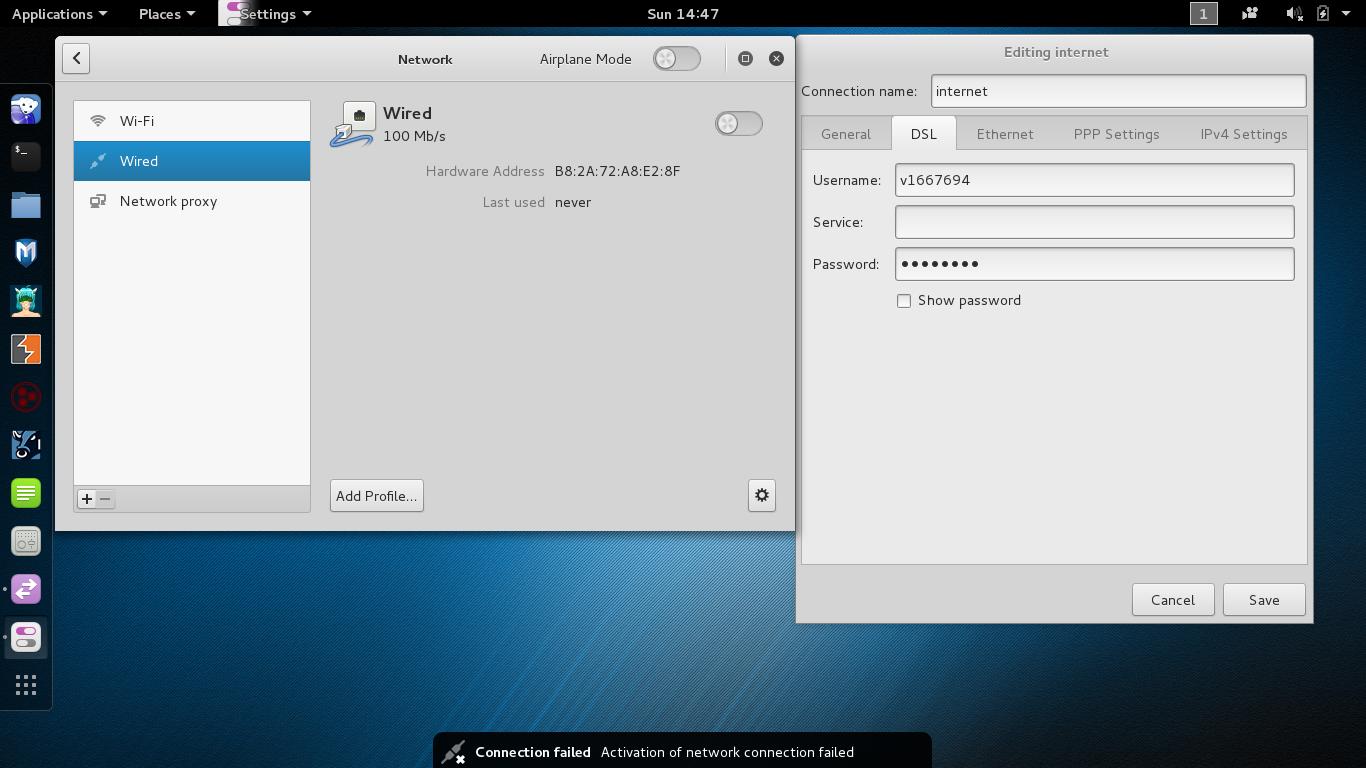
The “Activation of Network Connection Failed” error in Linux usually indicates a failed attempt to connect to a network. This error means Network Manager couldn’t start a network interface due to configuration or hardware issues. The most common cause is incorrect network settings or mismatches between the system’s network interface and the router.
Other causes include driver issues, hardware incompatibilities, or disabled network interfaces.
In this article, we will discuss solutions to this error.
1. Disable/Enable the Network Connection
This issue can be caused by temporary glitches in the network stack or conflicts in IP addressing. Turning the network connection off and then on resets the network settings, allowing it to reconnect with the router and update its IP or DNS settings.
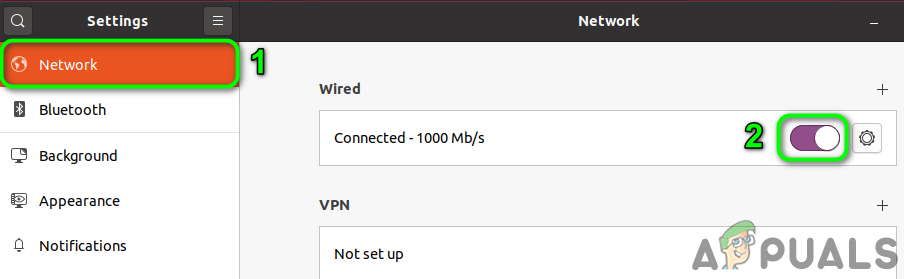
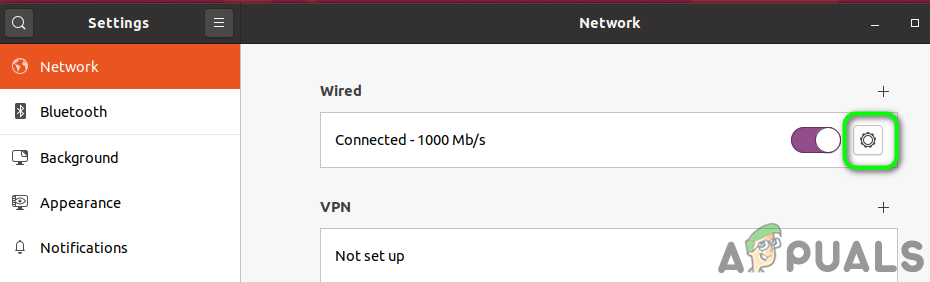
- Open Settings on your system and click on Network in the left pane.
- Disable the problematic connection by toggling the switch to the off position.
Disable the Network Connection - Restart your system. Upon restart, enable the network connection and check if the problem is solved.
- If not, press Alt + F2 to open the Run command box and type:
nm-connection-editor
- Expand the type of network you were having issues with, e.g., ethernet, and delete all entries under it.

Delete the Connection - Close all network editors and click on the network icon in the system tray.
- Disable the network and then reenable it.
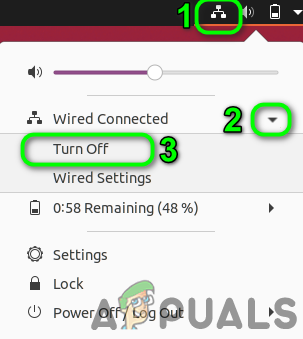
Disable the Network Connection from the System Tray - Restart your system and check if the issue is resolved.
2. Disable Fast Boot (Dual Boot System)
Disabling Fast Boot in Windows can fix issues with Linux not connecting to the network. Fast Boot puts some hardware, like network adapters, in hibernation, which can stop Linux from starting them properly. Turning off Fast Boot fully resets hardware during startup, letting Linux set them up correctly.
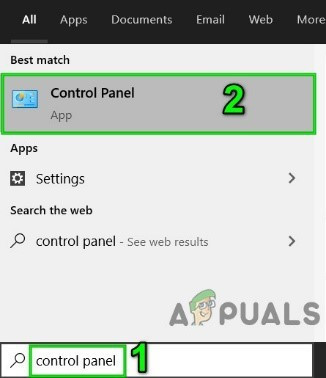
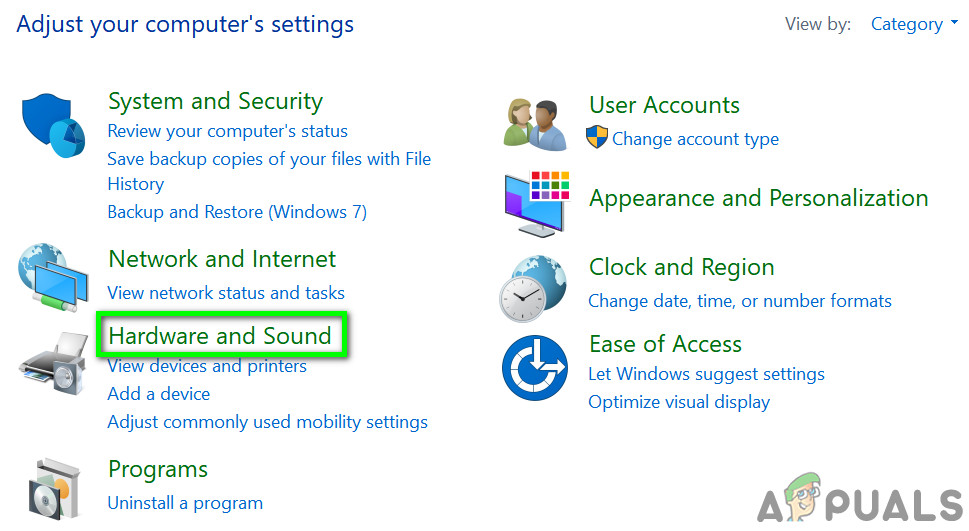
- Press Windows + S, type Control Panel, and click on Control Panel.
Open Control Panel - Click on Hardware and Sound.
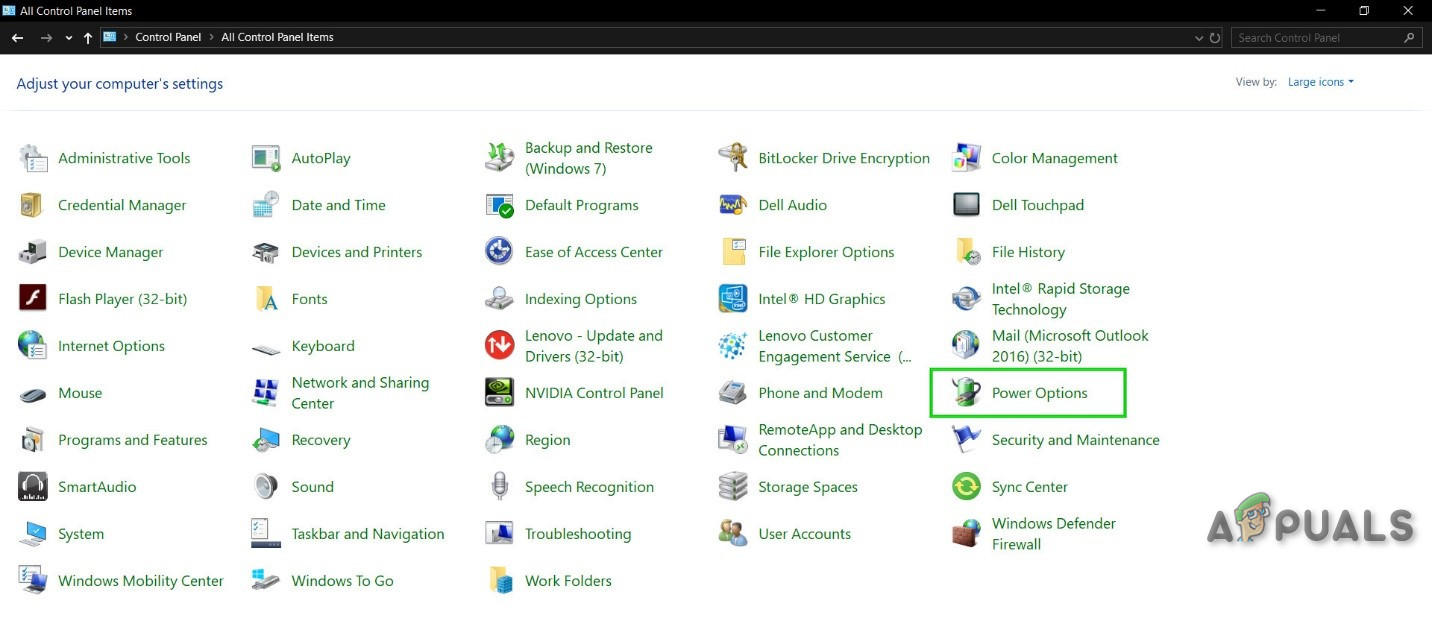
Open “Hardware and Sound” - Click on Power Options.
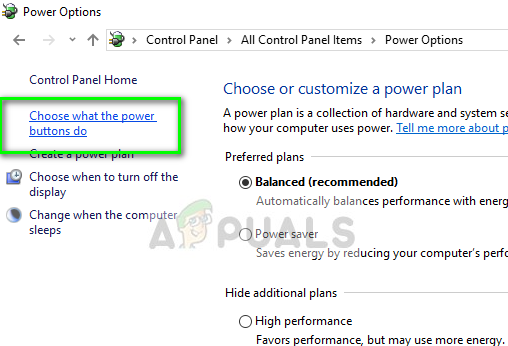
Click Power Options in Control Panel - On the left, click on Choose What the Power Buttons Do.
Choose what Power Buttons do – Control Panel - Uncheck the option for Turn on Fast Startup. If it’s grayed out, click on Change Settings that are Currently Unavailable and then uncheck it.
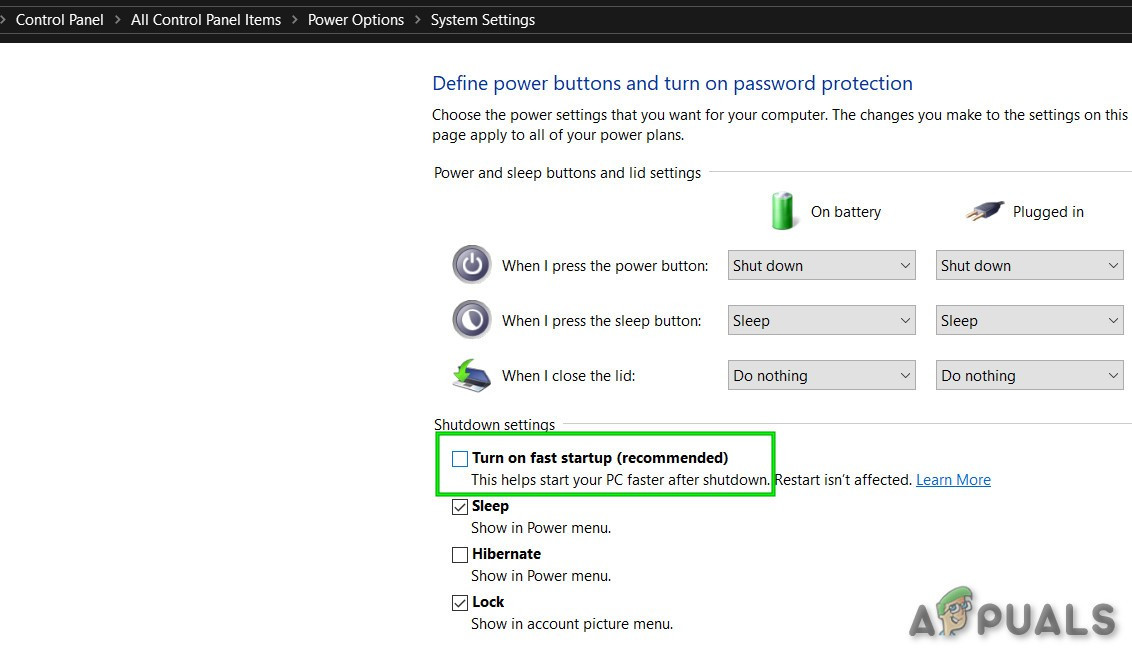
Uncheck the Turn on fast startup - Save changes and boot into Linux to check if the issue is resolved. You may need to fully uninstall/reinstall your Linux.
3. Disable Connect Automatically for the Network
Sometimes, your device keeps trying to connect to networks that aren’t set up correctly or are unavailable, causing problems. Turning off the “Connect Automatically” option for a specific network stops these failed attempts. This way, you can choose the network manually when it’s working, avoiding issues and having more control.
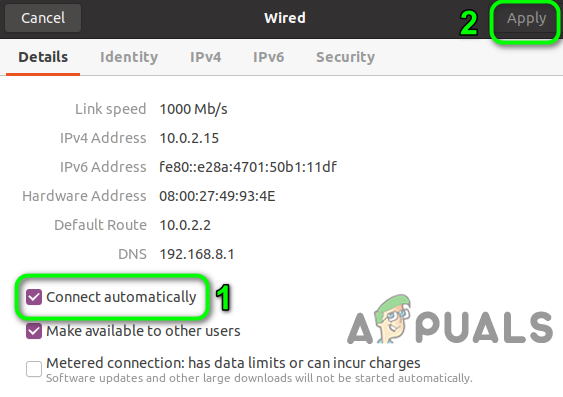
- Open Settings on your Linux and click on Network.
- Click on the gear icon next to the problematic network.
Click the Gear Icon of the Network - Uncheck the Connect Automatically option and apply your changes.
Disable Connect Automatically - Check if the connection issue is resolved.
4. Change DNS to DNSMASQ for the Network
Switching to DNSMASQ can make your system handle DNS queries faster. DNSMASQ acts as a simple DNS forwarder and cache, storing recent queries locally to speed up domain name resolution. This improves response times for repeated queries and helps avoid issues with slow DNS servers.
- Execute the following command in the Linux terminal:
sudo gedit /etc/NetworkManager/NetworkManager.conf
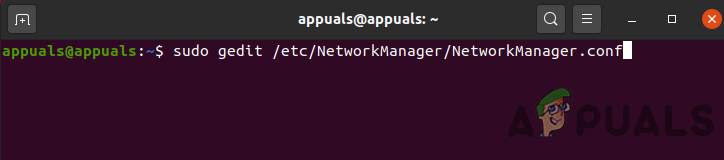
Edit Network Manager Configuration - Change dns to dnsmasq and save the file.
- Restart your system and check if the issue is resolved.
5. Correct Date/Time Settings of Your System
If the system clock is wrong, it can stop secure connections because SSL certificates need the correct time to work. Fixing the date and time makes sure certificates are checked properly, which can fix connection problems caused by this mismatch.
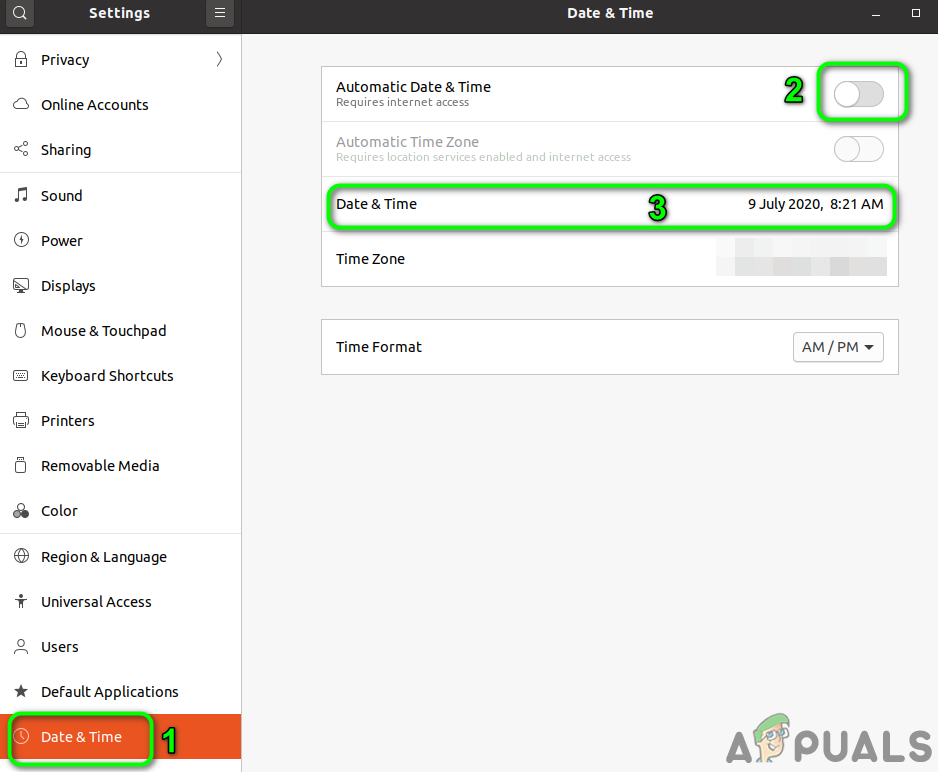
- In the bottom-left corner, click on Show Applications and then on Settings.
- Click on Date & Time in the left pane.
- Disable Automatic Date & Time.
- Correct the date and time and check if the issue is resolved.
Change Date & Time
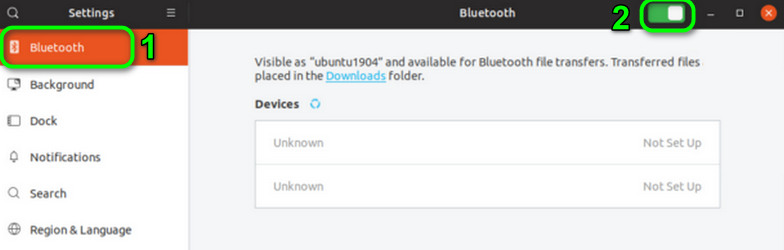
6. Delete Bluetooth Devices in Your System’s Settings
Sometimes, old paired devices can interfere and make it hard for your system to connect anew. Removing these unused devices resets the Bluetooth stack, helping your system focus on the new connection without past issues.
- Remove any Bluetooth devices connected to your system.
- Open Settings and click on Bluetooth in the left pane.
- Disable Bluetooth.
Disable Bluetooth - Launch the Linux terminal and type:
bluetoothctl

Open Bluetooth Control - A list of Bluetooth devices will appear. Then type:
bluetoothctl remove AA:BB:CC:DD:EE:FF
- Replace AA:BB:CC:DD:EE:FF with the ID string of the device, found by selecting the network icon > Device Name > Gear Icon.
- Repeat for all devices and check if the problem is solved.
- If not, check the path of the .crt file. If there are spaces in the folder name, remove them, then check if the problem is resolved.
7. Blacklist Other Communication Devices
If there are any other communication devices like Bluetooth or additional network adapters active, they can interfere with your primary network connection. Blacklisting these devices helps remove conflicts, allowing the system to focus on the correct network interface and establish a stable connection.
- Open the Linux terminal and type:
sudo lshw -C network

Open Network Connections through Linux Terminal - A list of network devices will appear. Identify the device you are not using, such as cdc_ether.
- Type the following command to create a new blacklist file:
sudo -H gedit /etc/modprobe.d/blacklist-cdc_ether.conf
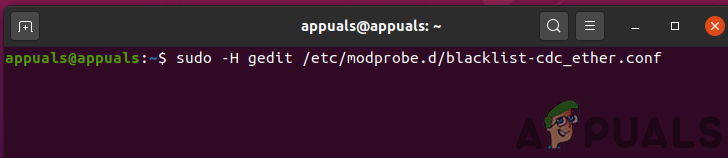
Create a File to Blacklist the Problematic Connection - Add these lines to the file:
blacklist cdc_ether

blacklist usbnet
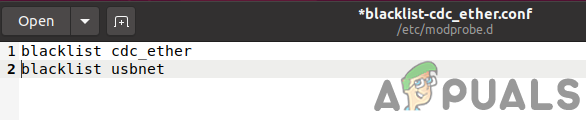
Blacklist the Network Device - Save the file and restart your system.
- After restarting, check if the issue is resolved. Note that when you need to use the internal 4G device, you should enable it.
8. Remove Network Drivers from the Blacklist
Sometimes, network drivers are blacklisted to avoid conflicts, but this can block needed drivers. Removing them from the blacklist lets the system load these drivers, allowing the right network interface to work.
- In the Linux terminal, enter:
sudo gedit /etc/modprobe.d/blacklist.conf

Open the Blacklist File - In the opened file, check if network-related drivers/modules are blacklisted. If using a Broadcom network card, remove entries related to bcma and bcmsmac.
- Restart your system and check if the problem is resolved.
9. Reinstall the Network Manager
Issues with network connections can sometimes be caused by a faulty Network Manager. Reinstalling it removes corrupt files or settings, restoring the system’s default network management.
- Launch the Linux Shell and type:
sudo systemctl restart network-manager.service

Restart Network Service - Check if the problem is resolved.
- If not, run:
sudo /etc/init.d/network-manager force-reload

Force Reload Network Manager - If prompted, enter your user password and check if the problem is resolved.
- If not, run:
sudo apt-get install -d --reinstall network-manager network-manager-gnome

Reinstall Network Manager - Check if the problem is resolved.
10. Disable Power Management of the Network Card/Driver
Power management can disrupt network stability by turning off the network card to save power, especially on laptops. Disabling this ensures the network card stays active, preventing connection drops or activation failures, and maintaining a stable connection.
- Open the Linux terminal and run these commands one by one:
sudo apt-get install linux-headers-generic build-essential dkms
sudo apt-get install git
git clone https://github.com/pvaret/rtl8192cu-fixes.git
sudo dkms add ./rtl8192cu-fixes
sudo dkms install 8192cu/1.11
sudo depmod -a
sudo cp ./rtl8192cu-fixes/blacklist-native-rtl8192.conf /etc/modprobe.d/
- Reboot your system and check if the problem is resolved.
11. Disable Hardware Encryption by the Network Device
Sometimes, network devices have trouble with hardware encryption, causing connection failures. Disabling it lets the software handle encryption, fixing issues from driver or firmware limits.
- Execute this command in the Linux terminal:
echo "options rt2800pci nohwcrypt=y"

Disable Hardware Encryption by the Network Device - Then execute the following commands:
sudo tee /etc/modprobe.d/rt2800pci.conf

sudo modprobe -rfv rt2800pci

sudo modprobe -v rt2800pci

sudo sed -i 's/3/2/' /etc/NetworkManager/conf.d/*
- Restart your system and check if the problem is resolved.
12. Update the Kernel of Your Linux Distro to the Latest Build
Updating your Linux kernel is important because new versions often fix bugs, boost performance, and solve hardware compatibility issues that may cause network problems. An updated kernel may provide patches for driver issues or network stack problems.
- Open the Linux shell and type:
sudo apt-get upgrade linux-image-generic

Update the Linux Kernel - Restart your system and check if the connection problem is resolved.
13. Upgrade Your Linux Variant to the Latest Build
Keeping your Linux variant updated ensures you’re using the latest kernel, drivers, and network tools, which can fix bugs and compatibility issues. Upgrading to the latest version may solve problems with network drivers, hardware support, or configuration mismatches causing connection errors.
- Open the Linux terminal and type:
sudo apt-get upgrade

Upgrade Ubuntu - Enter the password for your user account to display a list of available updates.
- Press the y key to confirm the update and then press Enter.
- Wait for the update process to complete, then check if the problem is resolved.
If no solution has worked so far, consider reinstalling your Linux distro. Before doing so, try using the iwconfig command, update your system BIOS, or utilize the WICD network manager. Additionally, consider using IPV6 (Link-Local) or disabling TCP.


Solution 1 worked for me. Thanks buddy