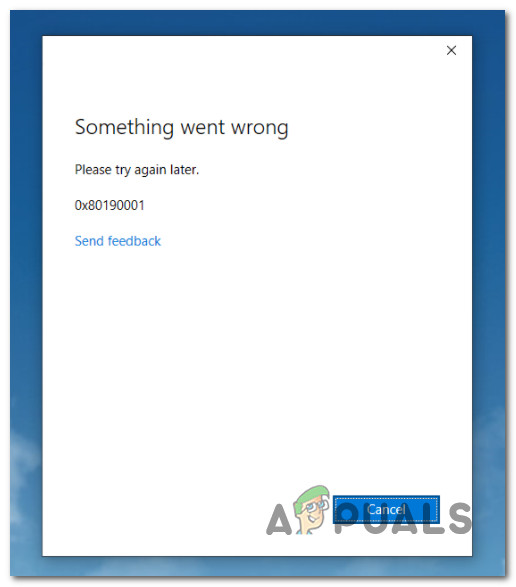
How to Fix Error 0x8019001 on PC and Xbox Consoles?
There’s an ongoing issue that’s currently affecting both Windows and Xbox console users. When opening certain native Windows applications, some users end up with the 0x8019001 error. On Xbox consoles, this problem appears when users attempt to sign in with their Xbox accounts. On PC, this problem is mainly encountered with Outlook and Microsoft Edge.
Update: In some cases, this error is also reported to occur on PC during the upgrading process to Windows 11.
As it turns out, there are several different reasons why you can expect this error to occur on Windows 10 and Windows 11. Here’s a shortlist of culprits that might be the root cause of this issue in this case:
- Generic native app inconsistency – As it turns out, this issue on Windows is often associated with a common inconsistency that’s affecting the allocation of system resources. Several users dealing with this problem have confirmed that the problem was finally resolved after they ran the Windows Apps Troubleshooter and applied the recommended fix.
- Corrupted Windows Store Cache – Windows Store cache corruption is another common scenario that might produce this error (especially on Windows 11). In this case, you should be able to fix the issue swiftly by resetting the Windows Store Cache via an elevated CMD command.
- Dependency WU service is stuck in a limbo state – Under certain circumstances, this problem can also be associated with a series of stuck service dependencies that Windows Update relied upon to update Store applications. In this case, you should try restarting every WU dependency service.
- Corrupted data on SoftwareDistribution folder – Corrupted data related to an upcoming native app update can also cause this error (especially after an unexpected interruption during the upgrade process). In this case, you can fix the issue by clearing the contents of the SoftwareDistribution folder.
- Corrupted system files – On top of the usual suspects, a larger corruption issue affecting your Windows files is also on the table. If you’re facing this issue, deploying SFC and DISM scans in quick succession should take care of the issue for you.
- Corrupted Windows profile – As it turns out, corruption affecting the Windows profile can also be the main driving force behind this consistent error code. If this scenario is applicable, creating a new Windows account should take care of the issue.
- 3rd party antivirus/firewall interference – If you’re using a 3rd party security suite, you should also troubleshoot against a potential interference produced by a false positive. In this case, try disabling or uninstalling the 3rd party suite that you suspect might be overprotective.
- Windows Update Agent glitch – If you’re experiencing this error code while using the Windows Upgrade agent in an attempt to get on Windows 11, you might be dealing with a notorious glitch that’s been active since Windows 11 came out. In this case, you should be able to bypass the error by using the Media Creation Tool instead.
- Corrupted Office installation – In the event that you’re dealing with this error while opening an application from the Office suite (Outlook, Word, Excel, etc.), chances are you’re dealing with a corrupted installation. In this case, perform an online Office repair and see if the problem is resolved afterward.
- Xbox Temporary Data issue – In case you’re experiencing this issue on an Xbox console (Xbox Series or Xbox One), chances are you’re dealing with a temporary data glitch. In this case, do a power-cycle procedure and attempt to sign in once again.
Now that we went over every potential cause of the 0x8019001 error, let’s go over every method that other users have successfully used to fix this problem on Windows 10 and Windows 11.
1. Run the Windows Apps Troubleshooter
You should know that the built-in troubleshooters available on Windows 11 are much more efficient than they were on previous versions of Windows.
With this in mind, you shouldn’t really dismiss this fix if you’re currently dealing with the 0x8019001 error when attempting to open a native Windows app.
The Windows Store Troubleshooter is capable of automatically resolving certain instances where the problem surfaces. We’ve already confirmed the effectiveness of this method out of other users that were experiencing this issue.
Note: The Windows Store Troubleshooter contains a selection of automated repair strategies. Most of these repair strategies can be applied with one click as the utility is capable of deploying if a recognizable malfunctioning scenario is found.
If you haven’t tried to fix this issue by running the Windows Apps Troubleshooter yet, here’s what you need to do:
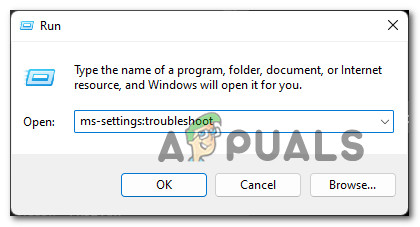
- Open up a Run dialog box by pressing Windows key + R.
- Next, inside the dialog box, type ‘ms-settings:troubleshoot‘, then press Enter to open up the Troubleshooting tab of the Settings app.
Accessing the troubleshooting tab - Inside the Troubleshoot tab, scroll down and click on Other troubleshooter from the bottom of the screen.

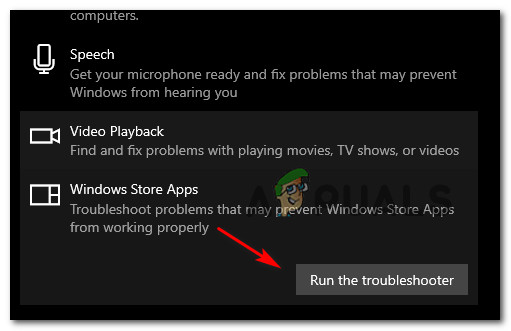
Accessing the Other Troubleshooters - From the Other Troubleshooters page, scroll down to the bottom of the screen and click on the Run button associated with Windows Apps Troubleshooter (under Others).
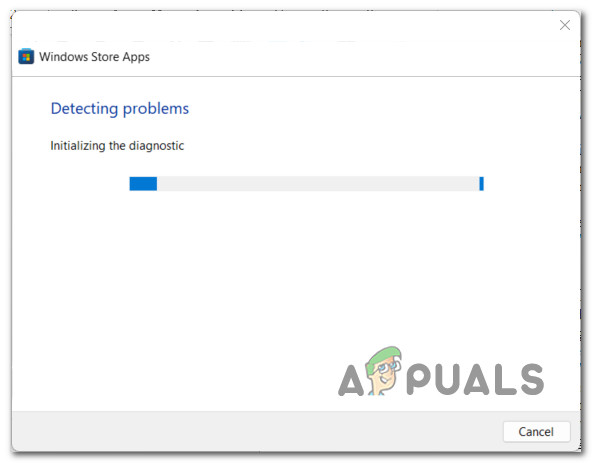
Running the Windows Store Apps troubleshooter - Wait until the operation is complete as the tool analyses the entire Windows Store component to figure out if any of the repair strategies included with the Windows Store Apps troubleshooter are applicable.
Scan for an Ongoing issue - If you’re presented with a choice, click on Apply this fix and wait until the repair strategy is applied.
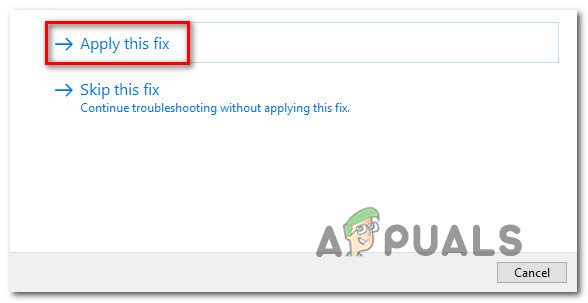
Apply this fix Note: Certain repair strategies will require you to do some manual steps. Next, follow the on-screen instructions to enforce the recommended fix.
- After the recommended Windows Store Apps troubleshooter fix has been applied, reboot your Windows computer and see if the problem is now fixed.
In case you’re still seeing the 0x8019001 error when launching certain Windows apps, follow the next method below.
2. Repair or Reset the Windows Store Cache
According to some affected users, this particular issue can also be related to corrupted temporary files or dependencies that the Windows Store has been accumulating as you installed new native apps.
Inconsistencies, glitches, and malfunctions are to be expected as the store component of Windows 11 is still in preview mode.
Generally, if the root cause of the 0x8019001 error is caused by temporary file data or a corrupted dependency, the way to fix it is to repair the entire suite. If this fails, you should proceed with a reset procedure.
Step by step instructions on doing this are included below:
- Start by pressing Windows key + I to open up the Settings menu on Windows 11.
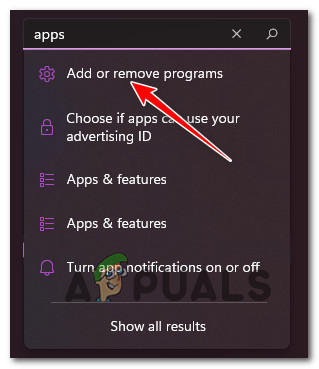
- Inside the root directory of the Settings menu, use the search function in the top-left corner to search for ‘apps’.
- Next, click on Add and Remove Programs from the auto-complete menu.
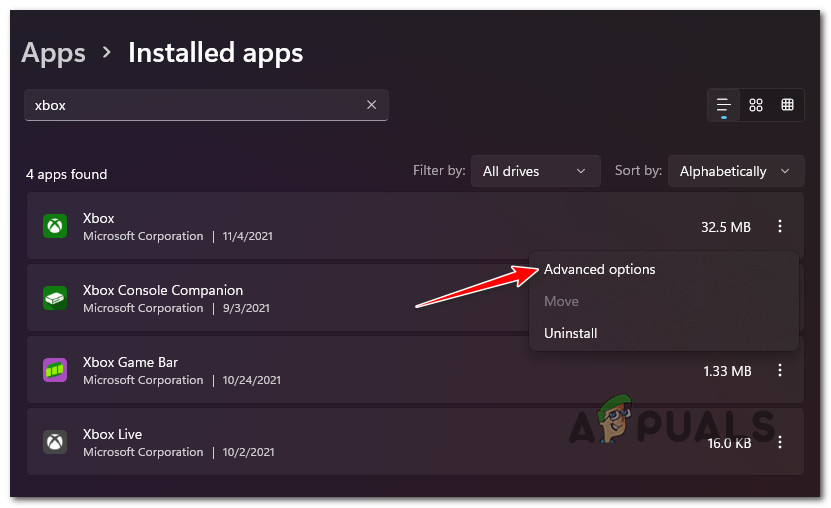
Add or Remove programs for Native apps - Next, move over to the right-hand side menu and use the search function (under App List) to search for ‘Microsoft Store’.
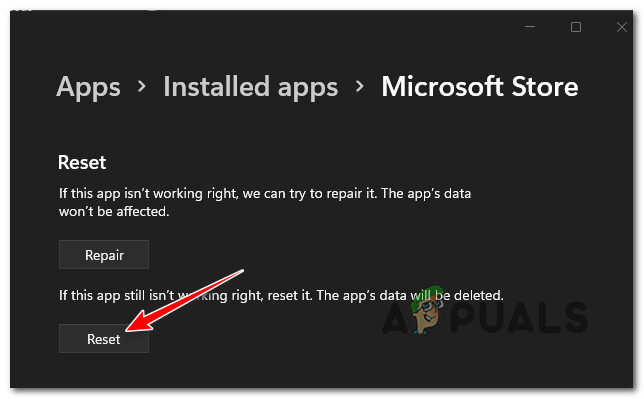
- From the list of results, click on the action button associated with Microsoft Store and select Advanced Settings from the context menu.
Access the Advanced Options menu - From the Advanced options menu, scroll down to the Reset section and click the Repair button. At the confirmation prompt, click on Repair once again.
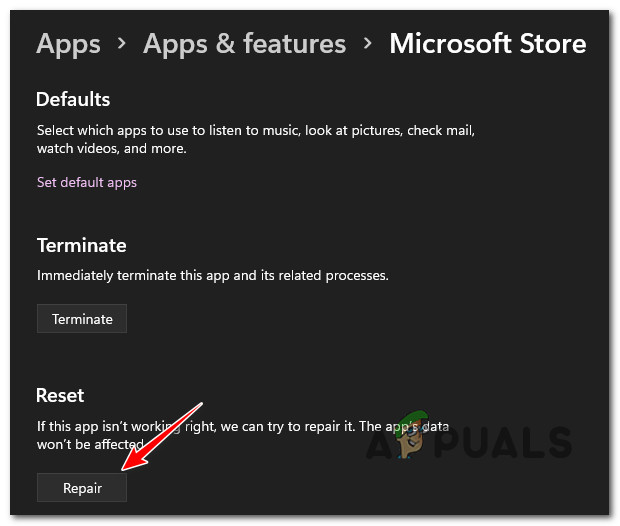
Repair the Microsoft Store Note: This operation will scan all system files and dependencies belonging to the Microsoft Store component and figure out whether any replace any file corruption with healthy file equivalents.
- After the operation is complete, recreate the scenario in which you were previously seeing the 0x8019001 error and see if the problem is now fixed.
- If the problem is still ongoing, return to the Advanced Settings menu of Microsoft Store and click the Reset button.
Reset the Microsoft Store Note: Going through with this procedure will not make you lose any library item or any type of other data related to your account. This will clear every temp folder that the Windows Store uses.
- At the confirmation prompt, click Reset once again to initiate the reset procedure.
After the reset procedure is complete, reboot your computer and see if the problem is now resolved.
If the same 0x8019001 error is still occurring, move down to the next potential fix below.
3. Enable Windows Update dependency services
This particular issue can also occur in instances where some WU (Windows Update) services are prevented from running so some native Windows apps can’t make use of them. This can either be caused by manual user intervention or by some 3rd party applications that will try to reduce resource usage.
Fortunately, you can get this resolved by ensuring that every WU service used during the updating process is enabled.
Here’s how you can do this from an elevated Command Prompt:
- Start by pressing Windows key + R. Next, type “cmd” and press Ctrl + Shift + Enter to open up an elevated Command Prompt.
- At the User Account Control (UAC), click Yes at the window to grant administrative privileges.

Create a CMD prompt - After you arrive in the elevated Command Prompt, type the following commands in whichever order, but make sure to hit the Enter key after each command to set the Startup type of each service to Automatic:
SC config trustedinstaller start=auto
SC config bits start=auto
SC config cryptsvc start=auto
- Once you do these changes, perform a system reboot once again and repeat the action that was previously causing the error code at the next system startup.
If the 0x8019001 error is still ongoing, move down to the next potential fix below.
4. Clear the SoftwareDistribution folder
Some users have reported that they managed to resolve the issue by clearing the Software Distribution folder.
Note: This is the main folder that the WU (Windows Update) component is using to store the majority of Windows Update files.
This operation will force your operating system to download all updates that are pending to be installed. This ends up resolving all those instances where the 0x8019001 error is triggered by an incomplete Windows update or by corrupted files inside the SoftwareDistribution folder.
Here’s what you need to do to clear the SoftwareDistribution folder:
Note: Before you can actually clear the SoftwareDistribution folder, you’ll first need to disable a selection of services first (Windows Update Service and Background Intelligence Transfer Service)
- Press Windows key + R to open up a Run dialog box.
- In the run box, type ‘cmd’ and press Ctrl + Shift + Enter to open up an elevated Command Prompt window.

Access the CMD interface Note: Deleting the SoftwareDistribution folder will not be possible unless you disable these two services.
- Inside the elevated Command Prompt, type the following command and hit Enter after each one to stop the two services:
net stop wuauserv
net stop bits
- Next, minimize the CMD prompt and open File Explorer. Once you’re inside, navigate to the following location:
C:\Windows\SoftwareDistribution
- Once you’re finally inside the Software Distribution folder, select all contents of that folder, right-click and choose Delete from the context menu.
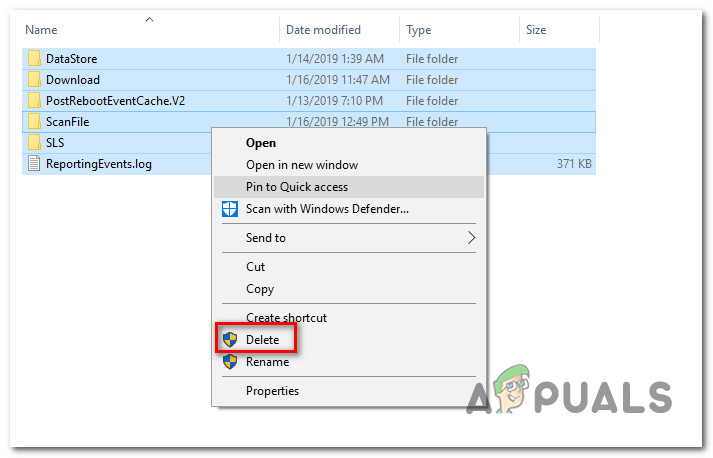
Delete the Software Distribution folder - Next, return to the elevated CMD prompt and type the following commands (press Enter after each one) to re-enable the same services that we previously stopped:
net start wuauserv
net start bits
- Reboot your computer and see if the issue is still occurring once the next startup sequence is complete.
If you’re still prevented from launching certain native games via the 0x8019001 error, move down to the next troubleshooting guide below.
5. Deploy SFC and DISM scans
If none of the methods above have worked, chances are you’re dealing with some kind of system file corruption that is somehow affecting the functionality of the native apps that you have installed.
The Store component on Windows 11 is interconnected with the fleet of native apps, so there are a lot of dependencies that might be indirectly causing the 0x8019001 error.
Because of this, you should also take the time to run a couple of built-in utilities capable of scanning for corrupted system files and replacing them with healthy equivalents.
We recommend SFC (System File Checker) and DISM (Deployment Image Servicing and Management).
The ideal way to approach this is to start with an SFC scan performed from an elevated CMD prompt.
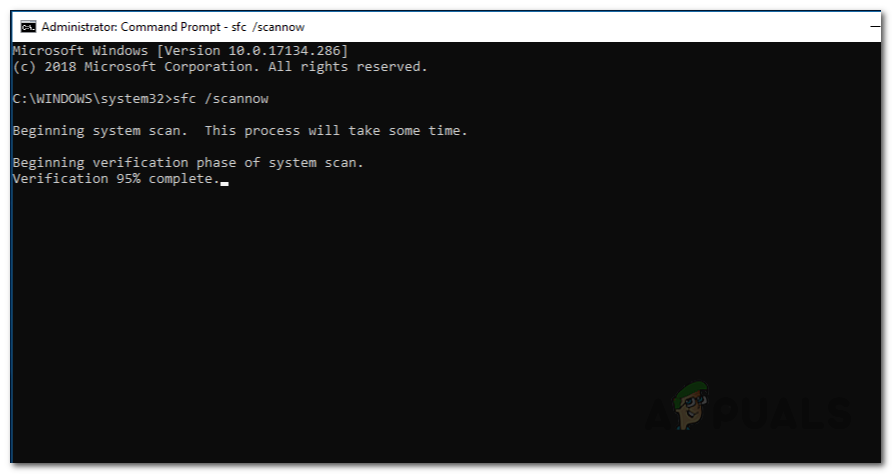
After the operation is finished, reboot your PC and wait for the next startup is complete.
Note: An SFC scan will scan your system for corrupted files and replace any corrupted file or dependency with a healthy equivalent using a locally stored cache.
Once your PC boots back up, move towards a DISM scan (even if you don’t see the error occurring again).
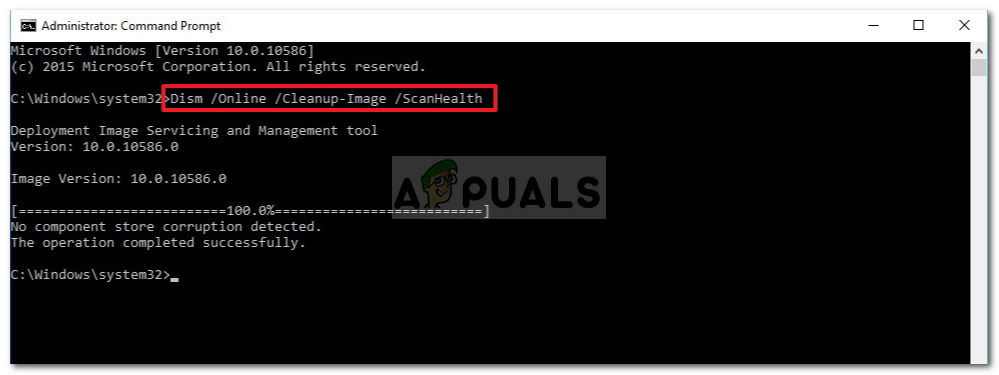
Note: Before you launch a DISM scan, ensure that you have a stable connection to the internet. This is mandatory because DISM is using a sub-component of Windows Update to download healthy files to replace the corrupted ones.
Once both scans are completed successfully, re-open the apps that were causing the 0x8019001 error and see if the problem is now fixed.
If the problem is still not fixed, move down to the next fix below.
6. Create a new Windows profile
As it turns out, the 0x8019001 error can also occur due to some type of corruption originating from your Windows profile.
Some users that were dealing with this problem when launching a native Windows app have confirmed that the issue was resolved after they’ve switched to a local Microsoft account.
Note: This method will end up clearing any corrupted dependencies that are currently tied to your current user profile.
Follow the steps below to create a new local user account for your Windows installation, then use it when launching a native Windows app:
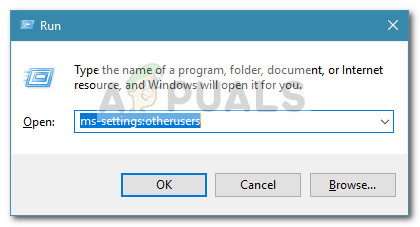
- Start by pressing Windows key + R to open up a run dialog box.
- In the box that just appeared, type ‘ms-settings:otherusers‘ inside the text box and press Enter to open up the Family & other people tab of the Settings app.
Access the Other Users tab - In the Family & other users tab, scroll down to the Other user’s tab and click on Add someone else to this PC.
- From the next menu, click on ‘I don’t have this person’s sign in information’ in order to create a local account.

I don’t have this person’s sign-in information - At the next screen, log in with your Microsoft account and click on Add a user without a Microsoft account.
- Set a username and password for the new account and assign a series of security questions.
- Next, restart your computer and sign in with the newly created account at the next startup.
- Launch the native Windows app that was previously failing with the 0x8019001 error and check if the problem is resolved.
If the problem is still not fixed, move down to the next potential fix below.
7. Turned Off Sync in Chrome (if applicable)
This might feel like a weird fix, but a lot of users have reported that they managed to get this issue resolved by disabling Chrome’s syncing functionality (oddly enough).
As it turns out, there’s currently an issue with how Chrome handle’s syncing on Windows 11 – under certain circumstances, it might interfere with certain Windows native apps.
Several affected users have turned off Chrome Syncing from settings and this ended up fixing the problem entirely.
Here’s how to do this:
- Open Chrome and click on your account icon from the top-right section of the screen.
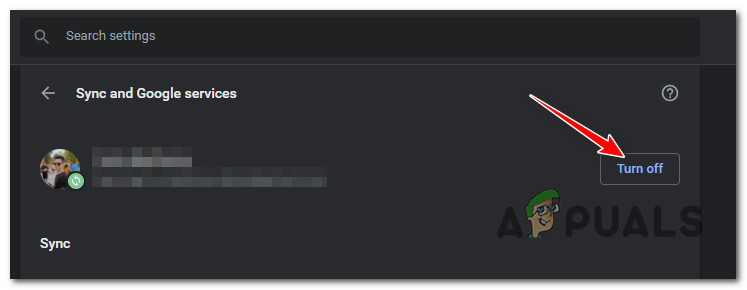
- From the context menu that just appeared, click on Sync is on.

Accessing the Syncing icons - Next, you’ll be transported directly into the Sync and Google services menu. Once you’re there, click on the Turn Off button associated with your account.
Disable Chrome Syncing - Once Chrome syncing has been disabled, reboot your PC and see if the error is now resolved.
In case you’re still experiencing the 0x8019001 error when opening Windows native apps, move down to the next method.
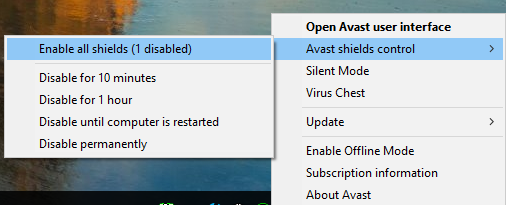
8. Disable or Uninstall 3rd party security suite
In some cases, the 0x8019001 error might be indirectly caused by an overprotective 3rd party security suite. There are several 3rd party AV suites (including Sophos, AVAST, and McAfee) that might stop the connection between the end-user computer and the Microsoft Store servers.
If this scenario is applicable, try disabling the real-time protection of their 3rd party suite or after they uninstalled it completely.
IMPORTANT: It’s important to note that Windows Defender doesn’t cause the same incompatibility issues with the activation process.
If you don’t want to get rid of your antivirus, you should start by disabling the real-time protection before checking if the problem is fixed.
This procedure will be different depending on the 3rd party security suite that you’re using.
Once you do this, retry the activation procedure and see if the process is now successful.
If you’re using a security suite that includes firewall protection, you should also try to uninstall the security program and ensure that you’re also removing any remnant files that might still enforce the same security rules.
To do this, here’s how to uninstall your 3rd party security suite and delete all remnant files.
If this method didn’t fix the issue or it wasn’t applicable to your scenario, try the next fix below.
9. Upgrade via Media Creation Tool (if applicable)
If you’re experiencing this issue while attempting to use the Windows Upgrade Assistant to get on Windows 11, chances are you can bypass the 0x8019001 error entirely by upgrading using the Media Creation tool instead.
Sure, the procedure is a little bit more tedious, but it will allow you to get the job done in case the Windows Upgrade Assistant couldn’t.
If you have no choice but to go this manual route, follow the instructions here to upgrade to Windows 11 via the Media Creation Tool.
In case this scenario was not applicable to you, move down to the next method below.
10. Repair the Office Installation
If none of the potential fixes above have worked for you, chances are you’re encountering the ‘0x8019001’ error due to some type of local corruption originating in the Office installation folder.
Typically, this problem will start occurring after an unexpected machine interruption or after an AV scan ended up quarantining files from the Office installation.
You should be able to fix the issue by repairing the Office installation in order to resolve any type of corruption that might be responsible for this error:
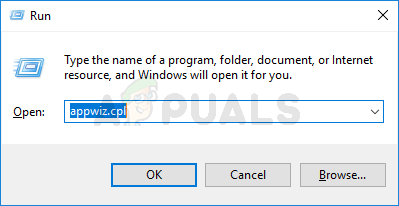
- Start by pressing Windows key + R to open up a Run dialog box.
- Next, type ‘appwiz.cpl’ inside the text box and press Enter to open up the Programs and Features menu.
Open the Programs and Features menu - In the Programs and Features menu, move down through the list of installed applications and locate the Office installation. Once you locate it, right-click on the listing associated with Office and choose Change from the newly appeared context menu.

Change the Office installation - Next, click on the Online Repair option from the list of available options and wait for the operation to complete.
Important: You need a stable Internet connection in order to go for this repair strategy.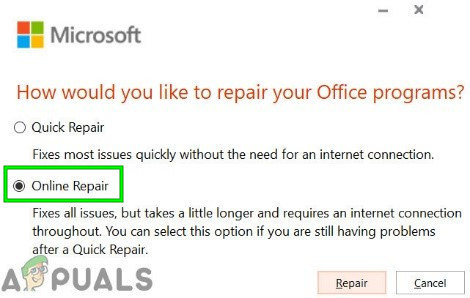
Perform an Online repair on the Office suite - After the operation is complete, reboot your machine and see if the problem is now fixed.
In case you’re encountering the 0x8019001 error on Xbox consoles, move down to the final fix below.
11. Power cycle your Xbox console (if applicable)
If you’re experiencing this issue while attempting to sign in with your Xbox account, chances are you’re dealing with a glitch facilitated by temporary data maintained by your Xbox One or Xbox Series X console.
To fix this, you’ll need to force the power capacitors to drain themselves by initiating a power-cycling procedure.
In case this is the scenario in which you’re experiencing the 0x8019001 error is applicable, here’s how to perform a power cycle on your Xbox console:
Note: The instructions below will work on both Xbox One and Xbox Series console models.
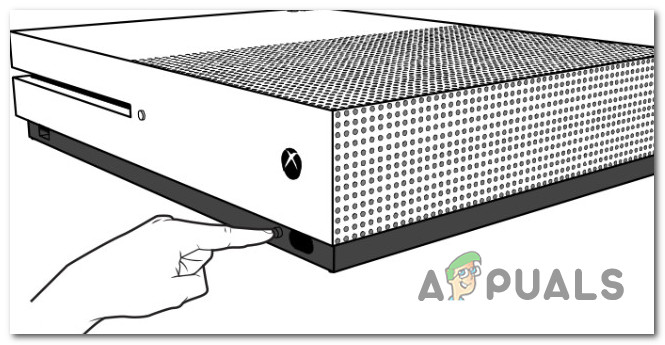
- Start by making sure your console is in idle mode, then press the Xbox button on your console.
- Keep the power button pressed for 10 seconds or until you see the front LED turning off.
Power cycle console - Once the Xbox One or Xbox Series S / X console is turned off, go ahead and disconnect the power cable and wait for one minute or so to allow the power capacitors time to discharge.
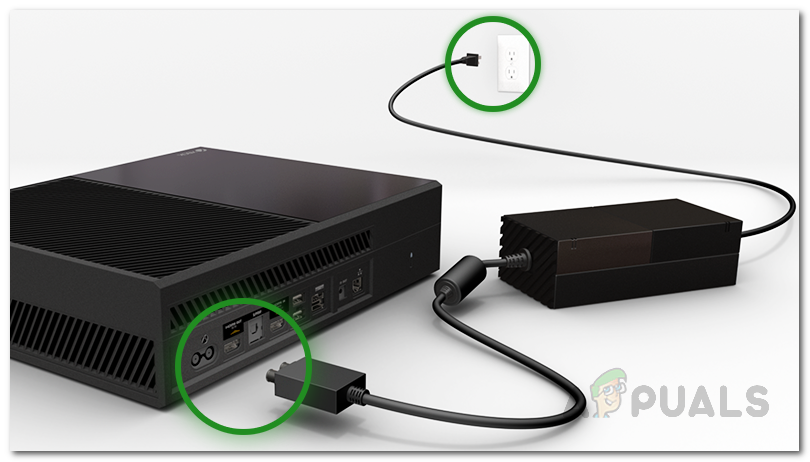
Power cycle Xbox console - Next, connect the power cable back, start up the console conventionally and see if the problem is now fixed.


Unfortunately in my case it was some glitch with the user profile. On a new profile I can log on to Edge and Teams, the two applications that refused to cooperate. It’s a pity that the standard tools are unable to fix that particular glitch.
Thanks for the suggestions.