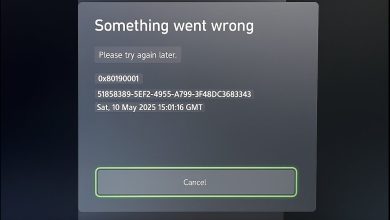
How to Fix Xbox One ‘Black Screen Of Death’ Error?
Some Xbox One users report that their console boots up to a completely black screen after installing a pending console firmware update. It hangs to a black screen indefinitely, but the quick actions menu is still accessible by pressing the Xbox button.

After thoroughly investigating the issue, we realized that several different underlying causes might cause this type of problem. Here’s a list of scenarios that you should know about:
- Corrupted persistent cache – It’s possible that the problem is being made worse by a flaw in the persistent cache that Xbox One keeps. By deleting the persistent cache before rebooting your Xbox One system, some users who were having the same problem as you were able to resolve it.
- Temporary Xbox One files are affecting the boot procedure – As it turns out, you can also expect to deal with this issue due to some type of corruption that has been accumulating inside the persistent cache of your console. In this case, a power cycle procedure should allow you to fix the issue.
- HDMI Connection issue – If a power cycling procedure was not effective in your case, you should proceed by checking every possible connection problem that could be causing this black screen issue. There are a set of troubleshooting strategies that will help you do this.
- Allow 24 Hz setting is turned on – If the video output option in your console’s settings is set to Allow 24Hz, you risk experiencing a problem in which the screen remains blank while you watch a Blu-ray disc.
- Display Setting issue – By completely resetting all display settings and making the Xbox system start up in low-resolution mode, other people who were also having this problem were able to resolve it. If you haven’t tried this fix yet, you should go through several steps to reset your display settings.
- The issue is caused by connected peripherals – It is possible that you will get a black screen when you switch on your console if you have any storage expansion cards, USB hard drives, or battery charging stations attached to it. This happens when the console attempts to update itself when it is turned on. You may put this hypothesis to the test by disabling all of the connected peripherals.
- AVR setup is connected to Xbox One console – If you have no display or sound on your television and your console is linked to an audio-video receiver (AVR) that is also connected to your television, you should try restarting the AVR component to see if this resolves the issue.
- Console firmware issue – You should be aware that Microsoft has already made several upgrades to improve the stability of the fleet of basic applications. Therefore, making sure that you are using the most recent firmware has the ability to solve the issue.
Now that you are familiar with every potential cause that might cause this type of issue, here’s a list of methods that other affected users have successfully used to get to the bottom of the issue:
1. Perform a power cycle procedure
If you’re just beginning to troubleshoot the issues, you shouldn’t immediately exclude the idea that the problem was caused by a cache from your list of suspects.
The issue, which caused afflicted Xbox One users to become permanently frozen on a black screen, was rectified, according to reports from some of those customers, when they performed a procedure that involved cycling the console’s power.
This step will ultimately fix any firmware problems or inconsistencies in the temporary files, which may have been the root cause of this behavior.
Note that utilizing this approach will delete the temporary folder and clear the power capacitors, ultimately resolving the problem for most situations that will cause it on Xbox One.
A power cycle is a technique that may be performed on Xbox One. Here is a simple explanation of how to do so:
- Ensure your Xbox One system is fully powered first (not in hibernation mode).
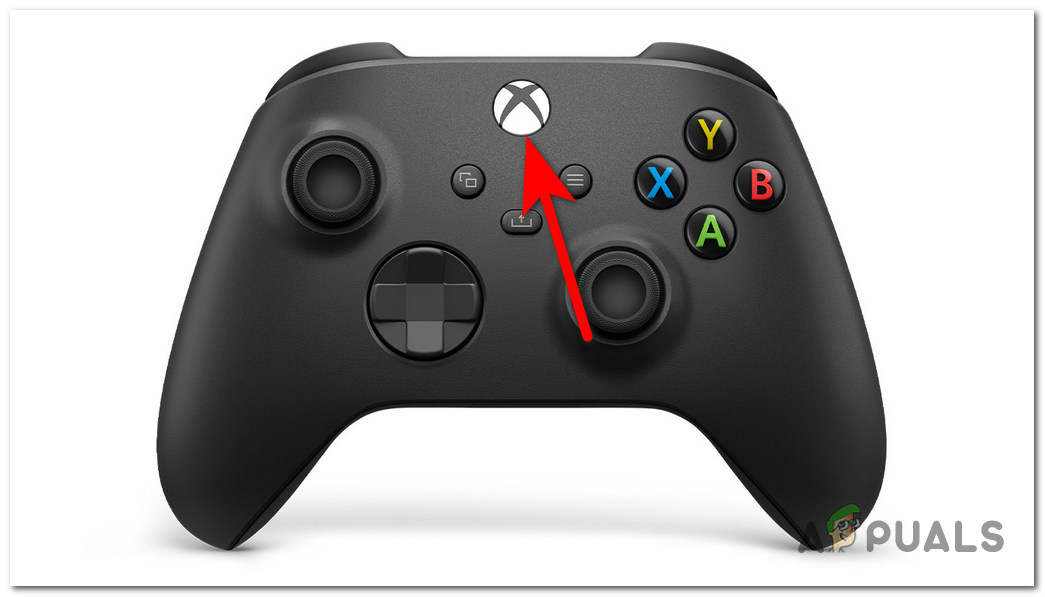
- After that, press and hold the Xbox button for around 10 seconds, or until you see that the console’s front LED has stopped flashing.
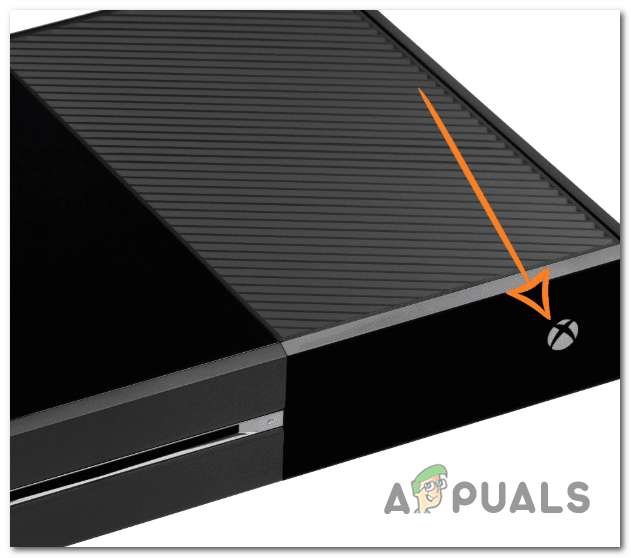
Press the Xbox button on your console - After you’ve done this, hold off trying to turn it back on for a full minute. Unplug the cord from the outlet while you wait to ensure the power capacitors are entirely cleaned.
- Reconnect the power cable and start your console normally to test if the problem has been resolved.
- Pay attention to the starting animation logo when your console restarts. If the longest animation logo displays, the power cycling process was accomplished, so use it as confirmation.
See if you are still stuck at a black screen and move to the next method below if the same issue persists.
2. Check all your connections
If the power-cycling procedure above didn’t work for you, you should take the time to check every possible connection issue that might be causing this black screen issue before we move on to more advanced repair strategies.
Note: Only follow this method if the screen remains completely black even when you press the Xbox button on your turned-on controller and the side menu doesn’t appear.
To make matters easier for you, we’ve made a list of connection troubleshooting methods that you should take the time to investigate:
- Check to see that your television and gaming console is powered on. Ensure that your television is tuned to the appropriate input signal (HDMI)
- Check that the HDMI cable is plugged into the console’s “out to TV” port.
- Insert the HDMI cable into one of the other available HDMI ports on your television.
- Use a separate HDMI cable to connect your console to your TV. (if applicable)
- Ensure that the HDMI cable connections on your gaming console and television set are secure.
- Connect your Xbox One console to a different TV. (if applicable)
Try the next method below if you followed all the instructions above and are still stuck at the black screen when booting up your Xbox console.
3. Disable 24 Hz for Blu-Ray playback
If the video output on your console is set to Allow 24Hz, you risk running into a problem that causes the screen to be blank when playing a Blu-ray disc.
Note: Because neither the Xbox Series S nor the Xbox One S All-Digital Edition has optical disc drives, the Blu-ray Player software cannot be installed on any of these consoles.
Several affected users that have experienced this issue have confirmed that the issue has disappeared completely after they followed the instructions below to disable the 24 Hz video mode.
Here’s what you need to do:
- Once you arrive at the black screen, press the Xbox button on your controller to bring up the guide menu.
- From the side menu that just appeared, access the Profile & system and select Settings from the next menu that just appeared.
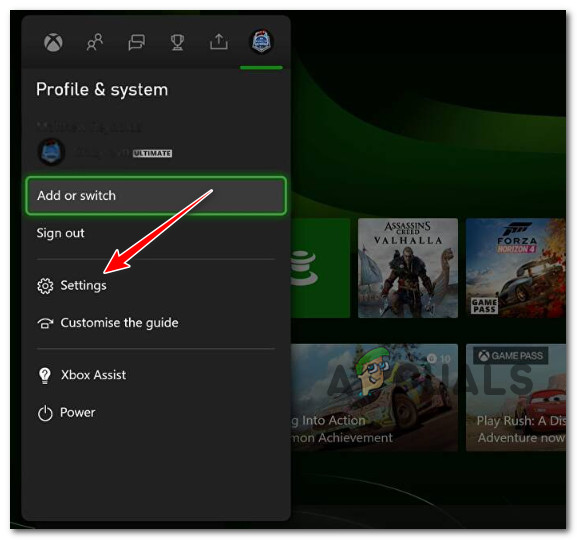
Access the Settings menu - Once you’re inside the Settings menu, access the General tab, then go to TV & display options menu.
- From the next menu, choose Video modes and turn off Allow 24 Hz from the settings menu.
- After this setting has been enforced, reboot your PC and see if the problem is fixed once the next startup is complete.
If the problem is still not fixed, move to the next method below.
4. Reset all display settings
If none of the methods above have proven to be effective in your case, you should also consider the possibility that there are certain display settings that are causing this behavior.
Several users we’re also experiencing have successfully managed to fix the issue by effectively resetting all display settings and forcing the Xbox system to boot up in low-resolution mode.
If you haven’t tried this fix yet, follow the instructions below to reset all the current display settings on your Xbox One settings:
- Make sure that there’s no disc currently inserted in your console. If there is, reject it before proceeding to the next step.
- To power down the console, you must first locate the Power button on the front of the device and then press and hold it for ten seconds.
- To turn on the console, hold down the Power and Eject buttons simultaneously until you hear a beep. Right away, you’ll hear one beep, and ten seconds later, another. The first beep will be followed by the power light flashing on.
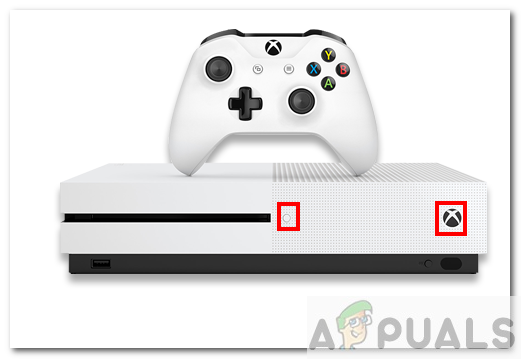
Press the Eject and Power button - Wait until you hear the second beep or the console starts up in low-resolution mode before releasing your grip (the Xbox startup screen will appear slightly pixelated).
Note: Instead of pressing and holding the Eject button on an Xbox Series S or Xbox One S All-Digital Edition, press and hold the Xbox and Pair buttons. - After doing this, your console will restart in low-resolution mode (640 x 480) without any previously established display settings.
Note: By pressing the Xbox button on your controller, you may access the instructions and adjust this setting. Select the desired resolution from the settings under Display by going to Profile & system > Settings > General > TV & display preferences.
If resetting the display settings didn’t fix the issue in your case, move down to the next method below.
5. Disconnect all peripherals from your Xbox One Console
If your console is trying to update itself when turned on, you may get a blank screen if you have any storage expansion cards, USB hard drives, or battery charging stations inserted. This can be caused by problems caused by certain devices.
If this is the case, you should try detaching everything from the computer other than the HDMI cable, the power cord, and the Ethernet wire to determine whether or not a connected accessory is causing the problem.
Don’t worry; after the update has finished installing, you’ll be able to rejoin and resume using these devices as normal.
If you disconnected all peripherals and still face the same issues, move down to the next method below.
6. Restart the AVR component (if applicable)
If the display or sound on your television is not working and your console is connected to an audio-video receiver (AVR) that is also connected to your television, you should try restarting the AVR component to see if this solves the problem. You should connect your console directly to the television if this does not work.
Several users experiencing this issue that we’re actively using an AVR device have confirmed that the black screen issue disappeared after successfully restarting the AVR component.
Here’s how to do this:
- Turn on your TV first, then wait until you see it displaying an image, then turn on the AVR.
- Once the AVR is turned on, turn on your console.
- To change your AVR’s input source away from the console and back, use the Input button on the TV’s remote control (for example, HDMI1 to HDMI2, and then back to HDMI1).
- Restart the AV.
- Set up your TV connection to HDMI by pressing the Xbox button to open the guide menu.
Press the Xbox button on your controller - Go to Profile & system > Settings > General > TV & display options and select Video fidelity & overscan.
- Under the Display dropdown that just appeared, select HDMI.
If the black screen issue is still not fixed, move to the next method below.
7. Fix a system update error (reinstall console firmware)
If none of the aforementioned solutions have worked for you, our advice is to begin by making sure that the most recent firmware update for your console is installed.
You should be aware that Microsoft has already made several upgrades to improve the stability of the fleet of basic applications. Therefore, making sure that you are using the most recent firmware has the ability to solve the issue.
Therefore, install all outstanding firmware updates before doing anything else.
You must go to the Xbox Support website and download the most recent OSU1 files to upgrade your Xbox One console with an offline update package. Then, for those files to work with the file system on your console, you must utilize a flash drive that has been re-formatted.
The new $SystemUpdate folder must be on your recovery flash drive for the OS to boot from it for this to function.
Here’s what you need to do:
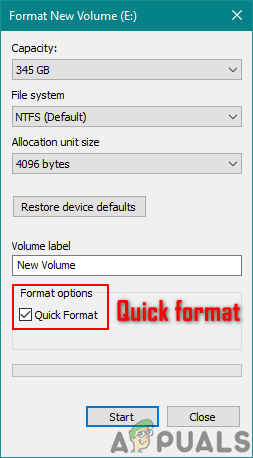
- Start by preparing the flash disk you will need to do the offline update. Put a USB drive with a minimum 7 GB capacity into your PC to accomplish this.
- Ensure that it is NTFS formatted. To accomplish this, in File Explorer, right-click on the drive and select Format… from the context menu. Before clicking Start, choose NTFS as the File system and check the box next to Quick Format.
Deploy quick format - After preparing the flash drive for future usage, visit the official Microsoft download link for the offline Xbox installer. You may download the most recent OS for your Xbox One console from this page.
- After that, open the flash drive you previously created and extract the contents of the package, being sure to place the $SystemUpdate in the root folder.
- Next, switch off your system and briefly hit the Xbox button while simultaneously holding down the Bind and Eject buttons.
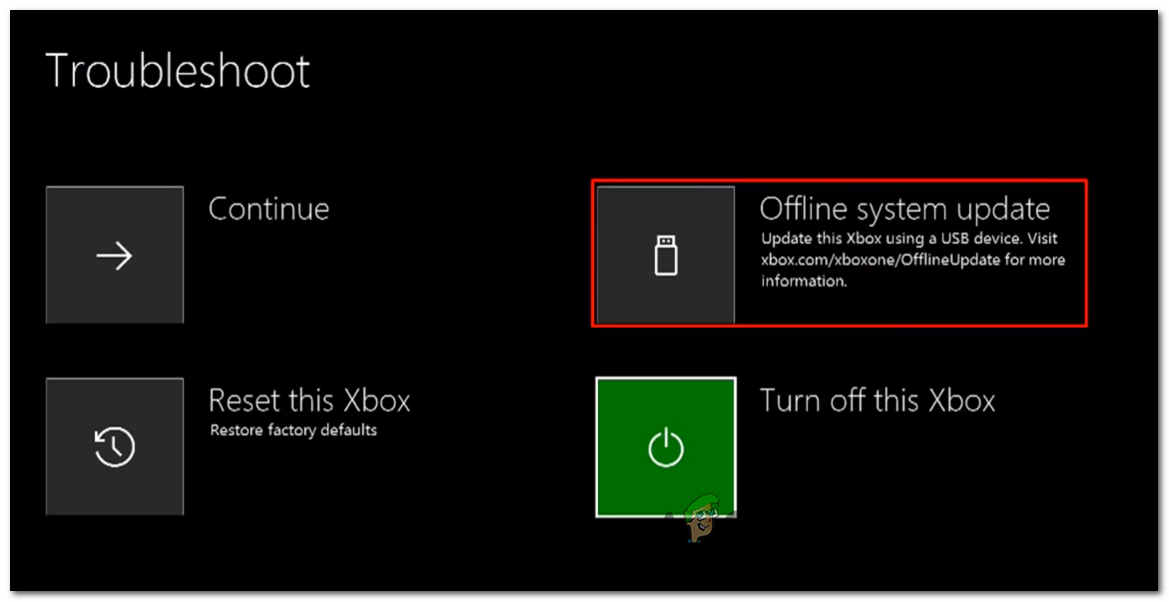
Open the Startup Troubleshooter - Release the Bind and Eject buttons when you hear the audio queued, then wait for the Startup Troubleshooter screen to display.
- Insert the previously generated flash drive and wait for the Offline system update box to appear.
- When the Offline system update menu is highlighted, select it with your controller and press X to open it.
Deploy a system update Note: This might take more than 20 minutes, depending on how quickly your flash drive can read and write data.
- Your console will restart when the procedure is finished, and the system will try to boot normally.
If you’re still stuck at a black screen even after updating your system to the latest version, move down to the next method below.
8. Clear the persistent storage
It’s likely that the problem is being caused by an inconsistency that’s hurting the permanent cache that Xbox One keeps. If so, this would explain why you’re stuck with a black screen at every startup.
Clearing the persistent storage cache is the next step you should take if the procedure described above was unsuccessful for you. However, if you haven’t already reinstalled the Blu-Ray software on your device, you won’t be able to accomplish this.
It is important to remember that while you are performing these steps, your console should remind you to download anything from the Xbox store (since the Blu-Ray infrastructure is missing).
When prompted with this message, click Install, and then follow the instructions on the screen. After the process is finished, the permanent cache will have been removed, allowing you to safely reinstall the Blu-Ray software support after it has been updated.
If you are searching for a walkthrough of the full procedure, the instructions that follow might serve as a guide for you:
- Verify that you are situated inside the console’s primary dashboard.
- To open the guidance menu, press the Xbox button on your controller.
- Access the Games & Apps option from the guide menu, which is displayed.
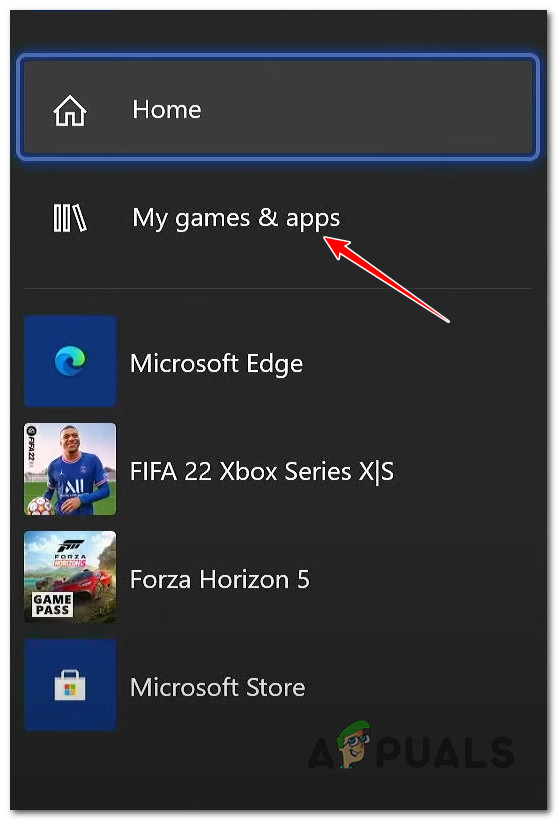
Access the My Games & Apps - Find the Blu-ray app listing by scrolling down the list of installed applications & games in the Game & apps menu.
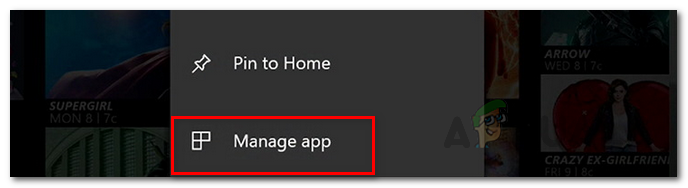
- Press your controller’s Start button after highlighting the Blu-ray app.
- From the context menu that just displayed, select Manage app / Manage game from the following menu.
Access the Manage Apps menu - After that, navigate to the right pane and select Uninstall all to uninstall every update and add-on.
- To guarantee that you get rid of all traces of the Blu-Ray program, choose to Uninstall all at the confirmation screen.
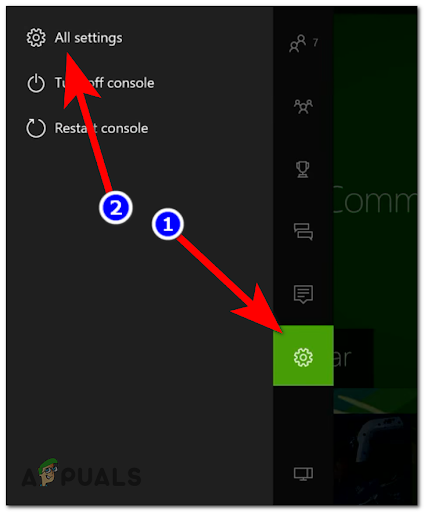
- Press the Xbox button on your controller once more to return to the main dashboard menu and bring up the guidance menu.
- Return to the guide menu and select the Settings option (gear icon).

Access the All settings menu - After returning to the Settings menu, go to the Console settings menu and choose the Disc & Blu-Ray option from the right-hand menu.
Access the All Settings menu - Navigate to the Persistent storage menu in the Disc & Blu-Ray menu (under Blu-Ray).
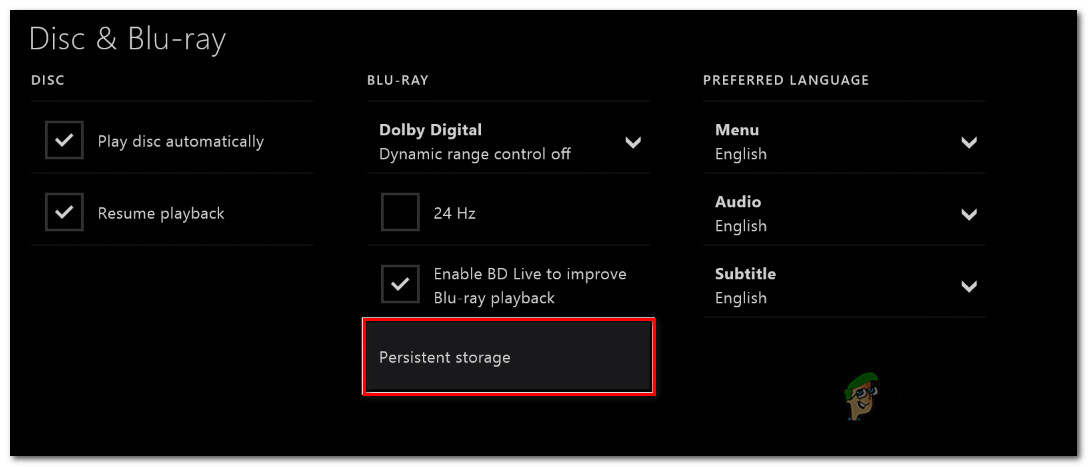
Access the Persistent Storage - After that, a confirmation menu should appear. At this point, launch the procedure using the Clear Persistent Storage option, then watch for it to finish.
- Switch off your Xbox One device and wait for the subsequent boot procedure to finish.
If the problem is still not fixed, move to the next method below.
9. Perform a hard reset
Because using this approach may lead you to lose all of the information that has been saved on your Xbox, you should ensure that you have exhausted all of your other options before deciding to perform a hard reset.
Whatever progress you have made will be lost if your game data is not saved. If you play an offline game where your data is not kept on any server, you will lose it all.
Therefore, you need to ensure that it is one of the last options you consider.
Therefore, to conduct a hard reset on your machine, follow the procedures that are stated below:
- Start your Xbox, and if a black screen occurs, press the Xbox button on the console and the eject button simultaneously for a few seconds to bring up a screen similar to the one below.
- Click “Reset this Xbox” on the following screen to restart your Xbox.
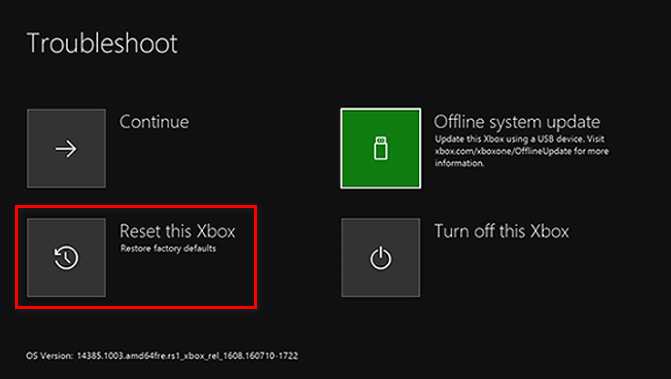
Resetting this Xbox - Click “Remove everything” under the “System” heading.
- After you do this, your console will start the reset procedure.
- Once the procedure is complete, see if the black screen issue is now fixed.