How to Fix Windows Update Error 0x80070020 on Windows 10/11
The Windows Update Error 0x80070020 is mostly occurs if there’s an application interfering with the automated update process. For Example: Antivirus products that employ real-time scanning, for instance, might interfere with the automated update process.
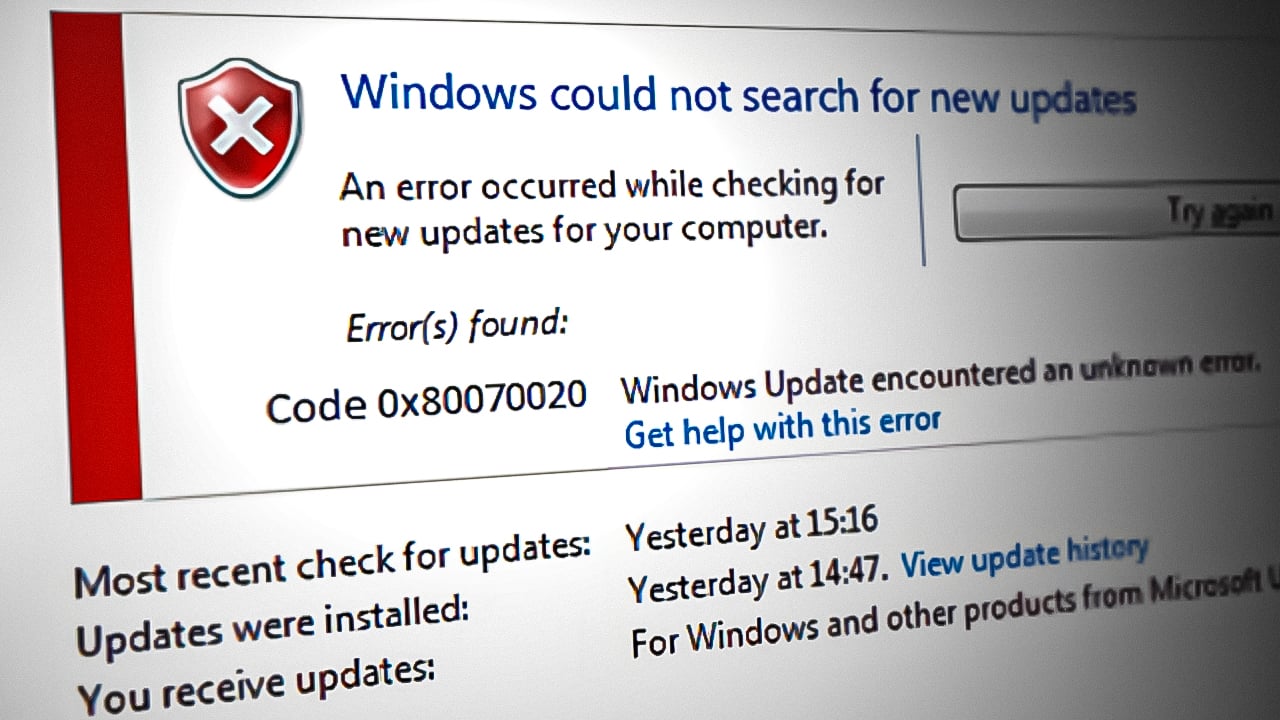
Microsoft has previously released an automatic fix for the 0x80070020 error via the Windows Update Troubleshooter. The 0x80070020 error first started surfacing at the end of 2017 and Microsoft was quick to deploy hotfixes for all WU versions as well as include a fix for Windows 11.
Keep in mind that an overprotective AV or an active AV scan are not the only scenarios that will cause this problem.
You can also expect to see the 0x8007002 Windows Update error due to a WU inconsistency, due to a conflicting GPU software, or due to some kind of system file corruption that affects a WU dependency.
If you’re dealing with the same issue, below you’ll find a list of confirmed fixes that other affected users have successfully used to troubleshoot this problem.
Let’s begin.
1. Run the Windows Update Troubleshooter
Note: The Windows Update Troubleshooter offers a collection of automatic repair solutions that may be used to resolve the most prevalent reasons for failing to install a pending Windows update.
If Windows Update Troubleshooter already addresses the source of the error, you only need to run the program and implement the suggested remedy to resolve the issue.
Follow the instructions below, if you haven’t previously, to run the Windows Update Troubleshooter and have the suggested fix automatically installed:
Update: The instructions below are compatible with all modern versions of Windows.
- Press Windows key + R to enter the Run dialog box.
- In the new box that opens, type “control” and press the Enter key to access the Control Panel interface.
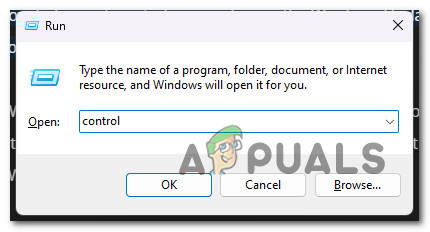
Open the classic Control panel menu - When the User Account Control prompts you to grant administrator privileges, click “Yes.”
- Search for “troubleshoot” using the Control Panel’s search feature (top-right corner of the screen).
- Select each of the Troubleshooting categories from the search results list.
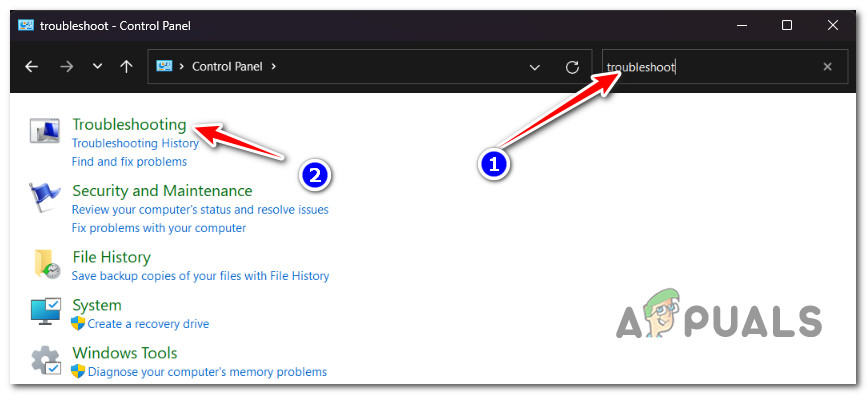
Search for the classic Troubleshooter - From the next menu, look for the Windows Update troubleshooter and launch it.
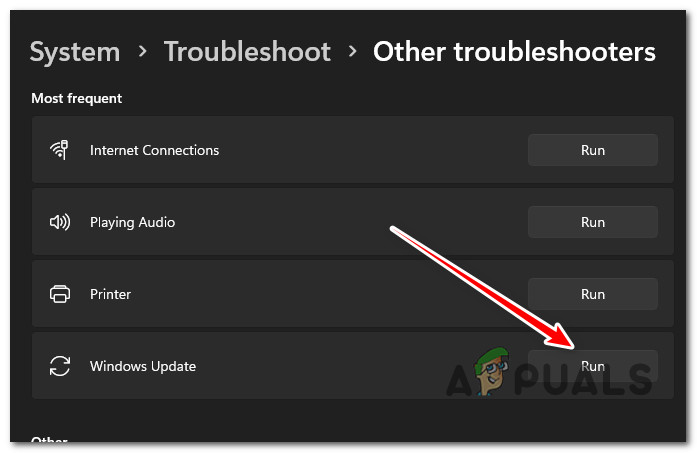
Run the Windows Update Troubleshooter Note: The screens you will see from now on will be different if you are using Windows 11.
- Click Next when prompted by the Windows Update Troubleshooter and wait for the first scan to complete.
- If you locate a potential solution, click Apply this Fix to implement it in the present circumstance.
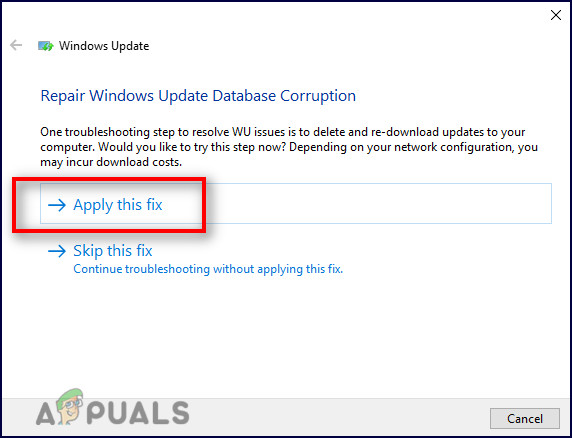
Apply the recommended fix Note: With some suggested methods, you may be required to do many tasks manually.
- Once the fix is applied successfully, restart your computer and attempt to reinstall the failed update.
2. Reset every Windows Computer
If you receive this 0x80070020 error regardless of the update that you try to install, the most common scenario that might produce this behavior on both Windows 10 and Windows 11 is a glitched WU dependency utilized in the upgrading process.
To resolve this, you should reset all WU components and WU management folders using a sequence of CMD commands. This method has been confirmed to work on both Windows 11 and older versions.
Follow the procedures below to reset every Windows Update component:
- To open the Run dialog box, press the Windows key + R.
- Then, type “cmd” in the text field and click Ctrl + Shift + Enter to launch a Command Prompt with elevated privileges.
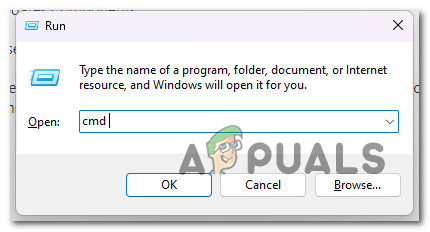
Open a CMD window Note: When prompted by UAC (User Account Control), click Yes to provide administrator privileges.
- After opening an elevated Command Prompt, perform the instructions given below in the following order and press Enter after each command to stop any WU-related services.
net stop wuauserv
net stop cryptSvc
net stop bits
net stop msiserver
- Just so you’re aware, the terminal will halt the Windows Update Services, MSI Installer, Cryptographic Services, and BITS Services with these commands.
- After stopping all applicable services, use the following commands to empty and rename the SoftwareDistribution and Catroot2 folders:
ren C:\Windows\SoftwareDistribution SoftwareDistribution.old
ren C:\Windows\System32\catroot2 Catroot2.old
Note: The revised WU component files are stored in these places. Your operating system will be compelled to generate fresh, uncorrupted copies of these folders if you rename them.
- Once the directories have been cleared, execute the following commands to activate the previously disabled services:
net start wuauserv
net start cryptSvc
net start bits
net start msiserver
- Reinstall the pending update to determine if the issue has been fixed.
3. Disable BitDefender or different 3rd party AV Temporarily (if applicable)
Since Bit Defender is a third-party program, Windows updates may be seen as a danger if the anti-virus is unfamiliar with the update or the update has not yet been registered on its machine.
Before installing any Windows update, you should disable any third-party anti-virus software and then update your anti-virus software.
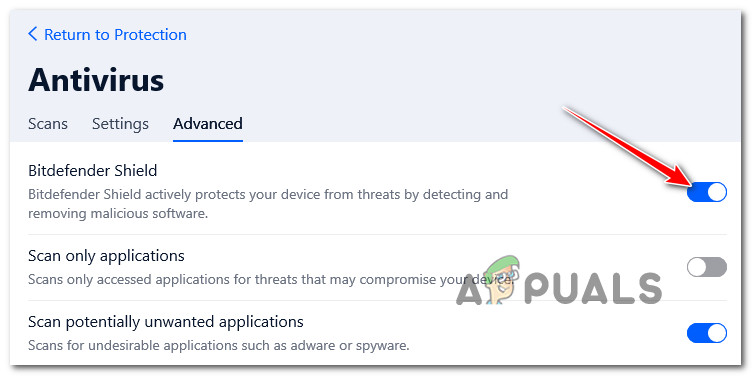
If you’re using BitDefender, test out this theory by accessing the settings menu of the AV, then go to Settings > Advanced and disable the BitDefender shield.
Keep in mind that there are other 3rd party AV suites with the potential of causing the 0x80070020 when installing a pending Windows update.
Aside from BitDefender, this problem is also reported to occur with Zone Alarm and Avira Antivirus.
If you’re running a third-party antivirus, it wouldn’t harm to temporarily stop its real-time protection and test the Windows 11 update while the security suite is off.
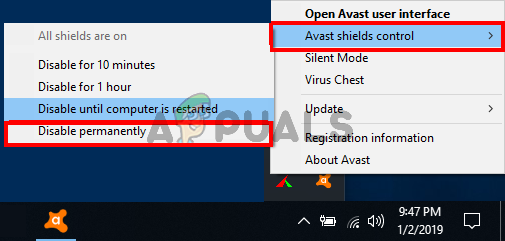
Note: The majority of AV suites allow you to stop real-time protection through the taskbar icon. If it is not feasible, the Settings menu should have the option to disable the presently active AV shields.
Additionally, you might try deleting the third-party suite entirely, especially if you’re employing an antivirus suite that serves as a firewall. If you decide to go this route, use this uninstallation guide to make sure you are not leaving behind any remnant files.
4. Uninstall Asus GPU Tweak II (if applicable)
There’s one app from ASUS’s toolkit that is known to cause a lot of issues with the updating processes on both Windows 10 and Windows.
Note: ASUS GPU Tweak II is one of the most popular Windows software programs for overclocking a graphics card. This program boasts customizable functions available for the majority of software features. GPU Tweak II is also used to measure its enhanced performance with other readily accessible benchmarking programs.
However, for all its advantages, ASUS GPU Tweak II is notoriously known for conflicting with the Widows Update protocol and even interfering with updates carried out through the Microsoft Store.
As it turns out, ASUS GPU Tweak II has one background service that interferes with Windows Update. The good news is, once you performed the overclocking and achieved a stable build, there’s not a lot of use for this tool.
Important: If you regularly tweak your frequencies and voltages so you can’t really uninstall your overclocking toll, consider an alternative like MSI Afterburner, EVGA Precision, or Nvidia Inspector.
So instead of letting it conflict with the WU component, follow the instructions below to uninstall it from your PC:
- Press Windows key + R to open up a Run dialog box.
- Next, type ‘appwiz.cpl’ inside the text box, then press Ctrl + Shift + Enter to open up the Programs and Features menu with admin access.
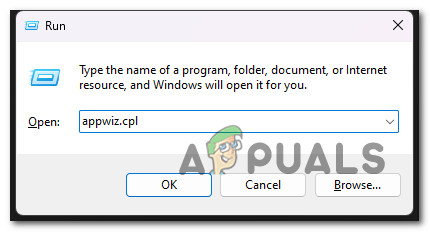
Open up the Programs and Features menu - At the User Account Control (UAC), click Yes to grant admin access.
- Once you’re inside the Programs and Features menu, scroll down through the installed programs and right-click on ASUS GPU Tweak II.
- From the context menu that just appeared, click on Uninstall / Change.
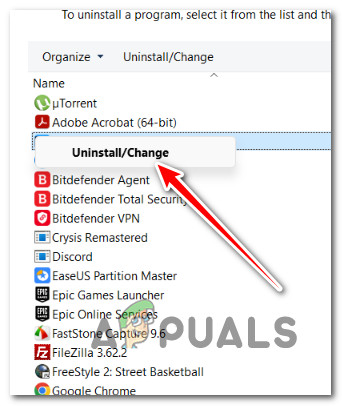
Uninstalling ASUS GPU Tweak II - Follow the on-screen instructions to carry on the uninstallation process, then reboot your PC.
- At the next startup, install the Windows update that was previously failing with the 0x80070020 error and see if the problem is now fixed.
5. Clean Boot
Before assuming that you are not dealing with a third-party app that is causing this behavior, take the time to boot your PC in a clean boot mode where no 3rd party app or process is permitted to run.
This will provide a clear conclusion if a service, process, or startup item outside Windows is causing the 0x80070020 error.
Note: A clean boot will force your system to boot with only the essential Windows programs and services. Once the clean boot state is achieved, no third-party services, processes, or startup items will be allowed to execute.
For detailed instructions on achieving a clean boot state, follow our step-by-step article. These instructions are universal and will work on both Windows 10 and Windows 11.
6. Deploy DISM and SFC scans
A damaged system file that prevents Windows from updating is one of the most prevalent causes of the 0x80070020 problem. This is true for both Windows 10 and Windows 11.
If this appears to be the case, you should run System File Checker (SFC) and Deployment Image Servicing and Management (DISM) scans.
Even though SFC and DISM are identical in some aspects, you should perform both checks concurrently to increase the likelihood of repairing broken system files.
Start with a simple SFC scan from an elevated CMD prompt.
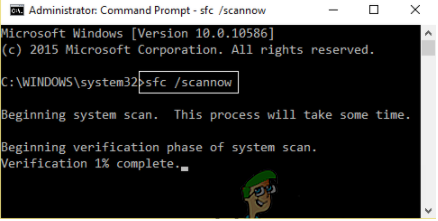
Note: This tool is entirely local and does not require a constant internet connection.
IMPORTANT: Don’t close the CMD window after initiating this operation, even if the tool appears to have stopped functioning. Wait for the procedure to conclude. If you interrupt the process before it is complete, your HDD or SSD might sustain logical errors.
After the SFC scan has been completed successfully, restart your computer and see if the issue persists.
If the 0x80070020 error persists upon upgrading, run a DISM scan and follow the on-screen directions to complete the procedure.
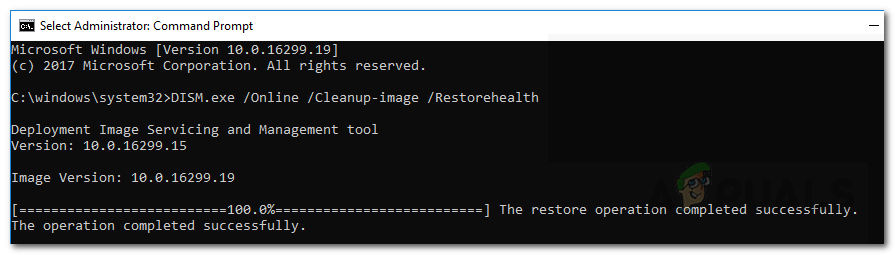
IMPORTANT: DISM uses Windows Update to replace corrupt system files with healthy ones, but SFC does not. Hence, you need to ensure that you have a stable Internet connection before beginning this procedure.
After a successful DISM scan, restart your computer to determine if the 0x80070020 error has been resolved.
7. Install the pending update manually
If you’ve come this far without a viable fix, the issue is almost certainly being caused by some type of system file corruption affecting the Windows Update component or an associated dependency.
Unless you want to refresh all your Windows components with a clean install or repair install procedure, one way to bypass the 0x80070020 error is to install the failing update manually.
Note: This method is recommended if you’re only experiencing this issue with certain pending updates.
By installing the update manually, you may be able to avoid the entire issue in which the pending update is stuck at 0%. There are other methods for achieving this, but the Microsoft Update Catalog is the most efficient and safe.
IMPORTANT: This method will not properly address the problem’s primary cause. The basic issue that prevents you from installing new pending updates will continue to exist even if this method is effective.
Here’s how to install the failing update via the Microsoft Update catalog and bypass the 0x80070020 error:
- Launch the Microsoft Update Catalog homepage in your web browser.
- On the Microsoft Update Catalog page, use the search box in the page’s upper-right corner to locate the update that failed to install.
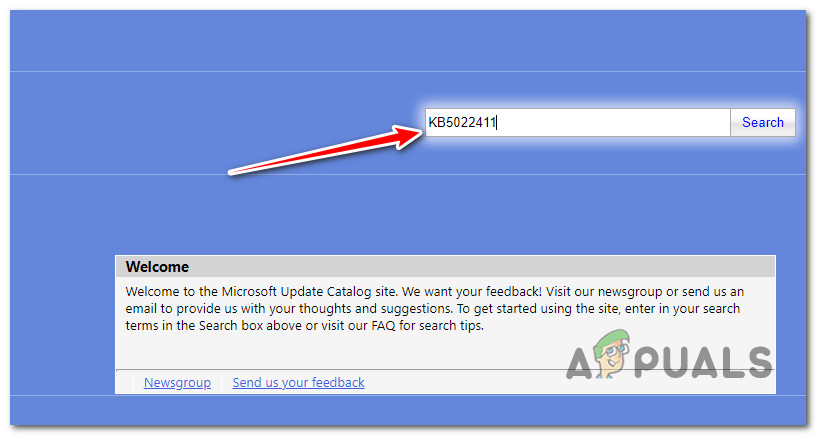
Search for the failing update on the Microsoft Update Microsoft - After reviewing the findings, consider the CPU architecture and Windows version while searching for an appropriate update.
- After locating the necessary update, click the Download button, then wait for the download to finish before proceeding.
- Double-click the executable file you just downloaded from your downloads directory. Follow the instructions on-screen to finish the sideloading of the forthcoming Windows update.
8. Perform a repair install or clean install
If none of the aforementioned solutions worked, there’s a good possibility you’re dealing with system file corruption that cannot be fixed unless you replace every Windows file.
You have two options for accomplishing this: a repair install or a clean install.
• A clean install is a simple process that involves only a few mouse clicks and no installation discs. However, the biggest disadvantage is that you will likely lose the majority of your personal data (apps, games, user preferences, etc.) if they are not backed up beforehand.
• A repair install would be the most efficient method. This will require Windows 11 installation DVD that is compatible, but it will allow you to retain all of your personal components, including applications, games, user preferences, and personal media. The process will only affect the OS components, leaving the rest untouched.


