FIX: Windows Shell Common DLL has stopped working
A DLL file contains data and sets of functions that other programs in Windows use on a daily basis. For example the dialog boxes that you interact with in Windows use various functions from the Comdlg32 DLL file. Every process in Windows depends on a DLL(s) one way or the other. The Windows Shell Common DLL is not responding error that we are here to resolve indicates that the Windows Shell Common DLL has crashed due to some error. A little dialog box appears that shows you this message. You can check its solution online from that dialog box or you can close that dialog box. For many users they may never see this error again but for some it becomes a routine problem that appears every time you try to make certain changes in the Windows.

This crash is usually preceded by the user attempt to make changes in the configurations of their audio devices i.e. playback or recording devices. The Configuration dialog box may open alright but if you click inside it The Windows Shell Common DLL is not responding error will be shown to you and the configuration window will be closed.
That configuration window directly accesses the audio device’s driver so if that driver is corrupted or is not compatible with the way Windows works then it may crash the DLL process and give you that error. For some most of the users the error went away after a few instances but for the rest, following are the solutions that are known to work against this error.
Solution 1: Install Appropriate Drivers
Incompatible audio device drivers are known to operate against the method that Windows 7 and later operating systems follow. So you will have to make sure you are using a stable version of drivers instead of any Beta version. You can download earlier version of the drivers for your operating system from the computer model manufacturer’s website and install it through device Manager.
If your audio devices are old, you can also try the Microsoft Vista’s driver for them instead if the drivers for newer operating system are unavailable. You can download them from your computer model manufacturer’s website too.
To install them, Press and Hold the Windows key and Press R. Type devmgmt.msc in the Run dialog box and Press Enter.
In the Device Manage window that opens, Double Click on Sound, video and game controllers.
Under it, Right Click on High Definition Audio and click Update Driver Software from the pop up menu.
Click Browse my computer for driver software and navigate to the location where you downloaded the drivers. Select the Drivers and proceed with the On screen instructions.
If you do not have the drivers, then you should check on the system manufacturer’s site for the drivers. Usually, you would put in the model number to pull up the system configuration on the manufacturer’s site from where you can download the drivers.
If this error appears when you are trying to connect USB Headphones then do trying inserting them into the USB 3.0 drivers if available as this known to resolve this issue.
Solution 2: Disable Any Audio Effect
Due to driver incompatibility, If you have applied any kind of effect on the audio, for example changed the mode in equalizer, then this can also be contributing to the Windows Shell Common Error.
Make sure all these audio effects are Off. Also Turn Off any feature similar to Enhanced Audio or such.
Solution 3: Run The SFC Scan
This scan checks the integrity of crucial Windows files including all the DLLs. Follow the steps here to run an SFC scan.
Solution 4: Configure Windows to accept certificates
In the case of many Windows users, their computers are, by default configured to block any and all certificates. Windows depends heavily on certificates to verify the identity of not only users but also of installed devices and drivers. That being the case, Windows being configured to block all certificates can lead to the Operating System not being able to verify the identities of certain devices (such as playback and recording devices) and/or their drivers, causing the user to be met with the Windows Shell Common DLL has stopped working error message whenever they try to adjust the settings of the affected devices.
If that is the case, using Windows PowerShell to configure Windows to accept some, if not all, certificates should be able to resolve this issue for you. In order to use this solution, you need to:
- Open the Start Menu.
- Search for “powershell”.
- Right-click on the search result titled Windows PowerShell and click on Run as administrator in the context menu.
- Type the following into Windows PowerShell and press Enter:
Set-ExecutionPolicy -ExecutionPolicy Unrestricted -Scope CurrentUser
- Once the command has been executed, close Windows PowerShell and restart your computer.
Check to see whether or not the issue has been fixed once your computer boots up.
Solution 5: Performing a Clean Boot
It is possible that a third party application or service might be interfering with certain elements of the operating system, Therefore, in this step, we will be running a clean boot to isolate the application/service causing this error. For that:
- Log in to the computer with an Administrator account.
- Press “Windows” + “R” to open up the “RUN” prompt.
Opening Run Prompt - Type in “msconfig” and press “Enter“.

Running MSCONFIG - Click on the “Services” option and uncheck the “Hide all Microsoft Services” button.
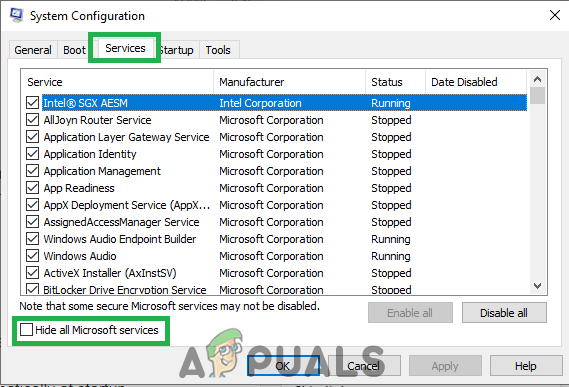
Clicking on the “Services” tab and Un-checking the “hide all Microsoft Services” option - Click on the “Disable All” option and then on “OK“.

Clicking on the “Disable All” option - Click on the “Startup” tab and click on the “Open Task Manager” option.

Clicking on the “Open Task Manager” option - Click on the “Startup” button in the task manager.
- Click on any application in the list that has “Enabled” written next to it and select the “Disable” option.

Clicking on the “Startup” tab and selecting an application listed there - Repeat this process for all applications in the list and restart your computer.
- Now your computer has been booted in the “Clean Boot” state.
- Check to see if the issue goes away.
- If the error isn’t encountered anymore, start enabling the services one by one and identify the service by enabling which the error comes back.
- Either, reinstall the service or keep it disabled.
Solution 6: Reinstalling Synaptics Touchpad Driver
The Synaptic Touchpad driver is known to sometimes cause the “Windows Shell Common DLL has stopped working” error. Therefore, in this step, we will be reinstalling the driver. For that:
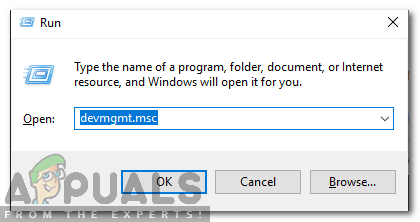
- Press “Windows” + “R” buttons simultaneously to open the Run prompt.
Opening Run Prompt - Type in “devmgmt.msc” and press “Enter“.
Typing “devmgmt.msc” in the run prompt. - Double click on the “Mouse and Other Pointing Devices” dropdown and right–click on the “Synaptics Touchpad” driver.

Right-clicking on the Synaptics Touchpad driver - Select “Uninstall” and click on “Yes” in the prompt.
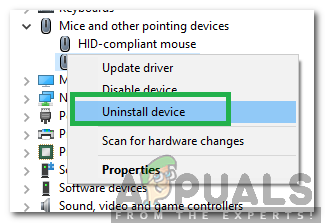
Selecting the “Uninstall Device” option from the list - Follow the on-screen instructions to completely uninstall the driver.
- Navigate back to the device management window and click on the “Actions” tab on the top.
- Select “Scan for Hardware Changes” from the list to reinstall the driver.
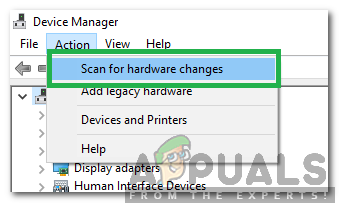
Selecting “Scan for Hardware Changes” from the list - Check to see if the issue persists.
I have tried all of the above in the past, none of which have helped to fix the issue.
Nevertheless I’ve followed your guide as closely as I can again, and again, to no avail.
Every time I try to change recording settings I get the error. It doesn’t matter if I left/right-click or try to change anything at all, the DLL crashes.
Please help, I am at my wits’ end.