FIX: Windows Live Mail Error 0x8007007A When Sending Emails
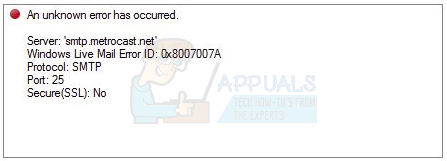
The error code 8007007a with Windows Live Mail or the Windows 10 Mail app indicates that the app is having trouble sending an email. This issue usually arises when an email is being sent containing an image or image album from OneDrive (previously known as SkyDrive). While SkyDrive permitted the sending of albums and images/videos via email, OneDrive does not, leading to this problem.
Even if the e-mail you’re trying to send doesn’t contain an image or image album, this is still the problem. You have most likely attempted to send such an e-mail previously, and it is now stuck in your Outbox folder. You won’t be able to send it due to OneDrive’s new policy regarding sending albums and images/videos via e-mail, and it will stay there, stuck, preventing any other e-mail messages from being sent. You will, however, be able to receive mail just fine.
Even though a number of users were baffled at this sudden change by Microsoft, there are a few things that you can do to go around it. Some of them are solutions to the issue, some mere workarounds, but you will be able to send your e-mails this way.

Method 1: Delete the message causing the issue
If a message is stuck in your Outbox folder and preventing other messages from being sent, the simplest way to solve it is to delete the message causing the problem.
- Open either Windows Live Mail or the Windows 10 Mail app, depending on which one you’re experiencing issues with. Do this by pressing the Windows key on your keyboard, typing the appropriate name, and then opening the resulting program.
- Below the account folders, on the left side of the navigation pane, click on the ‘Outbox‘. You should see the message in the center of your screen.
- Select the unsent message(s) and delete them, or it if there is only one.
- To test if this solved the problem, you can send a simple message to your own account – and see if you’re able to do so.
Method 2: Remove, and reconfigure your Windows Live Mail account (WLM only)
A misconfigured or corrupted Windows Live Mail account can be a possible cause. Consider removing it and re-adding your account to see if this solves the issue. Please note that this action will delete your folders. Your account will then need to be synced from scratch.
- Press the Windows key on your keyboard and type in Windows Live Mail, then open the result.
- From the menu bar, click Tools and choose Accounts
- Select the e-mail address you’re having issues with, click Remove and then OK.
- To re-add the account, click on the Tools menu from the menu bar again and choose Accounts.
- Click Add, and select Email account.
- Click Next.
- Type in your e-mail address, password, and display name, and click Next again.
- Click Finish to complete the wizard.
Method 3: Send the pictures as attached files
When you’re getting stuck while trying to send pictures, you can always try to send them as attached files, instead of sending them from your pictures folder.
- Open Windows Live Mail or the Mail app for Windows 10, and start writing a new e-mail.
- Select Insert, and click the Attach file icon (paper clip).
- Use the window that opens to navigate to your pictures, and select them, then click Open.
- If this opens Photo album tools, this means that you will have issues again. Repeat steps 2 and 3 again, and it will give you jpg images that you can attach as files. If it opens Photo album tools, attach the files one by one. Try sending your e-mail now.
Method 4: Untick “Create photo email from photo attachments”
This method is basically the same as the previous one, with one key difference. When you start writing the new e-mail, after step 1 and before you attach the files, find the Create photo email from photo attachments check box, and uncheck it. Proceed to add the pictures as described in steps 2 and 3, and it will add them as separate attachments instead of creating a photo album.