Fix: Windows Explorer High Power Usage Error on Windows 11/10
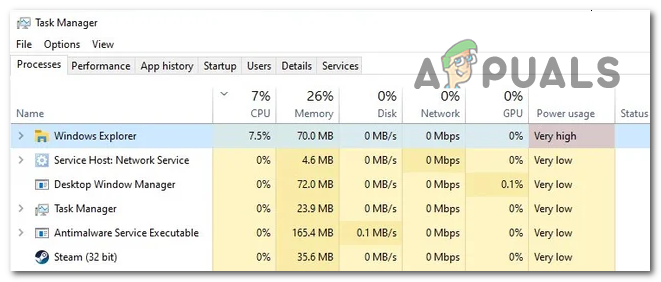
A lot of people have reported that while they were looking inside the Task Manager at the processes that are running on their Windows computer, they discovered that the Windows File Explorer is causing high or very high CPU power usage. This is causing their PC to run slower, especially when doing gaming or video editing that requires a higher CPU usage.
Even in situations where the Windows Explorer app is closed, the processes running in the background still consume a lot of CPU usage, lowering the performance of the PC. This error has been typically encountered on Windows 10, as well as Windows 11.
After many people have complained about this error and how it affects their computers, we have decided to take a deeper look into this problem to see what causes it. Here is a shortlist that contains all the possible reasons that could cause this Windows error:
- Shortcuts without icons – One of the most common causes that were found by the players is that they had some shortcuts and files that do not have an icon. Even if this seems like the most common reason, it was actually very efficient for many players that have tried it. All you have to do to fix this is to move or delete from your desktop every shortcut or file that does not have an icon.
- Quick access consumes a lot of system resources – If the first scenario was not applicable, the second thing you should do is check to see if the quick access feature is not actually hogging up your RAM and CPU memory. You can test out this theory by temporarily disabling the quick access feature.
- Outdated Windows build – Another cause for this issue could be the Windows which is missing an update. This is another common cause that could happen to everyone, and the reason could be that you have missed a Windows update and didn’t install it. The updates could be pending, waiting for your confirmation to install, or you might be able to find updates if you use the WU component. If there are updates, make sure to install them and reboot your PC at the end.
- Corrupted files – This issue might be also caused by some corrupted files that are present inside your PC, affecting it in different ways including this error. These files became corrupted without a known cause, but fortunately, you can clean them from your computer. All you have to do is to use the Command Prompt to deploy DISM and SFC scans in quick succession.
- The paging file is not enabled – As it turns out, another reason why you might expect to deal with this issue is a scenario in which the Windows Paging file is disabled and your Windows computer is not automatically permitted to manage the file size. To resolve this issue, you’ll need to enable the paging file from the Virtual Memory tab and restart the File Explorer service.
- 3rd party apps – The Windows File Explorer high CPU power usage error could be caused by some 3rd party apps that are causing the File Explorer to act this way. There are a lot of apps that might be the cause for it, so to find out which are the apps responsible for it, perform a clean boot to find out.
Now that you are aware of all the possible causes for your Windows File Explorer high CPU power usage error, here is a list of all the possible methods that users have used in order to fix this issue:
1. Look on the desktop for shortcuts without icons
The first thing people are recommending you to do is to look on your desktop for files or shortcuts that don’t have an icon. Even if this looks like a common and ordinary method, it has turned out to be helpful for many users that were going through this issue.
While they were looking for a method that can fix this issue, they discovered that on their desktop there are one or more shortcuts that do not have an icon. After moving them out of the desktop, they were happy to see that the results were good and the Windows File Explorer high power usage error issue was fixed.
So to do this method, all you have to do is to go to your desktop and look for shortcuts or files that do not have an icon. After you have located every one of them, select them and in case you still need those files, move them somewhere else. In case you don’t need them anymore, select the files and right-click on the screen, then click on Delete.
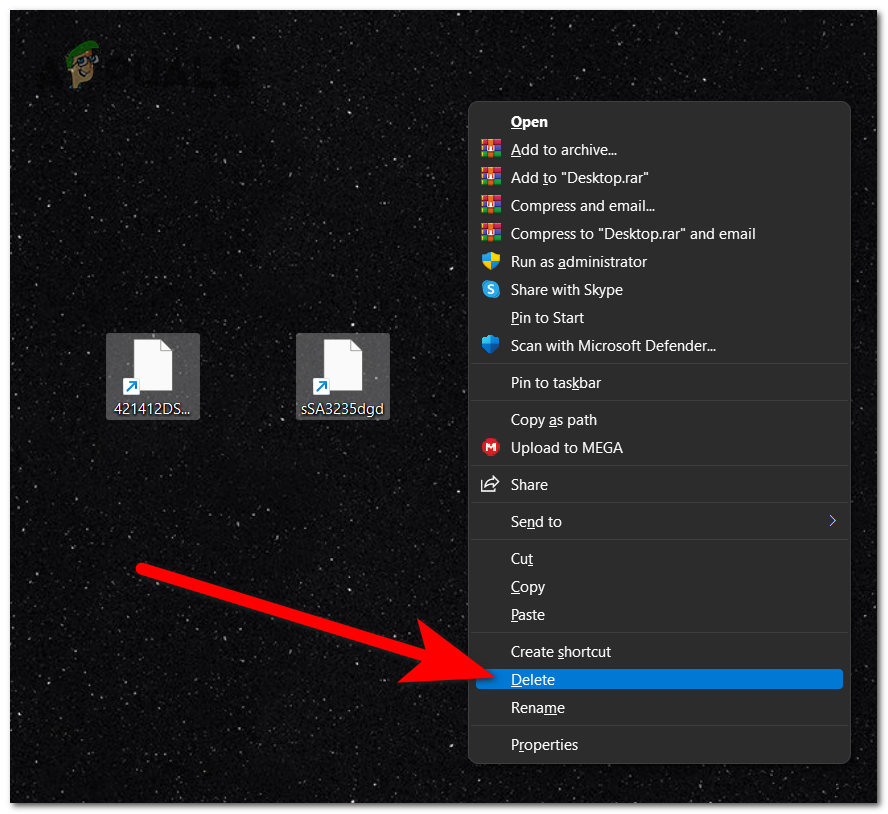
Note: You need to make sure that you get rid of every file that looks like the ones in the picture.
After you are certain you don’t have any shortcuts without icons on your screen, you should open the Task Manager to verify if the problem was fixed.
If the Windows File Explorer high CPU power usage error is still occurring, go to the second method below.
2. Disable the Quick Access feature
The second thing that people suggest you do is to disable the Quick Access feature from the Windows File Explorer. This is another method that was confirmed by a lot to be helpful in fixing this error, and also it is very easy to do it.
All you have to do is to go to the Windows Settings and disable the Quick Access feature. You can do this from the Personalization section by turning off the toggle associated with this option.
In case you don’t know how to do this, here are the steps you need to follow:
- The first thing you need to do is to open the Windows Settings. There are many ways to do this, one of them is to open a Run dialog box by pressing the Windows key + R and typing inside the search box ‘ms-settings:‘. After that, press Enter.

Using a Run dialog box to open the Windows Settings - Now that the Windows Settings appear on your screen, you have to select the Personalization section, then click on Start to go to the section that contains the feature toggle.

Inside Personalization accessing the Start section - Once you are inside the Start section, look for the Show recently opened items in Start, Jump Lists, and File Explorer option. When you find it, click on the toggle next to it and make sure that the feature is disabled (the button will turn grey after you disable it).

Disabling the Quick Access feature from the Windows Settings - Now that you are sure that the feature is disabled, you can close the Windows Settings.
- Open the Task Manager and look at the power usage that the Windows File Explorer is using now.
In case you have tried this and the Windows File Explorer high CPU power usage issue is still present, go to the next method below.
3. Check for Windows Updates
Another thing that is worth trying is to check if there are pending Windows Updates that are waiting to be installed, or if the scan detects newer updates available. In case you are missing some updates, your PC could be affected in different ways, including this error.
All you need to do is access Windows Update, check to see if any updates are available, then install them if they are. The Windows Update is located in your computer’s settings.
Here’s a guide that will show you what you have to do:
- You must first access Windows Settings. To do this, hit Windows key + R to open the Run dialog box, then type “ms-settings” into the search field, and then press Enter.

Opening the Windows Settings using a Run dialog box - When you are in the Windows Settings, use the menu on the left to scroll down until you see Windows Update. Click on it when you locate it.

Inside Windows Settings accessing the Windows Update section - Once inside Windows Update, select the Check for updates button on the right side to see if any updates are available. Click the Install button if there are.

Checking for available updates for your Windows - Restarting your computer after the update has been fully installed will ensure that the update is properly applied.
- Once your computer boots back completely, open the Task Manager to see if the Windows File Explorer high CPU power usage error still appears.
In case the usage of the CPU power is still high, go to the next possible method below.
4. Clear corrupted files using Command Prompt
It turns out that a system file corruption may also be the cause of this specific issue. Many different Windows customers have regularly reported this, indicating that the corrupted files on your machine may be to blame for the excessive GPU power utilization problem.
If this situation applies, you should be able to resolve the issue by executing a few built-in utilities made to handle situations where system file corruption results in the breakdown of critical components. Deployment Image Servicing and Management (DISM) as well as SFC (System File Checker).
While DISM is stronger at correcting dependencies that could harm backup and updating operations, SFC is better at fixing logical flaws. So that you can increase your chances of fixing the Windows File Explorer high CPU power usage error, we advise you to run both utilities.
Here is a simple tutorial on how to launch the SFC and DISM scans from an elevated Command Prompt:
- To bring up the Run dialogue box, press Windows key + R. Next, type “cmd” in the text box of the newly created Run dialog box, and click CTRL + Shift + Enter to launch a Command Prompt with administrator privileges. If the UAC (User Account Control) prompts you, select Yes to give admin access.

Using a Run dialog box to open the Command Prompt - Once you have gained access to the elevated CMD prompt, enter the following command to begin an SFC scan:
sfc /scannow
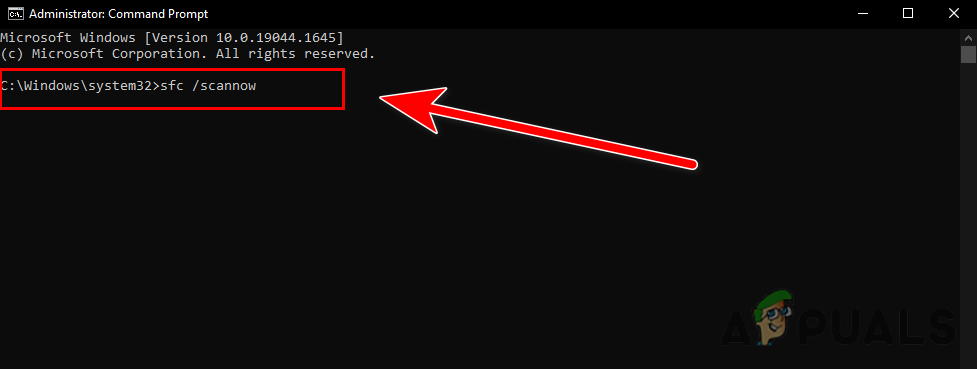
Running the sfc scannow command Note: To replace corrupted instances with healthy ones, this SFC scan employs a locally cached copy. It’s crucial that you finish this scan as soon as you begin it because if you close the window before it’s finished, you run the danger of adding further logical flaws.
- Restart your computer after the procedure is finished, then wait for the subsequent startup sequence to finish. Once the starting process is finished, repeat step 1 to open a new Command Prompt with admin privileges.
- Once you are able to access another elevated Command Prompt, enter the following command to begin a DISM scan and press Enter:
DISM /Online /Cleanup-Image /RestoreHealth
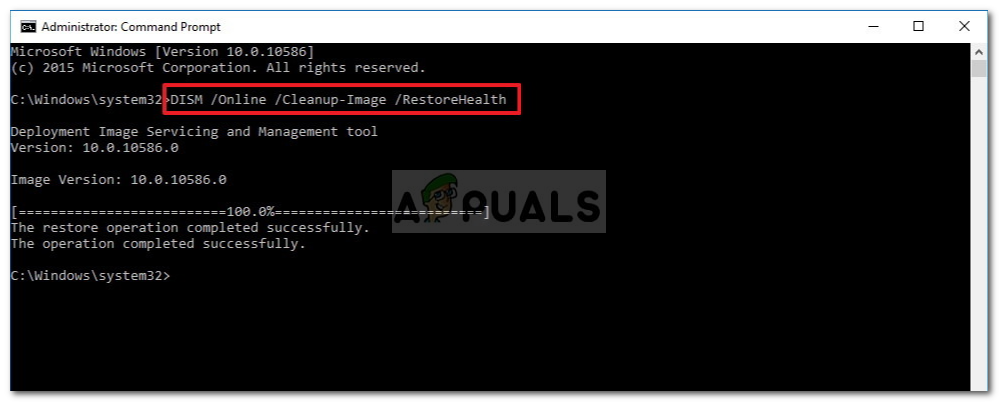
Restoring System Files Note: It’s crucial to remember that DISM needs a constant Internet connection. Since the utilities use the WU (Windows Component) to download healthy copies that will afterward be used to replace corrupted instances, this is critical. You must therefore take care to prevent a break in your network connection when performing this task.
- Restart your computer after the DISM scan is finished to check if the Windows File Explorer high CPU power usage error is fixed when the system starts up again.
In case the error still appears after doing this as well, check the following method.
5. Reset the File Explorer process & enable Paging File
The affected players that have gone through this issue are also suggesting that you should try to restart the Windows File Explorer process and make sure that the paging file is enabled. This process is very easy to follow and you might not have to do anything because the settings might be ok, but it is worth checking in case the options are different.
All you have to do is to go to the System Properties and check if some options are activated and set how they should be. If not, make sure to change them as you will see in the guide.
Here’s the guide that you need in order to see how to do this:
- The first thing you need to do is to open the System Properties. To do this, you have to open a Run dialog box by pressing the Windows key + R and typing ‘sysdm.cpl‘ inside the search bar, then press Enter.

Using a Run dialog box to open the System Properties - Once the System Properties appear on your screen, select the Advanced section and then click on the Settings button right under Performance.
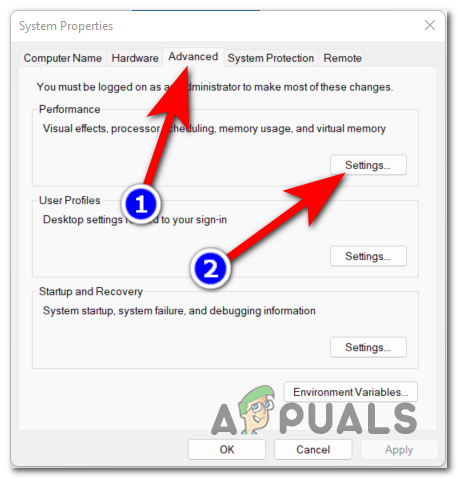
Opening the settings of the Performance section - Now that you are inside the Performance Options, go to the Advanced tab. Then right under Processor scheduling, you need to make sure that after Adjust for best performance of is selected Programs, and not Background services.
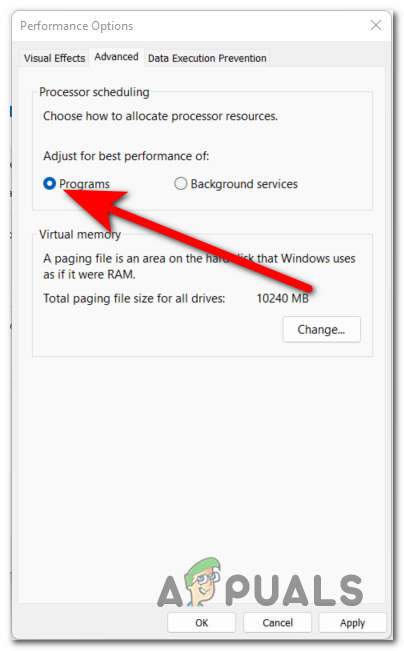
Making sure that the Programs option is selected - After that, right after Virtual memory, you have to click on the Change button. Now make sure that the Automatically manage paging file size for all drivers option is activated, meaning that the box next to it is checked.
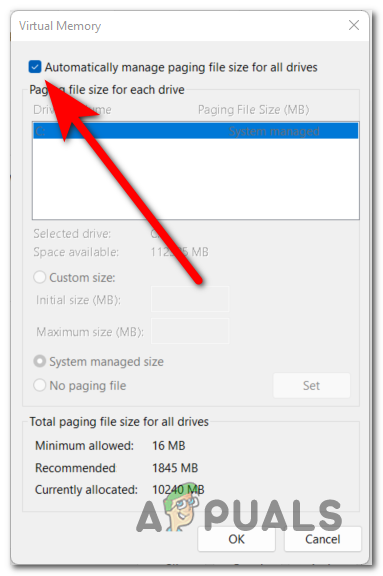
Checking if the option is activated - After that, click on OK, then click on Apply to save the changes in case you’ve made any.
- Try rebooting the computer to see if the problem has been fixed.
In case you’ve tried every method and none of them fixed your Windows File Explorer high CPU power usage error, go below to the last method available.
6. Perform a clean boot
The last thing you can do is to perform a clean boot. Keep in might that the Windows File Explorer high CPU power usage error might be also occurring because of some 3rd party program that is responsible for it.
As people report, they have found a lot of potential apps that might be the culprit for this issue.
To force Windows to boot up without any intervention from third parties, however, a clean boot procedure would be the best course of action given the number of potential offenders that could be to blame for this issue (only required startup services and processes will be permitted to run).
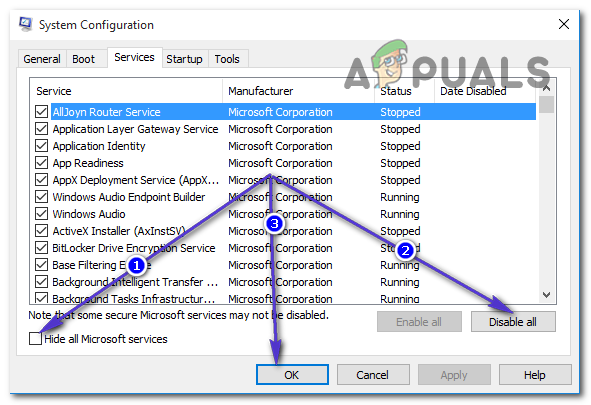
If you run your computer in a clean boot state and the issue disappears, it is evident that a third-party application is to blame for the Windows File Explorer high CPU power usage error.
In case you don’t know how to do this, here is how to start your Windows computer in a clean boot state and identify the root cause of the problem.


I can’t believe that MS still hasn’t fixed that shortcuts without icons issue.
It really was the issue on my machine.