Fix: Windows Taskbar Icons Missing
The start menu is everything in Windows 10. It can be quite a problem for the users if it stops working all of a sudden. It becomes almost impossible to do anything on your PC and may cause a lot of delays in your work.
The essential task bar made a welcome back in Windows 10 but, it wasn’t what some of the users were expecting. Many people reported that their task bar froze or didn’t display any icons. We ran some diagnostic tests and came up with a list of possible solutions. Work your way down starting from the top and hopefully, your issue will be resolved in no time.
Solution 1: Running System File Checker
System File Checker (SFC) is a utility present in Microsoft Windows which allows the users to scan their computers for corrupt files in their operating system. This tool has been there in Microsoft Windows since windows 98. It is a very useful tool for diagnosing the problem and checking if any problem is due to corrupt files in windows.
We can try running SFC and see if our problem gets solved. You will get one of the three responses when running SFC.
- Windows didn’t find any integrity violations
- Windows Resource Protection found corrupt files and repaired them
- Windows Resource Protection found corrupt files but was unable to fix some (or all) of them
- Press Windows + R to launch the Run application. Type “taskmgr” in the dialogue box and hit Enter to launch your computer’s task manager.
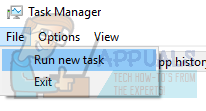
- Now click on File option present at the top left side of the window and select “Run new task” from the list of options available.
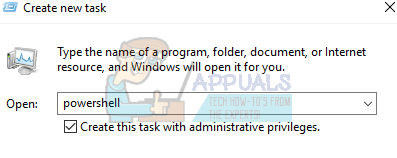
- Now type “powershell” in the dialogue box and check the option underneath which states “Create this task with administrative privileges”.
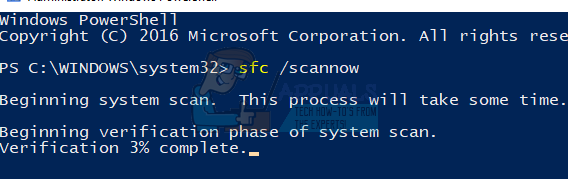
- Once in the Windows Powershell, type “sfc /scannow” and hit Enter. This process may take some time as your entire Windows files are being scanned by the computer and being checked for corrupt phases.
- If you encounter an error where Windows states that it found some error but was unable to fix them, you should type “DISM /Online /Cleanup-Image /RestoreHealth” in the PowerShell. This will download the corrupt files from the Windows update servers and replace the corrupt ones. Do note that this process can also consume some time according to your internet connection. Don’t cancel at any stage and let it run.
If an error was detected and was fixed using the above methods, restart your computer and check if the taskbar started working normally.
Solution 2: Reinstalling Windows Applications.
Most of the Windows inbuilt applications allow uninstalling option directly from their properties. However, utilities like taskbar don’t have such an option. We can uninstall such applications with a PowerShell cmdlet. This trick is also limited and won’t allow you to uninstall other important applications like Microsoft Edge or Cortana.
- Type PowerShell in the dialogue box of your start menu. Right click on the first result and select “Run as administrator”.
- Now we will enter a command which will re-install all the default Windows applications. If they some are already installed, it will skip them and move on to the next. Copy and paste the next line in your Windows PowerShell and hit enter.
Get-AppxPackage -AllUsers| Foreach {Add-AppxPackage -DisableDevelopmentMode -Register “$($_.InstallLocation)\AppXManifest.xml”}

A restart might be necessary to implement the changes necessary. Restart your computer and check if this fixed the problem for you.
Solution 3: Install the latest Windows updates
Windows roll out important updates targeting the bug fixes in the operating system. One of the bugs is our case; the problem with the task manager. If you are holding back and not installing the Windows update, we strongly recommend that you do. Windows 10 is the latest Windows operating system and new operating systems take a lot of time to get perfect in every regard.
There are a lot of issues still pending with the OS and Microsoft rolls out frequent updates to target these issues.
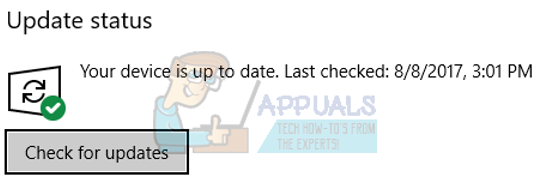
- Press Windows + S button to launch your start menu’s search bar. In the dialogue box type “Windows update”. Click the first search result which comes forward.

- Once in the update settings, click on the button which says “Check for updates”. Now Windows will automatically check for updates available and install them. It may even prompt you for a restart.
- After updating, restart your computer and check if your issue got fixed.
Solution 4: Restarting Windows Explorer
This is a simple fix which worked for a lot of people. If the problem with the taskbar isn’t as critical, this method should fix it instantly. We won’t need to meddle with other system settings and just restart the windows explorer.
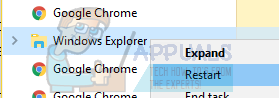
- Press Windows + R for the Run application to launch. Type “taskmgr” in the dialogue box to launch the task manager.
- Navigate to the Processes tab and search for the process of “Windows Explorer”.
- Right click on the process and select Restart. This will restart your windows explorer and launch all the opened files/folders after refreshing. You should save your work in case the explorer crashes upon restart.
Solution 5: Re-registering the Taskbar
We can try re-registering the taskbar in your operating system using the Windows PowerShell. This command is very system dependent and can cause a problem in your operating system if it isn’t installed properly. Create a restore point of your Windows just in case things go bad.
- Press Windows + R to launch the Run application. Type “taskmgr” in the dialogue box and hit Enter to launch your computer’s task manager.
- Now click on File option present at the top left side of the window and select “Run new task” from the list of options available.
- Now type “powershell” in the dialogue box and check the option underneath which states “Create this task with administrative privileges”.
- Once in the PowerShell, type
Get-AppXPackage -AllUsers | Foreach {Add-AppxPackage -DisableDevelopmentMode -Register “$($_.InstallLocation)\AppXManifest.xml”}
- After executing the command, navigate to your file explorer and open your local disk C. Navigate to the following address
C:/Users/name/AppData/Local/
Here name is your account’s username.
- Locate the folder named as “TileDataLayer”. Delete the folder. If you are unable to delete and Windows prompts that it is already in use, press Windows + R and type “services.msc”. Locate the service named as “Tile Data model server” and stop it. Now navigate back to the address mentioned and try deleting it again.

- Check if your taskbar started working as expected. You might require a restart in order for the changes to take effect.
Solution 6: Making new user account
It is possible that your account doesn’t meet the requirements as set by the UAC to access the taskbar correctly. UAC is also known as User Access Control. It is an infrastructure developed by Microsoft. It ensures that only users trusted with using applications can access them. Only certain users can get administrative privileges to keep malware off the system. If you have a limited account on a computer and also can’t access the calculator, it means there is a conflict with UAC.
You can ask the administrator to make you a new account or if you access to the administrative account, you make a new one yourself. We can guide you on how to make a new account so all the account settings in the new will be the same as your current account. This way you won’t feel any difference and also get to run the calculator perfectly.
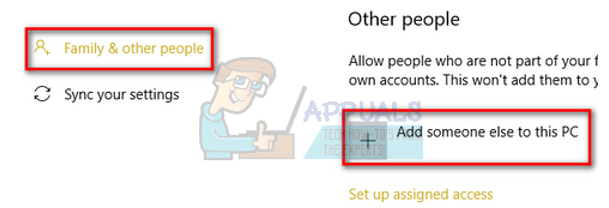
- Open an administrator account. Type Settings in the start menu dialogue box and click on Accounts.
- Now click “Family and other users” options present at the left side of the window.
- Once inside select the menu, select “Add someone else to this PC”.
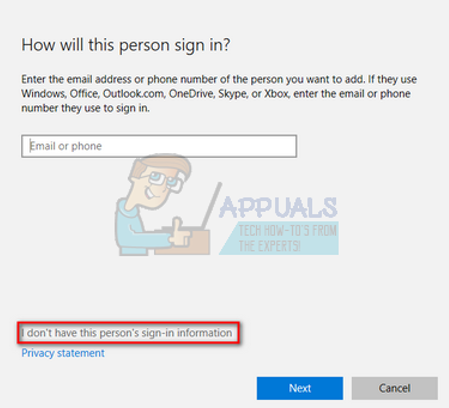
- Now Windows will guide you through its wizard on how to create a new account. When the new window comes forth, click “I don’t have this person’s sign-in information”.
- Now select the option “Add a user without Microsoft”. Windows will now prompt you to make a new Microsoft account and display a window like this.
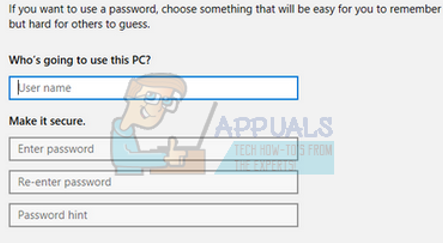
- Enter all the details and chose an easy password which you can remember.
- Now navigate to Settings > Accounts > Your Account.
- At the space beneath your account picture, you will see an option which says “Sign in with local account instead”.
- Enter your current password when the prompt comes and click Next.
- Now enter username and password for your local account and click on “Sign out and finish”.
- Now you can easily switch to a new local account, and move all your personal files to it without any barriers.
- Now navigate to Settings > Accounts > Your Account and select the option “Sign in with a Microsoft Account instead”.
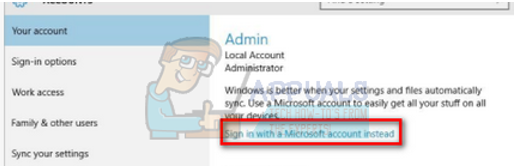
- Enter your username and password and click Sign in.

- Now you can safely delete your old account and continue using this one. Check if your taskbar got any better.
Solution 7: Repairing your Windows
As a last resort, we can try repairing your Windows. It is advised that you backup your data and save all your work before continuing with this process. This process can also consume some time so it is advised that you start it when you are absolutely sure there will be no interruptions. Follow our instruction in our article which explains how to repair your Windows 10.