What is System Reserved Partition and is it Safe to Delete it?
Several users are wondering what the System Reserved Partition is in their file explorer. This is because users don’t remember creating any System Reserved Partition during Windows setup. Some users are also curious if it is safe to delete or not. It is important to learn about this partition before taking any action against it. In this article, we will discuss the System reserved partition and all the possibilities regarding the user’s questions.
What is the System Reserved Partition?
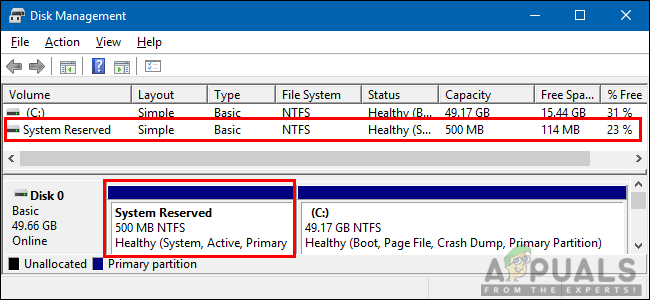
System Reserved Partition is created when you select unallocated space to install a clean new Windows operating system or Windows Server. This Partition contains the Boot Manager Code, Boot Configuration Database and the startup files used/required for BitLocker Drive Encryption.
When the computer starts, the Windows Boot Manager reads the boot data from the Boot Configuration Data Store. Your system starts the boot loader from the System Reserved partition, which then starts Windows Operating System from our system drive. If you ever decide to encrypt your hard drive with BitLocker drive encryption, then System Reserved partition contains all the necessary files for starting your computer without any issues. Your system boots the unencrypted System Reserved Partition and then decrypts the main encrypted drive and starts the encrypted Windows system.
The partition size varies on different Operating Systems. Windows 7 will have 100MB, Windows 8/8.1 will have 350MB, and Windows 10 will have a 500MB System Reserved Partition.
How to view the Contents of System Reserved Partition?
If you want to view the files/content of this particular partition in your system, then you need to give this partition a volume letter by using different methods. By giving the volume letter, it will unhide the System Reserved Partition and show it in your file explorer just like other volumes. You can unhide the System Reserved Partition through Diskpart by following the below steps:
Note: This method is applied in the available system utility. You can also try using some third-party software to change the partition options.
- Hold Windows key and press S to open search function, type cmd and press CTRL+Shift+Enter altogether to open a command prompt as an administrator.
- Type “diskpart” and press Enter, then type “list disk” to find your main disk number.
- After that type “select disk 0” and press Enter This will select your main hard drive where all volumes are located.

Selecting the system reserved disk in diskpart - Now type “list volume” and press Enter. This will list all the volumes (also system reserved) for you. Choose the system reserved volume by typing “select Volume 4” and press Enter.
Note: 4 is the number for the specific system, your volume number can be different. So check your system reserved volume number then type that when selecting. - Finally, type “assign letter K” and press Enter. This will assign the letter K (it can be anything else that is not taken) to the system reserved partition and the partition will unhide.
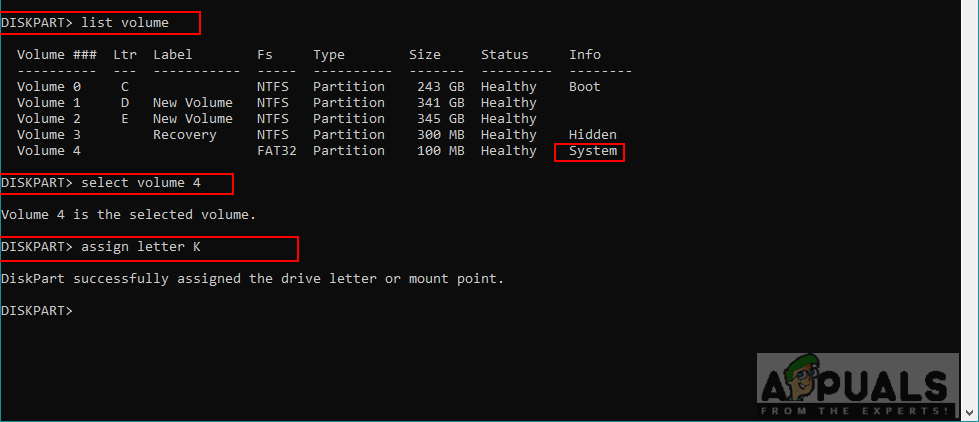
Assigning a letter to system reserved partition
Is it Safe to Delete System Reserved Partition?
It is unlikely to notice the System Reserved Partition on your system until you open Disk Management. Most users who notice this partition will wonder whether it is safe to delete it or not. If this partition is already created then your system will need it. This partition contains boot files necessary to load Windows. There are few complicated methods where you can delete this partition but it may cause the issue for Windows boot.
Therefore, if we want a definitive conclusion about the safety, then No, it is not 100% safe to delete the System Reserved Partition from your system. Since it takes a small amount of space, it is recommended to leave it as it is. If you are not comfortable with having multiple volumes for system files, then the appropriate way to get rid of this partition is to stop it from being generated.
How to Prevent System Reserved Partition from Generating?
You can prevent the generating of this partition during Windows setup. You can have all system files in a single System drive, which is by default known as C drive. Check the below methods to know about avoiding this partition from creating:
Method 1: Using Command Prompt during Windows Installation
In this method, we will be using the Diskpart utility through command prompt during the Windows setup. You can use this utility for creating the primary partition without making any System Reserved Partition by following the below steps:
- Boot into Windows setup and press Shift+F10 to open a command prompt window.
- Type “Diskpart” and press Enter. Then type “list disk” and find your main hard drive number.
- Now type “select disk 0” and press Enter. This will select the main hard drive that you want to select.
- After that, you need to create this a primary partition by typing “create primary partition” and pressing Enter.
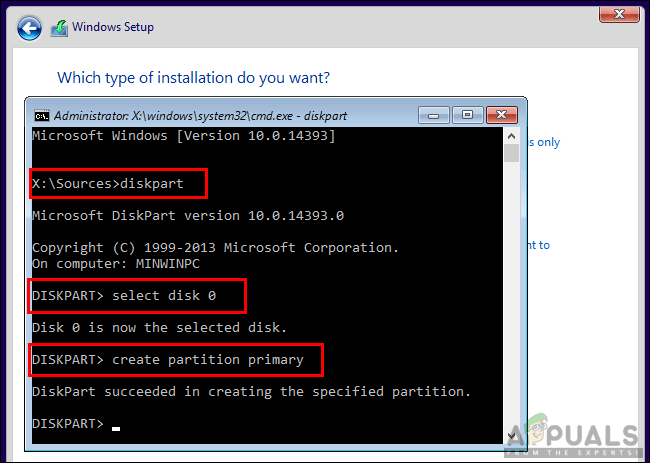
Creating primary partition without system reserved partition - You are done creating a primary partition, type “exit” and press Enter to exit the command prompt Windows and continue with the Windows setup.
Method 2: Using Windows Setup Partition Trick
Whenever you create a new partition during Windows setup, the System Reserved Partition will be automatically generated. However, we will be using a simple trick to install Windows in a single drive volume rather than having System Reserved Partition volume separate.
- When you boot into Windows setup, you’ll be prompted to create a primary partition for System files.
- Once you create a new partition for your Windows installation, it will automatically create System Reserved Partition as shown below:
- Select the Primary partition, click Delete and confirm the pop-up window by clicking OK.
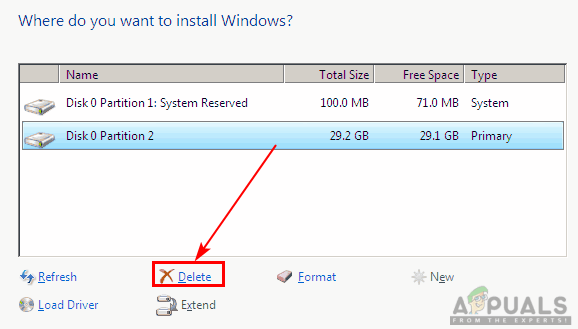
Deleting primary partition - Now select the System Reserved Partition and click on the Extend button. Now you can extend this partition by giving it all the unallocated space to it.
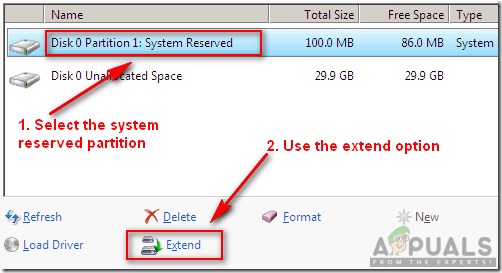
extending system reserved partition - Click format in last and then select this partition to install Windows on it.


