How to Fix Webcam Error Code 0xA00F4289
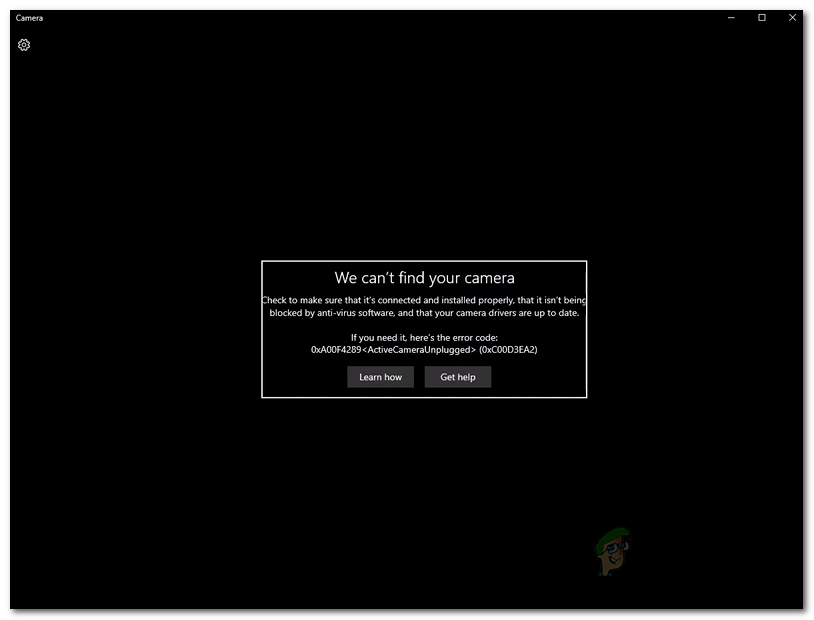
The error code 0xA00F4289 appears when users try to access their laptop’s webcam through the built-in Camera app in Windows 10. The camera app displays the “We can’t find your camera” error message along with some troubleshooting steps that are accompanied with the said error code. As it turns out, in some cases the camera might flicker on the app followed by the error message. The webcam shows some display for a second or so in some scenarios and then goes black which could indicate a disconnection of the built-in webcam.
This prevents the users from using their camera on applications such as Microsoft Teams or even Zoom. Therefore, in this article, we will be taking you through this issue by providing the possible causes of the issue so that you can develop an understanding of the issue. After that, we’ll get into the different methods that you can use to resolve the issue. So, with that said, let us get started.
- The camera is loose — One of the main reasons why this error code may occur is when the built-in webcam is loose and thus the system is not able to read it properly. Because of this, it displays the active camera unplugged message. This can be easily resolved by gently applying pressure around the camera. Doing so will get rid of the error message.
- Camera Server service is disabled — Another reason the error message may appear is when the Camera Frame Server service is disabled in the background. The service is required for your camera to work properly, thus, if you the service is not running, you won’t be able to use the camera properly and eventually stumble on an error message as such.
- Microsoft Skype interaction — As it turns out, in some scenarios, the issue can occur due to the interaction of the Skype application on your system with the camera. In such a case, the camera may not work as intended and thus you will be shown an error message. To circumvent this, you will either have to uninstall or exit Skype.
- Camera is deactivated — Finally, the issue may sometimes arise because the camera on your system is simply deactivated. When this happens, your computer won’t be able to access the camera and thus you will be shown an error message on the Camera app. To get around this, you will simply have to activate the camera by pressing the respective keys on your keyboard.
Now that we have gone through the possible causes of the issue, let us go through the different solutions that you can implement to get rid of the error code and be able to use the camera successfully. Before we begin, the first thing that you should do is make sure that your camera is not deactivated. As mentioned earlier, in some cases the issue can arise just because the camera is deactivated. Therefore, press the respective keys on your keyboard to activate the camera. Once you have done that, you can try checking if the issue is still there. In case it persists, you can follow the methods given down below.
Method 1: Apply Pressure Near the Camera
If you read the message carefully and as we have mentioned, it suggests that the computer isn’t able to access the camera because it has been unplugged. This may sound weird if you are not using an external camera but rather the built-in camera itself. However, this is still a possibility and can happen often. What basically happens is that the camera is either dislodged or it becomes loose due to which it is not being detected by the computer.
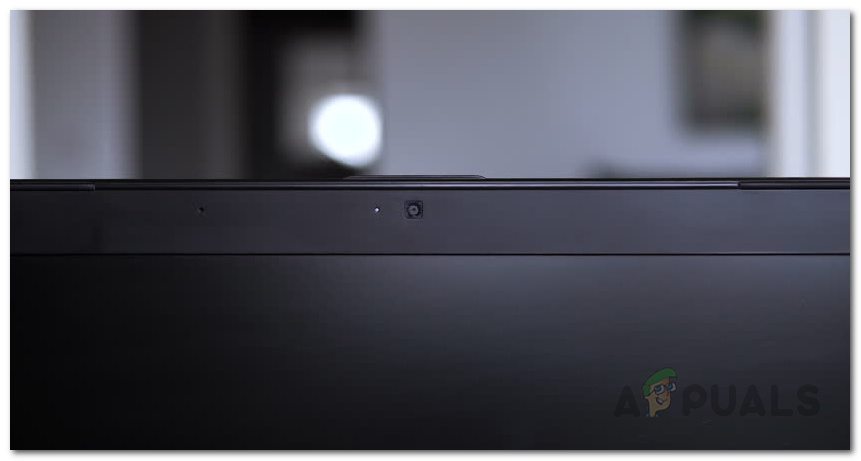
As it turns out, this can be easily resolved, however, it does require some carefulness. What you essentially have to do is apply pressure around the area of the webcam from both the back and front until its camera LED powers on. Make sure that you do not apply excessive force as it may cause permanent damage. You have to simply apply pressure gently and it should do the trick. This has been reported as working by more than half of the users who were facing this issue so it should most likely workout for you as well.
Method 2: Start Windows Camera Frame Server Service
As it turns out, like almost everything on your system, the camera also relies on certain services to function properly. The service happens to be the Windows Camera Frame Server service. In some cases, if the service is not running and is actually stopped, the camera might not be able to work properly. Therefore, in such a scenario, what you will have to do is turn on the service and then try using the camera. To do this, follow the instructions down below:
- First of all, open up the Run dialog box by pressing the Windows key + R shortcut for it.
- Then, in the Run dialog box, type in services.msc and press the Enter key. This will bring up the Services window.
- On the Services window, you will be able to see all of the available services. Locate the Windows Camera Frame Server service and then double-click on it to open up the Properties window.
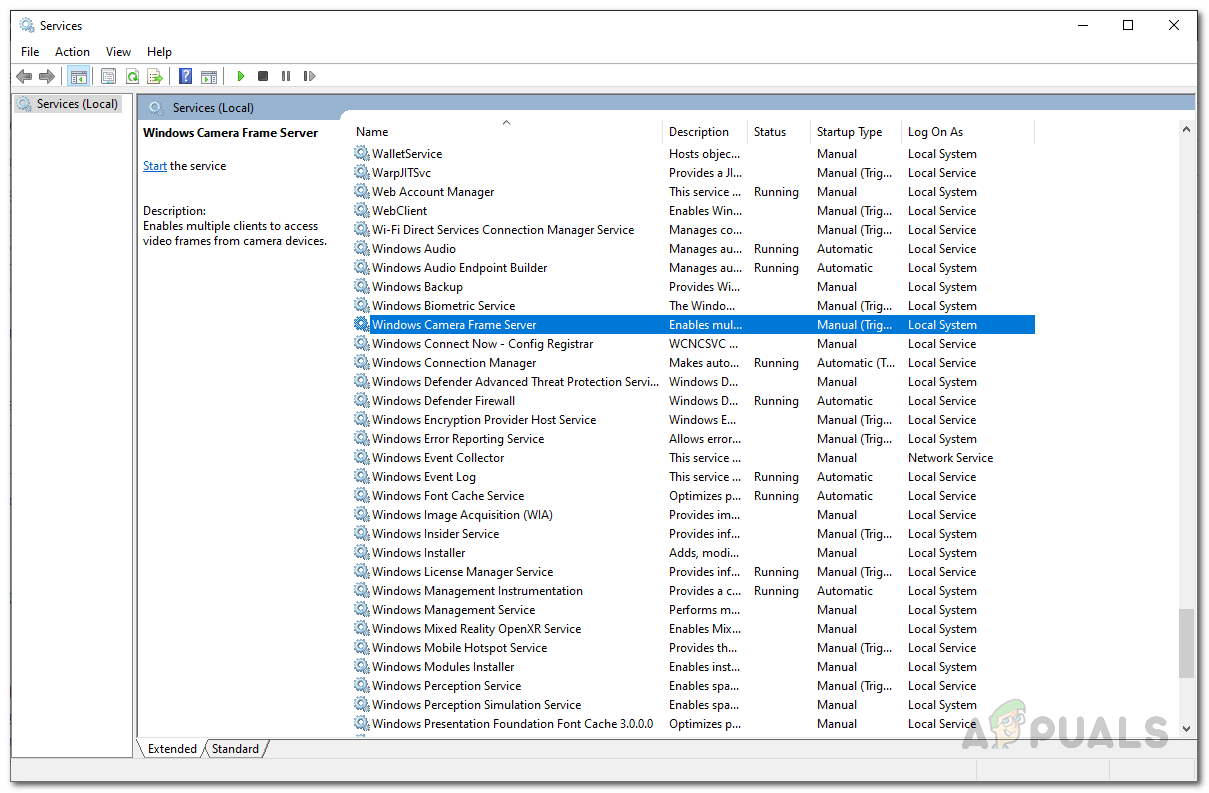
Windows Services - Click on the Start button to start the service and make sure that the Startup type is set to Automatic.
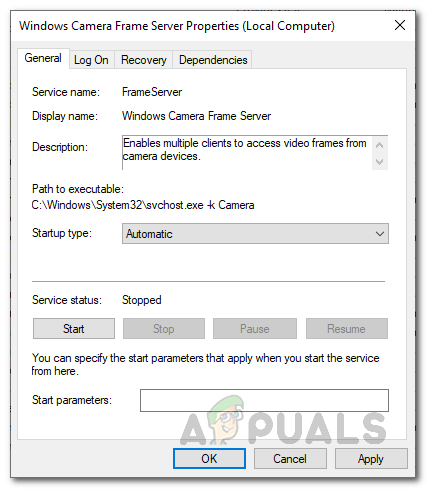
Windows Camera Frame Server Service Properties - After that, click on the Apply button and hit OK.
- See if that resolves the issue.
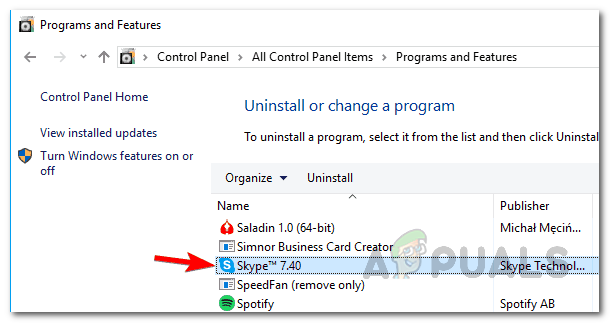
Method 3: Exit or Uninstall Skype
In some scenarios, the error message can also be caused due to the interference of the Skype application running in the background. This has been reported by other users who were facing a similar issue. If you have Skype installed on your system, then this scenario is applicable to you. In such a case, what you can do is simply exit the Skype app from the taskbar so as to stop it from interfering with the camera. After that, try using the camera. Make sure that you completely close the application and not just minimize it. You can also choose to uninstall the application from the Control Panel if you do not use it. If you uninstall Skype, you might have to restart your PC and then try accessing the camera to see if the issue has been resolved.