Fix: Virus Automatic Sample Submission Turns Off After Each Startup on Windows 11
The Insider Preview version of Windows 11 is currently plagued by a weird issue where the Automatic Sample Submission component of Windows Security automatically turns off after every startup. Unless you remember to automatically re-enable the setting after every boot, you will be exposed to a major security risk.
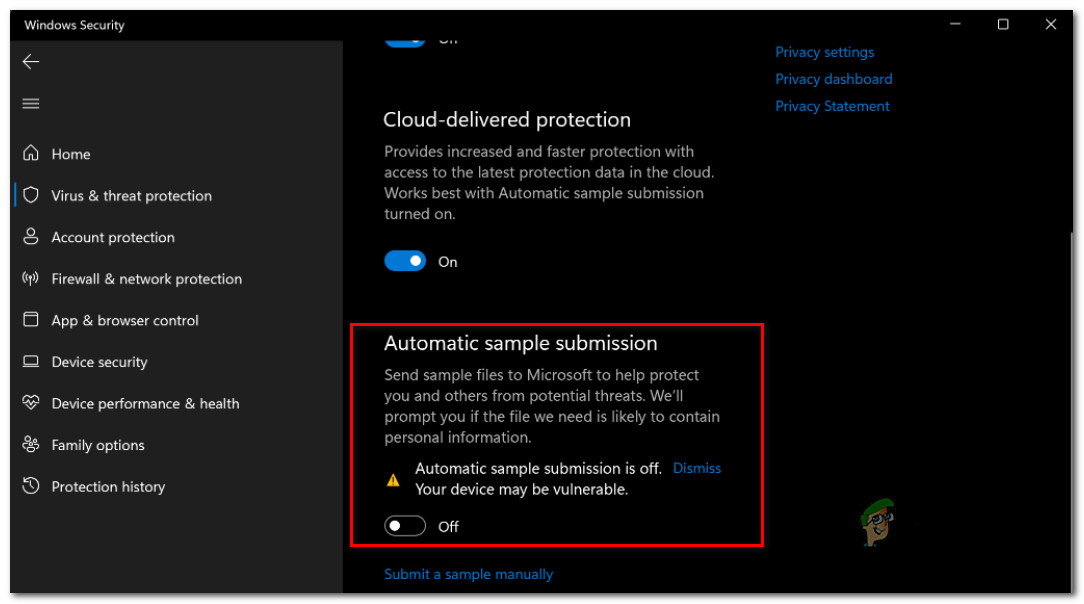
Fortunately, there are ways to resolve this issue permanently, so you won’t need to set up a permanent reminder.
Update: Microsoft finally addressed this issue via a hotfix released at the beginning of August 2021. To fix this issue automatically, install the Cumulative Update KB5004300 for Windows 11 (10.0.22000.100) via Windows Update.
As of now, there are two different methods that will ensure that the Automatic sample submission feature stays enabled:
- Create a Spynet Registry key via Registry Editor
- Install the official Hotfix via Windows Updates (KB5004300)
- Enable the Send file samples when further analysis is required policy to Enabled via Gpedit (only works on Windows 11 PRO, Windows 11 Enterprise, and Windows 11 Education)
Note: If you have no issues updating your system to the latest build, our advice is to go for the official fix released by Microsoft.
1. Install the KB5004300 Cumulative Windows 11 Update
After more than 3 months of this issue running rampant, Microsoft finally addressed this issue that finally puts a stop to the annoying bug that would automatically disable the automatic sample submission feature after every system boot.
The issue should be automatically resolved after you install the Cumulative Update for Windows 11 (10.0.22000.100) (KB5004300).
If you’re looking for specific instructions on installing this particular cumulative Windows 11 Update on your PC, follow the instructions below:
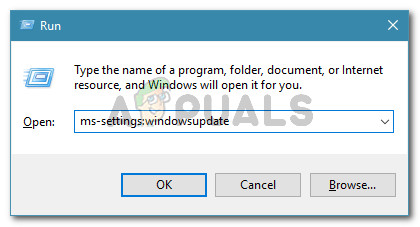
- Press Windows key + R to open up a Run dialog box. Next, type ‘ms-settings:windowsupdate’ inside the text box and press Enter to open up the Windows Update tab of the Settings app.
Open the Windows Update screen - Once you’re inside the Windows Update screen, move over to the right-hand section and click on Check for Updates to see if the Cumulative Update that fixes this issue is still not installed.
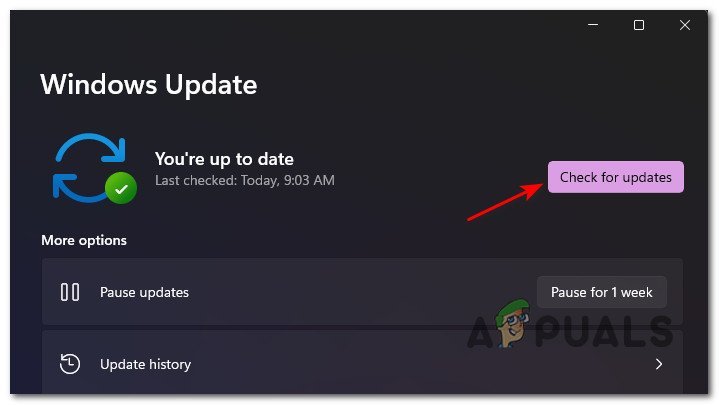
Check for Windows Updates - If the KB5004300 pending cumulative update is found, click on the Install Now button, then wait until the update is downloaded and installed on your PC.
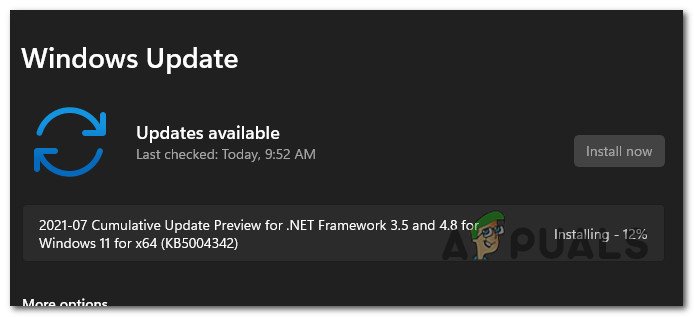
Install Windows Updates automatically - At the end of this process, you will be asked to restart your PC.
Note: If you have a lot of pending updates, the WU component will install them in the order of their release, so ensure that you install everything else to bring your build to the latest.
If you want to address the issue without updating your Windows 11 build, move down to the next potential fix below.
2. Create the Spynet Registry key
If you have your reasons for not wanting to update to the latest Windows 11 preview build available, you should also be able to fix this problem by creating a Spynet registry cluster which is the sole purpose of keeping this Windows Security functionality enabled in between restarts.
Note: This fix was only confirmed to occur on Windows 11 build older than 10.0.22000.10.
If you’re comfortable using Registry Editor, follow the instructions below to create the Spynet Registry cluster and ensure that the Automatic Sample Submission feature remains enabled during the booting sequence:
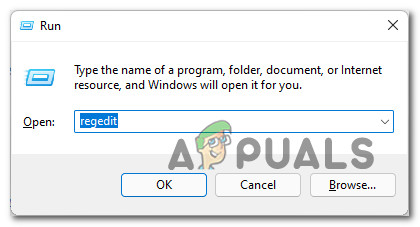
- Press Windows key +R key to open up the Run dialog box. Next, type ‘regedit’ inside the text box and press Ctrl + Shift + Enter to open up the Registry Editor with admin access.
Open the Registry Editor - When you’re prompted by the User Account Control, click Yes to grant admin access.
- Once you’re inside the Registry Editor, navigate to the following location:
Computer\HKEY_LOCAL_MACHINE\SOFTWARE\Policies\Microsoft\Windows Defender
- Next, right-click on the Windows Defender key and choose New > Key from the context menu that just appeared.
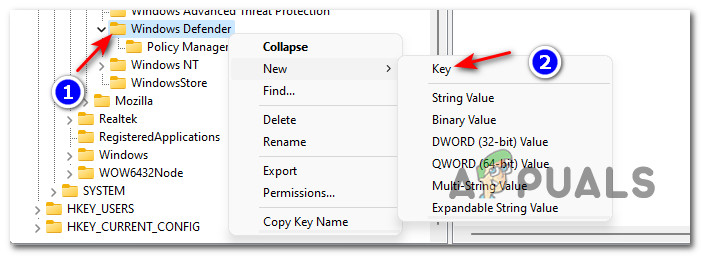
Creating a New Registry Key - Next, rename the newly created key to SpyNet by right-clicking on it and choosing Rename.
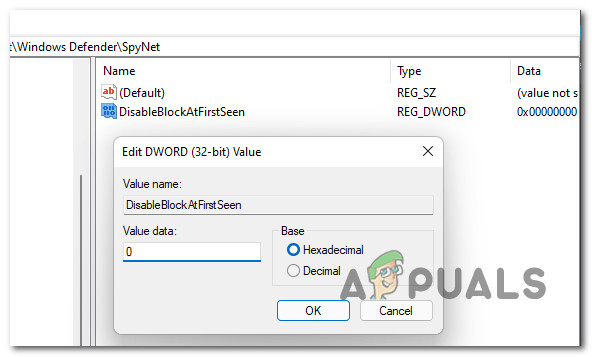
- Next, move over to the right-hand section of the screen, right-click on an empty space and choose New > Dword (32-bit) Value from the context menu.

Dword Value - Next, name the newly created Dword to DisableBlockAtFirstSeen, then double-click on it and set the Base to Hexadecimal and the value to 0.
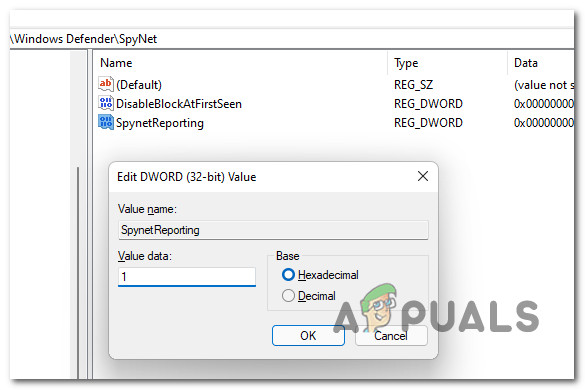
Creating the DisableBlockAtFirstSeen value - Next, right-click on an empty space inside the Spynet key and choose New > Dword (32-bit) Value from the context menu.
- Name the newly created Dword to SpynetReporting, then double-click on it and set the Base to Hexadecimal and the Value Data to 1.
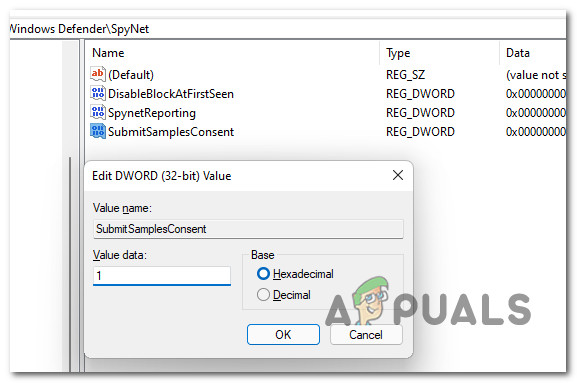
Modifying the SpynetReporting key - Finally, right-click on an empty space inside the Spynet key and choose New > Dword (32-bit) Value from the context menu.
- Name this last key SubmitSamplesConsent, then double-click on it and set the Base to Hexadecimal and the Value data to 1 before clicking Ok to save the changes.
Creating the required SpyNet keys - Once every required key is created, reboot your computer and see if the problem is fixed starting with the next startup.
If the problem is still not fixed, move down to the final potential fix below.
3. Modifying the Send file Samples policy via Gpedit
If you have a Windows 11 version that comes preinstalled with the Local Group Policy Editor, you should also be able to fix the problem by enabling the Set Send file samples when further analysis policy.
Important: Keep in mind that the Local Group Policy Editor tool won’t be available on Windows 11 Home. Only follow the instructions below for Windows 11 PRO, Windows 11 Enterprise, and Windows 11 Education.
As some affected users have confirmed, the Automatic Sample Submission function of Windows Defender will be forced to remain enabled if you explicitly enable a policy for it.
Follow the instructions below to enable the Send file Samples policy via Local Group Policy Editor:
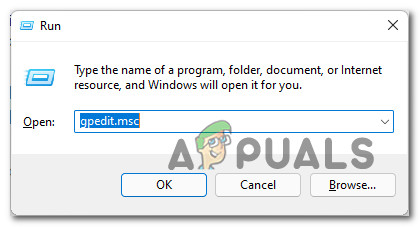
- Press Windows key + R to open up a Run dialog box. Next, type ‘gpedit.msc’ inside the text box and press Enter to open up the Local Group Policy Editor in Windows 11.
Open up the Local Group Policy Editor - When you’re prompted by the User Account Control, click Yes to grant admin access.
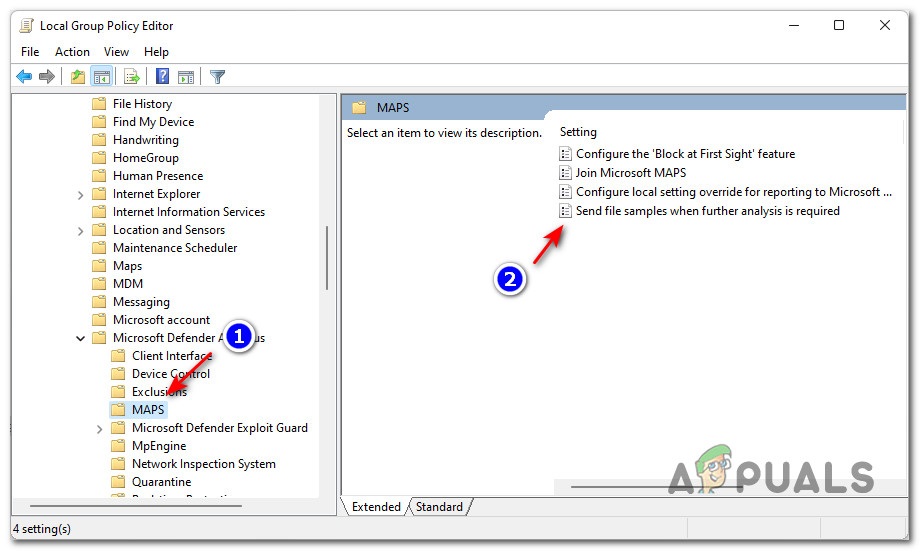
- Once you’re inside the Local Group Policy Editor, use the menu on the left to navigate to the following location:
Computer Configuration->Administrative Templates->Windows Components-> Microsoft Defender Antivirus->MAPS
- After you arrive in the correct location, move over to the right-hand section and double-click on the Send file samples when further analysis is required.
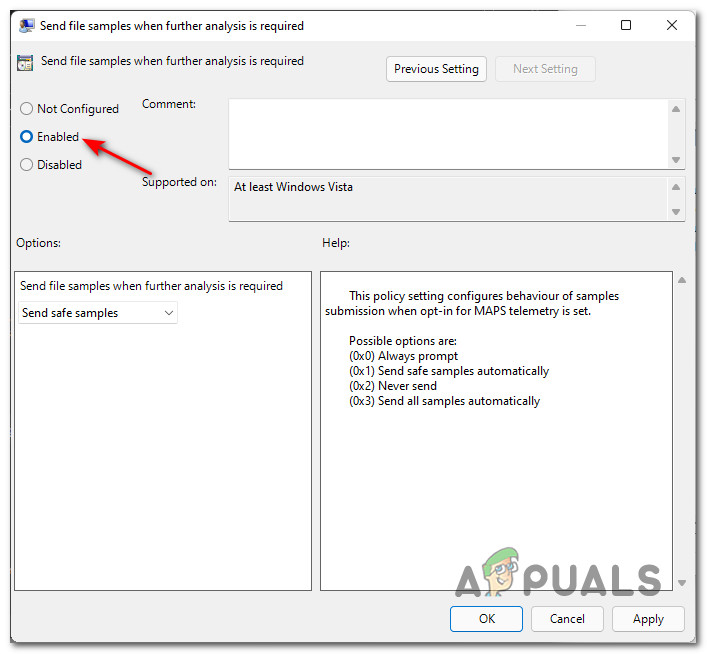
Open the File Sample Policy on Windows 11 - Next, from the Send file samples when further analysis is required policy, set the status of the policy to Enabled and click Apply to save the changes.
Enable the Sample submission policy - Once the change has been made, reboot your PC and wait for the change to be enforced at the next system startup.
- Monitor the situation and see if the automatic sample submission functionality stays enabled after you deployed this modification.


