Setup Steam Link to Set up In home Steam Streaming
Steps to setup Steam Home Streaming
Steam has a feature called In-Home Streaming. It allows you to play a game on one computer while the actual process is happening somewhere else (some other computer in your home). Through Steam, the game audio and video are captured on your remote computer and transferred to the computer where you want to play it. The game input (mouse, keyboard, and controller) information is sent from your computer to the remote computer.
This feature has gained a lot of popularity as you can basically run the Steam from any of your remote computers which has very high specifications while you can play on a more comfortable one present in your bedroom. This feature promises ease of access and accessibility at its best; something that other gaming clients have failed to provide.
Any two computers in a home can be used to stream a gameplay session. This feature can enable playing games on systems that would not traditionally be able to run those games. For example, a Windows game that can only be played in a Windows OS can be streamed from a Windows PC to a machine running Steam OS in your living room. A graphically intensive game can be streamed from a beefy computer at your office to your low-powered laptop in your bedroom.

1. What do I need for In-Home Steam Streaming?
While Streaming, you will run a game on your PC like you normally do. It will display on your monitor and can be easily controlled through a keyboard and mouse. Now Steam will capture the audio and video and beam it to another PC. Using In-Home Streaming, you can run Windows games on Mac or Linux, run demanding games on an older laptop, or simply beam the data to that LCD in your living room.
The basic entities you will need:
- A host PC running Steam (on Windows OS only).
- A network that can provide connectivity.
- A Steam Link or client PC running on any OS (Windows, OS X, Linux).
Now let’s indulge in the details. What are the basic hardware and software requirements?
1.1 The Host PC
The host PC should be powerful enough to run a game while simultaneously encode the video signals and pass it on. Some of the optimum requirements would be:
- A quad-core CPU (preferably an i5 or i7 with a model newer than 2011).
- An NVIDIA 600 series graphical processing unit, or an AMD 7000 series GPU.
Why do we need these cards? Because the In-Home Streaming now supports hardware encoding on both the GPUs. NVIDIA GTX 650 supports hardware encoding quite brilliantly while AMD also follows. You can also check out our picks for the best capture cards for streaming.
Of course, you can also use In-Home Streaming using the built-in GPU like the Intel-HD Graphics. I am using the streaming without any crashes or delays using an i5 2500k CPU. I had to overclock the processor a bit but the experience turned out just fine. Do note if you are using Intel-HD Graphics, you need to enable quick sync to avoid any crashes or lags along the way.
1.2 The Client PC or Steam Link
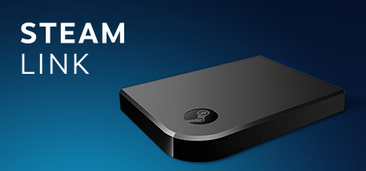
Valve’s Steam Link is an easy choice if you want to stream on your LED or LCD TV. It’s affordable ($50), it’s accessible and it’s small. It can also connect multiple Steam controllers wirelessly at an instant. Although we do recommend that you always connect them using wires to avoid packet losses or crashes.
The main idea behind Steam In-Home Streaming is that your host PC is doing all the muscle work. Ideally, we can easily stream to any old laptop or device without compromising on the quality of the game. But, the machine still needs to be beefy enough to handle all the decoding that is going quickly so there are no delays.
Valve ideally recommends a client with a GPU that can decode an H.264 video. Again, you can make use of Intel HD Graphics after enabling quick sync. You might not even need a dedicated GPU such as AMD or NVIDIA.
1.3 The Network
It is preferred that you get a stable router that doesn’t crash all the time. It is suggested that it has Gigabyte ports (not 100MB). Although the Steam Link has 100 MB ports, it is recommended that you use Gigabyte ones. This is to ensure that you have minimum packet losses and almost zero delays while playing the game
2. How to Enable In-Home Streaming
Now let’s get to the real part. How to enable your In-Home Streaming. The process doesn’t take long, all you have to do is follow the steps carefully.
- Open your Steam client and navigate to its Settings (click on Steam on the top left side of the screen and click on Settings).
- Click on the In-Home Streaming tab present at the left side of the screen. Check the box which says “Enable Streaming”.

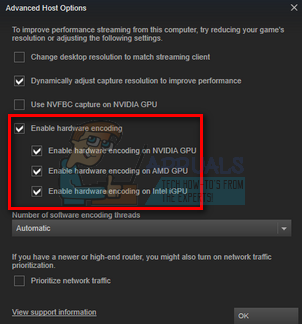
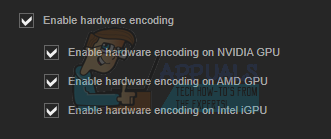
- Now click on the option which says “Advanced Host Options”. After the new menu appears, check all the boxes which enable Hardware Encoding.
- Now you should also connect your receiver computer on the same network and log in using the same account (the same account as in the same Steam account which is used in the host PC).
- Navigate to the In-Home Streaming tab located in Settings. If your host PC is ready and configured properly, its name should appear in the list of available devices. If your Streaming is enabled, it should display a status of Online. Select it and automatically, your Stream client will enter the Big Picture mode.
You are ready to stream.
3. How do I control my client’s PC?
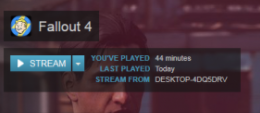
In-Home Streaming is developed to run in the Big Picture mode and there are many ways to control it. But it is not necessary to use the Big Picture at all. For example, you are streaming to a laptop, you should only select the game from your Steam library. If it is not installed locally, it will display “Steam” instead of the standard Play. You can also use the drop-down present beside it to install a game on your host pc.
On the Steam link, you can plug in the Xbox/Steam controllers, attach a keyboard and a mouse wirelessly, via Bluetooth or through USB ports. We advise that you always use USB connection while streaming to minimize all the inconveniences.
Your In-Home Streaming client can automatically detect any XInput device plugged into it. An Xbox 360 controller or the Steam controller is the easiest to configure.
On your PC, you can also attach the DualShock controllers if you have proper drivers installed for them. On your laptop, you may attach a keyboard and a mouse but on the Big Picture, you should probably stick to the controllers as is it optimized for it.
4. How do I connect a Steam Controller?
If you are using the Steam Link device, turn it on. Now on your controller, press the “X” button and then the Steam button to turn it on. This will make the controller go into pairing mode. It isn’t necessary to use a dongle to enter the pairing mode, although you can if the wireless method is giving you problems.
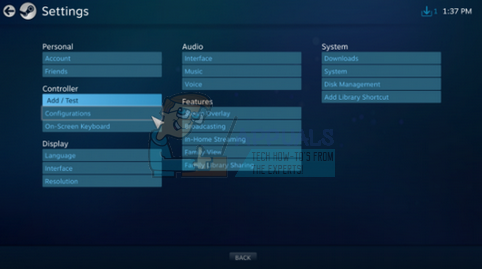
To connect the Steam controller to a PC, plug in the USB dongle. Then turn on your Steam controller by pressing the Steam button present on it. Then follow the instructions which appear on the screen for the pairing process. Do note that you would have to boot into the Steam Big Picture method to configure the Steam controller and use it properly.
5. Tweaking Steam In-Home Streaming Settings
We change your Steam In-Home Settings to ensure that you get the optimum performance on your client and host PCs.
- We should set the client performance as balanced as it balances the gameplay with the visual effects. This is the optimal setting as you don’t get much delay while also not compromising on the detail of the game.

- By enabling the hardware encoding, we make the GPU on your host computer do extra work to render the game you’re streaming.
- By enabling network prioritization, we can improve your bandwidth allocation. This feature will enable you to get much faster speeds and less delay by giving your prioritization than other services such as Netflix.

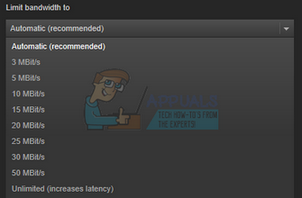
- Setting automatic bandwidth means that Steam determines the bandwidth itself and uses it. It is the recommended setting and this works with most of the games. However, the one with real-time movement and the games which are fast-paced, it will result in some compression artifacts. On the other hand, the unlimited bandwidth can increase your latency according to Steam developers. But you can still give it a try and check if you get satisfied with the image quality.
- You can select the resolution yourself depending on your client’s PC or machine. TVs generally support 1080p so you can switch to that. If you have a high-end monitor which supports 1440p, you can also switch to that to get high-end resolution while streaming.
- By enabling the hardware encoding, the GPU on the client computer will help to quickly decode the H.264 video signal. Otherwise, your CPU has to do all the hard work which can affect the performance. If you are experiencing poor performance issues, you can uncheck this statement and try refreshing your connection.
- If you are experiencing any input lag, you can try switching from the balanced mode to fast. This may reduce the quality of images or the graphics but will drastically reduce your input lag. For most of us, this is a fair trade-off but it depends on your preference.

6. What kind of router and home network do I need for In-Home Streaming?
For optimal performance, you would need a house-wired gigabit Ethernet. Both of the devices should be connected with a wire to the network instead of a wireless connection. This ensures that you don’t experience any packet loss or delays because of any kind of interference.
Troubleshooting: Steam In-Home Streaming Issues
Make sure that both of the computers are connected to the same network. Also, keep in mind that the streaming process requires UDP ports 27031 and 27036 and TCP ports 27036 27037. If you are having a problem with the Windows Firewall blocking access to these ports, you should disable your firewall first. If you have a Mac client, reboot the system if there was a Steam update available. It is also possible that third-party applications and antivirus also block access to these ports. Make sure that there is no interference or conflict.
Make sure that you have updated your GPU drivers. Many updates contain the fixes for these issues and the glitches won’t go away unless you have the latest software and drivers installed in both, the host and client PC.
This can be possible because of incorrect compatibility settings. Close your Steam completely after ending the Steamclientbootstrapper process from the task manager. Now right click your Steam client and select Properties. Browse to the Compatibility tab and uncheck the line which says “Disable display scaling on high DPI settings”. Save changes and restart Steam for the effects to take place..
You should try the following methods. Update the video and graphic drivers on both computers. Specifically on the client computer. Disable the hardware encoding in the host settings. If it still doesn’t work, try disabling the hardware encoding on your client’s computer and check if it brings any change. If you are still experiencing a problem, you should check your network connectivity with further detail.
Note: Although ideally, you can use Steam In-Home Streaming on any computer, it is advised that you fulfill the minimum hardware requirements. Failure to do so may cause problems in the gameplay.


