How to Unlock, Root, and Brick Recover the Huawei Mate 9
This guide will walk you completely though unlocking the bootloader, installing custom recovery, and rooting your Huawei Mate 9. Pay special attention to all the steps, because they may vary depending on your regional firmware. Rooting this beast of a Chinese phone is a far more technically involved process than many other devices, so be sure to read this guide thoroughly
I will also show you how to spoof your regional firmware incase the FRP (Factory Reset Protection) is somehow triggered, or you need to recover from a major disaster such as a bricked device.
Before you begin following this guide, you should have a backup of your ROM and the stock firmware for your device on stand-by.
Download Huawei Mate 9 stock firmware here:
Replace xxxx with your model number in the URL, e.g. find_model=MHA-L29C432
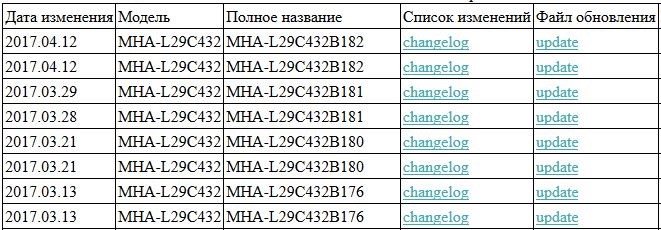
On that website, filter the “Тип” column by Full only. Now make sure that the link offered for your firmware in the “Список изменений” column nearly exactly matches the “Файл обновления” column. The only difference will be that the first column’s link should end in changelog.xml, and the second column’s link should end with update.zip.
Now copy the link from the “Список изменений” column and change the last part of the link to filelist.xml – this will display the XML paths for the files you need.
Example:
<vendorInfo logfile=”changelog.xml” name=”common” package=”update.zip” subpath=””/>
<vendorInfo logfile=”” name=”public” package=”update_data_public.zip” subpath=”public”/>
<vendorInfo logfile=”” name=”hw/eu” package=”update_hw_eu.zip” subpath=”hw/eu”/>
So what you need to do use the subpath to download the 3 zip files (change the $URL to the same URL you changed to filelist.xml)
Example:
https://web.archive.org/web/20181114034856/http://update.hicloud.com:8180/TDS/data/files/p3/s15/G1366/g104/v82379/f1/full/update.zip
Unlocking the Bootloader
Important notes before starting: Huawei devices are bootloader locked to specific regional firmware, and only Stock Recovery can do a proper factory reset. So if your phone becomes bricked after you have unlocked the bootloader, installed custom recovery, and rooted the device, you will need to flash the stock recovery from a regional firmware that allows firmware flashing, then claw your way back to your original regional firmware. The full details are found later in this guide, just be aware of this before you start tinkering with your Huawei Mate 9.
As is the case with a growing number of phone manufacturers, unlocking the bootloader is a bureaucratic process. You will need an unlock code from Huaweii, which will be sent to you via SMS.
- Go here: https://consumer.huawei.com/en/support/ and click on Download, then Unlock Bootloader. Alternatively, go here: https://emui.huawei.com/en/plugin/unlock/detail and fill out the unlock request form.
- Now make sure the USB Debugging and OEM Unlock are both enabled on your phone. OEM Unlock is found in Developer Options, so if you’ve not yet enabled Developer Options, go to Settings > About > tap on System Version repeatedly until Developer Options is enabled.
- Connect your Huawei Mate 9 to your computer and make sure it has accepted the RSA ID and connects in debug mode. Now disconnect the phone from your computer.
- Turn off your phone, and while holding the Volume Down button, re-connect the USB to the computer. This will automatically boot the phone into Download Mode.
- Open an ADB command terminal on your computer. Follow this guide if you have not installed ADB on your computer. In the ADB command terminal, type the following commands:
fastboot oem unlock XXXX
fastboot reboot
Replace the XXXX with the unlock code you received from Huawei!
Installing TWRP Custom Recovery on Huawei Mate 9
Warning: You must use TWRP-3.0.2-2-hi3660 for the Huawei Mate 9! Download here.
Copy the TWRP .img file to your “Minimal ADB and Fastboot” directory. Now put the phone into Download Mode (as explained in the bootloader unlocking steps) and enter the following commands into an ADB terminal:
fastboot flash recovery twrp-3.0.2-2-hi3660.img
fastboot reboot
To boot into TWRP, hold Volume Up + Power when your phone is turned off.
Rooting the Huawei Mate 9
There are two options for rooting this device – SuperUser or SuperRoot. Research them both if you’re unsure which to use, as they both may offer different pros and cons. You will also need Public_data.zip and Full_HW_data.zip, which can be obtained from the Bootloader Unlocking steps earlier in this guide.
SuperRoot Method
- Download superRoot.zip here
- Turn off your Huawei Mate 9 and boot into TWRP (Volume Up + Power)
- Format your Data (and only Data!) in TWRP
- Flash superRoot.zip, then flash Public_data.zip and Full_HW_data.zip
- Reboot your phone, and download PHH superuser from Google Play.
SuperSU Method
Warning: Make sure you do not have security PIN / fingerprint enabled before following these steps.
- Download SuperSU from here, or use Mirror 1 | Mirror 2
- Turn off your phone and boot into TWRP (Volume Up + Power)
- Format your Data in TWRP
- Flash SuperSU, followed by Public_data.zip and Full_HW_data.zip
- Reboot your phone
How to Un-Brick a Factory Reset Protected Huawei Mate 9
This part of the guide requires a bit of background information to fully understand how and why FRP (Factory Reset Protection) engages on Huawei devices. This is basically an “anti-theft” security feature meant to prevent a thief from factory resetting your phone – unfortunately, it basically locks you out of fastboot / bootloader mode.
FRP tends to be activated when you try to “Reset to Default” in the developer options while the bootloader is already unlocked. The “OEM Unlock” setting will become disabled after you unlock the bootloader, and because FRP is engaged, you cannot change it back. You will need to flash the original stock firmware, which will completely reset your Huawei Mate 9 to factory condition.
The problem is that except for two firmware regions (C636 and AL00), Huawei Mate 9 stock firmware cannot be directly flashed. Furthermore, the method for rooting the Huawei Mate 9 involves formatting the Data partition through TWRP custom recovery – unfortunately, much of the Huawei apps are stored on the Data partition (camera, system updates, etc.).
So if your Huawei Mate 9 becomes bricked after unlocking and installing TWRP, you will need to rebrand your device’s OEMINFO to C636, flash the C636 firmware, and use a tool like “Firmware Finder” to flash back to your regional firmware and stock recovery.
Re-Branding Your Huawei Mate 9 to Firmware C636
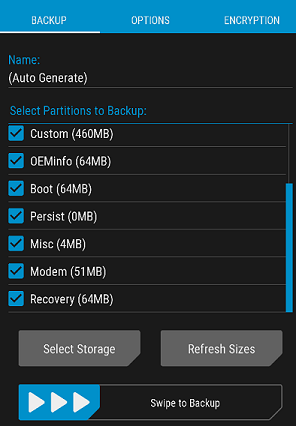
- Boot your phone into TWRP recovery and do a backup of OEMInfo
- Download “l29c636oeminfo.zip” from here and extract the files to your desktop
- Connect your phone to your computer via USB, and navigate to the OEMInfo backup folder
- Replace the files inside the OEMInfo backup with the ones from the .zip you downloaded, and then copy the folder to your external SD card.
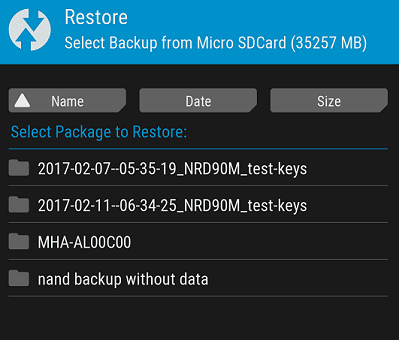
- Boot your phone back into TWRP recovery and Restore the folder you copied to your SD card
- Download the Huawei Mate 9 C636 offline firmware here
- Extract the dload.rar to your desktop and copy the extracted folder to your phone’s SD card.
- Turn off your phone and hold Volume Up + Volume Down + Power until the Updater Mode starts.
- After the installation is finished, you will need to re-unlock your bootloader and install TWRP again.
- Boot into TWRP and flash “update_full_hw_spcseas.zip” downloaded here (don’t worry about the error message it gives after flashing)
- Flash the C636 firmware again (this will re-lock the bootloader and disable the warning messages)
- Boot your phone completely and navigate to Settings > Factory Reset
- Download the latest updates through Settings > System Update
Getting Back to Your Regional Firmware
This is an involved process; please pay attention to the steps!
- Download Firmware Finder from Play Store here
- Download the Firmware Finder proxy tool when prompted after opening the FF app.
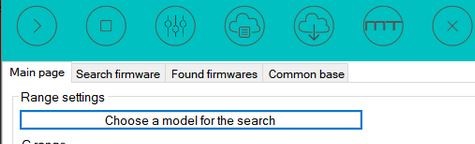
- Go back to the Firmware Finder tool and search for your original regional firmware using “Choose a model for the search”
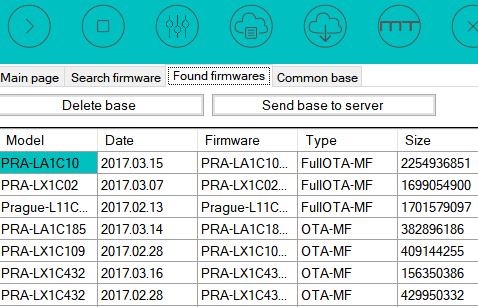
- Press the “Send Firmware to Update” button.
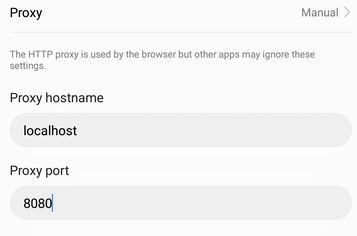
- The Firmware Finder proxy tool will open. Go to your phone’s Settings> Wi-Fi > Advanced > Add Manual Proxy as Local Host on port 8080.
- Go to your phone’s Settings > Update > press the three dots and choose “Download Full Package”.
- The download will start, then possibly fail – in this case, go back to Wi-Fi > Advanced and disable the proxy, then resume the firmware update.
The link for “Huawei Mate 9 C636 offline firmware” needed to factory reset the mobile phone is broken/unavailable. I’m assuming we could use the **** site to search for the C636 firmware and use it, will it work? And if yes, is there a specific version of the firmware that should work with the cooked OEM info included?