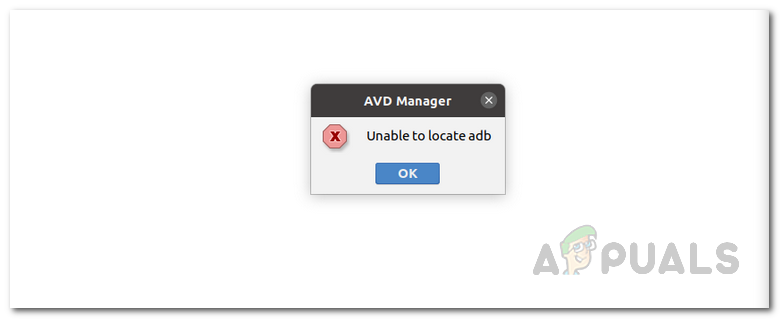
How to Fix Error “Unable to Locate ADB” on Android Studio?
Android Debug Bridge or ADB allows you to communicate with your devices via a command-line interface. It can be used for various purposes as it facilitates a bunch of actions including installing and debugging apps on your device. While trying to run your app via the Android Studio, you might face the “Unable to Locate ADB” error message that stops the simulation. As it turns out, the error message appears when Android Studio is not able to locate the ADB.exe file that is located in the platform-tools folder.
This can happen due to several reasons including when your antivirus software removes the adb.exe file due to a false alarm. Issues like these are pretty common with antivirus software and thus, while using one, you need to make sure that it isn’t triggering a false positive on the files that you are working with. In addition to that, your project settings can also cause this error message to pop up. To understand and establish a better understanding of the error message in question, let us discuss the different reasons the issue may arise in more detail. However, do remember that the causes include but are not limited to the ones mentioned down below.
- Third-Party Antivirus — Antivirus softwares are known to cause several issues where they remove a file from your system due to a false positive. Avast antivirus has been known to cause this a lot with ADB where it locks the file in the virus chest. If this is applicable, you will have to restore the file from there and everything should be good. However, keep in mind that it may not only be limited to Avast if you are using a different third-party antivirus, but it could also likely be causing the issue and thus you should look at the files that have been quarantined by the application.
- Project Settings — As it turns out, in some cases, the error message may arise due to your project settings. The Android SDK by default does not give projects a default SDK. In such a scenario, you will have to go to the project settings and give the project an SDK which by default is set to No SDK.
- Corrupted Platform Tools — In addition to the aforementioned reasons, if your platform tools are damaged or corrupted, that might result in the error message as well. If this scenario is applicable, Windows Defender or any third-party software likely quarantines it, and as a result, you no longer have the adb.exe file in the platform-tools folder. In such a case, you will simply have to reinstall platform tools to resolve the issue.
Now that we have gone through the possible causes of the issue, let us get started by mentioning down the different workarounds that are available to you to get the issue sorted. So, without further ado, let us dive right into it.
Restore ADB From Third-Party Antivirus
As it turns out, the first thing that you should do when you face the error message in question is to check the third-party antivirus software that is installed on your system. More often than not, antivirus software can trigger false-positive and quarantine files that are not dangerous at all. In this case, the adb.exe would be the targeted file that is regarded as a dangerous or potential threat by the antivirus software and as a result removed from your system.
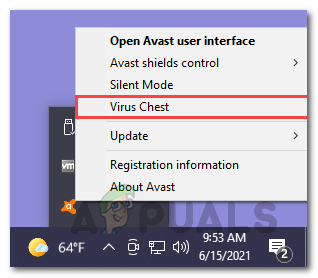
If this case applies to you, especially if you are using the Avast antivirus, you should check the virus chest of your antivirus software to see if the file has been quarantined by it. In case it is, simply restore the file and then try running the application. To do this, follow the instructions given down below:
- First of all, right-click your antivirus icon on the taskbar, and then from the menu that appears, choose Virus Chest.
Opening Virus Chest - Here, check if the ABD.exe file is present. In case it is, go ahead and click the three horizontal dots in front of the file.
- From the drop-down menu that appears, choose the Restore option. This will remove the file from Virus Chest and you will be able to use it.
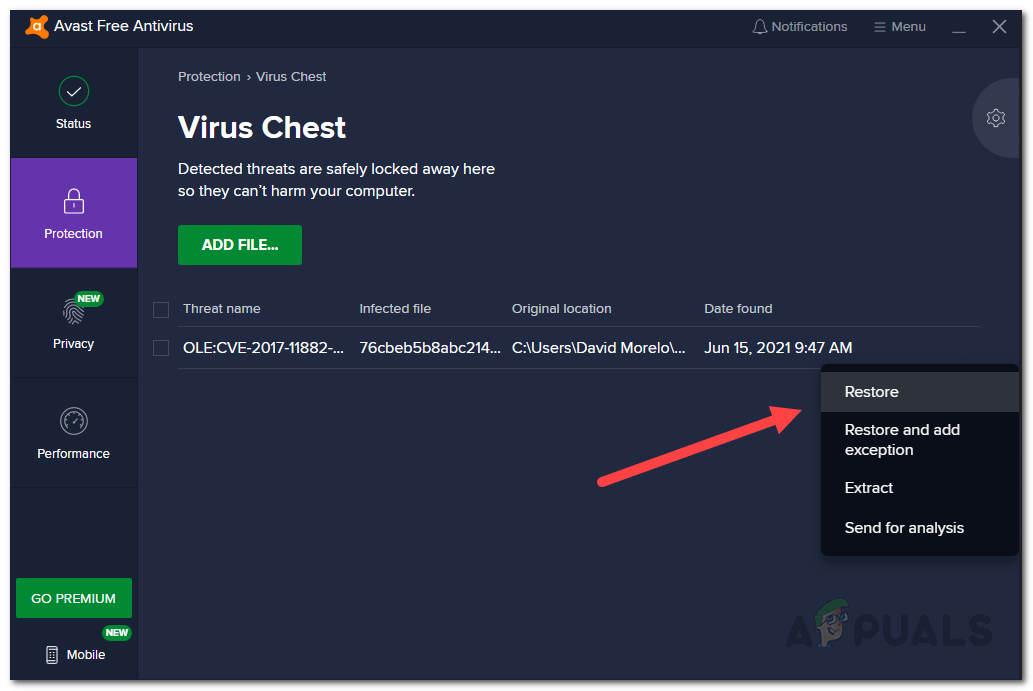
Restoring File from Virus Chest - Alternatively, you can also choose the Restore and add exception option to make sure that it isn’t put away in the Virus Chest again.
Change Project Settings
If your antivirus software is not the culprit or if it doesn’t apply to you, the error message is likely being triggered due to your project settings. This happens when your project has no SDK assigned to it and as a result, it does not have access to ADB which is why you face the error message in question. To resolve this, you will have to change the default project settings which are set to No SDK by default. These settings can be found under Project Structure. To do this, follow the instructions given down below:
- First of all, make sure Android Studio is open.
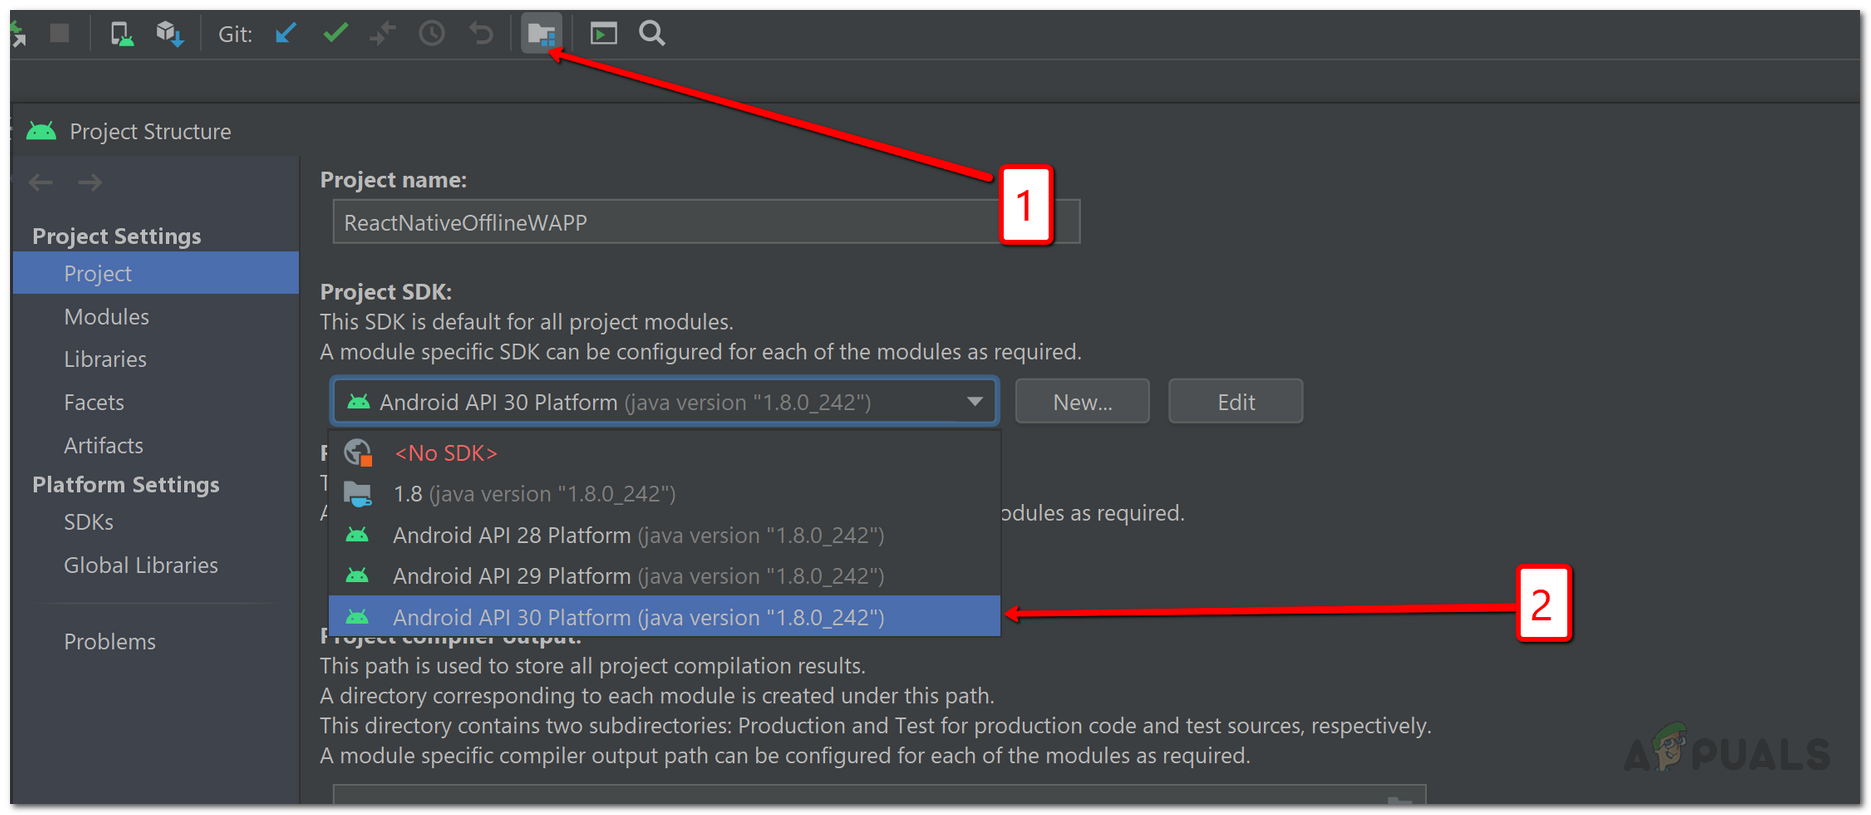
- Then, make your way to File > Project Structure. Alternatively, you can click the Project Structure icon as shown in the picture down below.
- Once the Project Structure window is open, click on Project under Project Settings.
- Then, go ahead with what Project SDK is set to. If it is set to No SDK, go ahead and change it to Android API XX Platform from the drop-down menu.
Changing Default Project SDK - In case there are no options in the drop-down menu, you can click the New button, choose Android SDK and then choose the directory where Android SDK is present.
- Once you have done that, you will be able to select Android API XX Platform from the drop-down menu.
- After you have done that, click the OK button and try running your application to see if the issue persists.
Install Android SDK from SDK Manager
As it turns out, if you are missing the relevant Android version SDK on your system, that will also cause the error message to arise. If this case is applicable, you can easily resolve the error message by installing the respective Android SDK from the SDK Manager found in the Android Studio. To do this, follow the instructions given down below:
- In the Android Studio window, open up the Preferences window by going to File > Settings.
- Then, on the left-hand side, make your way to Appearance & Behavior > System Settings > Android SDK.
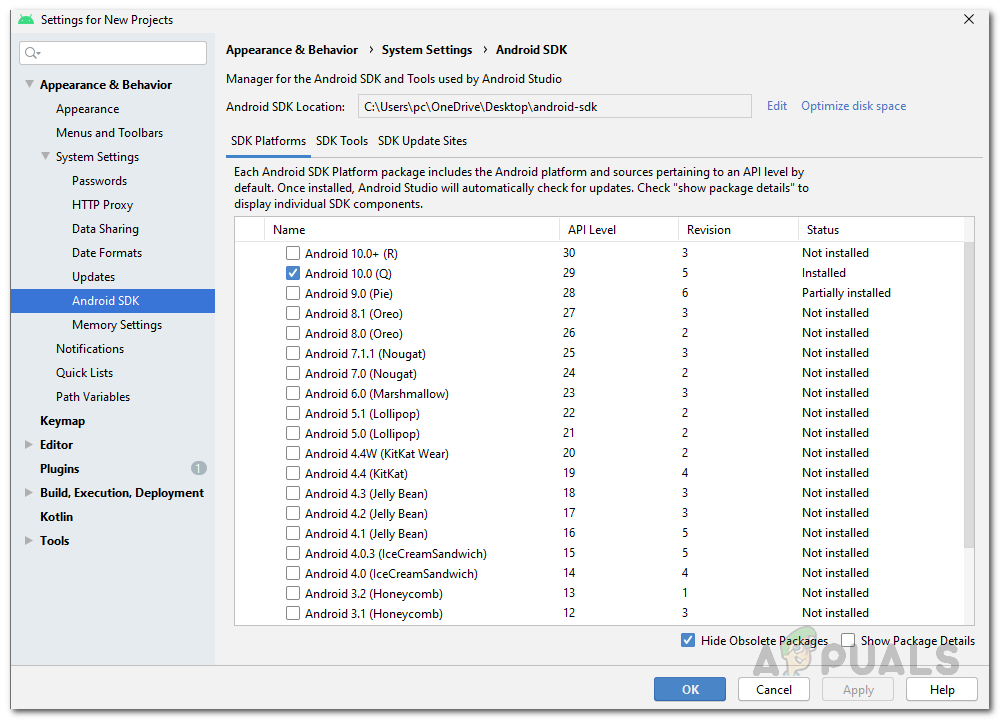
SDK Manager - Once you are in the SDK Manager, under SDK Platforms, install the SDK Platform for your respective Android version.
- After you have done that, go ahead and try running the application to see if you still face the error message.
Reinstall Platform Tools
Finally, if you are still facing the error message in question after trying the methods mentioned above, it could be that the issue is being triggered by damaged or corrupted platform tools files. If this scenario applies to you, you will have to reinstall the platform tools on your system to get rid of this error message. This can be done easily via the SDK Manager. You can uninstall platform tools via the SDK Manager and after that, you can easily install it again via a few clicks. To do this, follow the instructions given down below:
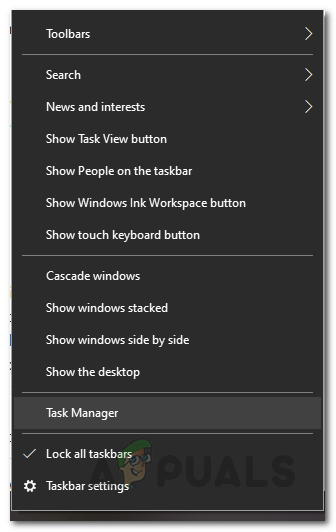
- First of all, close the Android Studio and then open up the Task Manager by right-clicking your taskbar. From the menu that appears, choose Task Manager.
Opening Task Manager - In the Task Manager window, under Processes, look for the ADB.exe process and end it.
- Once you have done that, go ahead and open up the Android Studio again.
- Now, you will have to open up the SDK Manager. For this, click the box icon with a down arrow as shown in the picture.

Opening SDK Manager - Once the SDK Manager is open, switch to the SDK Tools tab.
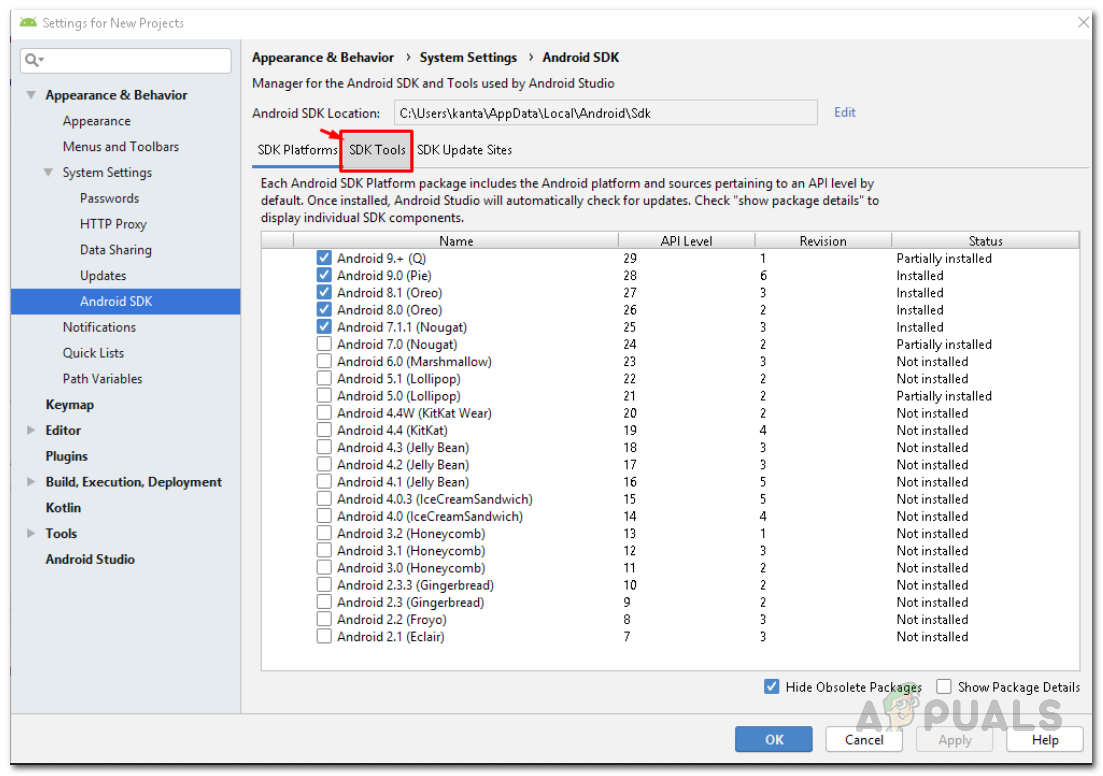
Switching to the SDK Tools Tab - In the SDK Tools tab, scroll down until you see Android SDK Platform-Tools. Uncheck it and then click OK.
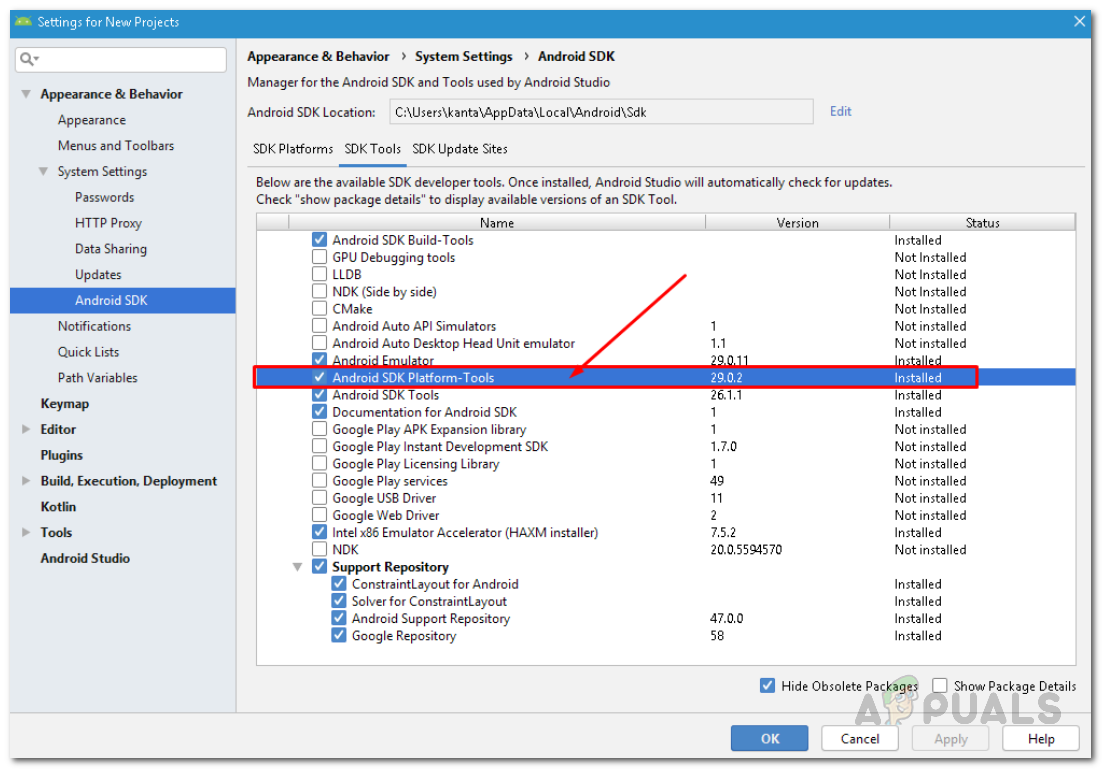
Android Platform-Tools in SDK Manager - This will uninstall platform-tools from your IDE. Wait for it to finish uninstalling.
- Once it has been uninstalled and the Gradle is synced, open up the SDK Manager again and switch to the SDK Tools tab again. Here, look for Android SDK Platform-Tools again and tick it. Finally, click OK and wait for it to finish, and then sync your project.
- After all that is done, go ahead and try running your application to see if the error message pops up.


