How To Make An Android App For Your Smart Home System on Android Studio?
This article is part two of another article How To Make Smart Home Automation Using ESP32 Module? in which a method to make a Smart Home System was provided. In this article, we are going to demonstrate the step by step procedure of how to develop an android application and connect it t the firebase database. Then this mobile application will be used to switch the electrical appliances in the home.
Smart Home Systems that are already available in the market are very costly. If you have the necessary components and an android device, you can make a home automation system at home which will be equally efficient but will be very low in cost. Go through these two articles to make your own Home Automation System at home.
How To Develop An Android Application For Home Automation?
We are going to develop an android app that will be used as a remote control to control the electrical home appliances that were connected to the ESP32 module in the other article. to go to the other article, Click Here.
Step 1: Software Needed
As we are going to develop an android application, we will need just one software. But to run that software, we will need to install another software first. You can download them from the following links.
Step 2: Understanding The Main Working
We are going to make an application that will have both front-end and back-end coding. On the main screen, it will contain some buttons that will control the switching of the electrical appliances that are connected to the ESP32 microcontroller board. In the back-end coding, We will send a “1” if the switch is on and a “0” if the switch is off.
We are going to make a Firebase database. This database will contain 2 entities named as Light and AC. The light will contain the value for the switching of lights and AC will contain a value for the switching of the fan. This value will be then sent to the microcontroller and then the microcontroller will send a control signal to the relay module accordingly.
Step 3: Setting Up Android Studio
Before installing Android Studio, we will install JAVA JDK first. To install this, click on the exe file that you downloaded from the above link, and click next until it is successfully installed. Now Go through the following steps so that your command prompt recognizes java as an external or internal command.
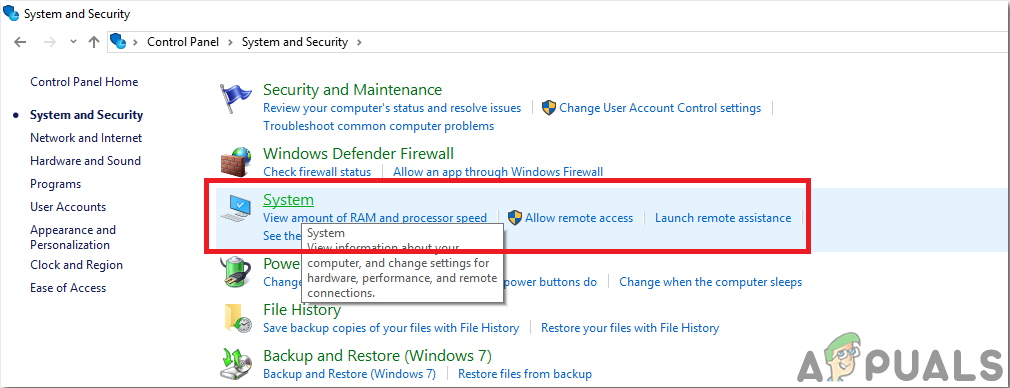
- Open Control Panel and click on System and Security.
- Click on System.
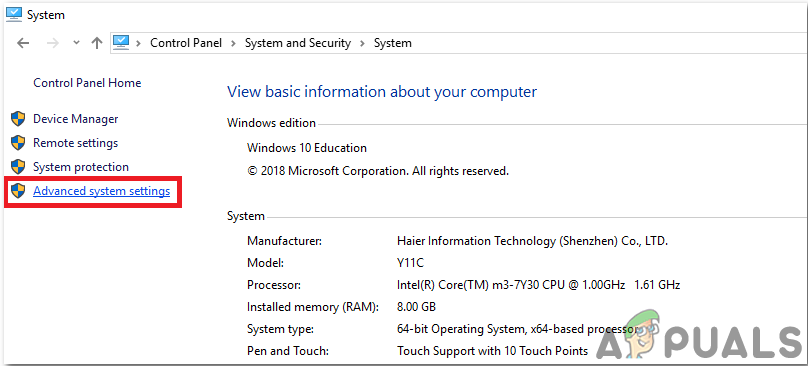
System - Click on Advanced System Setting and then click on Environmental Variables.
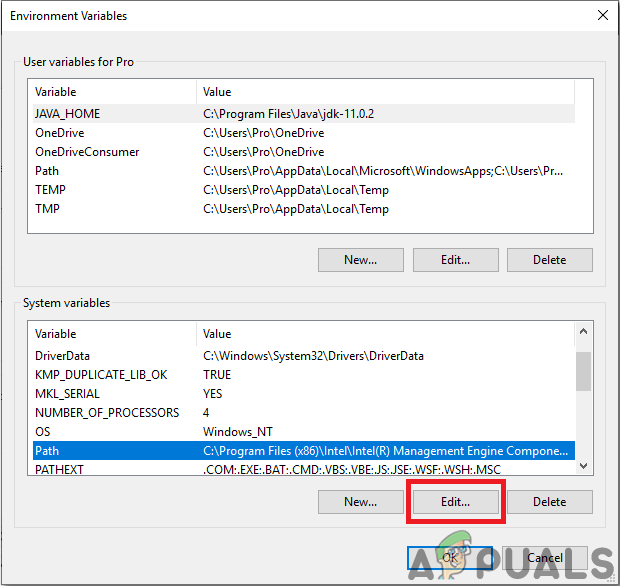
Advanced System Setting - In the System Variable section, click on the path and then click on edit. A new Edit Environmental Variable box will appear.
Edit Path - Now go to C:\Program Files\Java in your PC. Open the JDK folder, click on the bin folder and then copy the path of that folder.
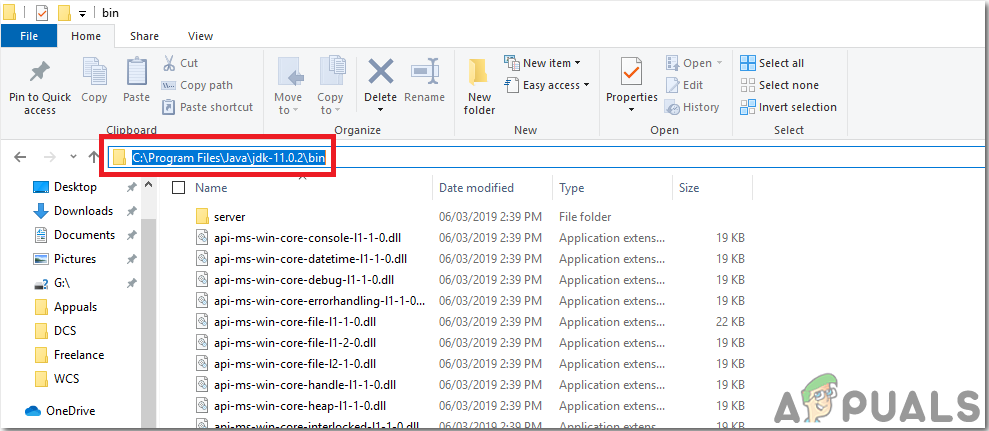
Path of the bin folder - Now go to the Edit Environmental Variable box and click on new to make a new variable. Paste the path that you copied in the above step in the new variable and save it.
- Now to confirm, if it is completely installed, open command prompt and type java –version.
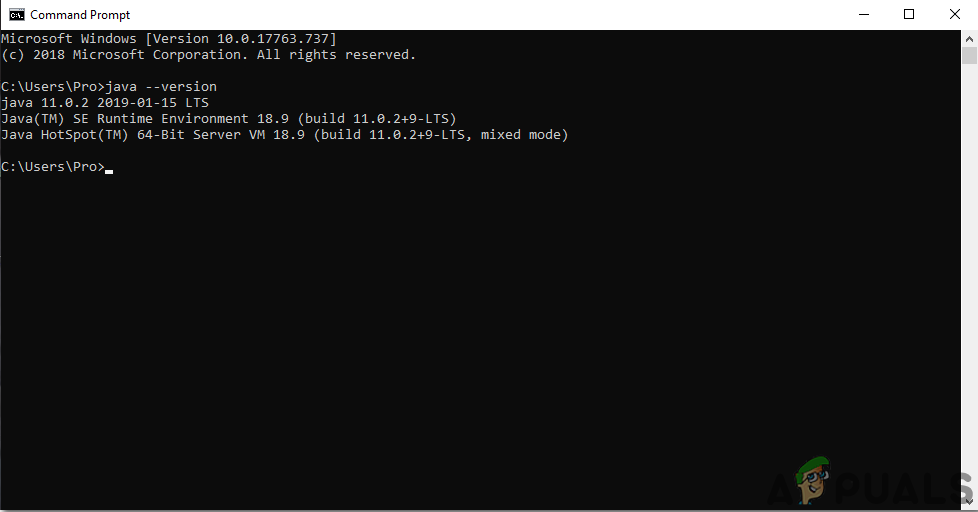
JAVA version
Now as you have successfully installed Java JDK on your computer. Let us now install Android Studio on your computer. Installing this software is very easy. You need to open the downloaded file and click next until your software is fully installed.
Step 4: Making The Layout
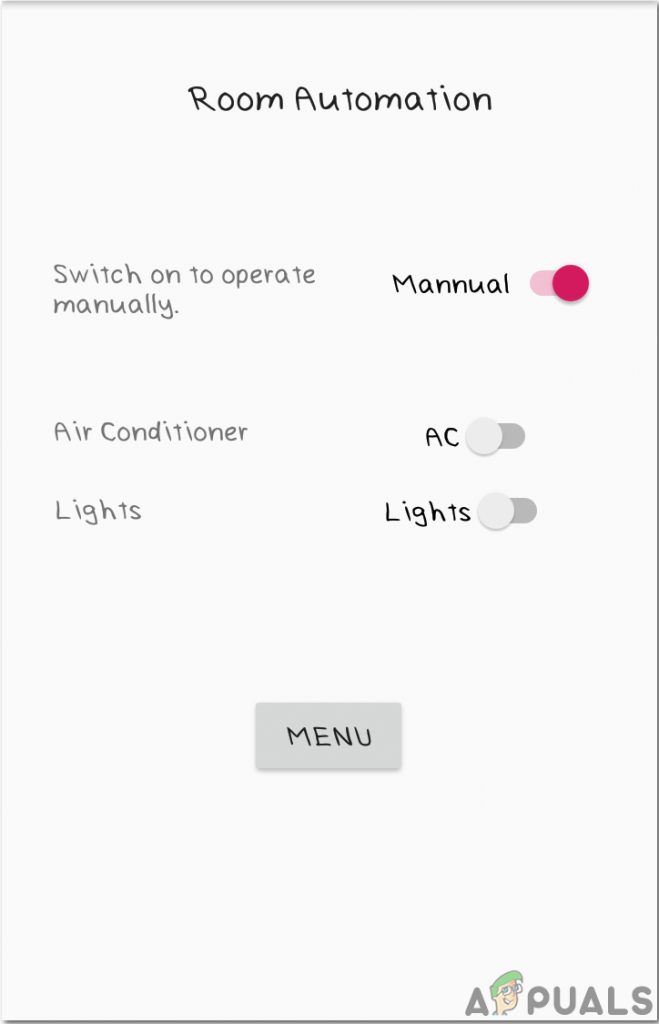
We will make a layout that will contain some buttons which will send the command of 0 or 1 to the firebase database. This will be a simple layout that will contain some buttons. In my app, I will just include two buttons that will control the lights and the fan. If you want to include more buttons for more home appliances, copy the same chunk of code in the main program and make a new variable in the database. Without wasting any time, let us move towards the steps of making a simple layout for our app.
1. First of all, go to File > New > New Project. A menu will appear. Select Empty Project.
2. Now name the project and set KOTLIN as your programming language.
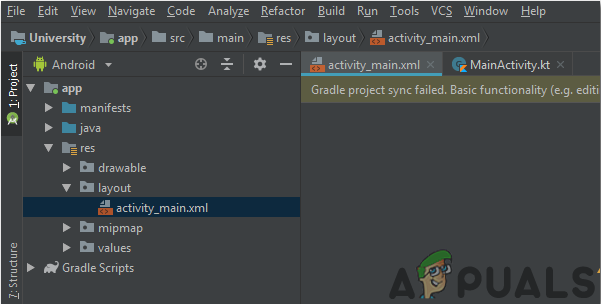
3. Now on the left corner, click on app > res > layout > activity_main.xml.
4. Here, add the following code below the code that is already provided in your android studio. We are making a constraint layout. The following code is adding a heading of Room Automation on the top. It is then adding 3 switches. one switch allows you to select f you want to operate the home appliances manually or not. The other two switched will operate the fan and the lights respectively.
    <TextView
        android:id="@+id/textView2"
        android:layout_width="wrap_content"
        android:layout_height="wrap_content"
        android:layout_marginTop="8dp"
        android:layout_marginBottom="8dp"
        android:fontFamily="sans-serif-medium"
        android:text="Room Automation"
        android:textAppearance="@style/TextAppearance.AppCompat.Body1"
        android:textSize="18sp"
        app:layout_constraintBottom_toBottomOf="parent"
        app:layout_constraintEnd_toEndOf="parent"
        app:layout_constraintHorizontal_bias="0.528"
        app:layout_constraintStart_toStartOf="parent"
        app:layout_constraintTop_toTopOf="parent"
        app:layout_constraintVertical_bias="0.063" />

    <TextView
        android:id="@+id/textView3"
        android:layout_width="wrap_content"
        android:layout_height="wrap_content"
        android:layout_marginStart="8dp"
        android:layout_marginTop="8dp"
        android:layout_marginEnd="8dp"
        android:layout_marginBottom="8dp"
        android:text="Air Conditioner"
        app:layout_constraintBottom_toBottomOf="parent"
        app:layout_constraintEnd_toEndOf="parent"
        app:layout_constraintHorizontal_bias="0.086"
        app:layout_constraintStart_toStartOf="parent"
        app:layout_constraintTop_toTopOf="parent"
        app:layout_constraintVertical_bias="0.416" />

    <Switch
        android:id="@+id/switch1"
        android:layout_width="wrap_content"
        android:layout_height="wrap_content"
        android:layout_marginStart="8dp"
        android:layout_marginTop="8dp"
        android:layout_marginEnd="8dp"
        android:layout_marginBottom="8dp"
        android:text="Mannual"
        android:visibility="gone"
        app:layout_constraintBottom_toBottomOf="parent"
        app:layout_constraintEnd_toEndOf="parent"
        app:layout_constraintHorizontal_bias="0.887"
        app:layout_constraintStart_toStartOf="parent"
        app:layout_constraintTop_toTopOf="parent"
        app:layout_constraintVertical_bias="0.258" />

    <TextView
        android:id="@+id/textView5"
        android:layout_width="wrap_content"
        android:layout_height="wrap_content"
        android:layout_marginStart="8dp"
        android:layout_marginTop="8dp"
        android:layout_marginEnd="8dp"
        android:layout_marginBottom="8dp"
        android:text="Lights"
        app:layout_constraintBottom_toBottomOf="parent"
        app:layout_constraintEnd_toEndOf="parent"
        app:layout_constraintHorizontal_bias="0.073"
        app:layout_constraintStart_toStartOf="parent"
        app:layout_constraintTop_toTopOf="parent"
        app:layout_constraintVertical_bias="0.498" />

    <Button
        android:id="@+id/button3"
        android:layout_width="wrap_content"
        android:layout_height="wrap_content"
        android:layout_marginTop="8dp"
        android:layout_marginBottom="8dp"
        android:text="Menu"
        app:layout_constraintBottom_toBottomOf="parent"
        app:layout_constraintEnd_toEndOf="parent"
        app:layout_constraintHorizontal_bias="0.498"
        app:layout_constraintStart_toStartOf="parent"
        app:layout_constraintTop_toTopOf="parent"
        app:layout_constraintVertical_bias="0.749" />

    <TextView
        android:id="@+id/textView6"
        android:layout_width="167dp"
        android:layout_height="38dp"
        android:layout_marginStart="8dp"
        android:layout_marginTop="140dp"
        android:layout_marginEnd="8dp"
        android:layout_marginBottom="8dp"
        android:text="Switch on to operate manually."
        app:layout_constraintBottom_toBottomOf="parent"
        app:layout_constraintEnd_toEndOf="parent"
        app:layout_constraintHorizontal_bias="0.114"
        app:layout_constraintStart_toStartOf="parent"
        app:layout_constraintTop_toTopOf="parent"
        app:layout_constraintVertical_bias="0.0" />

    <Switch
        android:id="@+id/toggleButton2"
        android:layout_width="wrap_content"
        android:layout_height="wrap_content"
        android:layout_marginStart="8dp"
        android:layout_marginTop="8dp"
        android:layout_marginEnd="8dp"
        android:layout_marginBottom="8dp"
        android:text="AC"
        android:visibility="gone"
        app:layout_constraintBottom_toBottomOf="parent"
        app:layout_constraintEnd_toEndOf="parent"
        app:layout_constraintHorizontal_bias="0.808"
        app:layout_constraintStart_toStartOf="parent"
        app:layout_constraintTop_toTopOf="parent"
        app:layout_constraintVertical_bias="0.421" />

    <Switch
        android:id="@+id/toggleButton3"
        android:layout_width="wrap_content"
        android:layout_height="wrap_content"
        android:layout_marginStart="8dp"
        android:layout_marginTop="8dp"
        android:layout_marginEnd="8dp"
        android:layout_marginBottom="8dp"
        android:text="Lights"
        android:visibility="gone"
        app:layout_constraintBottom_toBottomOf="parent"
        app:layout_constraintEnd_toEndOf="parent"
        app:layout_constraintHorizontal_bias="0.811"
        app:layout_constraintStart_toStartOf="parent"
        app:layout_constraintTop_toTopOf="parent" />

</android.support.constraint.ConstraintLayout>
5. The Layout of your app will look like the image below.
Step 5: Back-End Coding
The back end code is the most important part of any application. It is the main bridge between the front-end layout and the database of the project. In our application, we just want to send a “1” in the database when the switch is on and a “0” in the database when the switch is off. Go through the following steps to add the code in your application
1. On the left corner, click on app > java > com.example.my applicationmyapplication > main_activity.
2. Now on this screen, copy the following code in your class.
class automation : AppCompatActivity() {

    var database = FirebaseDatabase.getInstance()
    var myRef = database.reference
    internal lateinit var btnSwitch:Switch
    internal lateinit var btnSwitch1:Switch
    internal lateinit var btnSwitch2:Switch

    override fun onCreate(savedInstanceState: Bundle?) {
        super.onCreate(savedInstanceState)
        setContentView(R.layout.activity_automation)

        myRef.child("Toggle/switch").addValueEventListener(object : ValueEventListener{
            override fun onCancelled(p0: DatabaseError) {

            }
            override fun onDataChange(p0: DataSnapshot) {
                switch1.visibility = View.VISIBLE
                if (p0.value.toString().equals("1")){
                    switch1.isChecked = true;
                    toggleButton2.visibility = View.VISIBLE
                    toggleButton3.visibility = View.VISIBLE

                    myRef.child("automation/AC").addValueEventListener(object :ValueEventListener{
                        override fun onCancelled(p0: DatabaseError) {

                        }

                        override fun onDataChange(p0: DataSnapshot) {
                            if(p0.value.toString().equals("1")){
                                toggleButton2.isChecked = true
                            }
                            else
                                toggleButton2.isChecked = false

                        }
                    })

                    myRef.child("automation/light").addValueEventListener(object :ValueEventListener{
                        override fun onCancelled(p0: DatabaseError) {

                        }

                        override fun onDataChange(p0: DataSnapshot) {
                            if(p0.value.toString().equals("1")){
                                toggleButton3.isChecked = true
                            }
                            else
                                toggleButton3.isChecked = false

                        }
                    })
                }
                else{
                    switch1.isChecked = false
                    toggleButton2.visibility = View.GONE
                    toggleButton3.visibility = View.GONE
                }

              // Log.d("ahsan", p0.value.toString())
            }
        })

        button3.setOnClickListener{
            val intent = Intent(this, MainActivity::class.java)
            startActivity(intent)
        }

        btnSwitch = findViewById<View>(R.id.switch1) as Switch
        btnSwitch1 = findViewById<View>(R.id.toggleButton2) as Switch
        btnSwitch2 = findViewById<View>(R.id.toggleButton3) as Switch

        btnSwitch.setOnClickListener{
            if(btnSwitch.isChecked)
            {
                myRef.child("Toggle/switch").setValue("1")

                btnSwitch1.setOnClickListener{
                    if(btnSwitch1.isChecked)
                    {
                        myRef.child("automation/AC").setValue("1")
                    }
                    else
                    {
                        myRef.child("automation/AC").setValue("0")
                    }
                }


                btnSwitch2.setOnClickListener{
                    if(btnSwitch2.isChecked)
                    {
                        myRef.child("automation/light").setValue("1")
                    }
                    else
                    {
                        myRef.child("automation/light").setValue("0")
                    }
                }
            }
            else
            {
                myRef.child("Toggle/switch").setValue("0")
            }
        }
    }
}
Right now, the code may give some errors at some points because it is not connected to the firebase database right now. We will make a firebase database and connect it to the application.
Step 6: Connecting The App To Firebase Database
Connecting the firebase database to the android app is almost the final step. We are going to make a database on Firebase. Firebase is a mobile and web application improvement stage that furnishes designers with plenty of devices and administrations to enable them to grow top-notch applications, develop their client base, and acquire more benefits. Firebase is providing us two services that are Real-Time Database and Firestore.

We will make a Real-Time Database on which all the values will be updated in real-time with a delay f some seconds. Go through the following steps to make a real-time database on firebase. Android studio provides a very simple method to make this connection. Go through the following steps to establish this connection.
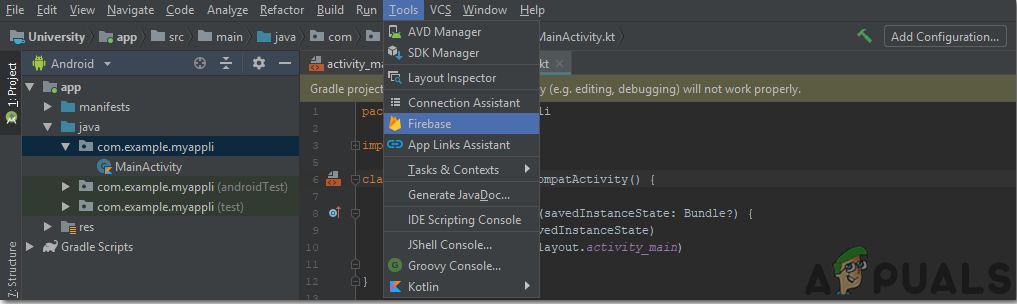
1. Click n Tools. A drop-down menu will appear from which, select Firebase.
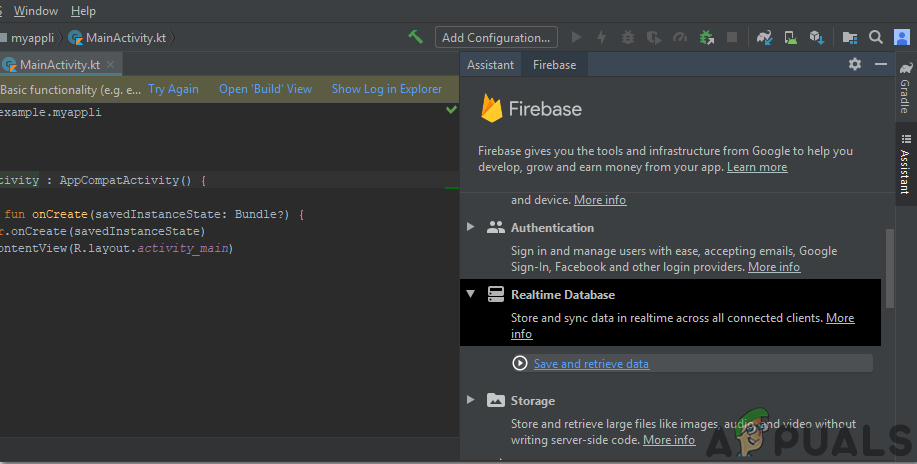
2. A big menu will appear on the right side of the screen that will be providing the menu of almost every service that firebase is providing. But right now our main focus is on Real-Time Database. So click on Real-Time Database. A link to “Save and Retrieve Data” will appear. Click that link.
3. Connect on Connect To Firebase button. It will take you to the default web browser. First, it will ask you to log-in to your Gmail account.
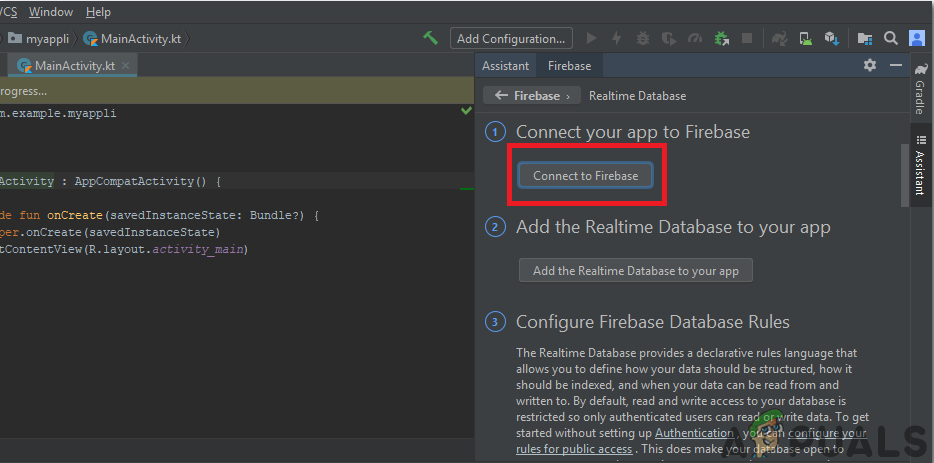
4. Now click on Add the Realtime Database to your app button from the menu shown in the image above. A box will appear asking to make some changes. Click on Accept changes. You will see that the application will start syncing to connect to our Real-Time Database.
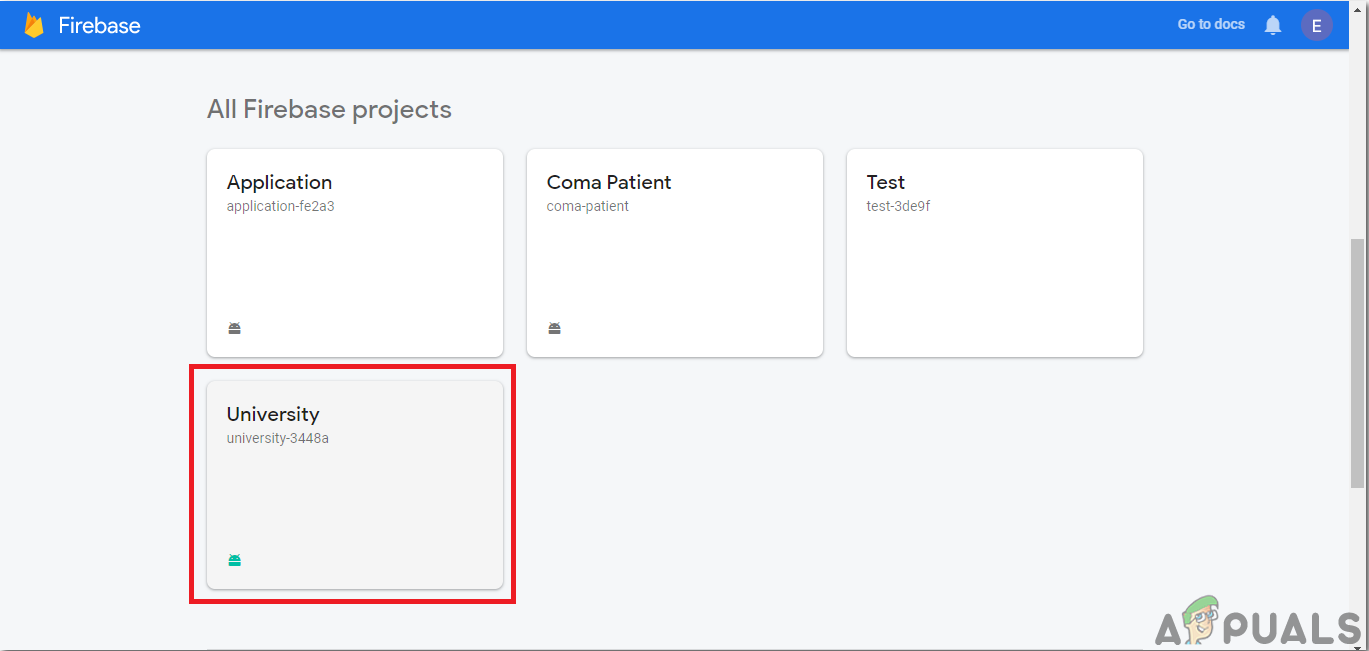
5. Now go to Firebase Console. There you will see a project already made. The android logo on that projet’s icon means that it already belongs to an android application.
6. From the Develop menu that appears on the left side of the screen, select Database. A button of Create Database will appear on the right. Click on that button.
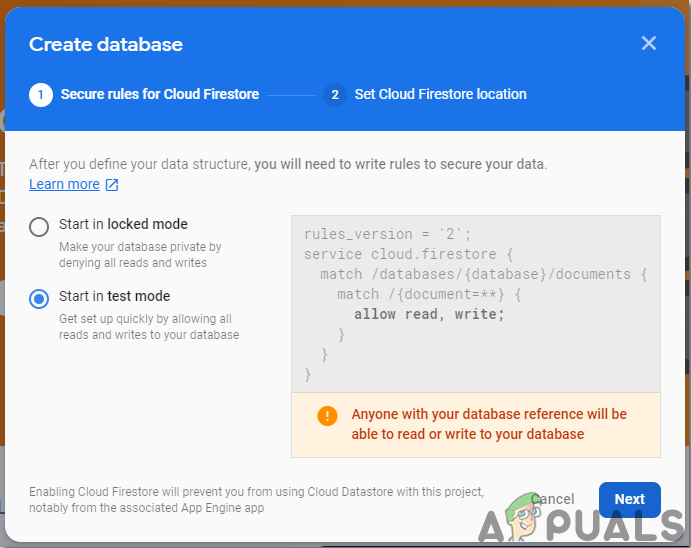
7. A menu will appear asking to set the mode of your database. Click on test mode and then click Enable.
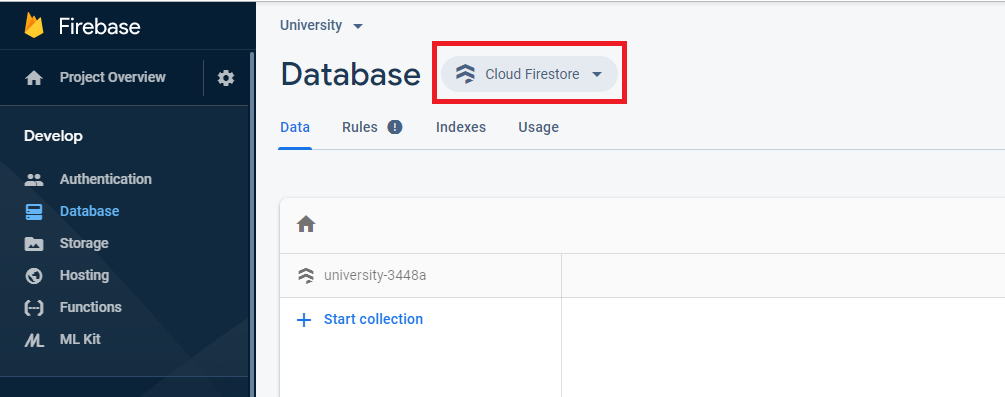
8. Now a really important step to remember is to change the Cloud Firestore to Real-Time Database. To do so click on the button shown in the below image and change the desired option.
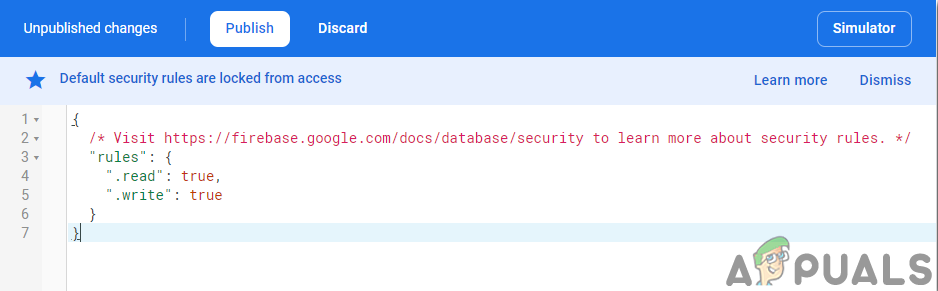
9. Now click on the Rules tab and change the configurations to True. Once everything is done, click Publish.
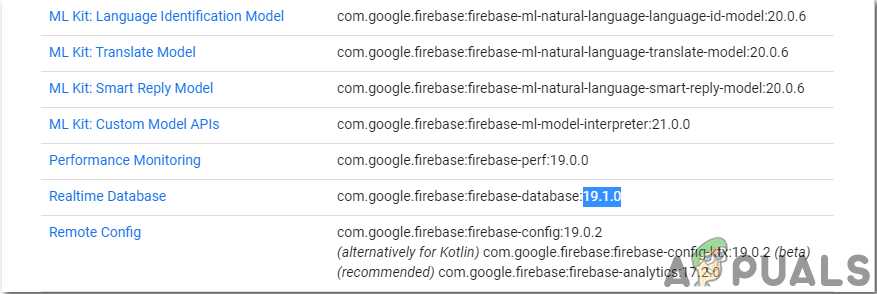
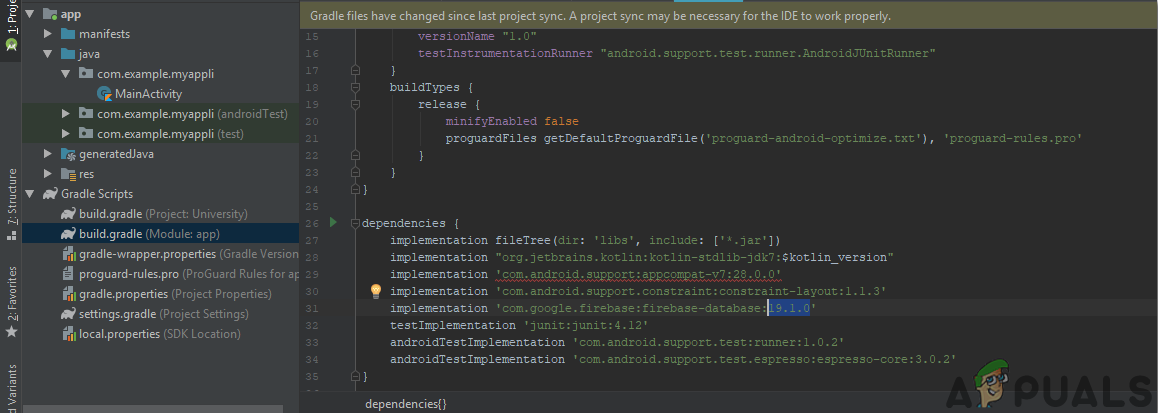
10. One thing that you need to do other than connecting the firebase, is to update the database version. For that, click on go to docs. Now click on guides and select Android Guides from the list that appears on the screen. Scroll down until a table appears. Look for Real-Time Database in that table and find its version. in my case, it is 19.1.0
11. Click on Gradle Scripts, a menu on the left side of the screen. Then select built. gradle (Module: app). Now in the code, search for the version of the Real-Time database and replace it by the new one.
Now our Firebase Connection with our Android app is fully established. We can now proceed towards the testing part of our project.
Step 7: Testing
The Testing part is very simple. You just need to go to your Android device and enable the Developers Options from the setting. Then you will need to enable the USB Debugging. After doing all this, connect your Android device to your computer and run the android project in android studio. This will build the app on your android device.
Now, click the buttons on your screen and it will automatically make the entities on your firebase database. You will see that some values will be updated in their corresponding entity as you press the buttons.


hey can you tell me how to I test the app and connect the wires light or bulb to the ESP32 module