Fix: TouchWiz Home has stopped
Over the years, Samsung has taken a lot of heat from angry users due to its excessive suite of bloatware apps. On top of that, its custom launcher (TouchWiz Home) lags behind in terms of stability and speed.
Samsung flagships possess enough processing power and system resources to achieve solid benchmarks, despite being weighed down by a suite of mostly unnecessary bloatware and a launcher with clear limitations. However, when examining Samsung’s product line in the low-to-medium range, it becomes obvious that their performance is significantly impacted by bloatware and launcher instability.
TouchWiz is Samsung’s proprietary front touch user interface. Although it may seem efficient with system resources due to its simplistic design, sadly that is not the case. In addition to demanding more resources than the stock Android launcher, it has some design flaws that frequently make it lag behind and become unresponsive.
If you’re a Samsung owner, there’s a high chance you’re familiar with TouchWiz’s force stop errors. These errors are not restricted to one particular Samsung model and can be found on all devices running with this touch interface, although the frequency is smaller on flagships. For the most part, there are two variations of TouchWiz errors: “Unfortunately, TouchWiz Home has stopped” and “Unfortunately, TouchWiz has stopped.

Regardless of which error message you’re getting, the root causes for the two issues are roughly the same.
- TouchWiz experiences glitches with old data and cache after an OS update.
- TouchWiz needs more system resources and becomes unresponsive.
- Conflicting third-party app.
- A glitched widget is causing TouchWiz to force stop.
- Inability to allocate enough resources for gestures and motions.
Now that we know the causes, let’s see how you can make the error go away. To ensure you cover all the troubleshooting aspects, please follow the methods below in order until you find a solution that works for you.
Method 1: Clear Data and Cache for TouchWiz Home.
Most manufacturers design their devices to delete cached data from previous versions after updating the Android operating system, but not Samsung. Many users have reported that their TouchWiz interface began displaying errors after upgrading the Android version to Lollipop, Marshmallow, or Nougat.
Aside from the glitch provoked by the system update, TouchWiz can break down because of cache data accumulation. In addition to making your launcher unable to keep up with your actions, TouchWiz might become unresponsive and display the ‘Unfortunately, TouchWiz Home has stopped‘ error. Another clear indicator that you need to remove the cache from TouchWiz is if the error is displayed when you’re trying to move apps within TouchWiz’s interface.
Regardless of your device’s symptoms, the following steps are always the first logical actions. Here’s what you need to do:
- On your home screen, tap on your Apps drawer to expand it.
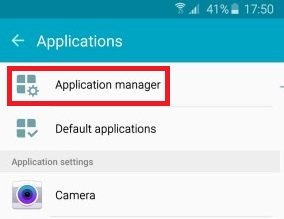
- Go to Settings > Applications, and tap on Application Manager.
- Swipe from left to right to make your way to the All Apps screen.
- Scroll down and tap on TouchWiz Home.
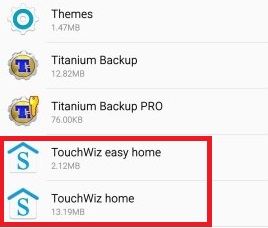
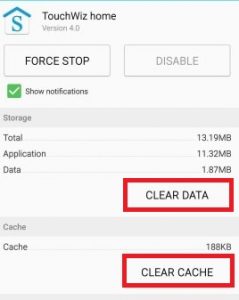
- Tap on ‘Clear Cache‘ and then on ‘Clear Data‘. If you cannot find these two options, look inside the ‘Storage‘ folder. If you are using Easy Mode, repeat these steps with ‘TouchWiz Easy Home’.
 Note: Keep in mind that this will remove your custom home screens, but you will still be able to find them in your gallery.
 - Restart your device and see if the issue persists.
Method 2: Disable Motions and Gestures
Motions and gestures are known to glitch in some versions of the TouchWiz interface. Although this is less common in the latest models, older Samsung iterations with modest specs frequently encounter this issue. This is even more true for devices running an Android version older than Marshmallow.
- On your home screen, tap the App drawer to expand it.
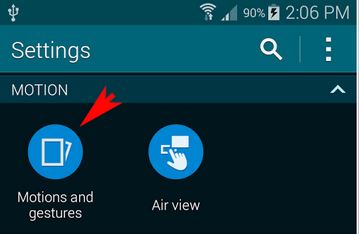
- Go to Settings and tap on Motions & Gestures.
- Systematically disable every motion and gesture present there.
- Restart your phone and see if the error message reappears.
Method 3: Soft Reset Your Device.
If you’ve cleared the cache and disabled motions & gestures without any result, let’s assume the error appears as a result of a software glitch. Many times, a soft reset followed by draining the stored electricity in the capacitors will refresh your phone’s memory, and the error will stop appearing. Depending on how your device is built, the steps may be slightly different.
If you have a device with a detachable battery, here’s what you need to do:
- Remove the back cover and take out the battery while the device is running.
- Hold the power button for over 30 seconds. This will drain the remaining electricity from various component capacitors, forcing a memory refresh.
- Put the battery back on and power up your phone again.
In the event that you are working with a newer Samsung model that does not have a detachable back case (S7 or S7 Edge), here is what you should do:
- While your device is on, press and hold the Power button for approximately 10 seconds. This will initiate a soft reset. Note: A soft reset won’t delete any of your personal data.
- Power your phone on again. Your Android will boot up, and your apps will be re-optimized.
Method 4: Changing the Animation Scale
In some cases, reconfiguring the animation scale in TouchWiz might eliminate the error message. One of the things you can do is change the animation scale. Here’s how:
- Go to Settings and look for the Developer option.
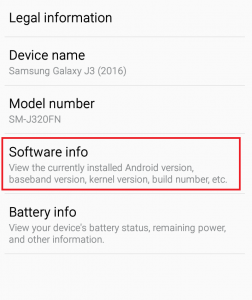
- If you can’t find an entry called Developer Options, scroll all the way down and tap on About Device.
- Tap on Software info.
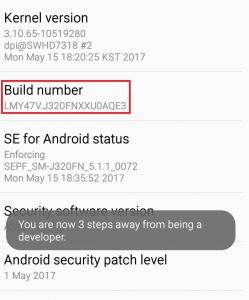
- Tap on the Build number 7 times until you receive a message stating, “You are a developer.
- Go back to Settings and tap on the Developer option.
- Scroll all the way down to the Drawing category.
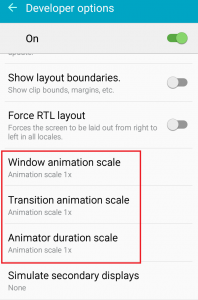
- Slightly alter the values of Window Animation Scale, Transition Animation Scale, and Animator Duration Scale. In order to avoid changing your device’s movements through screens too much, I recommend increasing them by 0.5x.
- Restart your device and see if the error disappears.
Method 5: Switching to Easy Mode.
Easy Mode is designed to streamline the user experience even further by removing some complicated features that might clutter the screen and add to the confusion. Some users have reported that switching to Easy Mode and then switching back to Standard Mode removes the message “Unfortunately, TouchWiz Home has stopped“. Here’s how:
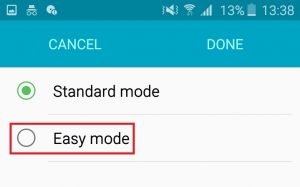
- Go to Settings, scroll down to the Personal tab, and tap on Easy mode.
- Switch the mode from Standard to Easy Mode.
- Browse through the menus for a good while, and restart your device.
- After the restart, go back to Settings > Easy Mode and set it to Standard Mode.
Method 6: Eliminating Software Conflicts
If the methods above didn’t eliminate the error, it could be that the TouchWiz interface is conflicting with a third-party app you recently installed. The chances of this occurring are even higher if you have an inactive third-party launcher or a clipboard app like Enhanced Clipboard.
A clear way to establish if TouchWiz Home is conflicting with third-party apps is to boot your device in Safe Mode. While in Safe Mode, your device will be prevented from loading third-party apps and processes; hence, if the error doesn’t recur, it is evident that a third-party software conflict is to blame. Here’s what you need to do:
- Press and hold the power button.
- Tap and hold on Power Off.
- When the Reboot to Safe Mode prompt appears, tap OK.
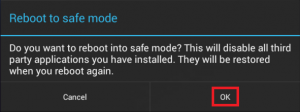
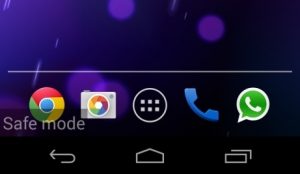
- Your device will restart in Safe Mode. A Safe Mode icon should be displayed in the bottom-left corner.
- Browse around using the TouchWiz interface to see if the error has disappeared.
If the error reappears, move on to Method 7. However, if the error is gone, it’s time to figure out which app or widget is causing the issue. Here’s how:
- Go to Settings > Application Manager and swipe to the Downloaded tab.
- Start by uninstalling any custom launchers and widgets you might have on your system.
- Uninstall clipboard apps and icon packs.
- Consider the time when the error first started appearing and uninstall the apps that might have been installed during that period.
- Reboot your device. It should boot up in normal mode. Confirm this by checking if the Safe Mode icon is gone from the bottom left corner.
Method 7: Wiping the Cache Partition.
If you have come this far without results, it is time to apply a universal fix that solves most software-related glitches. In the event that the TouchWiz message originates from Samsung’s firmware, wiping the cache partition might make it go away.
The procedure may slightly differ from device to device, but for the most part, the steps for wiping the cache partition are the same on most Samsung devices. If the steps described below do not take you into Android’s system recovery, perform an online search using the phrase “how to wipe cache partition + *YourModel*”.
- Power off your device completely.
- Press and hold the Volume Up key + Power button.
- Release both buttons when you see the Android screen.
- The next screen should take you to Recovery Mode.

- Use the volume buttons to navigate down to ‘Wipe Cache Partition.’
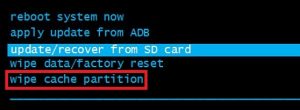
- With “Wipe Cache Partition” highlighted, tap the power button to select it.
- Wait for the process to complete. You’ll know it’s ready when your device asks to reboot.
- Press the Power button to reboot and wait for your device to restart.
Method 8: Performing a Master Reset
Now that we’ve exhausted nearly all available solutions, there’s one last thing you can do before sending your phone for a re-flash: perform a factory reset. This will restore your phone to its original state. In most cases, this causes TouchWiz to resume its normal functionality.
Before you proceed, it’s important to realize that a factory reset will delete any personal data and account information that isn’t on your SD card. To avoid unnecessary data loss, the steps below will include creating a backup. Here’s what you need to do:
- Go to Settings and scroll down to Backup & Reset.
- If “Back up my data” is disabled, enable it and wait for a new backup to be created.
- Scroll down and tap on ‘Factory Data Reset.’
- Confirm by tapping on ‘Reset Phone‘.
- Wait for the process to complete. Your device will reboot at the end of it.