Fix: Stop Windows 7 from Upgrading to Windows 10
Windows 10 – the latest and greatest in a long line of Windows Operating Systems – is certainly not every Windows user’s cup of tea. Most Windows users aren’t even ready for everything that Windows 10 has to offer and brings with it, and that is especially the case with Windows 7 users. Just because Microsoft is offering every Windows user who owns a legitimate copy of Windows 7, 8 or 8.1 a free upgrade to Windows 10 does not mean that every legitimate Windows user should immediately jump on the Windows 10 bandwagon.
If you are one of the many Windows users who are not yet ready for Windows 10 and know that it would be better for you to hold off on an upgrade to Windows 10, the Get Windows 10 icon in your computer’s system tray would certainly be an annoyance to you. The Get Windows 10 icon is the icon that you can use to reserve/okay your computer’s upgrade to Windows 10, but if you aren’t planning on upgrading to Windows 10 anytime in the near future, you can simply remove this useless system tray icon using this guide.
Disabling the Get Windows 10 icon is pretty easy – however, what must be done if you have okayed/reserved a Windows 10 upgrade for your computer and your computer continuously tries to download and Windows 10, but you no longer want to go through with it? While okaying/reserving a Windows 10 upgrade for your computer does complicate things a little, you are still going to be able to stop your Windows 7 computer from being upgraded to Windows 10, and you can do so by either fiddling around with your computer’s registry or using a program that is solely dedicated to prevent Windows 7 computers from upgrading to Windows 10.
Option 1: Prevent a Windows 10 upgrade by tweaking your computer’s Registry
The first option that you have when it comes to preventing your Windows 7 computer from being upgraded to Windows 10 is to do so by playing around with and tweaking certain parts of your computer’s Registry. In order to use this option to make sure that your Windows 7 computer does not upgrade to Windows 10 even if you have okayed/reserved the upgrade, you need to:
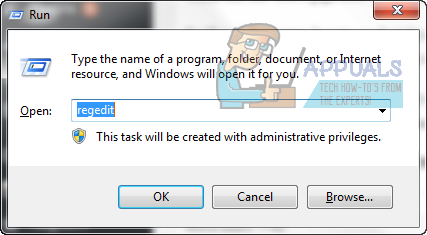
Press the Windows Logo key + R to open a Run
Type regedit into the Run dialog and press Enter to launch the Registry Editor.
In the left pane of the Registry Editor, navigate to the following directory:
HKEY_LOCAL_MACHINE > SOFTWARE > Microsoft > Windows > CurrentVersion > WindowsUpdate
Click on the OSUpgrade folder in the left pane to have its contents displayed in the right pane.
In the right pane, locate and right-click on a registry value titled KickoffDownload, click on Delete in the contextual menu and then click on Yes in the resulting popup.
In the right pane, locate and right-click on a registry value titled KickoffSource, click on Delete in the contextual menu and then click on Yes in the resulting popup.
Click on the State folder under OSUpgrade in the left pane to have its contents displayed in the right pane.
In the right pane, locate and double-click on the registry value named OSUpgradeState to modify it.
Replace whatever is in the OSUpgradeState value’s Value data field with 00000001 and then click on OK.

In the right pane, locate and double-click on the registry value named OSUpgradeStateTimeStamp to modify it.
Replace whatever is in the value’s Value data field with 2015-07-28 10:09:55 and then click on OK.
In the right pane, locate and right-click on the registry value titled OSUpgradePhase, click on Delete in the contextual menu and click on Yes in the resulting popup.
Close the Registry Editor and restart your computer. Your computer should no longer try to upgrade to Windows 10 regardless of whether or not you reserved/okayed a Windows 10 upgrade for your computer.
Option 2: Prevent a Windows 10 upgrade using Never10
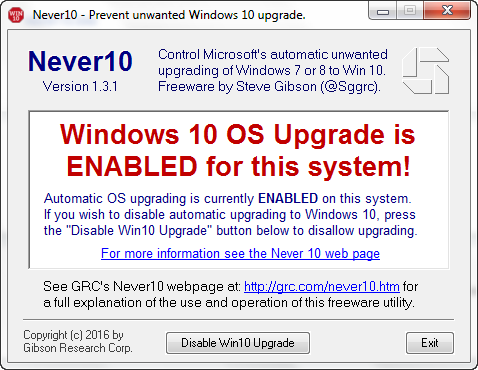
Seeing as how countless users of Windows 7, 8 and 8.1 wanted to make sure that their computers would not avail the free upgrade to Windows 10 until or unless they were ready for it, many application developers started creating programs designed for the sole purpose of preventing Windows computers from upgrading to Windows 10. The very best among these programs is Never10, a program designed by the GRC (Gibson Research Corporation). Speaking to the effectiveness, efficiency and overall excellence of Never10 is the fact that over 1 million users have downloaded the program in order to prevent their computers from upgrading to Windows 10.
In order to stop your Windows 7 computer from upgrading to Windows 10 using this option, you need to:
Click here to download Never10.
Once Never10 has been downloaded, simply navigate to the directory where it has been downloaded and double-click on it to launch If met with a prompt, click on Run or Yes (whichever applies).
Never10 can only prevent your computer from upgrading to Windows 10 if your instance of Windows 7 has every single critical update available for it installed. If your computer lacks one or more critical update, Never10 will inform you, and you can click on Install Update to install all of the missing Windows Updates for Windows 7. You can proceed once all available updates have been downloaded and installed.
Click on Disable Win10 Upgrade, and voila – you are done!
You are free to now close and even uninstall Never10, but it should be noted that you are going to need Never10 to re-enable the Windows 10 upgrade should you choose to avail it in the future.
Pro Tip: As soon as you okay/reserve a Windows 10 upgrade for your computer, your computer downloads installation files for Windows 10, files which are stored as Temporary Windows installation files and can take up over 5 gigabytes of disk space. If you are sure that you are not going to be upgrading to Windows 10 in the near future, it would be extremely beneficial to get rid of these installation files and claim back some extremely precious disk space. The most convenient method for deleting these Windows 10 installation files depends on the option you used to prevent your Windows 7 computer from upgrading to Windows 10, although you are free to use any of these two methods as both have the same end result.
If you used Option 1:
Open the Start Menu.
Search for “disk cleanup”.
Click on the search result titled Disk Cleanup.
Click on OK to initiate the Disk Cleanup
Allow Disk Cleanup to compile a list of all the expendable files on the primary partition of your computer’s HDD/SSD.
Once Disk Cleanup is done creating a list, make sure to locate Temporary Windows installation files and select them by checking the checkbox beside the option for them. Also, for the sake of freeing up a bit of extra disk space, select all of the other kinds of files on the list as well.
Click on OK.
In the resulting popup, click on Delete Files.
Wait for all of the files to be deleted, and once they are, the Temporary Windows installation files, along with a fair bit of other junk, will be gone.
If you used Option 2:
Launch Never10.
Click on Remove Win10 Files.
Wait for all Windows 10 installation files to be deleted. Once this process is complete, Never10 will report that 0 bytes are being consumed by Windows 10 installation files.
Hi Kevinwhat if I need to undo method 1 to get the update to work now?