How to Fix: “Steam Deck can’t reach the Steam Servers”
 Reviewed by Huzaifa Haroon
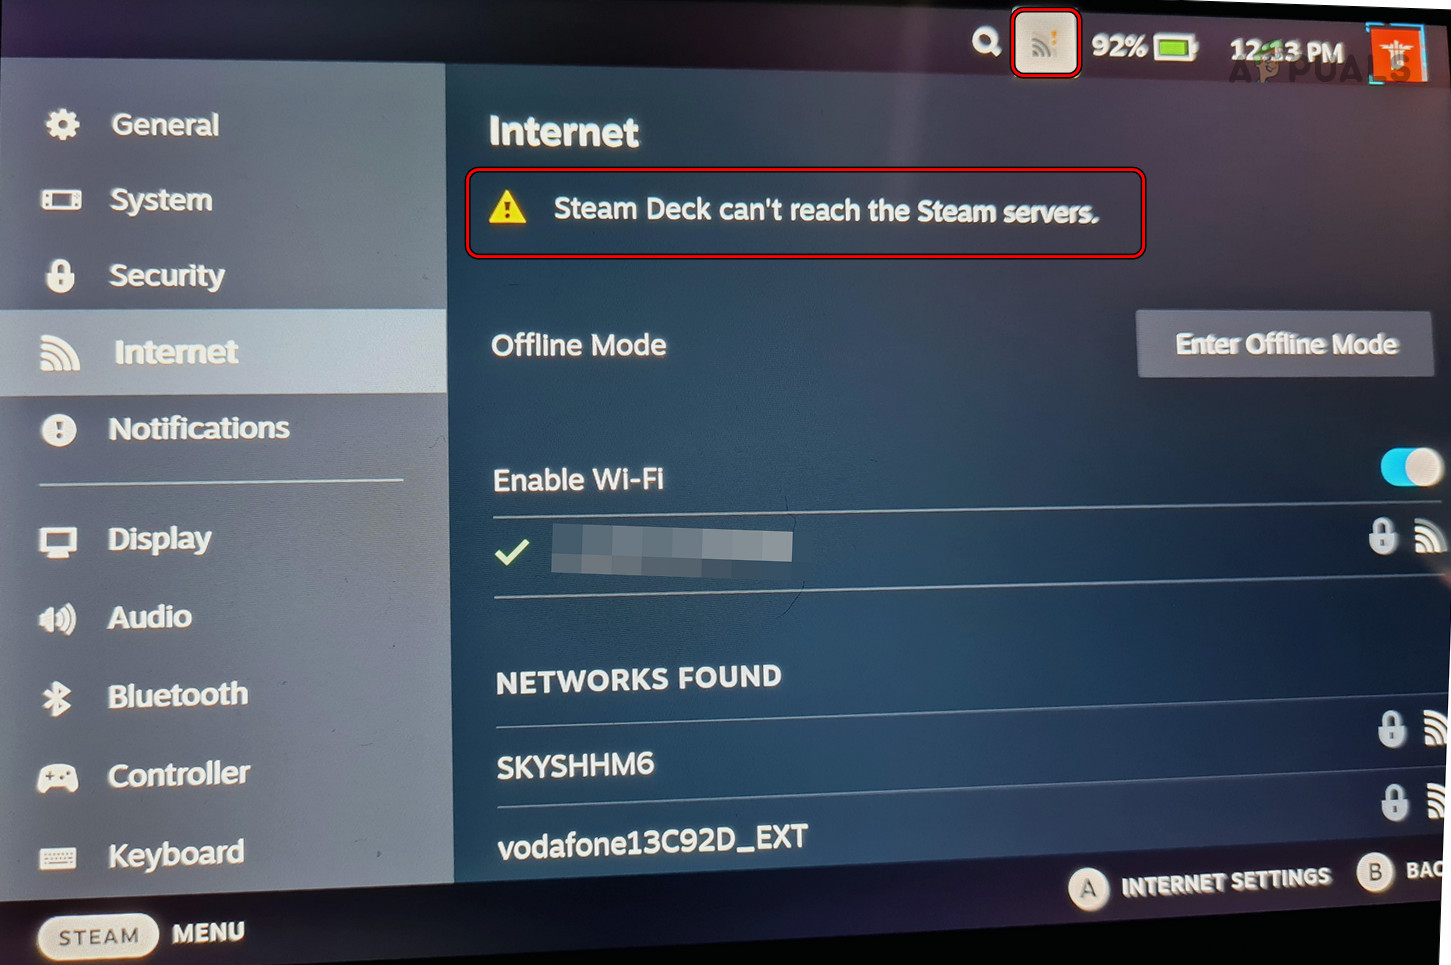
If the Steam Deck cannot connect to its servers, gameplay and other functions will be disrupted, indicated by a yellow exclamation mark on the Wi-Fi icon. This issue commonly occurs post-OS update. Occasionally, games can download but cloud saves fail. Noticeable disruptions may also occur upon waking the Steam Deck from sleep mode.
Troubleshooting Prerequisites
- Ensure the Steam services are operational.
- Ensure your Wi-Fi is functioning properly on other devices by opening a browser to check if internet access is available.
1. Try Airplane, Offline, and Desktop modes
A malfunction in the Steam Deck’s communication modules can prevent it from connecting to its servers. Activating airplane mode, offline mode, or desktop mode should resolve the issue.
Disable/Enable the Wi-Fi
- Tap on the Wi-Fi icon at the top and turn off Wi-Fi.
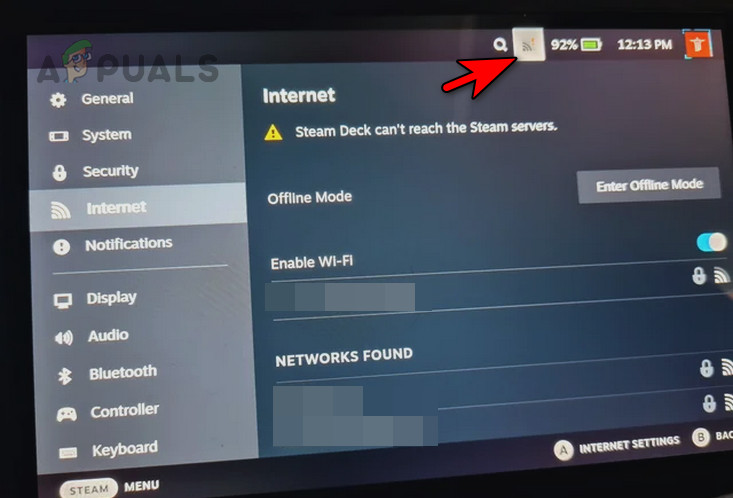
Disable Wi-Fi on the Steam Deck - Wait for a minute and enable Wi-Fi. See if the issue is resolved.
- If not, remove the network from the Steam Deck and add it back. Check if the connection has been established.
Enable/Disable Airplane Mode
- Launch the deck’s Quick Settings and enable Airplane Mode.

Enable Airplane Mode on the Steam Deck - Wait for a minute and disable Airplane Mode. Confirm if the connection is reestablished.
Enable/Disable Offline Mode
- Launch the deck’s Settings and go to the Internet.
- Enable Offline Mode and wait for a minute.
- Disable offline mode and see if the issue is cleared.
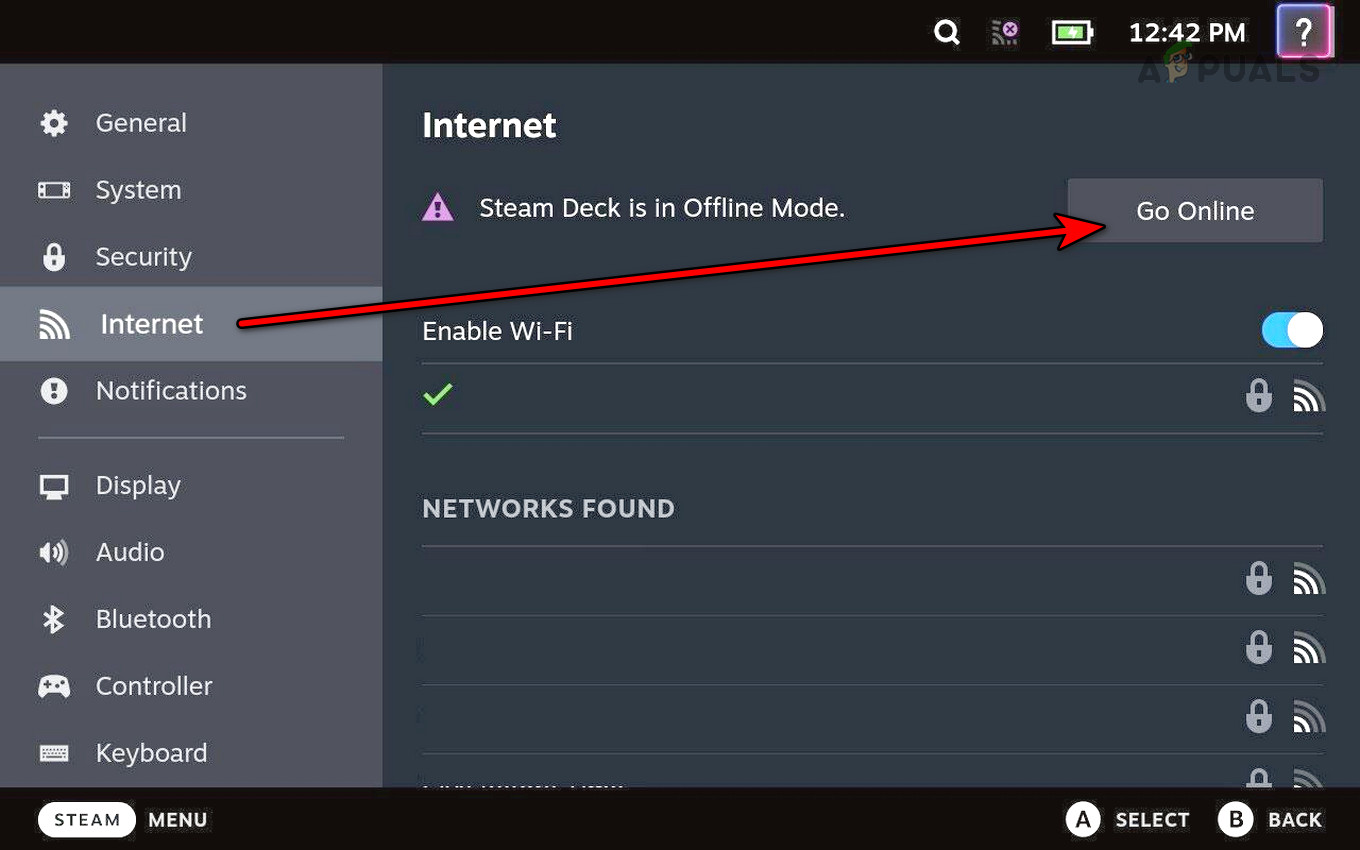
Disable Offline Mode on the Steam Deck
Switch to the Desktop Mode
- Press and hold the Power button.
- Release the button on the Power Options menu and select Switch to Desktop Mode.
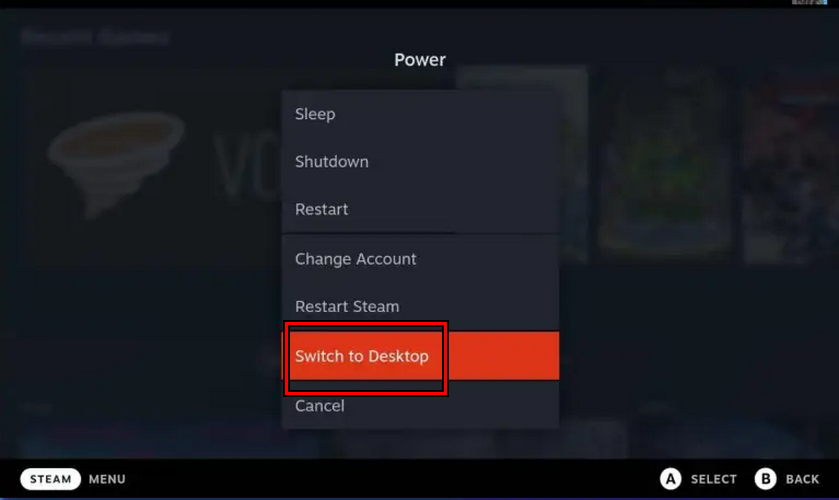
Switch the Steam Deck to the Desktop Mode - Check if the deck can reach Steam servers. If so, switch to the Game Mode and verify if the problem is solved.
2. Try the User Switcher on the Steam Deck
If the Steam Deck fails to register your login, it will not send the information to the servers, causing an issue. Using the user switcher on the Steam Deck should resolve this problem.
- Press and hold the Power button.
- Release the button on the Power Options menu and select Change Account.
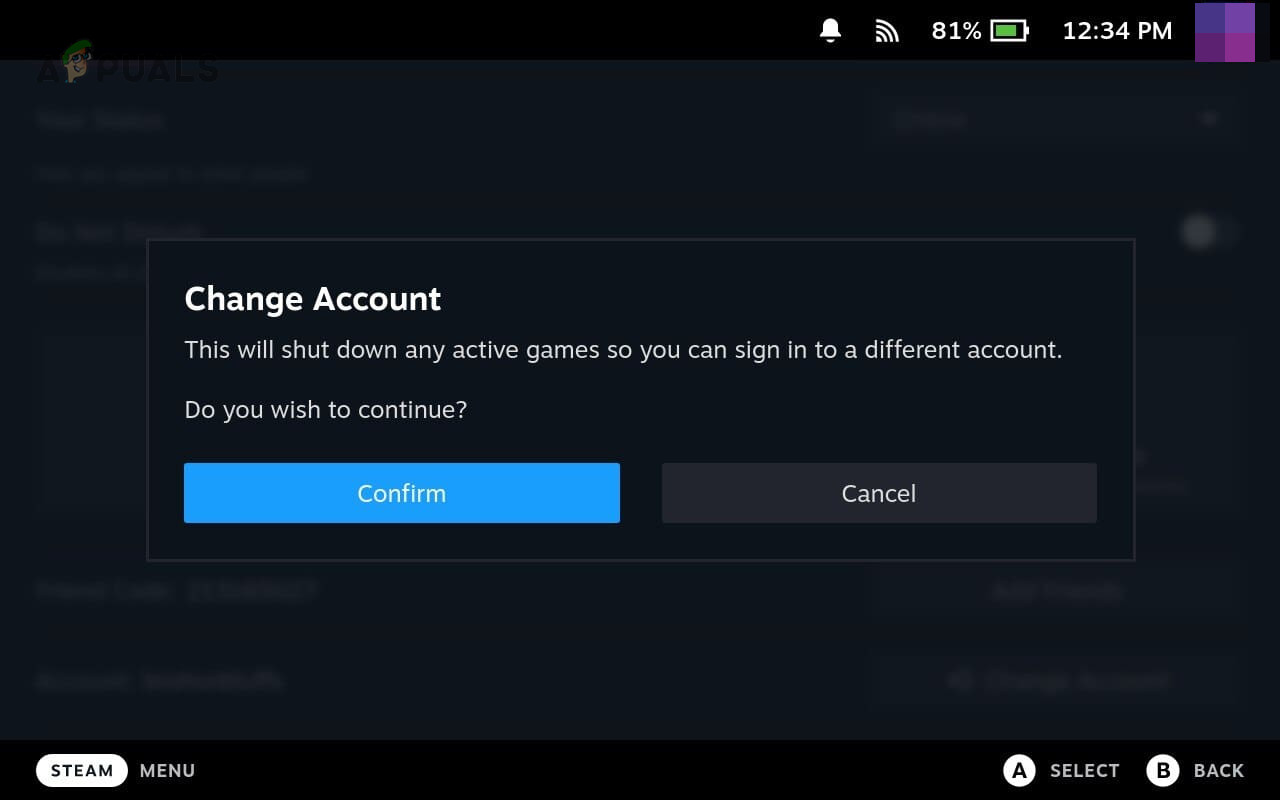
Switch to Another Account on the Steam Deck - Confirm to change the account and log in using your credentials. See if the issue is resolved.
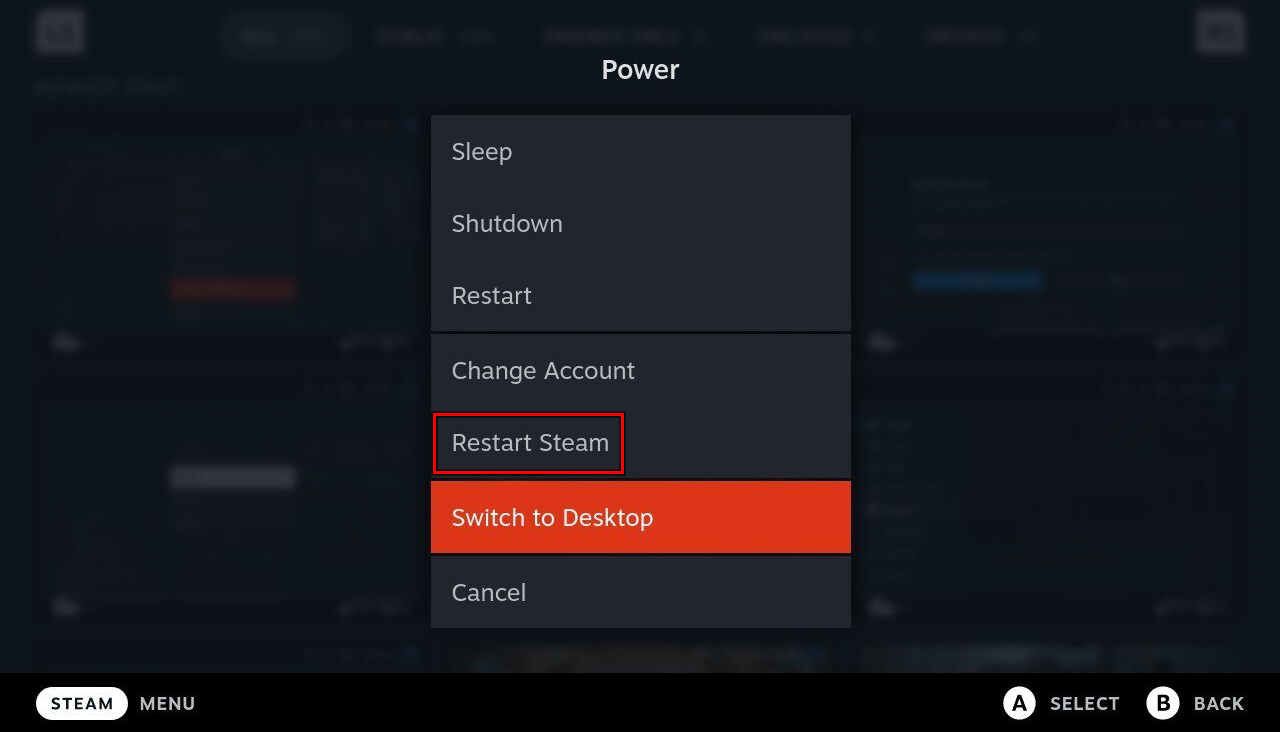
3. Restart the Steam Client, Steam Deck and Router
The Steam Deck can’t connect to its servers because of a communication issue between the device and the router. This problem can be resolved by restarting the Steam client, Steam Deck, and router.
Restart the Steam Client
- Press and hold the power button.
- Release the power button once the Power Options are shown and select Restart Steam Client. Check if the problem is solved.
Restart Steam in the Power Menu of the Steam Deck
Restart the Steam Deck
- Press the Steam button on the deck and go to Power > Restart.
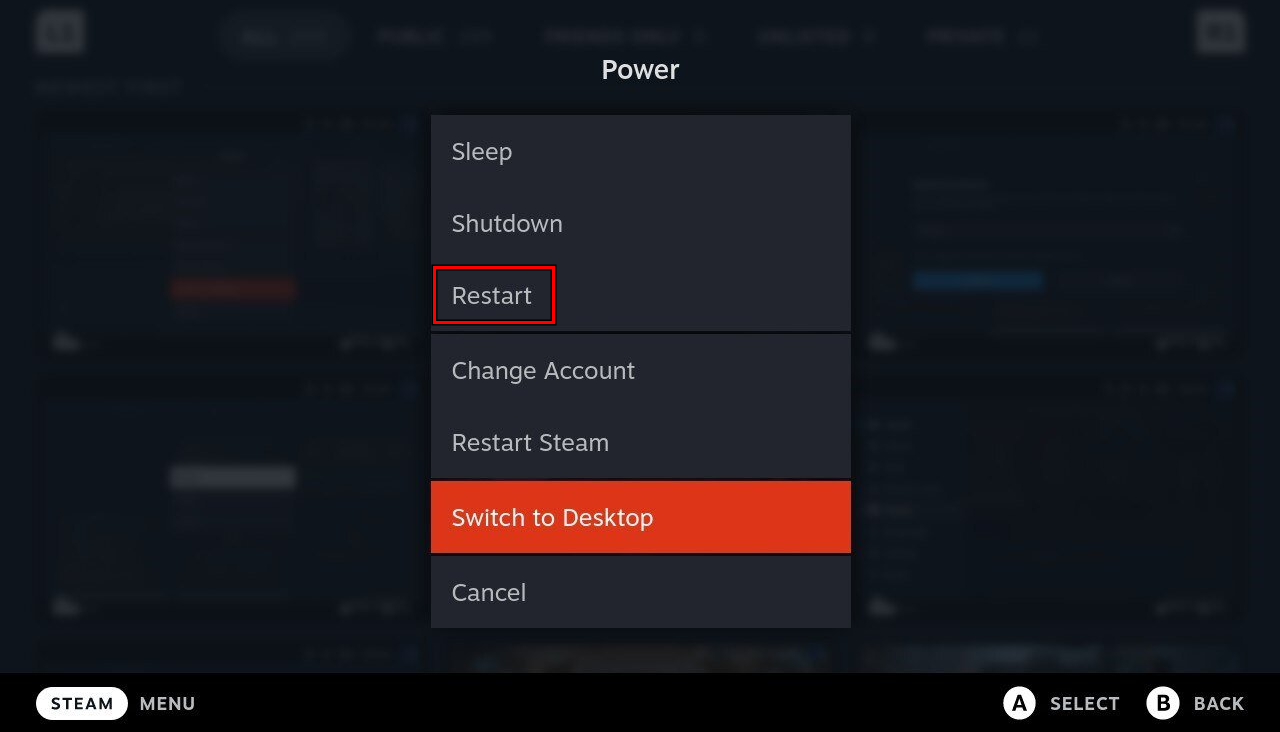
Restart the Steam Deck Through the Power Menu - Upon restart, check if the connection has been restored.
- If not, press/hold the power button till the deck restarts. Once restarted, verify if the issue is cleared.
Perform a Cold Restart of the Deck and Router
- Put the deck in offline mode and power it off.
- Power off the router and unplug its power cable.
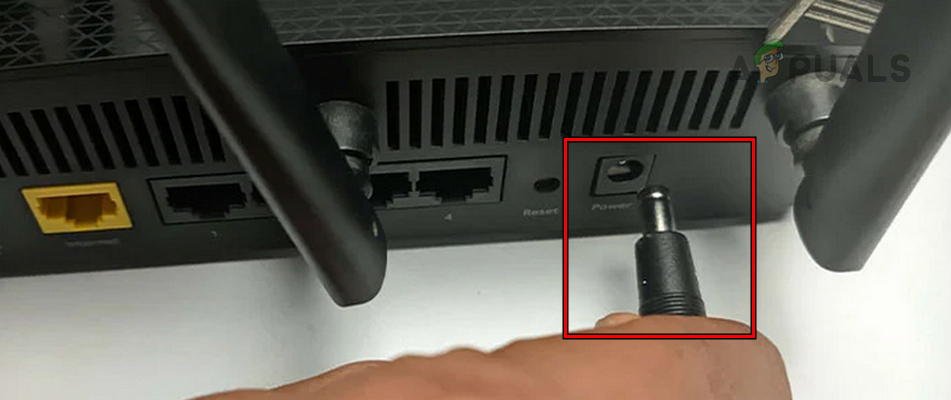
Unplug the Power Cable of the Router - Wait for 5 minutes and plug back the power cord.
- Power on the router and power on the Steam Deck.
- Disable the offline mode and make sure no other devices are connected to the router, just the Steam Deck. See if the connection issue has been restored.
4. Put the Deck into the Battery Storage Mode
Activating battery storage mode sets all deck hardware modules to their default state. This can fix server issues resulting from hardware malfunctions.
- Power off the Steam Deck by holding the power button until it is turned off.
- Unplug the charger and other peripherals from the deck.
- Hold down the Volume Up button and tap on the Power button once.
- Once the startup chime is heard, release the Volume Up button.
- Navigate to Setup Utility > Power > Battery Storage Mode.
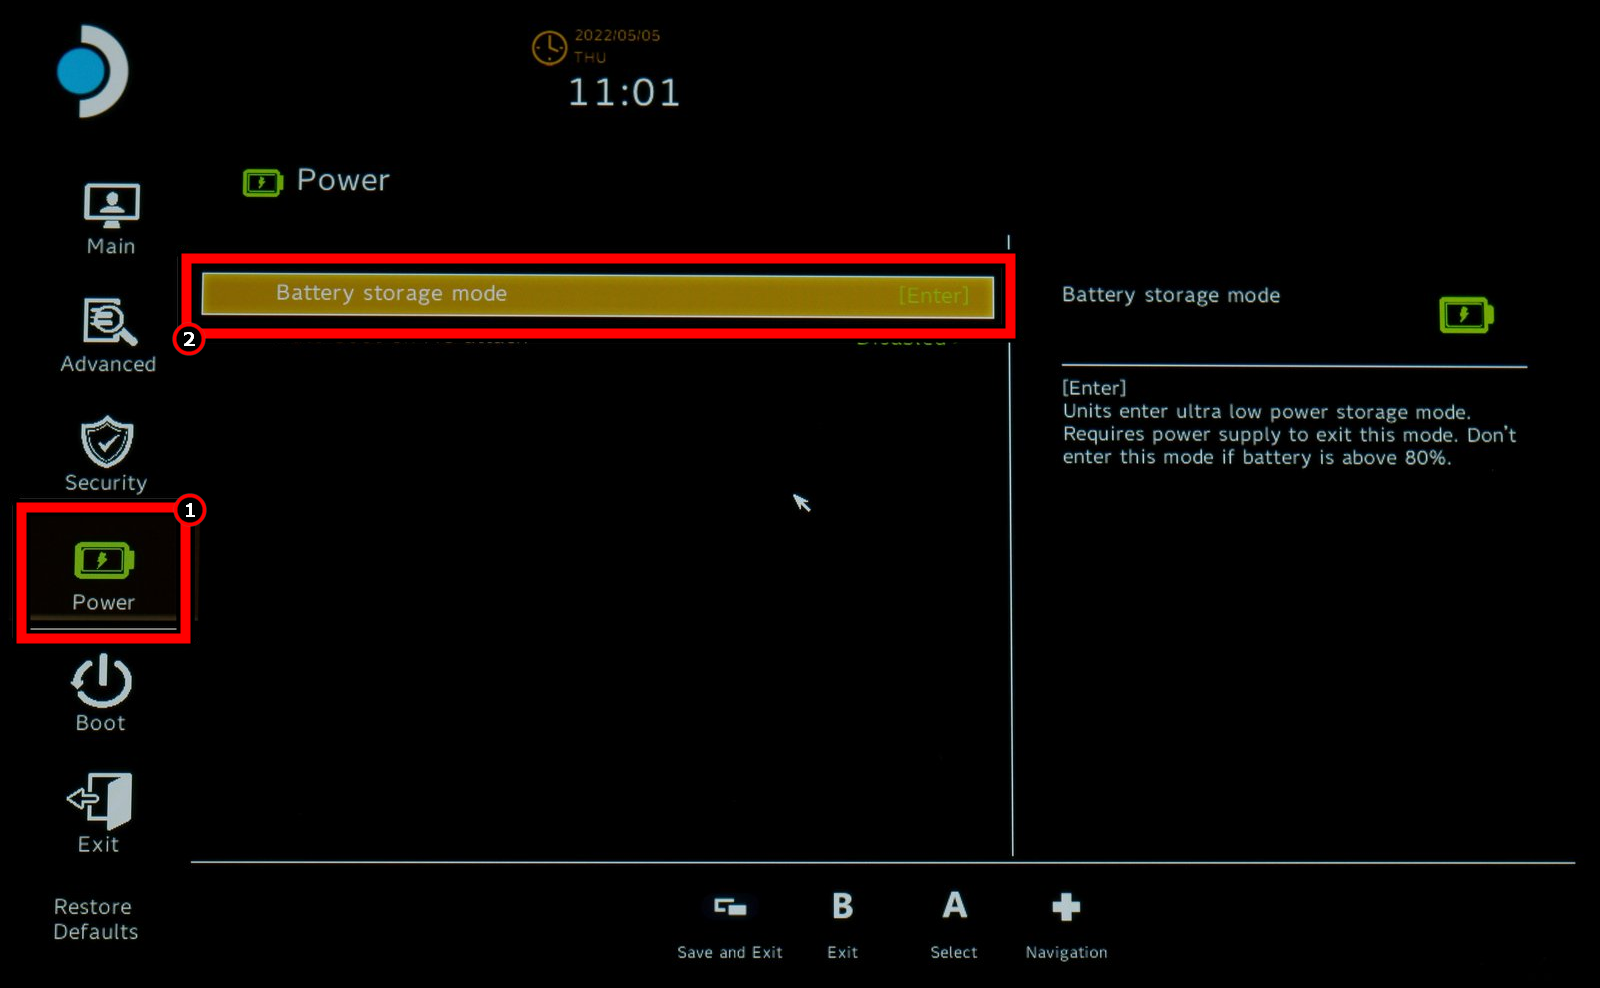
Enable Battery Storage Mode in the BIOS of the Steam Deck - Press Enter and wait till the deck turns off after its LED blinks thrice. This confirms that the desk has gone into storage mode.
- After 5 minutes, put the deck on charging and the deck should boot automatically. If it fails to automatically boot, you may retry the above steps.
- Once it is powered on, see if it can reach Steam servers.
5. Change the Update Channel of the Steam Deck
The Steam Deck cannot connect to its servers due to an OS bug. Changing and updating the Steam Deck’s update channel will resolve this issue.
- Go to the Steam Deck Settings > System > System Update Channel.
- Change the update channel. For example, if it is Beta, switch to Stable or vice versa.
- Tap on Update and install available updates.
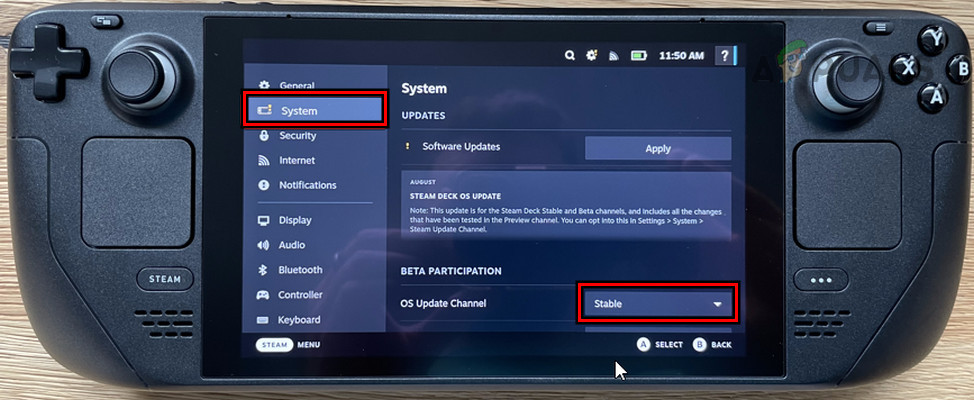
Change the OS Update Channel to Stable for the Steam Deck - Restart the deck and see if it is operating correctly.
6. Change the Deck’s Download Region
If the Download Region is set to a problematic or inappropriate server for your location, it can cause connection issues. Accordingly, changing the Download Region of the deck will resolve the problem.
- Go to the deck’s Settings > Downloads > Download Region.
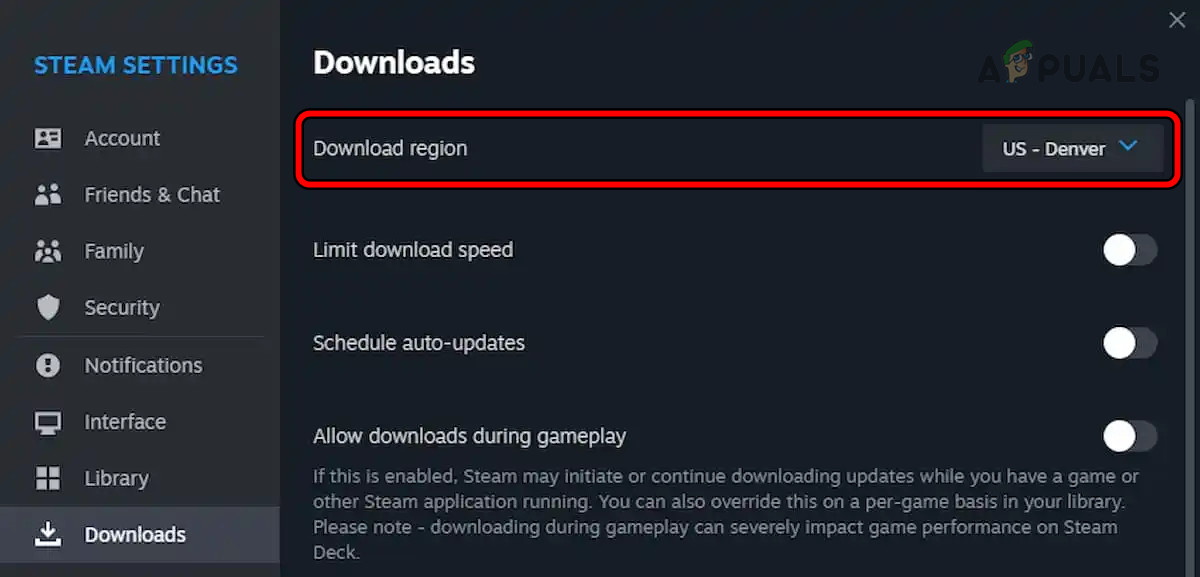
Change the Download Region of the Steam Deck - Select the region that is closest to your location and restart the deck. Check if the connection is restored.
7. Disable Remote Play on the Steam Deck
If Remote Play is enabled on the Steam Deck, it may disrupt the server connection. Disabling Remote Play on the Deck can fix this issue.
- Go to the Steam Deck Settings > Remote Play.

Disable Remote Play on the Steam Deck - Disable it and restart the deck. Verify if the problem is cleared.
8. Change IPv6 and DNS Settings of the Deck
If the Deck’s DNS settings are no longer valid or the DNS servers can’t reach the Steam servers, it may cause the current connection issue. Additionally, if your network isn’t optimized for the IPv6 protocol, it could contribute to the problem.
To resolve the issue, disable IPv6 and change the DNS settings on the Steam Deck.
Disable IPv6
- Switch the deck to the Desktop Mode and go to System Settings > Connections > Wi-Fi Settings.
- Disable IPv6 and restart the device. Check if the issue is cleared.
Disable IPv6 on the Steam Deck
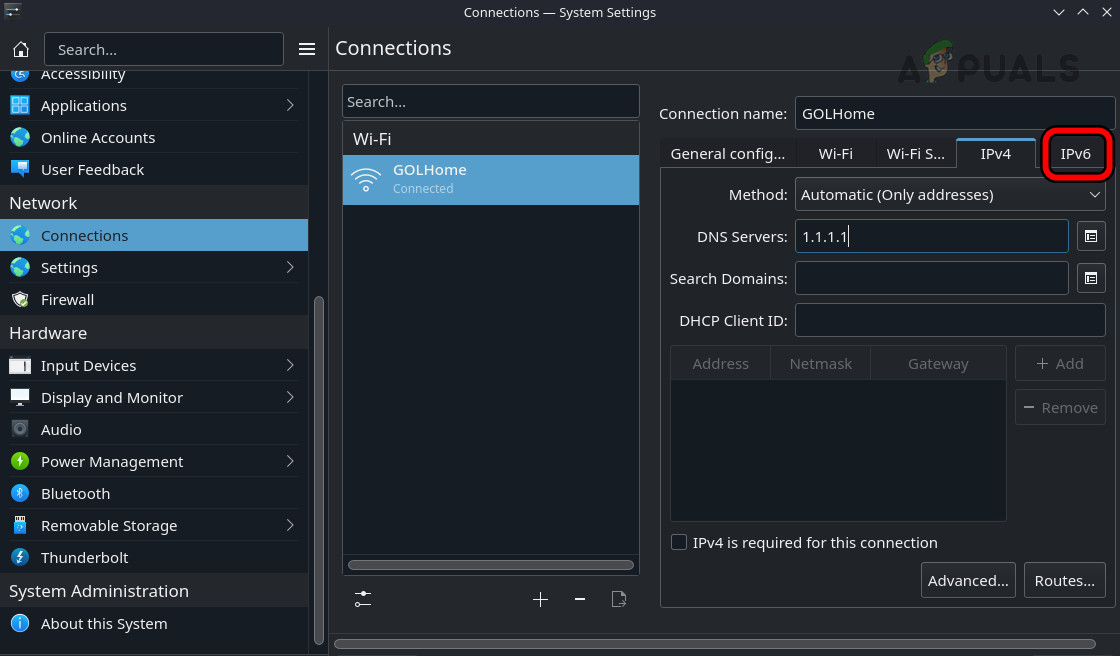
Change DNS
- Switch to the Desktop Mode of the Steam Deck and go to System Settings > Connections > Wi-Fi Settings.
- Add the following DNS servers for IPv4:
1.1.1.1

1.0.0.1
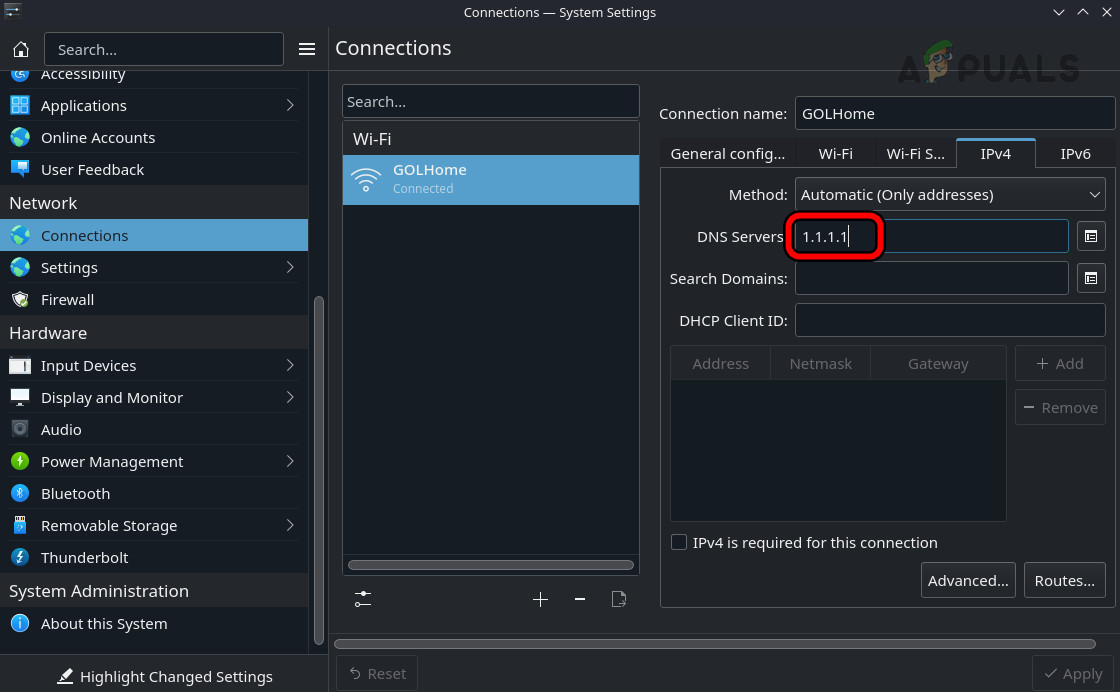
Change the DNS Server of the Steam Deck - Save the change and restart the Steam Deck. Verify if it can reach its servers.
9. Disable the Power Saving Feature of the Network Card
If you encounter a server connection issue on the Steam Deck, it may be due to the network card entering sleep state or not waking up from it. To fix this this, disable the power-saving feature of the network card.
- Go to the deck’s Settings > System.
- Under System Settings, enable Developer Mode, and in the left pane, select Developer.
- Under Miscellaneous, disable the toggle of Enable WIFI Power Management and see if the issue is resolved.
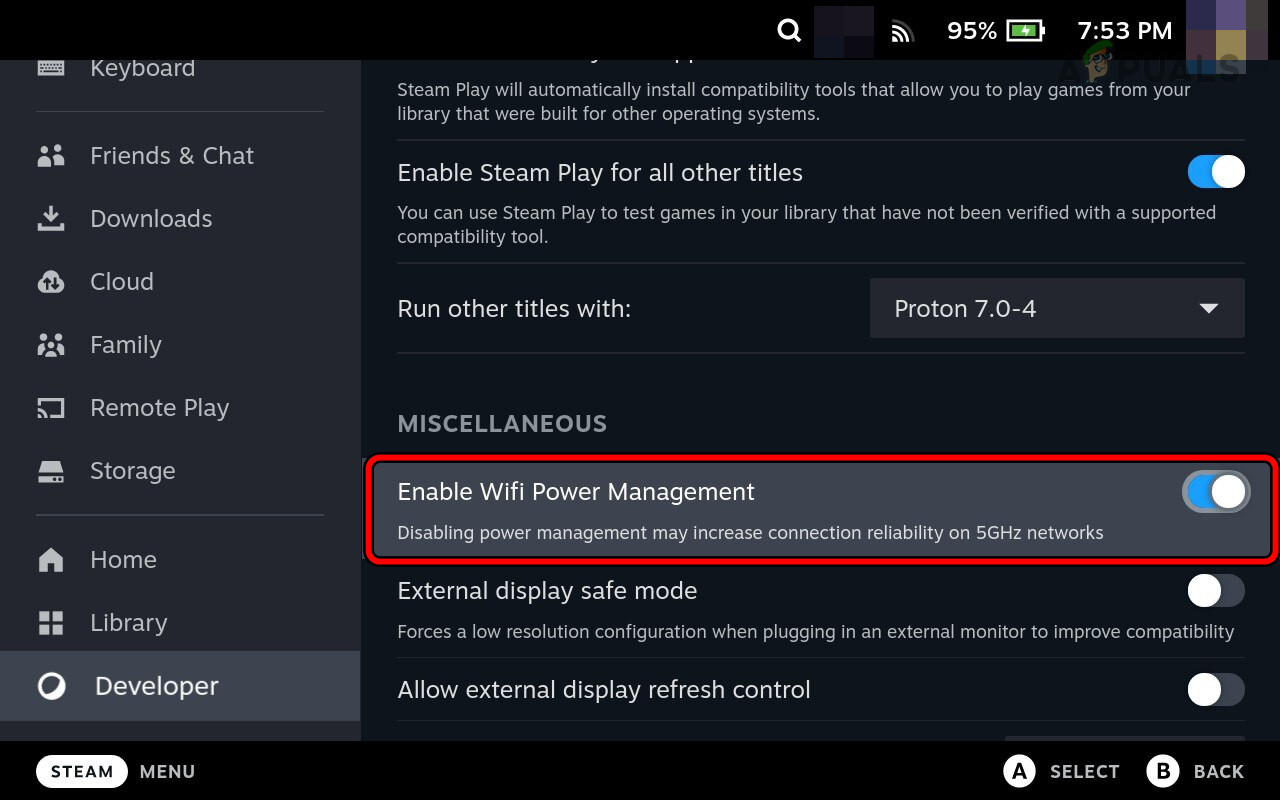
Disable Wi-Fi Power Management of the Steam Deck
10. Change the Router Settings
There can be many router settings that can break communication between the Steam Deck and its servers. Changing these settings will clear the problem.
To change these settings, go to the router’s admin portal and log in using your credentials.
Disable the Band Steering
- Go to the Wireless section and disable Band Steering.

Disable the Band Steering of the Router - Restart the router and Steam Deck. Verify if the connection problem is solved.
Change the Wi-Fi Encryption
- Go to the Wireless section and open Security.
- Change it to WPA3 and save the changes.
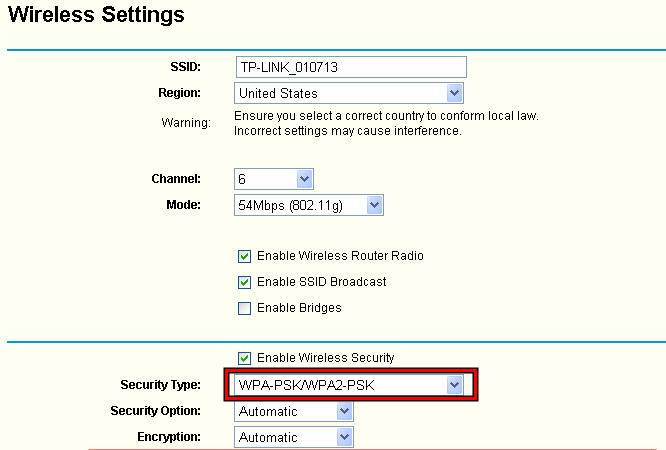
Change the Wi-Fi Security Type to WPA-PSK WPA2-PSK - Restart the router and Steam Deck. Check if it is working correctly.
- If not, change the Encryption to WPA2 or WPA and see if that solves the problem.
Change the Wireless Mode of the Network
- Go to Settings > Wireless > Advanced Settings.
- Change the Wireless Mode to 802.11n/ac and save the changes.
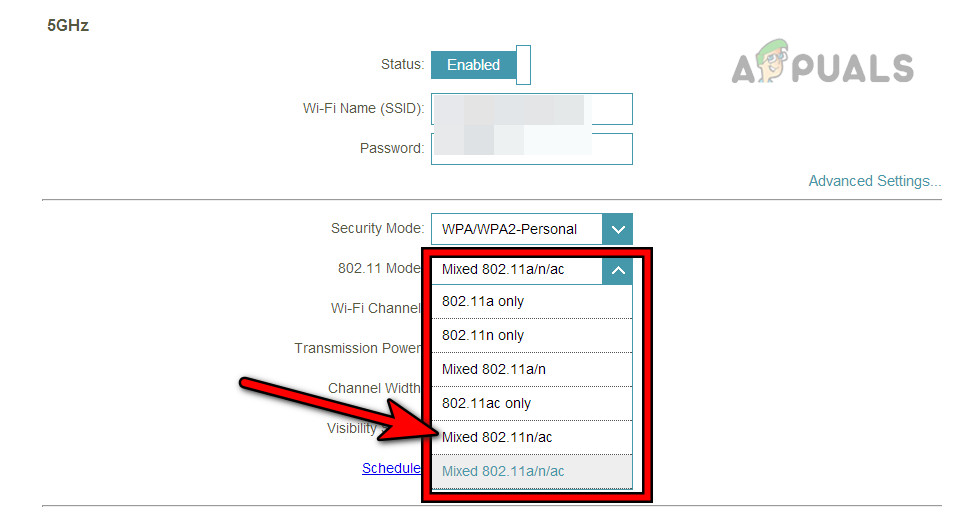
Change the Wireless Mode of the Router to 802.11n/ac - Restart the route and Steam Deck. Confirm if the Internet connection is restored.
Change the Wi-Fi Channel
- Download a Wi-Fi Analyzer app on your phone and use it to find out the less-crowded channel in your vicinity.
- Go to the router Settings > Wireless > Advanced Settings.
- Change the Channel to a less-crowded one such as Channel 5. For a dual-band router, make sure to select the best channel for each band.
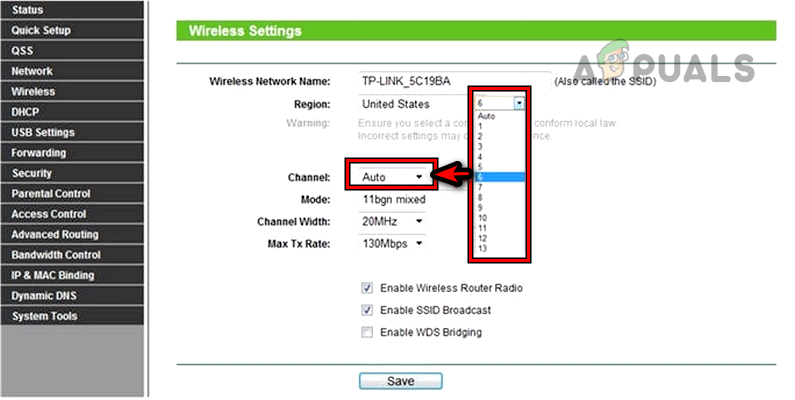
Change the WIFI Channel - Save the changes and restart the router.
- Restart the Steam Deck and see if its Internet connection is back to normal.
Disable 5 GHz and Enable 2.4 GHz
- Go to Settings > Wireless > Advanced Settings.
- Disable 5 GHz and enable 2.4 GHz.
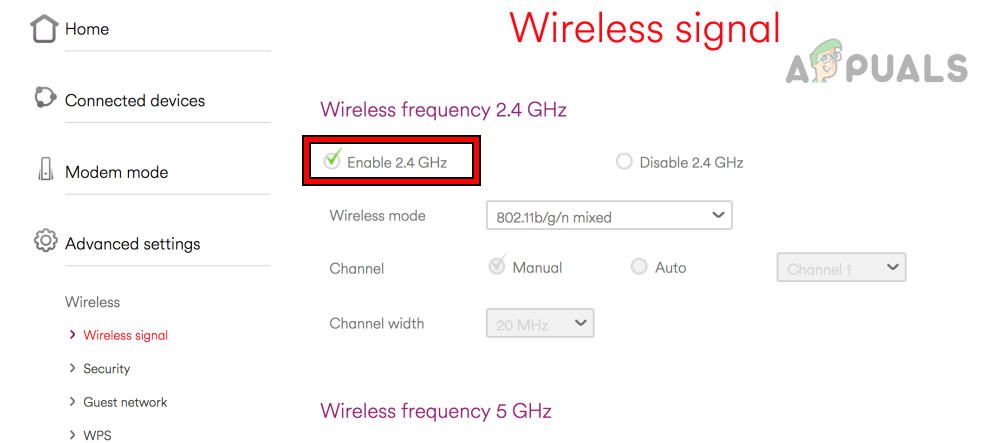
Enable 2.4 GHz in the Router Settings - Save the changes and restart the router.
- Restart the Steam Deck and connect it to the 2.4 GHz band. Check if the problem is solved.
Reset the Router
- Firstly, note down or back up the info needed to reconfigure the router after factory resetting it.
- Press and hold the router’s reset button. You may find it under or on the side of the router.

Reset the Router to the Factory Defaults - Release the button after 30 seconds and wait till the router is properly powered on.
- Configure it as per the OEM instructions and connect the Steam Deck to the network. See if it can access the Internet.
11. Try on Another Network
The deck will not reach Steam servers if your ISP is restricting the deck’s access to servers. In this case, trying another network will solve the problem.
- Disconnect the deck from the network in use and restart it.
- Connect it to another network (such as the phone’s hotspot) and verify if the deck has started communicating with Steam servers.
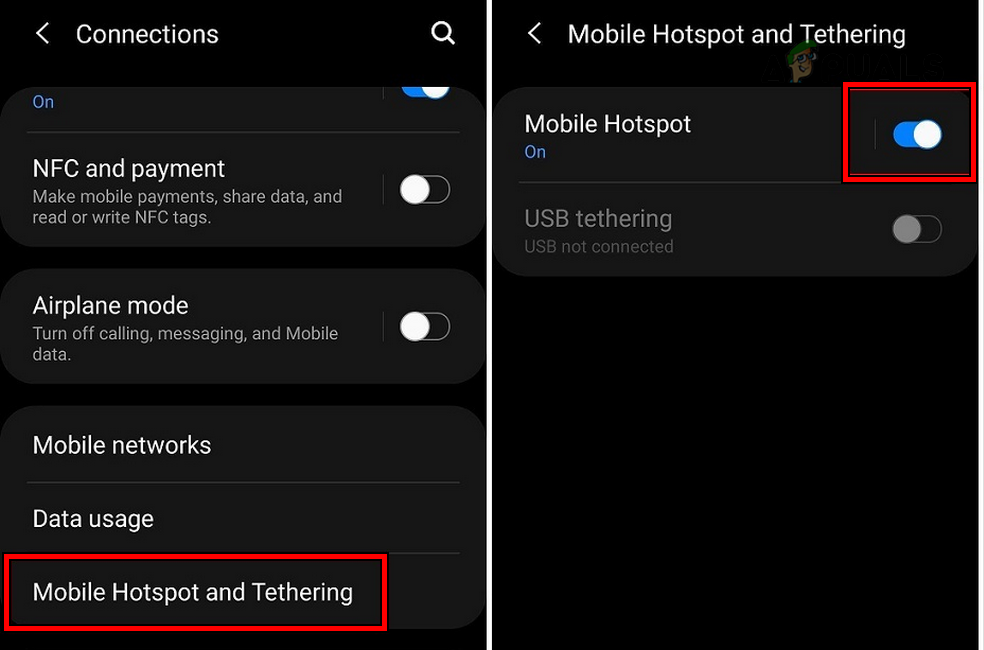
Enable Hotspot on the Phone
12. Reset or Reimage the Steam Deck
If the operating system components managing the network communication of the deck are damaged, it can prevent the deck from connecting to the servers. Resetting or reimaging the Steam Deck can resolve this issue.
If there’s excess data on your Steam Deck, consider signing out of the Steam account on it and other devices. Then, log back into the Steam account on the Steam Deck to check if this resolves the error.
If not, factory resetting the deck is the last resort. This step will erase the data on the deck, so, back up the essentials.
Reset the Steam Deck
- Launch the Steam Deck Settings and go to System.
- In the Advanced section, tap on Factory Reset and confirm to reset the deck.
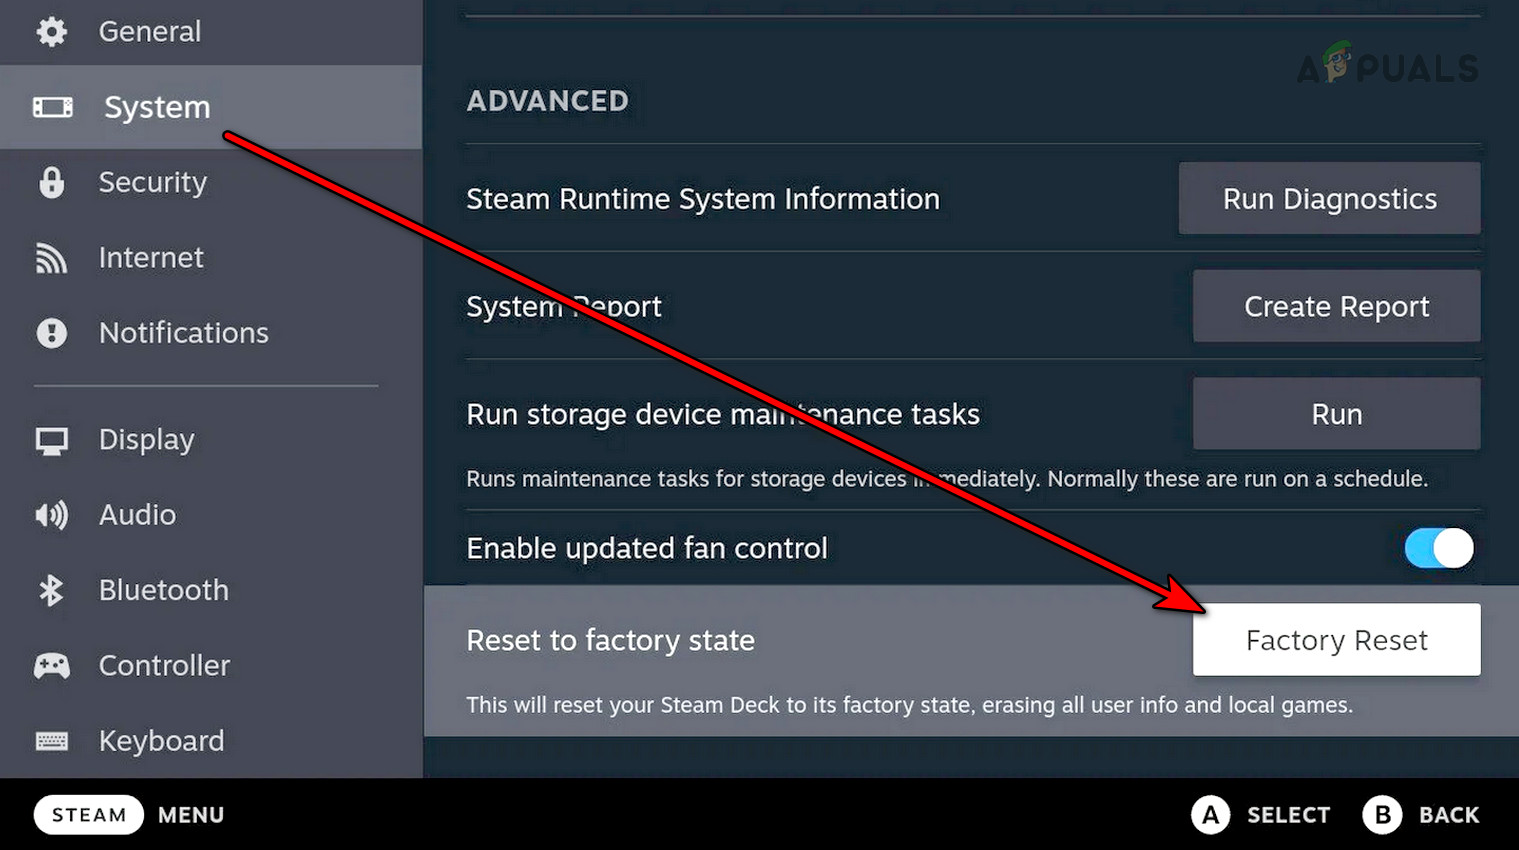
Factory Reset the Steam Deck - Once done, set it up and see if its connection problem is cleared.
Reimage the Steam Deck
- Go to the official download link of the Steam Deck Recovery Image and download it.
- Prepare a bootable USB by using the recovery image of the SteamOS. On a Mac or Linux machine, you can use Balena Etcher and for a Windows PC, you can use Rufus to create a bootable USB disk.
- Use an adapter or hub to plug the USB into the deck and power off the deck by pressing/holding the power button till the device turns off.
- Hold down the volume down button and tap once on the power button.
- When the start-up chime is heard, release the volume down button.
- Once the device shows the Boot Manager windows, click on Boot from the EFI USB Device <your USB drive>.
- In the desktop window shown, select Reimage Steam OS and follow the prompts shown on the screen.
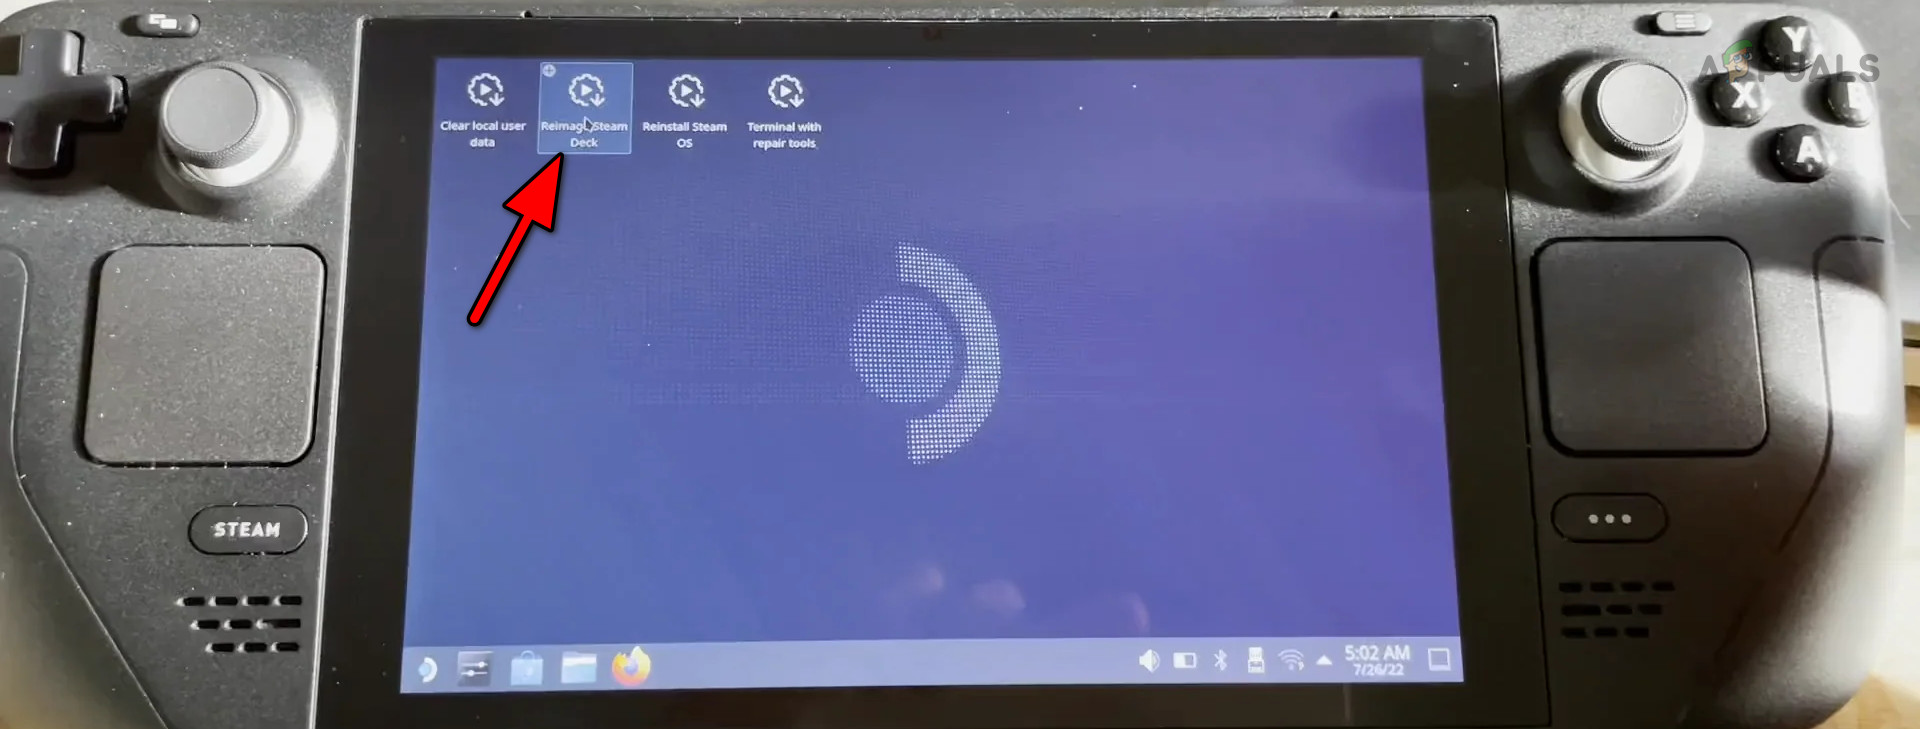
Reimage Steam Deck - Once the process is completed, configure the deck as per your requirements and hopefully, it will access Steam servers without a problem.
If the issue persists, you may contact Steam Support. This issue might be hardware-related and if the deck is under warranty, you may claim the same.
Reviewed by Huzaifa Haroon