Fix RunDLL ‘There was a problem starting’ when Opening HDD
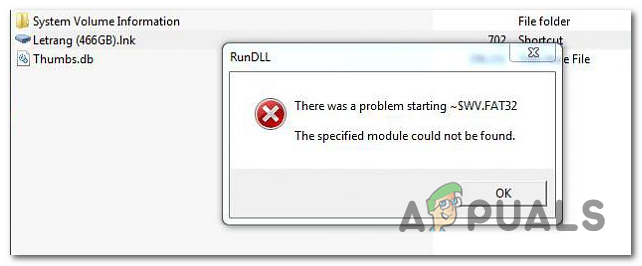
The RunDLL error ‘There was a problem starting ~. The specified module could not be found‘ mainly occurs when Windows users try to open an HDD or external HDD drive. But for some users, the error only appears when they try to open up a shortcut that is pointing to an executable stored on this disk.
This particular issue is not exclusive to a certain Windows version and is confirmed to occur on Windows 7, Windows 8.1 and Windows 10.
As it turns out, in most cases, this particular error will occur due to an autorun.inf file stored in the root of the HDD that is either system-protected, read-only and hidden – this issue is most likely facilitated by some kind of virus infection. If this is the case, you can fix the problem easily by deleting every autorun.inf file that might be causing the problem – You can either do this via a CMD prompt (Method 1) or by using Registry Editor (Method 2).
However, the issue can also be caused by logical errors on the affected drive (Method 3), a partially removed infection (Method 4) or a severe case of system file corruption (Method 5).
Method 1: Deleting the autorun.inf file
According to various user reports, this issue is popularly caused by what’s known as a ‘shortcut virus’. This type of malware hides all your files and folders, then replaces them all with shortcuts that look exactly the same. Nowadays, every major AV suite is equipped to detect and eliminate this kind of security threat, but the problem is, not all of them are capable of removing the autorun.inf file that was previously created.
If this happens, the drives affected by the virus might become inaccessible as a result and show the ‘There was a problem starting ~. The specified module could not be found‘ when the user tries to access them.
If this scenario is applicable, you can fix the issue by using the terminal to navigate to the root location of your hard disk and deleting the autorun.inf file – Most likely, it has read-only properties, it’s hidden or it’s a system protected.
The instructions below will help you to get rid of it and fix the issue:
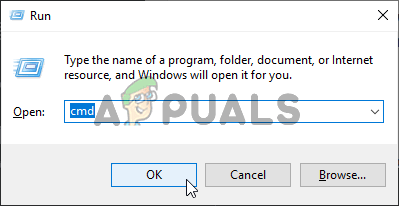
- Press Windows key + R to open up a Run dialog box. Next, inside the text box, type ‘cmd’ and press Ctrl + Shift + Enter to open up a CMD window with elevated privileges. When you’re asked to provide administrative access via the UAC (User Account Control), click Yes to grant admin access.
Running Command Prompt - Once you’re inside the elevated CMD prompt, type the following command in order to navigate to the root location of the affected drive:
CD X:\
Note: Keep in mind that X is simply a placeholder for the affected drive. Replace it according to the letter corresponding to the drive-in your particular scenario.
- Once you manage to get to the root location of the affected drive, type or paste the following locations in order and press Enter after each one to delete the autorun.inf file forcefully:
Attrib -r -s -h d:\autorun.inf
Del /F d:\autorun.inf
- After the operation is complete, close the elevated CMD prompt and restart your computer. Once the next startup sequence is complete, open File Explorer and double-click on the affected drive again to see if the issue has been fixed.
If you’re still encountering the ‘There was a problem starting ~. The specified module could not be found‘ error, move down to the next potential fix below.
Method 2: Deleting autorun.inf keys via Registry Editor
If you’re not comfortable with using a terminal to delete the problematic autorun.inf files or multiple drives are affected and you want to fix the issue all at once, a better way to do it is via Registry Editor.
By using Registry Editor to navigate to the location of every saved Run and RunOnce key, you can effectively disable the autorun.inf files that might be triggering the ‘There was a problem starting ~. The specified module could not be found‘ error.
There are four different locations in the Registry where the autorun.inf files might be found. Using Registry Editor, you can get to each location manually and remove the Run and RunOnce keys that are allowing the autorun.inf file from denying you access to the drive.
Here’s a quick guide on how to do this:
Note: The steps below are universal and can be followed on Windows 7, Windows 8.1 and Windows 10.
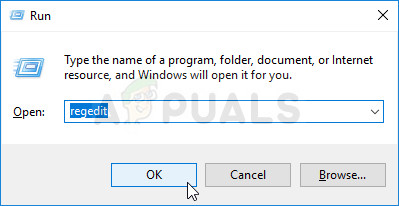
- Press Windows key + R to open up a Run dialog box. Inside the newly appeared text box, type ‘regedit’ and press Enter to open up the Registry Editor. When you see the UAC (User Account Control) prompt, click on Yes to grant admin access.
Running the Registry Editor - Once you’re inside the Registry Editor, use the left-hand side to navigate to the following location:
HKEY_CURRENT_USER\Software\Microsoft\Windows\CurrentVersion\Run
Note: You can either navigate there manually or you can paste the location directly into the navigation bar and press Enter to get there instantly.
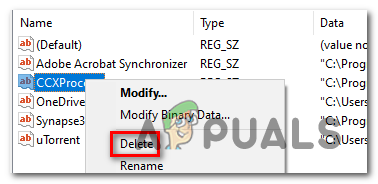
- After you manage to arrive to the correct location, move over to the right-hand side and look for any entry that doesn’t lead back to a known program that you willingly installed. Be sure to look at the location (Data) to see if this list contains evidence of a PuP (Potentially unwanted Program) or remnants of a malware program.
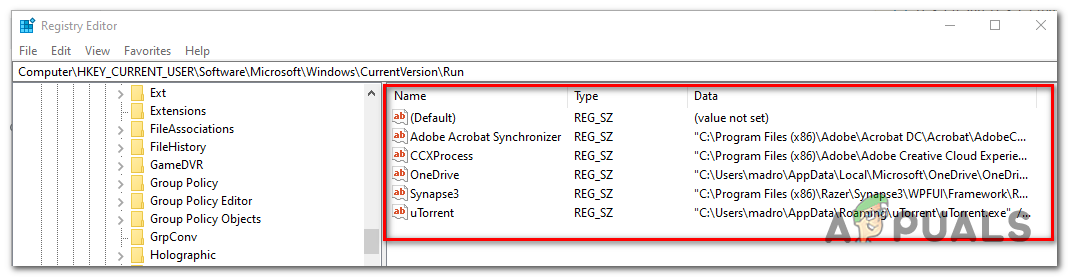
Investigating for the corrupt Run or RunOnce key Note: Ignore the (Default) entry.
- In case you manage to find evidence of a malicious Run key, right-click on it and choose Delete from the newly appeared context menu.
Deleting the problematic key - Next, it’s time to ensure that the rest of the remaining Run and RunOnce locations don’t contain the same link to the problematic autorun.inf file. To do this, navigate to each of the following locations and repeat step 3 and 4 with all of them until every potential problem-causing key is deleted:
HKEY_CURRENT_USER\Software\Microsoft\Windows\CurrentVersion\RunOnce
HKEY_LOCAL_MACHINE\Software\Microsoft\Windows\CurrentVersion\Run
HKEY_LOCAL_MACHINE\Software\Microsoft\Windows\CurrentVersion\RunOnce
- After every key has been deleted, close Registry Editor and restart your computer. Once the next startup is complete, attempt to access the drive again and see if the issue is now resolved.
If you’re still encountering the ‘There was a problem starting ~. The specified module could not be found‘ error when trying to access it, move down to the next potential fix.
Method 3: Running CHKDSK
Another potential culprit that might lead to the apparition of this issue is corrupted data on your HDD. If this is the main culprit behind the issue, you can probably get the issue fixed by running the CHKDSK utility.
Some users that we’re also dealing with the same problem have reported that the ‘There was a problem starting ~. The specified module could not be found‘ error no longer appeared when they accessed their driver after running an Automatic CHKDSK scan with the ‘Scan for and attempt recovery of bad sectors’ checkbox enabled.
Here’s a step-by-step guide on running the CHKDSK utility to fix corrupted data.
Method 4: Running a malware scan
If none of the methods above have allowed you to fix the issue, it’s also possible that the issue is being caused by an ongoing security infection. If you haven’t done it yet, we highly recommend that you perform a deep scan with a competent AV suite.
If you already pay for a premium AV subscription, use it to scan for any malware that might still be lingering on your computer.
But if you’re looking for a competent AV suite that is capable of identifying and removing any remnant files that might still cause issues, you should consider using Malwarebytes.
In case you need help triggering a deep scan with Malwarebytes, here are some step by step instructions.
Method 5: Refreshing every OS component
If none of the potential fixes above have helped you access your drive, it’s very likely that the problem occurs due to some type of system file corruption.
In order to replace every Windows component without affecting your personal files, consider doing a repair install.
In case that’s not a possibility, the only viable fix as this point is to go for a clean install.


