How to Root HyperOS Using Magisk in 3 Easy Steps
 Reviewed by Huzaifa Haroon
Xiaomi has long been a leading choice within the Android community for customization and advanced feature exploration. Designed with enthusiasts in mind, Xiaomi devices—especially with their unique software—cater perfectly to users seeking greater control, particularly in areas such as rooting.
This article provides a comprehensive, step-by-step guide to rooting your Xiaomi device running HyperOS. We will explain both the potential risks and the exact procedures required to ensure a safe and successful rooting experience.

↪ Rooting HyperOS
With HyperOS, Xiaomi has retained much of MIUI’s core architecture, resulting in a similar user experience—including the process required for rooting. Therefore, the rooting process for HyperOS remains largely unchanged from previous MIUI versions.
Rooting is the process of gaining privileged control over your device’s system. This provides you with enhanced authority over hardware and software functions, enabling you to bypass manufacturer or Android system limitations that typically restrict user access.
Rooting HyperOS Using Magisk
The primary approach to rooting HyperOS involves using Magisk. This method requires you to obtain your device’s boot.img file. Magisk uses this file to generate a patched version that you can safely flash to your phone, enabling root access without modifying the device’s system partition.
Before beginning the rooting procedure, please be aware that rooting HyperOS requires you to unlock the device’s bootloader. This must be done via the official method, which involves submitting an unlock request to Xiaomi. Keep in mind that the process includes a mandatory waiting period of approximately 168 hours before unlocking is permitted.
Pre-Requisites
Ensure you have the following requirements ready before beginning the rooting process. Many of these items have been discussed previously in this guide.
- An unlocked bootloader.
- A PC for downloading, extracting, and flashing the boot.img file onto your device.
- A USB cable for reliable data transfer. Alternatively, you may consider a wireless file transfer if you prefer.
- An active internet connection to download all necessary files and tools.
- Platform Tools (to execute Fastboot commands when flashing the patched boot.img file).
- ADB Drivers installed on your PC.
↪ Enable USB Debugging
- Open Settings and tap “About Phone.”
- Locate the “OS version” field and tap it repeatedly until you see the message: “You are now a developer.”
 Enabling “Developer options” in HyperOS
 - Return to Settings and scroll to “Additional settings.” Tap to open it.
- Scroll down to find “Developer options” and select it.
- Locate the “USB debugging” option and turn it on.
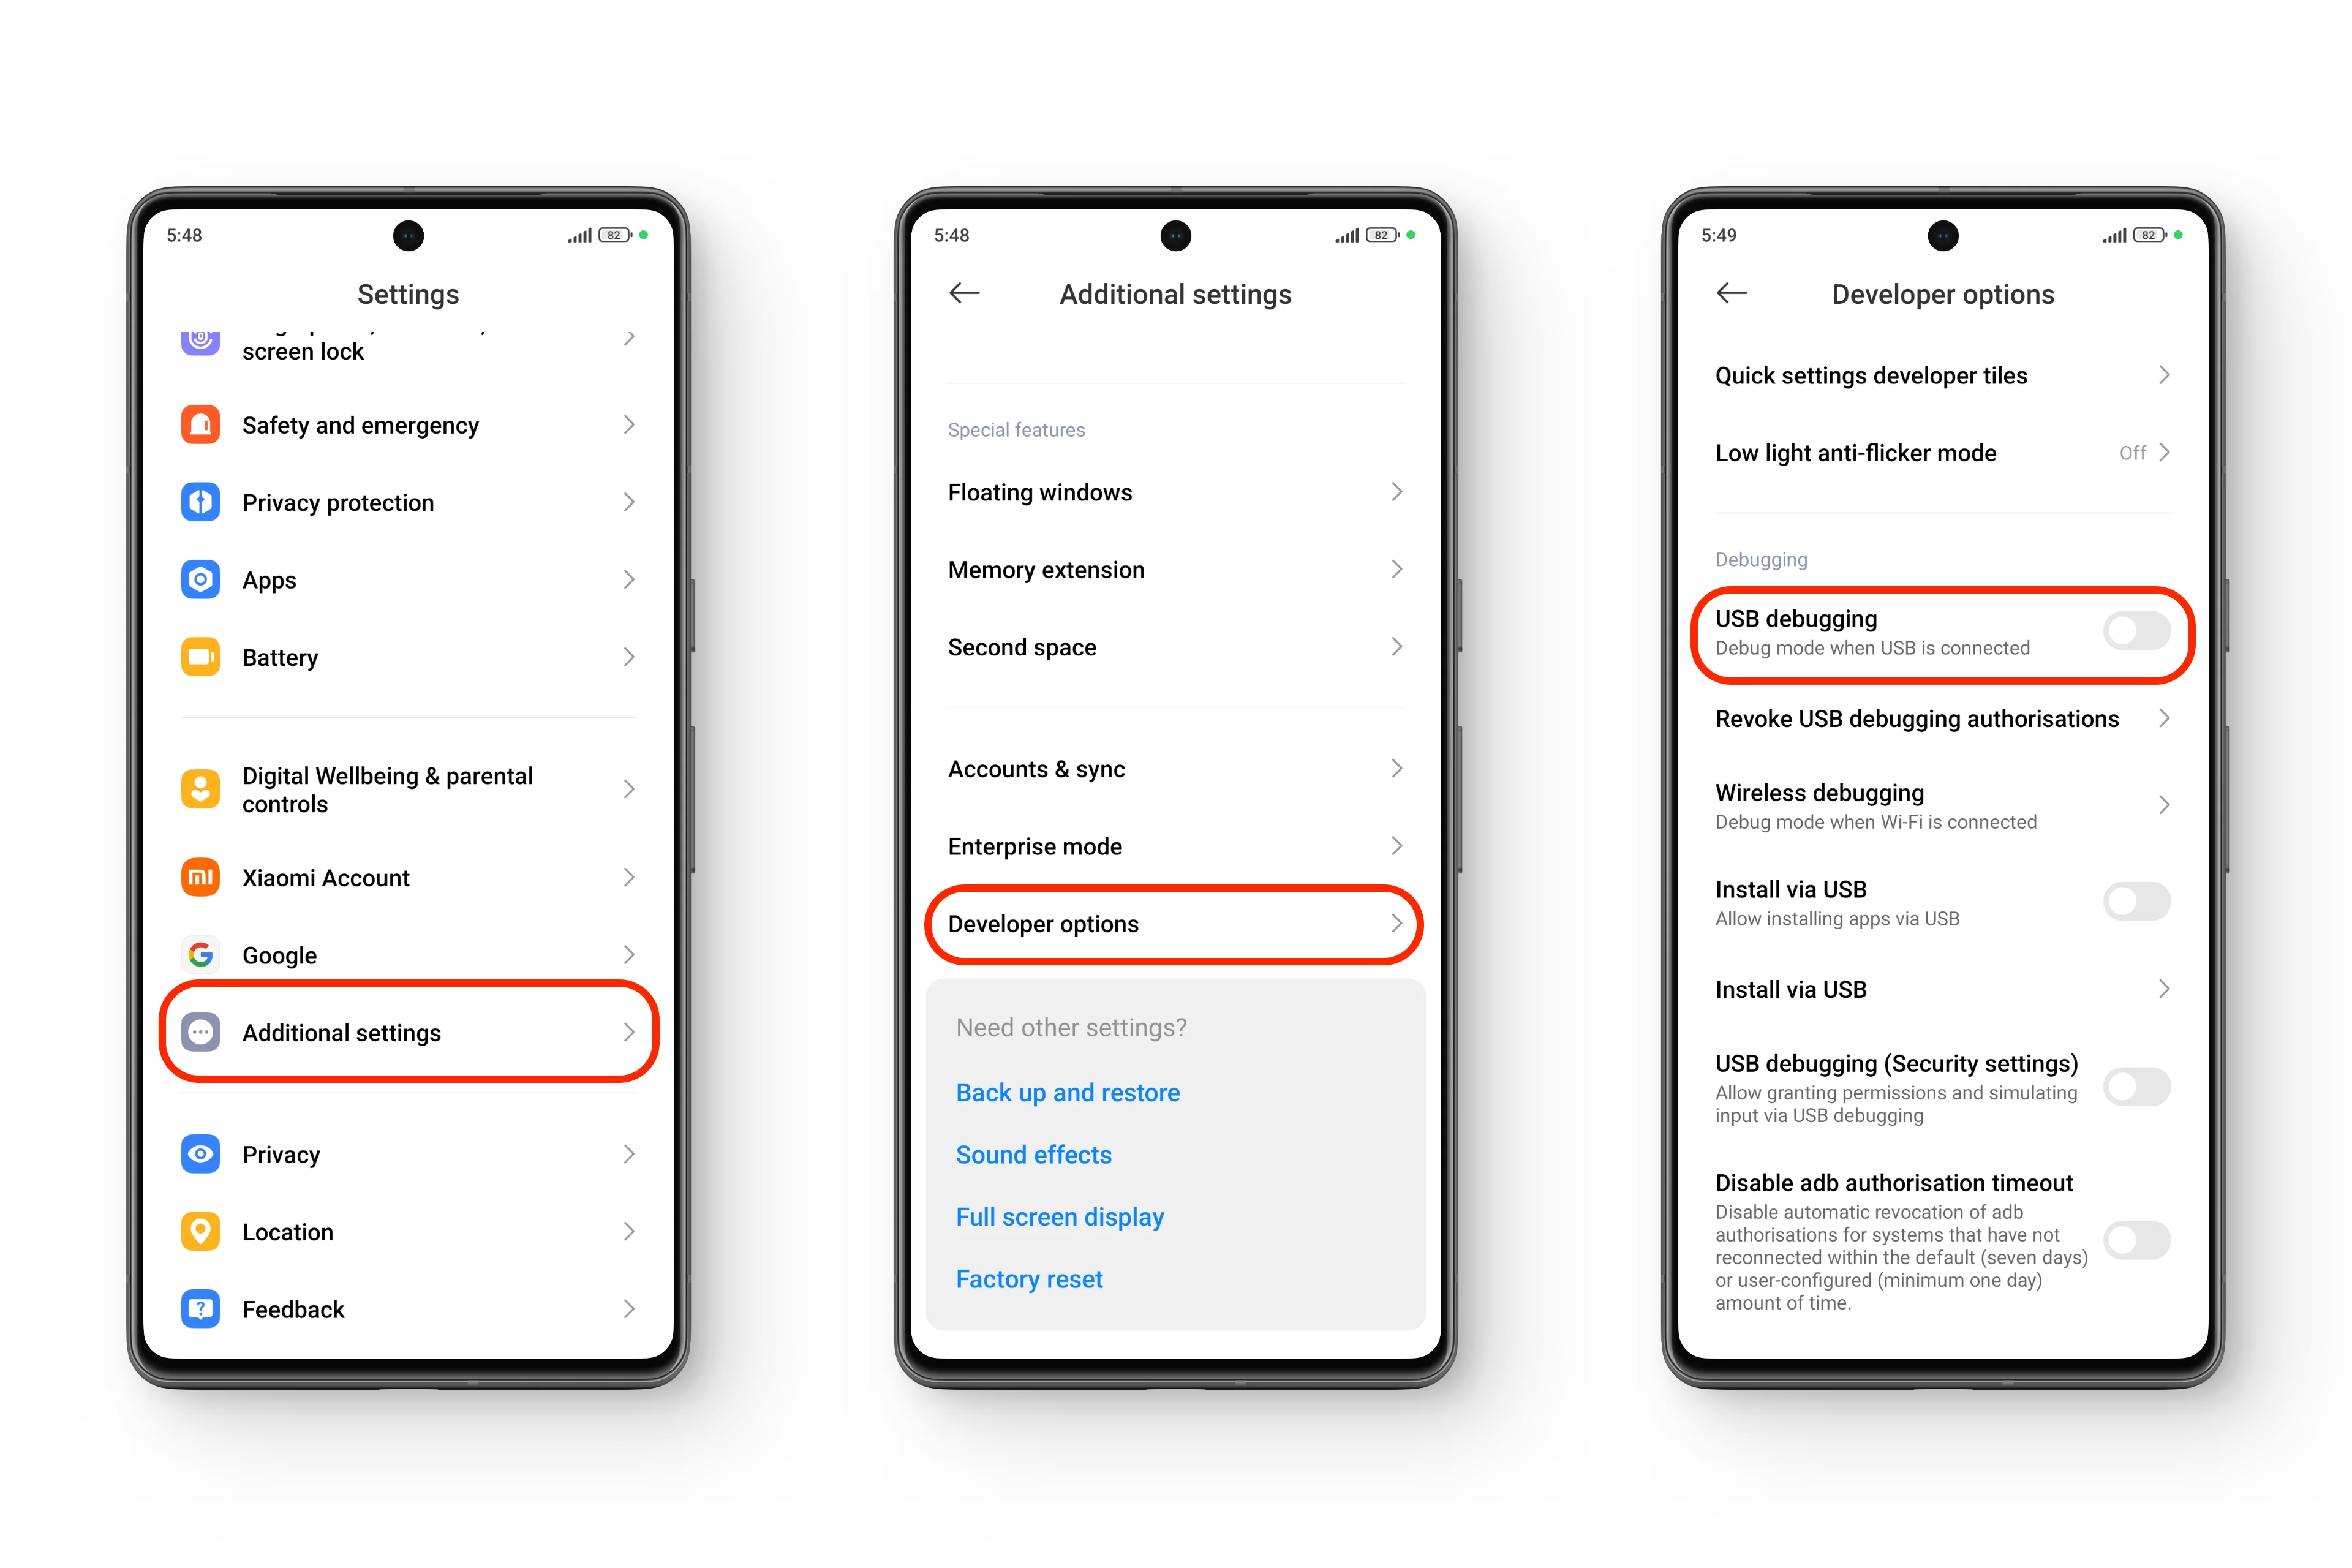 Enabling “USB debugging” in HyperOS
 - When prompted by the confirmation dialog, select “OK.”
 The (HyperOS) precautionary dialog box
 Enabling “Developer options” in HyperOS
 Enabling “USB debugging” in HyperOS
 The (HyperOS) precautionary dialog box
Enabling USB Debugging allows your phone to communicate with your PC during the root process, which is essential when it becomes time to flash the patched recovery image file back onto your device.
1. Finding Your Phone’s “boot.img” File
The initial stage of rooting your device requires locating and patching the boot.img file. This essential file is usually embedded within the payload.bin that accompanies OTA updates for your Xiaomi device.
1.1) Find the “payload.bin” file
- Download the HyperOS Recovery ROM file that matches your device’s current OS version from a reliable source. This will usually be a .zip file.

HyperOS Recovery ROM | Xiaomi - Extract the downloaded .zip file. Inside, locate the file named payload.bin.
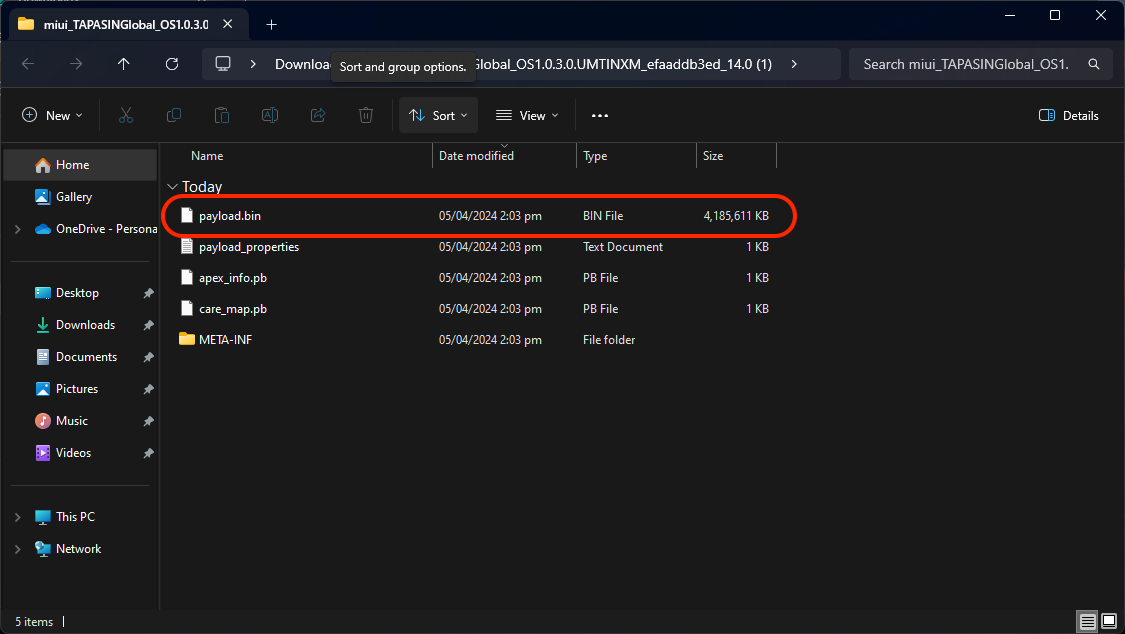
Extracted Recovery.zip Folder - To unpack the payload.bin file from the ROM, you will need the Payload Dumper Tool.
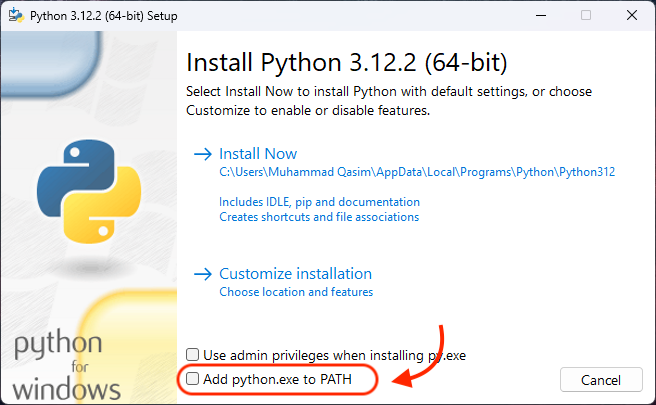
1.2) Extract the “payload.bin” File (Requires Python)
- Download and install Python 3 (or newer). During installation, make sure to select “Add Python to PATH.”
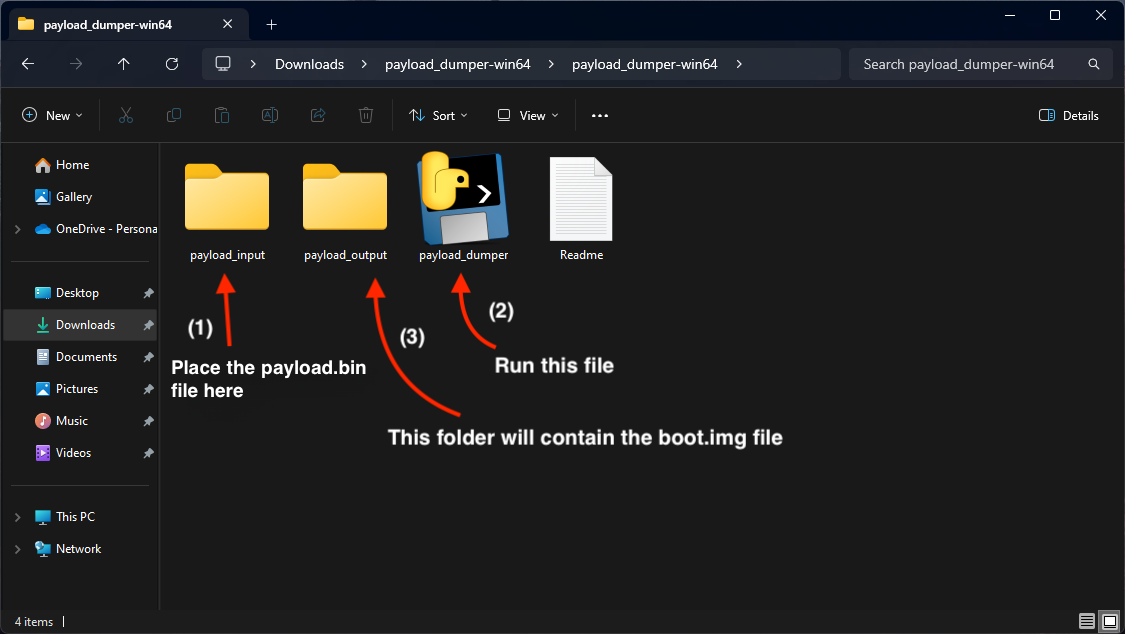
- Download the Payload Dumper Tool from the official repository. Extract the .zip file to access its contents.
- The extracted folder will contain several files. Your focus should be on payload_dumper.exe and the folders payload_input and payload_output.
1.3) Acquire the “boot.img” File via Payload Dumper.
- Copy the payload.bin file you extracted from the ROM zip into the payload_input folder.
- Navigate to the directory containing payload_input and run payload_dumper.exe.
- The tool will extract the payload.bin file and output a new boot.img file into the payload_output folder. This boot.img file is essential for the next steps.
2. Patching the boot.img File
After acquiring the boot.img file, the next step is to patch it using the Magisk Manager app. To do this, you will first need to transfer the boot.img file to your phone. Use a USB cable or a wireless transfer method, depending on your convenience.
- Download the Magisk Manager app directly onto your phone from a trusted source. Avoid unofficial app stores for security reasons.
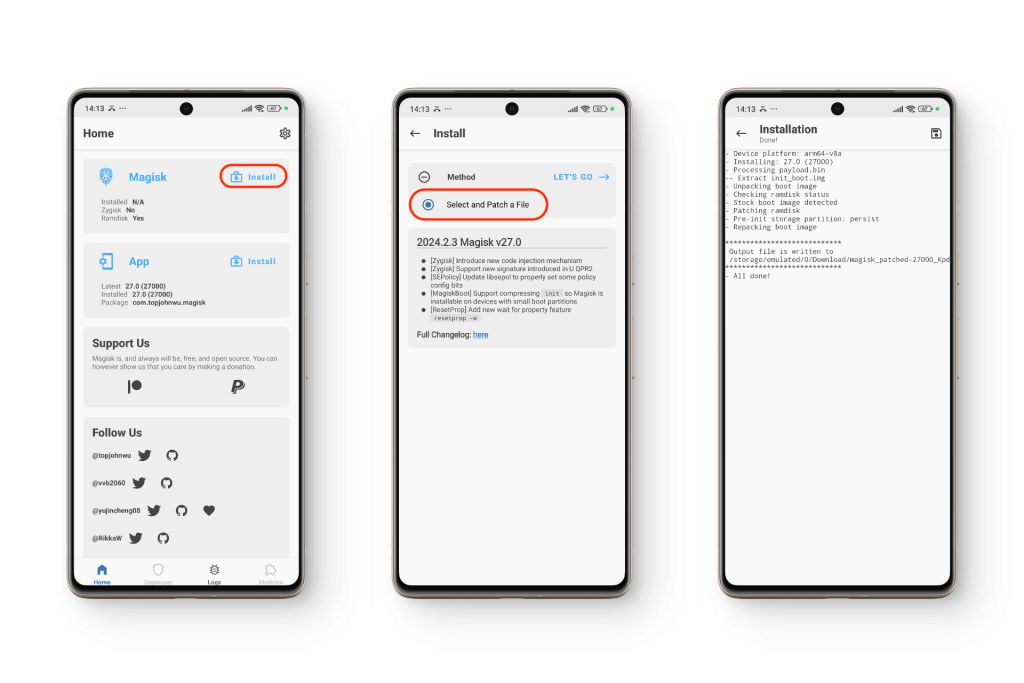
- Open the Magisk Manager app and select the “Install” option. You will typically see a prompt like “Select and Patch a File“.
- Navigate to the folder where you stored the boot.img file. Select it to allow Magisk to patch the file.
3. Flashing the Patched Image File (via PC)
Once Magisk has patched your boot image, a new file named “magisk_patched.img” will appear in your phone’s Download folder. This patched file must be transferred back to your PC, as you’ll need it for the flashing stage.
3.1) Setting Up Your PC
- Verify that you have ADB drivers installed on your PC.
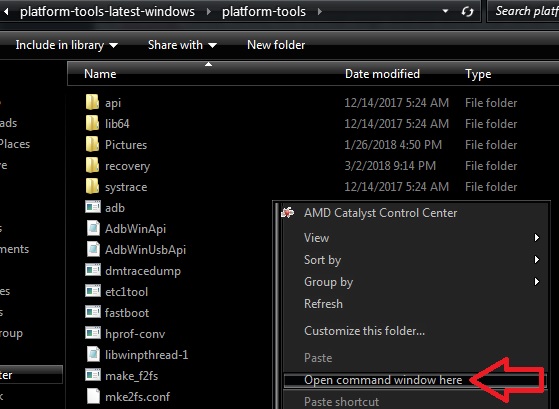
- Navigate to your platform-tools folder and open a Command Prompt window in this directory.
- Click the address bar in the folder, type “cmd“, and press Enter. This opens the Command Prompt at the correct location for issuing Fastboot commands.
3.2 Booting into Fastboot Mode
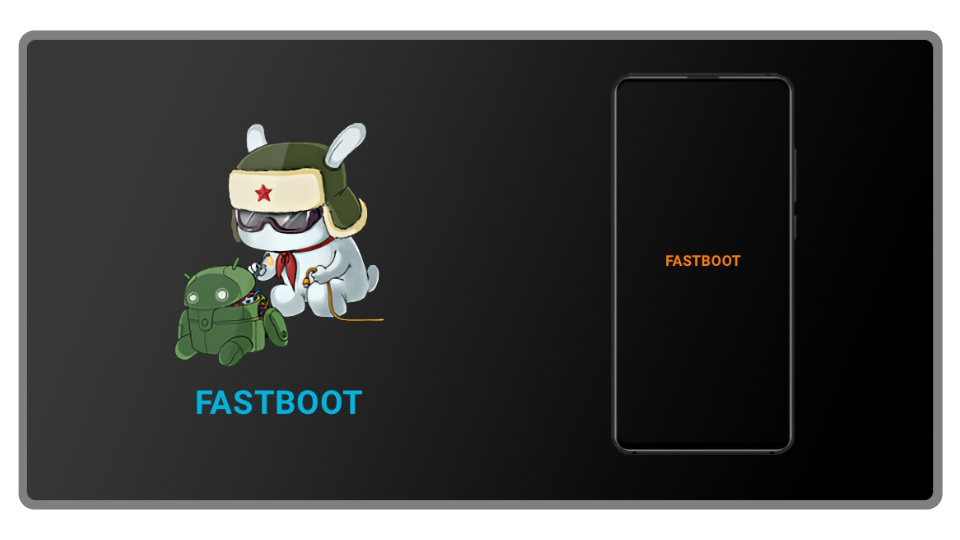
- Power off your phone entirely.
- Press and hold both the Power and Volume Down buttons simultaneously until the “FASTBOOT” screen or a bunny mascot appears.
3.3) Connecting and Verification
- Connect your powered-off phone to your PC using your USB cable.
- In the Command Prompt window, type the following command and press Enter. This ensures your PC detects your phone successfully.
fastboot devices3.4) Flashing the Patched Image
- To install the patched root image, enter this command and press Enter in the Command Prompt:
fastboot flash boot magisk_patched.img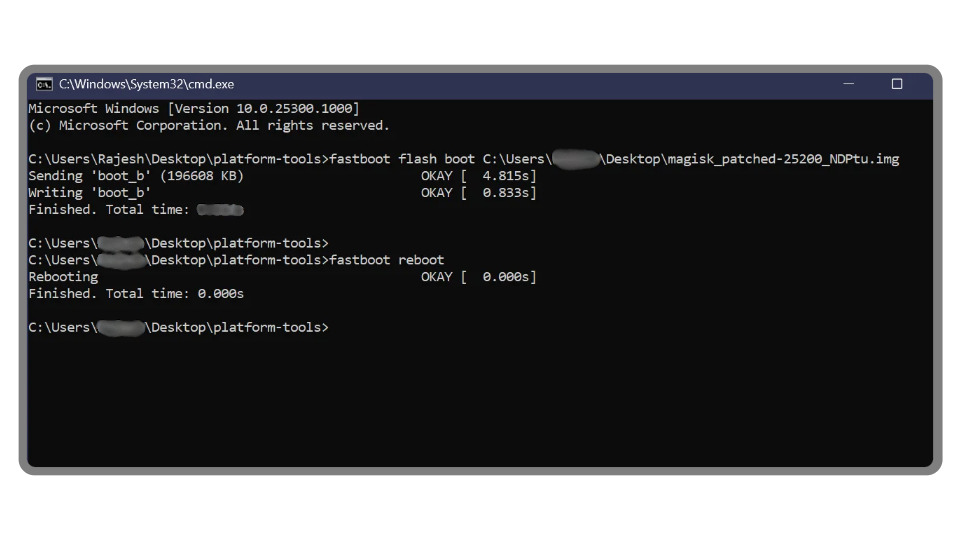
3.5) Rebooting Your Device
- When flashing completes, the Command Prompt will show “Finished“.
- You may now restart your phone manually, or simply enter the command below to trigger a safe reboot:
fastboot rebootBONUS: Flashing Root Image File via Custom Recovery
If you have a pre-patched boot.img file (either generated externally or downloaded from a trusted source), you may be able to flash it via a custom recovery installed on your device. However, note that flashing an .img file using Xiaomi’s stock recovery can risk rendering your phone unusable—exercise caution at this stage.
If you are using a custom recovery solution such as Orange Fox or TWRP, there is no need to transfer the root image to your PC. You can flash the boot image directly from recovery without intermediary steps.
It is important to remember that this method often still requires a PC initially to extract or obtain the correct boot image. The boot.img must match the exact HyperOS version installed on your device; updates occur frequently, so the custom recovery approach may not always be practical or reliable.
Reviewed by Huzaifa Haroon