How to Unlock and Root the Nokia 7.2
Nokia released the Nokia 7.2 around October 2019, and it’s still a surprisingly good entry-level Android phone halfway into 2020. It’s fairly easy to unlock and root this phone, as it was shipped with an unlockable bootloader, but there are some caveats.
Nokia released a security update in December that removed the bootloader unlocking ability, so in order to follow this guide, you must be on firmware prior to the December update. We will keep an eye on future developments for this device, as the modding community is still interested in acquiring an unlock method for the latest firmware.
If you are on the latest firmware version and want to unlock the Nokia 7.2, your only options currently is to pay for a third-party flashing service that can downgrade the device’s firmware, or visit a Nokia Care Center and request them to downgrade your phone to Android 9.
From a downgraded device, you can unlock and root the phone and apply the latest firmware update manually, but downgrading it is not something you can do by yourself. It requires official Nokia service center tools.
Requirements:
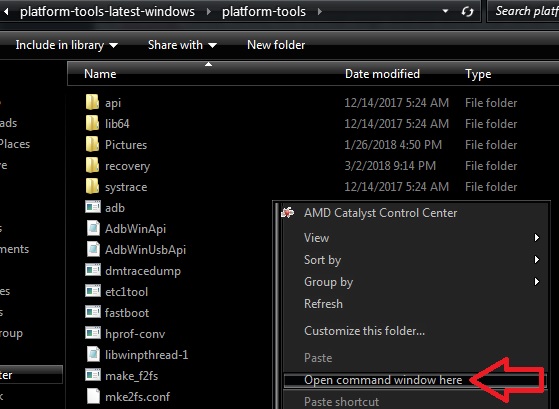
- ADB & Fastboot (see Appual’s guide “How to install ADB on Windows”)
- TWRP for Nokia 7.2 (Official)
- Magisk flashable .zip
- Exact firmware version .zip on your phone for rooting (Link in root section)
- (Optional) Nokia 7.2 – V2.250 (Android 10) firmware Global | India
Important note: After rooting the device, future OTA updates will not successfully install.
Unlocking the Nokia 7.2 bootloader
- First we need to enable Developer Options. Go into Settings > About Phone > tap 7 times on BuildID to unlock Developer Mode.
- Go into Developer Options and enable OEM Unlocking. If this option is greyed out, some users at XDA confirm that connecting to WiFi and rebooting the device unlock the option, for some reason.
- Reboot the phone into Bootloader/Fastboot mode by holding Volume Down + Power while the device is turned off.
- Connect the phone to your PC via USB, and launch a new ADB terminal window.
- Type the following commands in the ADB:
fastboot flash unlock_critical
We are using unlock_critical instead of regular fastboot flash unlock so that we can flash the bootloader in the future. If we only used fastboot flash unlock, the bootloader will not allow us to flash firmware updates as the critical system will be locked down.
Your Nokia 7.2 will go through the unlock process which includes a factory reset and wiping your data. When it’s finished you should be brought to the Android setup wizard, but if the phone doesn’t automatically reboot you can type “fastboot reboot” in ADB after the unlock is finished. Just give it time.
(Optional) Upgrading to Android 10 after bootloader unlock
If you want to use the latest Nokia 7.2 official firmware, it is highly important that you upgrade the firmware before rooting the device. This is because after /system files have been tampered with, the system will no longer allow firmware updates to be installed, even manually flashed in recovery. It’s a great way to brick your Nokia 7.2.
- Download the official firmware for your regional version, and transfer the .zip file to your storage.
- Reboot the phone into stock Recovery Mode by holding Volume Up + Power with the phone turned off.
- Highlight the option “Apply Update from ADB” and press Power to confirm.
- Choose the OTA upgrade .zip file you transferred to your storage, and confirm flashing it.
- After the firmware upgrade has successfully flashed, you can tap the Reboot System and be brought to the Android system.
- Check to see if Developer Options, OEM Unlock, and USB Debugging were disabled after reboot. Re-enable them if necessary.
Rooting the Nokia 7.2
Whether or not you followed the optional upgrade steps above, the steps for rooting remain the same. It is only a difference in files you will need.
If you did not upgrade your phone to the Android 10 firmware, than you will need the firmware package of the exact firmware you are using. Check in your About Phone settings and grab the exact firmware version shown on your device.
Here is a list of links to all Nokia 7.2 firmware version downloads. Save it on your desktop for later. If you upgraded to the latest Android 10 version, you can use that.
We will start by installing TWRP.
- Download the official TWRP for Nokia 7.2 and place it in your main ADB folder.
- Connect your phone to your PC over USB, and launch an ADB terminal.
- In the ADB terminal, type:
- adb reboot bootloader
- fastboot flash recovery twrp.img
- fastboot reboot
- When you are in the TWRP menu, type into ADB console:
adb devices
- If device is successfully shown, type this into ADB:
dd if=/dev/block/bootdevice/by-name/boot of=/sdcard/boot.img
This will create a new boot.img file in your internal storage. We can flash this if anything goes wrong.
Magisk root
- On main menu of TWRP, tap Wipe>Advance Wipe>enable Dalvik, Data, and Internal Storage checkboxes. Do not wipe System Data.
- Go back to TWRP main menu and tap Install > choose the Magisk.zip on your device storage.
- Swipe to flash it, and now you can reboot your phone to the Android system.
That’s it. Your Nokia 7.2 should now be Magisk, rooted with TWRP recovery, and the latest Android 10 firmware if you followed that section.