How to Unlock and Root the Samsung Galaxy A51
According to market analytics, the Samsung Galaxy A51 is one of the best-selling midrange Android phones for Q1 2020. It comes with a 6.5” AMOLED screen, Exynos 9611 (10nm) chipset with Mali-G72 MP3 GPU, and 4GB/6GB/8GB RAM variants.
The A51 hasn’t received much love from the mod community, as the Galaxy A71 is only a little bit more expensive but has much better specs. So there is currently no TWRP available for the A51, official or unofficial. There is still a way to unlock and root the Galaxy A51, but it is extremely tricky and requires a lot of patience.
You need both Windows and Linux, but you are fine with using a bootable Linux USB like Kalix Live. This is because you will need to create a brand new firmware.img file using the Linux terminal during this guide. Alternatively you can use the Linux Bash System for Windows.
We can only recommend proceeding to people either familiar with Linux, or have a lot of time and patience on their hands and desperately want to root the Samsung Galaxy A51.
Requirements:
- Windows PC and bootable Linux OS, or Windows with Linux Bash System
- Frija or SamFirm for downloading Galaxy A51 official firmware
- GSI Android 10 A/B Gapps arm64v8
- LZ4 Extractor
- Simg2img
- LPunpack Tool
- Odin
- 7zip
- Permissive kernel
Unlock Galaxy A51 bootloader
- Go to Settings > About Phone > tap on Build Number 7 times to unlock Developer Mode.
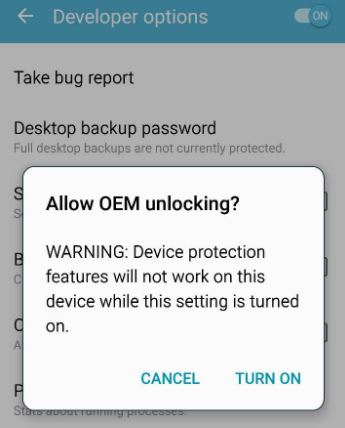
- Go to Developer Options > enable OEM Unlocking.
- Turn off the Galaxy A51, then hold both volume buttons while connecting the phone to your PC via USB.
- The phone will boot into Download Mode. Hold the Volume Up button to unlock the bootloader.
Your Galaxy A51 will perform a factory reset and reboot into the Android setup wizard.
Preparing the .img files in Windows
- Download the official Samsung firmware for your exact Galaxy A51 model and regional firmware variant.
- Extract the file named AP_file.tar.md5 from the firmware.zip file.
- Using 7zip, extract the file named super.img.lz4 from the AP_file.tar.md5 file.
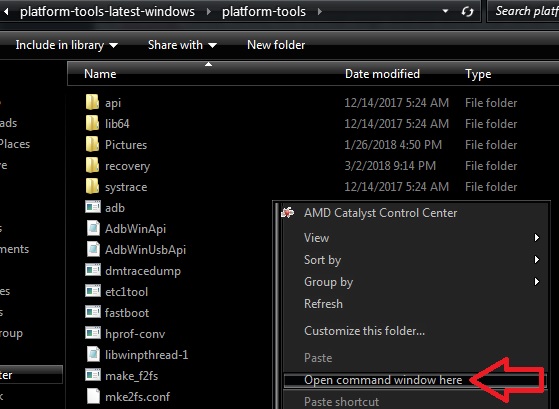
- Put the super.img.iz4 file in the LZ4 folder and launch a CMD prompt, and type:
lz4.exe -d super.img.lz4 superLZ4.img
- Now place the superLZ4.img file in Simg2img folder and type in CMD:
simg2img.exe -i superLZ4.img -o superSIMG.img
Creating a flashable .img file in Linux
We warned you that this guide will require a Linux terminal (or Linux Bash System for Windows). Get a pot of coffee boiling.
Grab the superSIMG.img file from your Windows partition, and place it in otatools/bin folder.
Extract the .img file using the Linux terminal with this command:
./lpunpack --slot=0 superSIMG.img <destination dir>
Now place the GSI Android 10 A/B Gapps arm64v8 file in the same Linux folder as where you just extracted superSIMG.img, and rename the GSI file to system.img. Your folder should contain odm.img, system.img, vendor.img, and product.img.
Now we need to perform an extremely critical and sensitive step, where we will combine all of those files into a single super.img file. Please read this section carefully before continuing.
In the following Linux command, there are some very important numbers you need to change. They refer to the sizes (in bytes) of the 3 .img files you extracted (odm, vendor and product), plus the system.img you downloaded/renamed. You need to update the code with the actual sizes in bytes of your files.
-
- system:readonly:1577095168:main (size of unsparsed system.img in bytes)
- vendor:readonly:342155264:main (size of vendor.img in bytes)
- odm:readonly:643456:main (size of odm.img in bytes)
- group main:4293513600 (main partition size 1577095168+342155264+643456=2776752512)
- The size of group main is the sum of the 4 .img files, calculate accordingly!
Now here is the Linux command you need to use, after making the necessary adjustments:
./lpmake --metadata-size 65536 --super-name super --metadata-slots 2 --device super:4294967296 --group main:4293513600 --partition system:readonly:1577095168:main --image system=./system.img --partition vendor:readonly:342155264:main --image vendor=./vendor.img --partition odm:readonly:643456:main --image odm=./odm.img --sparse --output ./super.img
This should now create a brand new file named super.img, place this on your Windows partition.
Flashing the super.img in Windows
- Use 7zip to create a .tar file and place the super.img we created in Linux inside it.
- Open Odin, untick Auto Reboot, and add the .tar file to the AP tab.
- Boot your Galaxy A51 into Download Mode, and click Start in Odin.
- After the .tar file is flashed, do not reboot your Galaxy A51. Put the (NoForcedEnforce).tar file in the AP tab and flash it as well.
- Now reboot your Galaxy A51 into the original recovery, and perform a factory reset.
Once you are back into the Android system, install a terminal emulator app, and run these commands:
su
setenforce 0
getenforce (it should show Permissive)