How to Prevent Users from Changing Theme in Windows?
The Windows themes are used to customize the interface of the Windows. It will change the colors, sounds, screen saver, pointers, and desktop background for the user account. There are several themes that the user can choose for their desktop. However, an administrator at home or in the organization can disable the theme changing settings from a standard account. It will completely disable the theme settings; however, the users can still change the colors, sounds, screen saver, pointers, and desktop background. In this article, we will show you methods for disabling the theme settings.

Method 1: Using the Local Group Policy Editor
The Local Group Policy Editor contains all kinds of policies that can enable and disable specific settings on the operating system. It can be used to customize settings for a computer or a specific user on the computer. There is a specific policy setting for preventing users from changing the theme of their operating system. It is listed under the User Configuration category of the Group Policy Editor.
The Local Group Policy Editor isn’t available for every Windows 10 edition. If you are using the Windows 10 Home edition, then skip this method and try using the Registry method in this article.
- Press the Windows + R key together on your keyboard to open a Run dialog. Then, you need to type “gpedit.msc” in the dialog box and press the Enter key or click on the Ok button. This will open up the Local Group Policy Editor window on your computer.

Opening the Group Policy Editor - In the Local Group Policy Editor window, head over to the following path:
User Configuration\Administrative Templates\Control Panel\Personalization\
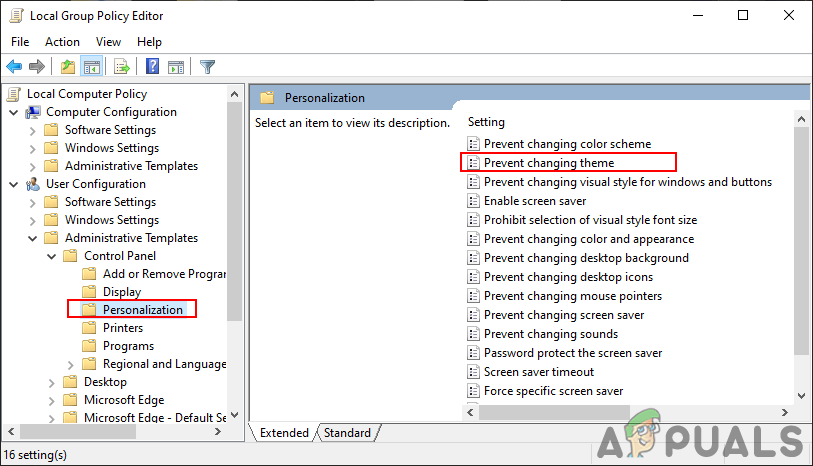
Navigating to the setting - Now double-click on the policy named “Prevent changing theme” and it will open another window. Then choose the Enable toggle option as shown below.
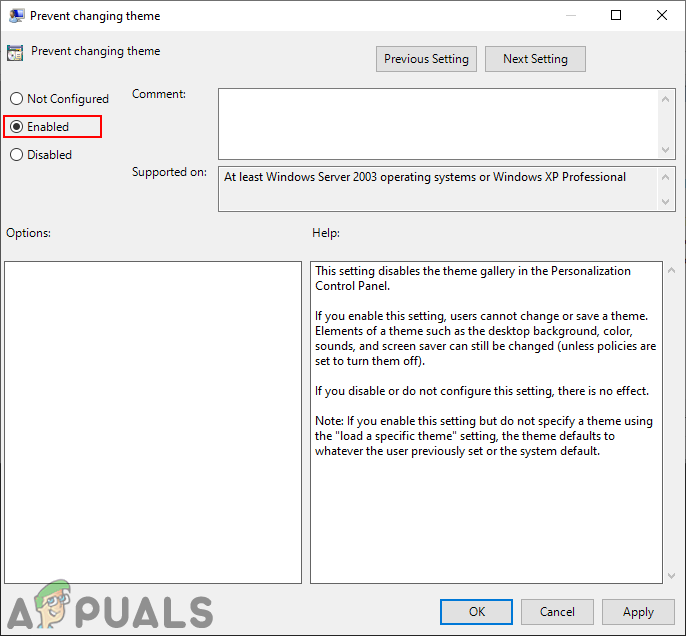
Enabling the setting - After that, just click on the Apply and Ok buttons to save these changes.
- The Group Policy will automatically update the changes. If not, then you must force the update for the group policy.
- Search for Command Prompt in the Windows search feature and run it as an administrator. Now type the following command in Command Prompt (Admin) and press the Enter key. You can also update the group policy by restarting the computer.
gpupdate /force
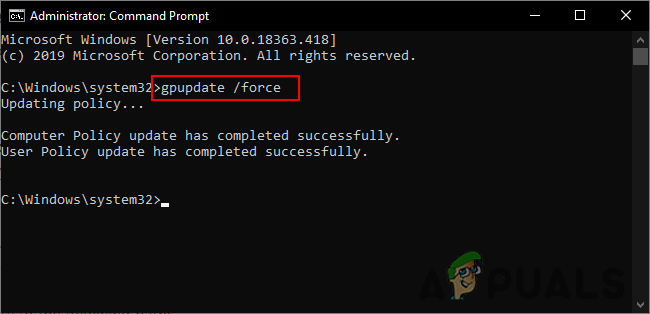
Force updating the group policy - If you want to enable the theme settings again, just change the toggle option to Disabled or Not Configured in step 3.
Method 2: Using the Registry Editor
Another way to prevent users from changing themes on the computer is by using the Registry Editor. Whenever we configure a setting in the Group Policy Editor, it will automatically update the Registry for that specific setting. If you used the Group Policy Editor and configured the setting, then you don’t need to use this method because it will be already configured. However, if you are using this method directly, then you need to configure it from the start. There will some technical steps for creating the missing key and value for this specific setting. Follow the below steps carefully to prevent users from changing the theme:
Note: We have included a registry backup step for safety. However, you can skip it if you don’t want to create a backup.
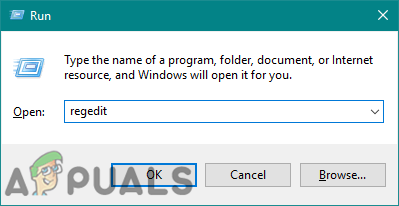
- First, open the Run dialog box by pressing the Windows and R keys together on your keyboard. Then, you need to type “regedit” in the dialog box and press the Enter key to open the Registry Editor. If you get UAC (User Account Control) prompt, then click on the Yes button.
Opening the Registry Editor - To create a Registry backup before making new changes, click on the File menu and choose the Export option. Select the path and name the file as you want. Lastly, click on the Save button to create the backup.
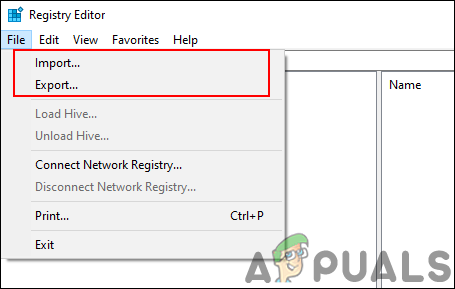
Creating a registry backup Note: You can always restore a backup by clicking on the File menu and choosing the Import option as shown. Then, you can choose the backup file that you recently created.
- In the Registry Editor window, head to the following location:
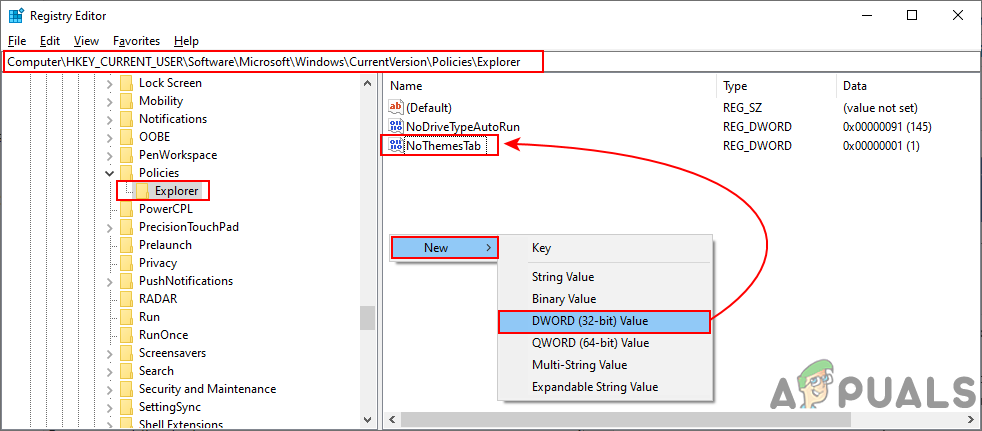
HKEY_CURRENT_USER\Software\Microsoft\Windows\CurrentVersion\Policies\Explorer
Note: If the Explorer key is missing, just right-click on the Policies key and choose the New > Key option. Then name that newly created key as “Explorer“.
- Right-click on the right pane of the Explorer key and choose the New > DWORD (32-bit) Value option. Then rename the value as “NoThemesTab” and save it.
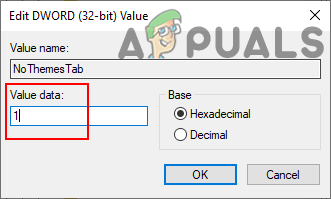
Creating a new value in Registry - Double-click on the NoThemesTab value and it will open a small dialog. Now change the value data to 1 and click on the Ok button.
Changing the value data - Finally, close the Registry Editor window, and reboot the computer to apply the new changes.
- You can always enable it back by changing the value data to 0 or by removing the value from the Registry.


