How to Partition and Configure Drives for Linux UEFI Boot
Actually doing the partitioning work for any U/EFI-based Linux or Windows implementation isn’t much more difficult than writing partition tables for a standard MBR-based operating system. Using the newer GUID Partition Table (GPT) technology can be confusing, though, since it doesn’t support extended or logical partitions. This is counterintuitive to those who have worked with the more traditional technology. EFI-based installations store their boot loaders in the EFI System Partition instead of the Master Boot Record, which means GRUB will live somewhere else than where you’re used to if you’re booting or dual-booting Linux. Users with Windows pre-installed somewhere on the disk will already have one of these partitions.
You have the option to reformat your drive for UEFI completely by using the GPT style, though the original EFI specification supports MBR partitioning as well. If you’re dual-booting Windows and GNU/Linux, then you can actually convert an existing disk using the Windows command line as well. Please note, though, that using this sort of arrangement to additionally boot OS X or macOS Sierra more than likely won’t follow along with the same steps.
Method 1: Converting an Existing Drive Using the Windows Command Line
Boot your PC from a Windows Setup memory stick or DVD. You may need to hold down a key such as F1 or F2 to enter the U/EFI BIOS configuration menu to select a removable media option. How you do this differs between the various hardware vendors. Users of Asus netbooks may wish instead to hold down the Esc key after pushing on, which will give them an options menu and thus allow them to select the correct boot media. If you’re having trouble, then enable UEFI booting in the BIOS configuration screen and then test that you can boot from any USB stick you’ve made with a GPT table if this is applicable. You may have to first enable this option before it permits you to do so openly. If you need to make a USB stick with a valid UEFI GRUB2 multiboot USB stick, then continue to Method 6.
Once you’ve booted, hold down Shift and push F10 at the same time to open a DOS terminal window. Type diskpart, then list disk and then finally select disk followed by the disk number to identify the drive you’re attempting to reformat. Once you’ve selected it, type clean and then covert gpt. This might take a few moments, but you can type exit immediately afterward when you’re ready to move on. Keep in mind that you probably don’t want to do this to a disk with valid file systems, but a few people have reportedly done so. It’s always best to back important data up before proceeding to prevent the loss of anything important.
Method 2: Creating a New GPT Table in Linux with gdisk
You may already be familiar with using fdisk or cfdisk. These programs work with MBR-based drives. Let’s assume you wanted to configure a new GPT-based drive. You could use gdisk, which is closest to fdisk, or cgdisk, which is closest to cfdisk, to configure the drive in question. These utilities naturally have their own man pages, so this is a good place to start if you already know how to use fdisk or cfdisk.
Assuming your drive is mapped to /dev/sda and has no valid partition table, we could run gdisk /dev/sda from a root prompt. You’ll probably have wanted to boot from a Linux live CD, DVD or USB to perform this work. Remember that this is potentially completely destructive, and for this example, we’re using a blank drive. Running wipefs -a /dev/sda is a good way to eliminate any signatures from the drive, but once again this will render everything you currently have on it inaccessible. You can replace /dev/sda with any other drive device file, but ensure that you’re not adding a partition number after the name of it.
When you’re at the gdisk prompt, you can always use ? to get a list of commands. These aren’t particularly useful unless you already know how to use fdisk, though. You might also see a warning about Windows’ inability to boot from GPT, which might seem weird under Linux. This is an attempt by the programmers to keep inexperienced Windows users from toasting their drives if they’ve never worked with Linux before. You might additionally see a message surrounded by a bunch of asterisks, which is designed to remind you that there’s a valid partition system on the disk as it is. If this is the case but you thought the drive was empty, then you might want to type q for quit then run wipefs -a to empty it. Do that only if you’re absolutely certain you want to toast the drive in question.

Since GPT measures disk data in blocks, you won’t see any information about C/H/S geometry. Typing o followed by pushing enter will create a new empty GPT if you don’t have one already. Running wipefs -a with the device file name after will ensure you don’t have one. You might want to try p with nothing else to view the table if you don’t know whether you have one installed. You should always do this to ensure that you’re working with the correct partition table before making drastic changes. When you’ve returned to the “Command (? for help):” prompt, type v and enter to verify the disk. The n command will add a new partition, which you will need to do if your drive is empty. This would be the case if you ran wipefs -a /dev/sda, having replaced the device file name with whatever drive you may have used.
Locations and sizes of your new partitions have to be entered in absolute form unless you use fully relative values. For instance, you could specify +64GB to create a 64 binary gigabyte partition after the current beginning of a free space block. You’ll be asked to specify a partition type. If you’re creating a small partition for the EFI or UEFI region, then you’ll need to use the ef00 type. Otherwise, you’ll probably be working with the 8304 type for Linux root file systems on x86_64 processors.
Administrators of 32-bit machines might instead want to use 8303, since this corresponds to the x86 instruction set. Linux itself isn’t very particular about the partition type numbers you use, but your bootstrap code might be.
To change the partition type of partition that you’ve already created, type t and you’ll receive a prompt asking for the partition number. Type the number of the partition and push enter. At the Hex code or GUID (L to show codes, Enter = 8300): prompt, type the Hex code for the type you require. Typing L and pushing enter will show a large table indicating the various partition types your version of gdisk can create. Type the desired partition number type and push enter.
You may have noticed that when you run the p command you see a name column, which gives each partition a descriptive label. These labels are independent of file system volume labels you set when formatting partitions. Type the c command and push enter to edit these labels. The gdisk program will prompt you for a partition number. Enter one of them and then type a name. Push the enter key to approve your changes. When you’re sure of all your changes to the table, type w and push enter to write them out. If you’ve converted an MBR table, then be aware you might be writing changes without an EFI partition especially if you already had Fedora, Debian or Ubuntu installed.
Method 3: Converting an MBR Table with gdisk
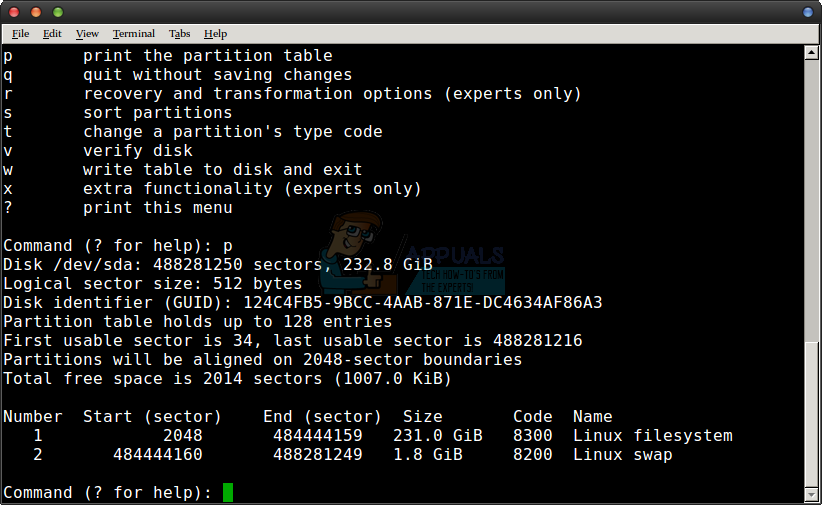
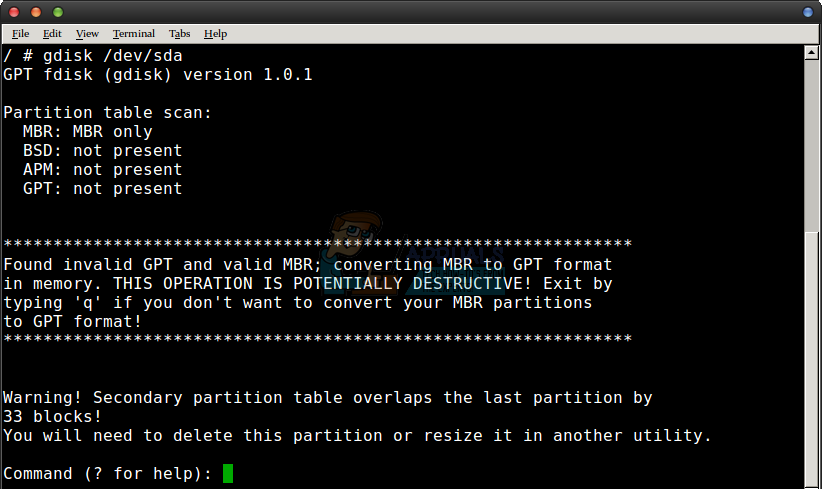
If you’re only installing Linux and not another operating system along with it, then you can still convert an existing MBR table to GPT using the gdisk command. Again, it’s best if you back up all pertinent data before proceeding. Once you’re ready, open a root prompt by typing sudo -i at the command prompt. More than likely you’ll need to work from a USB live environment to do this. At the root prompt type gdisk /dev/sda or whatever other device you’re working with. You’ll receive a message that reads “Found invalid GPT and valid MBR” or something to that effect if you’ve run it on a drive that has a valid MBR partition table. Type the p command and push enter to view the new table. You may make any changes using the techniques laid out in Method 2. Type w and push enter to write the data to disk.
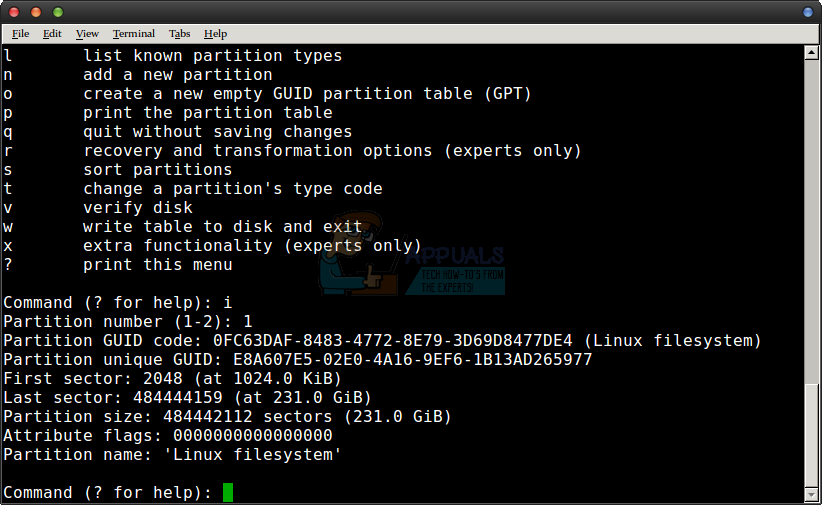
Check the first and second partitions with the i command in order to ensure that they’re valid. Remember you still won’t have a valid EFI partition if you didn’t create one, and this is needed to boot this type of system.
Method 4: Installing File Systems to the Table
Consider the following example GPT structure, which assumes you’re preparing to dual-boot Microsoft Windows and Linux. From the “?Command (? for help):” prompt, type n to create a new 50-100MB partition and then select the FAT32 type. Agree to the prompt asking you to set the boot flag. This will serve as the EFI region. Then create a sizable partition by typing the n command again, which will serve for the installation of, perhaps, Kali, Ubuntu or Debian. If this is the case, then you’ll want to choose ext4 as the partition type.
What size is sizable depends on just how massive your drive is. You could create something as small as an 80GB partition or less, but users of massive drives might want to give Linux around 250GB. You can create more than one partition if you sought to install more than one variety of Linux to a single system. Next, type n again and push enter. Create a smaller partition and set it to Linux swap type.
How much swap you’ll need depends on how much physical RAM you have, but it has to be at least equal to the amount of physical RAM you have if you want to use hibernation mode.
You’ll need to type n and push enter once again to create another sizable partition of type NTFS if you plan to install Microsoft Windows to the drive. If this is the case, then you’ll also need a data partition to trade information between Linux and Windows. This second data partition should also feature the NTFS type. If you’re not installing Windows, then you won’t need this partition, but some users choose to create a data partition anyway.
Once you’ve made the partitions take up the whole amount of space on the drive, type p to have a look at them. Use the c command followed by enter to give them descriptive names before typing v followed by enter to verify them. Once you’ve made sure they’re acceptable type w and push enter to write the table to the disk.
You’re now ready to install operating systems. Assuming you have a valid boot medium, whether it be a USB memory stick or SDHC card, boot your machine from it. In the Linux installer, make sure that you mount the FAT32 partition as /boot/efi and then proceed with the installation as normal. If you’re only installing a single distribution of Linux with nothing else on your drive, then you can continue as though you were installing on a regular MBR drive with nothing else as a concern.
Let’s assume you wanted to install Microsoft Windows 8.1 or 10 to one of the other partitions. Boot your machine from the install media and select the blank NTFS partition you created earlier. The GPT labels should help, but keep in mind that Windows uses CP/M and DOS-derived drive letters instead of /dev files. You don’t want to pick the wrong region on disk, or you might undo your previous Linux distribution. The Windows installer will automatically identify your EFI partition and create MSFTRES as well as a new NTFS volume. When you reboot, though, you’ll find you can only boot into Windows and not Linux. Continue to Method 5 to correct this issue.
Even though you can only boot into Windows if you decided to go that route at this point, if you’re installing a second distribution of Linux this is where you’d need to do it. Keep in mind that if you’re installing Ubuntu, Lubuntu, Xubuntu, Linux Mint or any other derivative that you should select the “Do something else” option when notified that you have another operating system installed. Theoretically, even if you were only using this operating system, you should select this and then highlight the FAT32 partition in the table you’re offered. Change it to “Use as EFI” and then select your install partition. Click on “Use as /” and then select ext4 as the file system type. Proceed with the installation as normal. The Ubuntu installer and it’s derivatives as well as the Fedora installer should automatically update GRUB2 if you have no version of Windows on your system, so you shouldn’t need to do anything else.
Method 5: Forcing GRUB2 to Recognize Microsoft Windows
Should you have elected to install Microsoft Windows in Method 4, then you’ll be stuck with a system that refuses to boot to anything else. If you’re given the Windows 8.1 loader, then select “Other Operating System,” “Ubuntu,” “Linux” or whatever other function remains there. If you see none of these, then you may need to disable secure boot in Method 7. Some users wouldn’t be able to install anything because of secure boot. Those users will need those steps as well.
Assuming you’ve gotten to the point where you’ve reached a Linux desktop, hold down Ctrl, Alt and T to open up a terminal window. You may wish to instead use Ctrl, Alt and F2 to open a virtual console or instead open up a terminal by selecting the Applications, Dash or Whisker menu and clicking on Terminal from System Tools. You may wish to hold down the Windows key and push R to get an application launch menu to try this code as well. Xfce4 users can hold down Alt and push F2 then start it from there.
You’ll need to move the boot directory, which can be accomplished a few different ways. Type gksu followed by the name of the graphical file manager your distribution uses. Hence, gksu nautiluis, gksu thunar and gksu pcmanfm are all valid commands. Once given a prompt enter your administration password and navigate to /boot/efi/EFI in order to delete the boot directory and then copy the boot directory out of the Microsoft directory over to your mounted Windows partition. After this, you may delete the Microsoft directory. Navigate in your manager to ![]() and open it in a text editor. You should still be operating as root at this point. Comment out the two lines that begin with GRUB_HIDDEN by putting # symbols in front of them.
and open it in a text editor. You should still be operating as root at this point. Comment out the two lines that begin with GRUB_HIDDEN by putting # symbols in front of them.
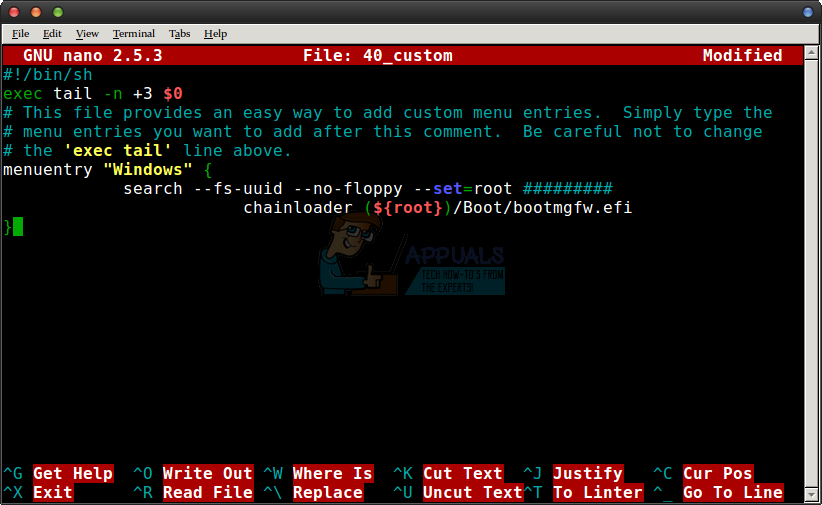
Save the file and then navigate to the ![]() file and open it up for editing. Add the following lines to make Windows bootable:
file and open it up for editing. Add the following lines to make Windows bootable:
menuentry “Windows” {
search –fs-uuid –no-floppy –set=root #########
chainloader (${root})/Boot/bootmgfw.efi
}
Replace the # symbols with your EFI partition’s UUID number code after pasting it in. It’s safe to paste it in like that and then edit it. Remember that you’ll need to hold down Shift while pushing Ctrl and V to paste into a terminal window if you’re using the nano or vi editors. Users of nano will need to hold down Ctrl and push O to save when they’re done editing in the number.
Run sudo update-grub from the root terminal and everything should update automatically. Keep in mind that if you make any mistake and prevent the system from booting you can reboot into a Linux live environment from your install medium and make corrections by mounting the FAT32 partition you made.
Method 6: Creating Bootable U/EFI GRUB2 USB Drives
These steps will work as well for an SDHC, SDXC, microSDHC or microSDXC card plugged into a reader or for a standard USB memory stick. If you received any error message about gdisk in any of the previous methods, then type sudo apt-get install gdisk at the terminal before proceeding. Assuming you haven’t, then you need to find the device file mapped to your external storage. You can use sudo fdisk -l to find a list, or you might want to navigate in the Dash or Whisker menu to Gnome Disks Utility.
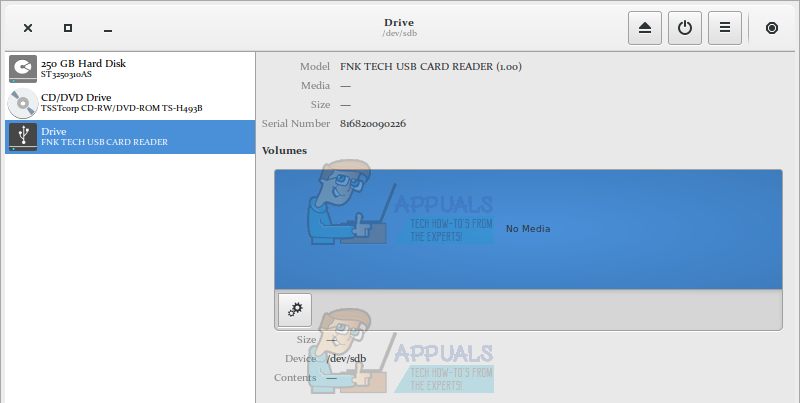
Inside the Disks Utility, you might find a USB or other card reader that reads No Media. If this is the case, then check to ensure you have a card loaded into it. If you have a USB memory stick that reads No Media, then remove the stick and reinsert it. That means you had already ejected the drive.
If on the other hand, you see any active partitions, then click on the square button to stop them. You’ll need to be sure that you’re working with a blank medium or at least one you’ve backed up everything from. The following steps will eradicate everything on the card or stick.
We’ll assume for the rest of this that /dev/sdd is your target drive, but you’ll need to replace it with the actual name. Navigate back to the terminal and type sudo sgdisk –zap-all /dev/sdd to clean the drive. You might have to reinsert it afterwards. You could also use sudo wipefs -a /dev/sdd to accomplish the same thing, but remember that in either case you’ll be annihilating this card or stick so you want to be sure this is what you want to do. You’ll need to create a partition to store the EFI data, and you can use a terminal shortcut by entering sudo sgdisk –new=1:0:0 –typecode=1:ef00 /dev/sdd to create one. Run sudo mkfs.msdos -F 32 -n “GRUB2EFI” /dev/sdd1 to format the partition in question. You can take a look back at the Disks Utility or Gparted to check your progress, or you can run sudo parted -l to check it out. If all went well, you should have a new partition with a valid empty 32-bit FAT file system in it.
Click on the play button in the Disks Utility to mount the partition. If you’d prefer to use the terminal, then you can try sudo mount -t vfat /dev/sdd1 /cdrom -o uid=1000,gid=1000,umask=022 provided that you don’t already have something mounted to /cdrom, but if you do you can instead use the /mnt directory. To continue you’ll need the EFI files necessary for booting a machine in this fashion. Fortunately, some very brilliant volunteers from the Ubuntu forums have done the work for you. They have an archive linked at https://ubuntuforums.org/showthread.php?t=2276498 that will work even if you’re not working with any Ubuntu-based distribution. You can also use your own if you have a set. If you’re using the pack from that site, then run rsync -auv usb-pack_efi/ /cdrom after extraction. You should replace /cdrom with the mount directory you used. Move the files over to the FAT32 partition, keeping in mind that bootia32.efi is needed for 32-bit architectures and bootx64.efi is necessary for booting 64-bit architectures. You’ll need the grub.cfg file to configure GRUB2. Once you’re ready you can run sudo grub-install –removable –boot-directory=/mnt/boot –efi-directory=/cdrom/EFI/BOOT /dev/sdd to install the bootloader in place. Should moving files to /cdrom give you any trouble you’ll need to use sudo before your commands to do it. Copy any bootable ISO files you have over to the /iso/ directory inside of /cdrom and then open the grub.cfg file for editing so you can add their names to it. Comment out any absent ISO files with a # symbol, and make sure any ISO files you do add are correct for the architecture that you’re working with. You can’t boot 32-bit machines with 64-bit ISO files, but you can usually boot a 64-bit machine with a 32-bit ISO file.
Reboot your machine and select the removable device as your boot medium in your machine’s firmware. This step is different for different types of firmware.
Method 7: Disabling Secure Boot
Some users will experience problems with UEFI Secure Boot while using the previous methods. This method will also make it difficult to boot from external media. Users with machines currently running Windows 8.1 or 10 should hold down the Windows/Super key and push I to open up the settings charms. Click on “Change PC Settings” and then select “Advanced Startup” before selecting “Restart Now.”
Some versions of Windows 8.1 and 10 moved these functions. Select Update from the left sidebar and then click Restart Now under Advanced Startup. If given a “Choose an option” screen, select “Troubleshoot” and then select “Advanced Options” again.
Locate “UEFI Firmware Settings” and then click the button to reboot your system into the UEFI setup screen. Otherwise, if you’re working with a built machine, something with a blank drive or something with an existing distribution of Linux, then you’ll need to hold down a certain key while the system starts up. This depends on your motherboard’s BIOS or EFI firmware. The company that made your motherboard’s BIOS system will also influence where you disable secure boot from. HP Secure Boot machines will find it in the Security drop-down menu under Secure Boot Configuration. Enable Legacy Support and disable Secure Boot in this menu.
ASRock UEFI users can select the Security charm and then click on Secure boot to disable it. Acer netbook users will want to select the Authentication option and then push the down cursor key to highlight “Secure Boot” and disable it by pushing enter. Those with ASUS machines may find it under the Boot charm. Clicking on Secure Boot in this environment will disable it.
Reboot your machine and you should be able to boot from external media properly.