How to Fix .NET Runtime Error 1026
Several Windows users have opened up Event Viewer and discovered a lot of .NET Runtime Error 1026 errors that are happening in quick succession. Most affected users are reporting that whenever a new event of this kind is created, they also end up seeing an application error pop-up. This issue is confirmed to occur on Windows 7, Windows 8.1, and Windows 10.

After investigating this issue, it turns out that there are several different underlying causes that might be producing the .NET Runtime Error 1026. Here’s a list of potential culprits that might cause this error:
- 3rd party application conflict – As it turns out, you can see this particular issue occurring due to a conflict between two 3rd party processes or between a 3rd party service and a native Windows process. In most situations of this kind, you should be able to fix the issue by achieving a clean boot state and identifying the culprit via trial and error.
- Corrupted .NET Infrastructure files – If you’re constantly seeing new instances of this error inside Event Viewer, it’s possible that you’re dealing with some type of corruption that’s affecting the .NET Framework installation. In this case, the most efficient way of going about solving the issue is to run the .NET Repair Tool.
- Lauchpad.exe conflict with Windows Update – In the past, this issue started occurring as a result of a bad Windows Update that ended up breaking the existing functionality of Launchpad.exe. Affected users facing the same issue have confirmed that they managed to fix the issue by giving the admin account full control over the user’s folder and renaming the Launchpad.exe executable.
- Corrupted Windows Media Installation – Under certain circumstances, it’s possible;e to encounter this kind of issue due to a partially corrupted Windows Media Player dependency. If that’s the case, you should be able to fix the issue by using the Windows Features utility to reinstall the WMP package.
- System File corruption – Keep in mind that you can also experience this issue even if the corruption affecting your device is beyond the scope of the .NET Framework that you’re actively using. In this case, you should take the time to run DISM and SFC scans in an attempt to fix superficial cases of system file corruption. However, in most serious circumstances, you might need to go for a clean install or repair install procedure.
Now that you know every scenario that might be the underlying cause of this issue, here’s a list of methods that other affected users have successfully used to get to the bottom of this issue:
Method 1: Clean Boot Procedure
According to most documented cases, this issue can most likely occur due to some kind of conflict between two 3rd party programs or between a 3rd party program and a native Windows process. This is way more likely if you’re only noticing new instances of the .NET Runtime Error 1026 error popping up when you attempt to open a 3rd party application.
If this scenario is applicable, you can isolate and identify the culprit by starting your computer into clean boot mode and seeing if the issue still occurs.
This operation will ensure that your computer boots up in a mode that disallows the running of any 3rd party service, process, or startup item.
If you boot your computer into a Clean Boot state and you see that the issue stops occurring, you can go ahead and systematically re-enable every process and startup item and do regular restarts until you manage to pinpoint the culprit.
In case the same .NET Runtime Error 1026 error is still occurring even after you boot your PC into the clean boot, move down to the next potential fix below.
Method 2: Running the .NET Repair Tool
If a clean boot didn’t work for you, our recommendation is to proceed with a series of troubleshooting steps that will allow you to fix any underlying issues with the .NET redist packages that are currently installed on your computer.
Several affected users that were also struggling with this issue have reported that they finally managed to prevent new instances of the .NET Runtime Error 1026 error from occurring by running the .NET Framework Repair Tool – This tool will automatically scan your computer and fix any .NET dependencies that might be creating issues.
If you haven’t tried running the .NET Repair tool, follow the instructions below for step by step instructions on doing so:
- Open your browser and access the Microsoft .NET Framework Repair tool download page. Once you’re inside the page, click on the Download button (under Microsoft .NET Framework Repair Tool).
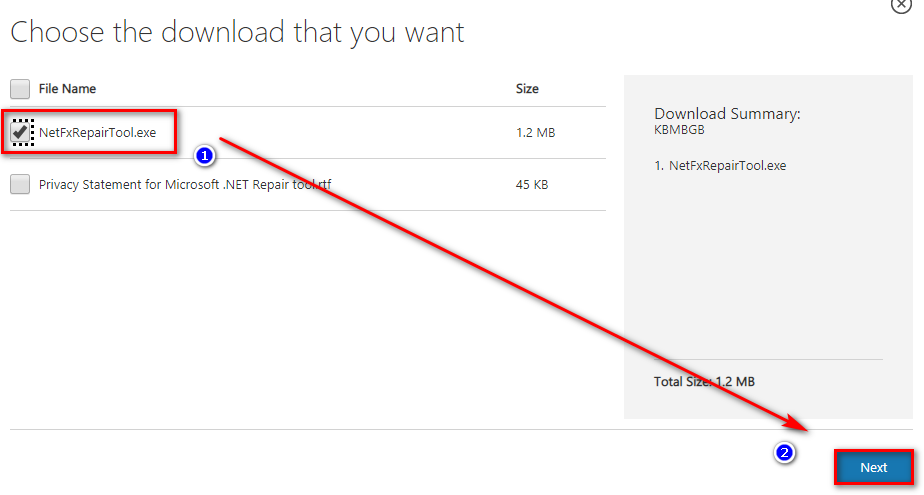
Downloading the NET Framework Repair tool - After you get to the next screen, start by checking the box associated with NetFxRepairTool.exe while unchecking everything else. Next, click on Next to advance to the next menu.
- Once the download is complete, double-click on the installation executable that you’ve just downloaded, then click Yes when prompted at the UAC (User Account Control).
- After you manage to open the Microsoft .NET Framework Repair Tool, follow the on-screen instructions and check the box associated with I have read and accepted the license terms when prompted by the ToS before clicking on Next to move forward.
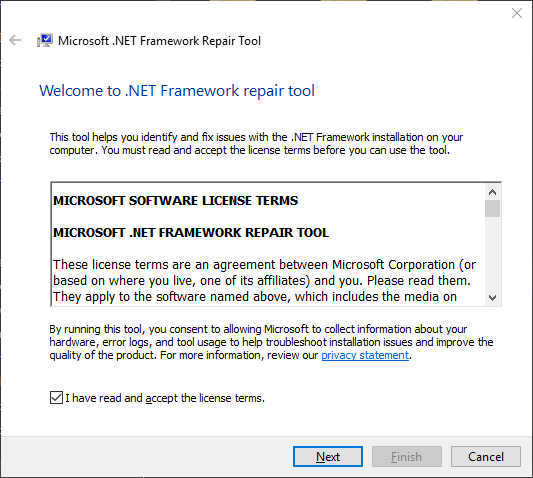
Initiating a repair using the .NET Repair tool - At this point, the utility should have already begun the scanning of the .NET dependencies installed on your computer. Wait patiently until the process is complete and avoid interrupting it to avoid additional issues.
- Once the operation is finally complete, click on Next to automatically apply the repair strategy that the utility recommends.
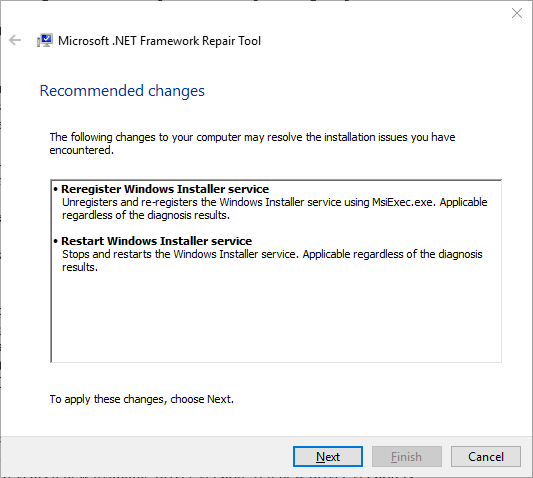
Applying the recommended fix for the .NET framework - Once the fix is successfully applied, click on Finish to complete the process. If you’re not prompted to restart automatically, do it yourself and see check Event Viewer once the nest startup is complete to see if the same kind of issue is still occurring.
If you already ran the .NET Framework Repair utility and you’re still seeing this kind of issue, move down to the next potential fix below.
Method 3: Renaming the Launchpad.exe (if applicable)
As it turns out, you can expect to see this error due to a new Windows Update that ended up breaking an existing Windows 10 functionality. Although the .NET Runtime Error 1026 error is not really indicative of this potential culprit, several affected users have confirmed that they were able to get Full Control permissions for the Users directory and renaming the Launchpad.exe to something different in order to prevent Windows from using it.
Note: If you have multiple users account on this computer, you need to do this for every user present inside the C:\Users\ directory.
If you haven’t tried this method yet, follow the instructions below to obtain Full Control permissions in the Users directory and rename the main Launchpad executable:
Update: As far, this particular fix was only confirmed to work for Windows 10.
- Start by ensuring that the user account you’re currently using is an administrator.
- Next, navigate to the root directory of your OS drive (most likely C:/), right-click on the Users folder, and choose Properties from the context menu that just appeared.
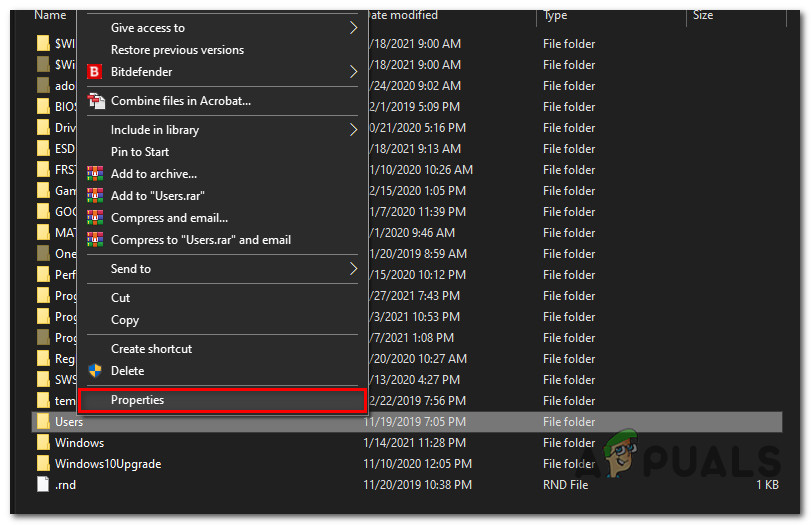
Accessing the Properties screen of Users - Once you’re inside the Properties screen, access the Security tab, select the Administrators group from the menu below, then click on Edit.
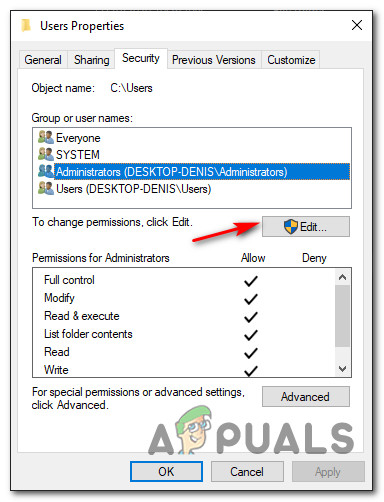
Editing the permissions of the Administrators tab Note: When prompted by the UAC (User Account Control Prompt), click Yes to grant administrative privileges.
- Inside the Permissions for Users window, select the Administrators tab and ensure that the Allow box associated with Full control is checked.
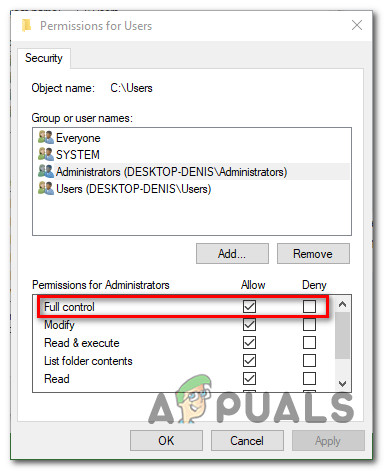
Modifying the permissions of Users - Click Apply to save the changes and ensure that you have Full Control permissions to the Users folder.
- Return to File Explorer and use the ribbon at the top to access the View tab. From the contextual menu that just appeared, check the box associated with Hidden Items.

Making hidden items visible - Next, use File Explorer to navigate to the following location:
C:\Users\[username]\AppData\Local\Microsoft_Corporation
- Once you’re inside, see if you can spot an executable named Launchpad_XXX.exe
Note: XXX is just a placeholder. In your case, you will see a random number of characters. - If you can locate the correct executable, simply rename it to something different or simply ad the .old extension at the end of the name. This will force Windows to disregard this file and create a new healthy equivalent that will hopefully not create the same kind of issue.
- Open Event Viewer and see if the problem is now fixed.
If you’re still spotting new instances of the .NET Runtime Error 1026, move down to the next potential fix below.
Method 4: Reinstalling Windows Media Player
If you’re encountering this error while attempting to launch an application or game that needs to make use of a Windows Media Player dependency, you might be able to fix this issue by reinstalling the local installation of Windows Media Player.
Typically, you will be able to spot if this scenario is applicable by checking the Event ID log file. If it contains mentions of Microsoft.Xna.Framework.Media.MediaQueue.Play or something different, this fix will most likely allow you to fix the issue.
Several affected users have confirmed that they were able to prevent the apparition of new instances of the .NET Runtime Error 1026 error, by using the Programs and Features menu to essentially reinstall the entire Windows Media Player component.
If you haven’t tried doing this yet, follow the instructions below:
- Press Windows key + R to open up a Run dialog box. Inside the text box, type ‘appwiz.cpl’ inside the text box and press Enter to open up the Programs and Features menu.
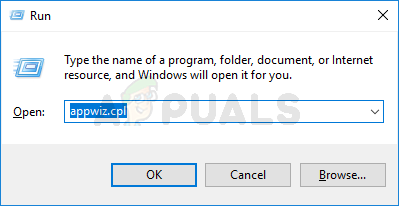
Accessing the Programs and Features menu - Once you’re inside the Programs and Features menu, click on Turn Windows features on or off. When you’re prompted by the UAC (User Account Control), click Yes to grant admin access.
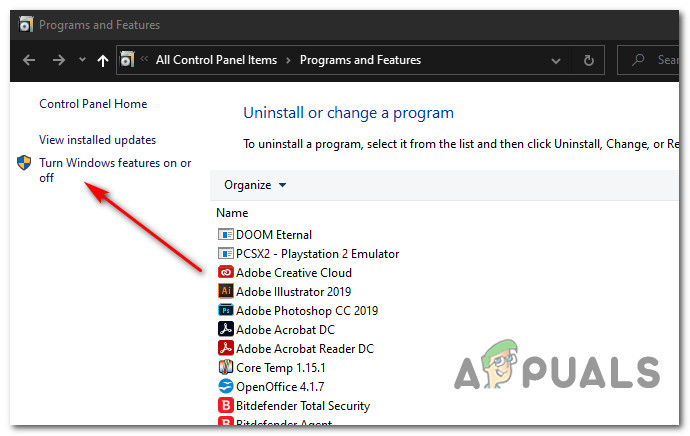
Accessing the Windows Features menu - Once you’re inside the Windows Features menu, scroll down through the list of features and expand the drop-down menu associated with Media Features.
- Next, uncheck the box associated with Windows Media Player and click Ok to effectively disable Windows Media Player. At the confirmation prompt, click on Yes to confirm the operation.
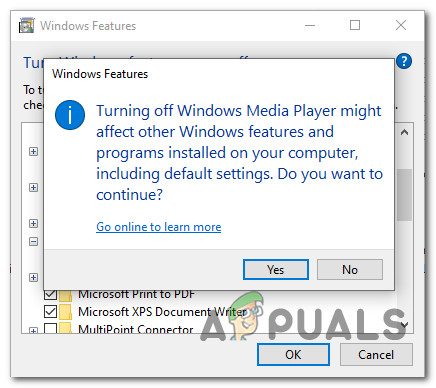
Disabling the Windows Media Player component - Wait until the operation is complete, then restart your computer in order to allow your computer to boot without the WMP components.
- Follow steps 1 to 3 to return to the Windows Features screen, then check the box associated with Windows Media Player (under Media Features) to re-enable, then confirm the operation and wait for the process to complete.
- Check Event Viewer and see if you can spot new instances of the .NET Runtime Error 1026.
If the issue is still not resolved, move down to the next potential fix below.
Method 5: Running SFC and DISM Scans
If none of the methods above have worked for you, it’s time to start troubleshooting for some kind of corruption affecting your system files that’s affecting the .NET framework. if the .NET Framework repair tool was not effective in your case, you should proceed by running a couple of built-in utilities that every recent Windows version has (SFC and DISM).
SFC (System File Checker) and DISM (Deployment Image Servicing and Management) are two tools capable of effectively identifying corrupted system files and replacing them with healthy equivalents.
Even though these 2 tools share some similarities, our recommendation is to run both in quick succession in order to improve your chances of fixing the corrupted system files.
Doing an SFC scan is an ideal place to start since it’s an entirely local tool that will not require you to have a reliable internet connection.

Note: After starting this procedure, it’s important to avoid closing the elevated CMD window even when the utility looks like it froze (this tends to happen with PC’s using traditional HDD). Wai patiently until the process is complete as interrupting the operation might cause logical errors on your HDD.
Once the SFC scan is complete, reboot your computer and deploy a DISM scan once the next startup is complete.
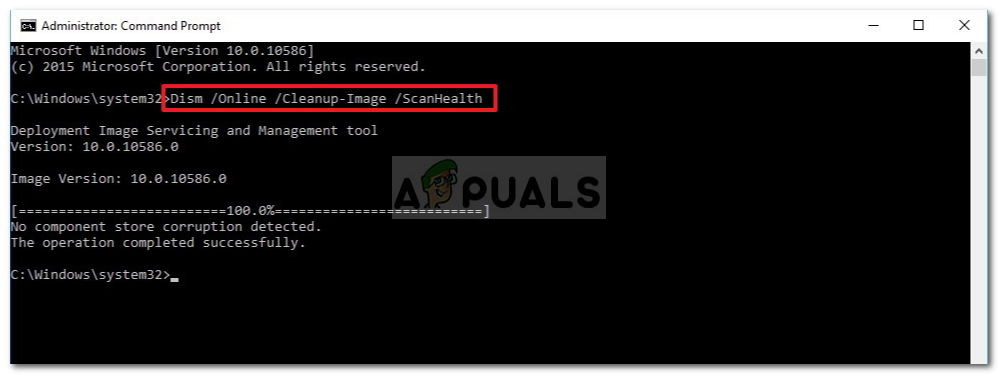
Note: This utility uses a sub-component of Windows Update to download healthy components to replace corrupted instances of system files. Because of this, you need to make sure that you have reliable Internet.
Once the DISM scan has been completed successfully, restart your computer and check Event Viewers to see if you can spot new instances of the .NET Runtime Error 1026.
In case the same issue is still occurring, move down to the next potential fix below.
Method 6: Refresh every Windows Component
If none of the methods above have worked in your case, it’s very likely that you’re dealing with some kind of underlying system corruption issue that is affecting your .NET framework that no built-in utility is able to fix.
If this scenario is applicable, one of the last things you can do is to make sure that you are essentially refreshing every Windows component in order to eliminate any type of corruption that might be responsible for this issue.
When it comes to doing this, there are 2 procedures that you should consider using:
- Repair install (in-place repair) – This is the recommended procedure if you are not short of time and you want to go for a method that will allow you to preserve your personal files present on the OS drive. Doing a repair install procedure will require you to use compatible installation media. But the major advantage is that you get to keep your installed applications, games, personal media, and even some user preferences.
- Clean install – If you’re looking for a quick fix and you don’t have important data on your OS drive (or you have already backed it up), the procedure that makes the most sense is a clean install. This will not require you to use installation media (you can start it directly from the GUI menu of Windows).


