Fix: iPhone Backup Session Failed
You may encounter the backup session failed message for your iPhone due to interference from your security applications (antivirus/ antimalware/ firewall). Moreover, the corrupt installation of iTunes or OS of your system/iPhone may also cause the error under discussion.
The affected user encounters the error when he tries to back up his iPhone on a computer with iTunes. In some rare cases, the user encountered the issue when he tried to restore his iPhone. Some users got the error message for all the Apple devices they tried on the system. The issue is not limited to a particular OS/ iOS. Moreover, the issue is reported on nearly all models of the iPhone.

Before moving on with the troubleshooting process of the iTunes backup session failed, try another cable and port to back up your iPhone.
Solution 1: Reconnect Your Phone and System
A temporary malfunction of the communication or application modules may result in the error under discussion. In this context, disconnecting and reconnecting the devices may solve the problem.
- Exit all Apple applications including iTunes.
- Now remove the USB cable from both devices.
- Restart both devices after a short while and then connect again.
- Now try to perform the backup again to check if the issue has been resolved.
Solution 2: Allowing the Apple-Related Processes through the Security Applications
The security applications of your system (antivirus/antimalware/firewall) are key components for protection for the safety/ security of your system/data. These applications (especially Malwarebytes) are known to create hindrance in the operation of the backup process of Apple devices and can cause the error under discussion. In this scenario, allowing the Apple-related processes through the antivirus/antimalware/firewall applications may solve the problem.
Warning: Proceed at your own risk as changing settings of your antivirus/antimalware/firewall applications may expose your system to threats like viruses, trojans, etc.
- Update your antivirus/antimalware/firewall applications to the latest builds and check if the problem is solved.
- If not, then add the following directories in the exclusion list of your antivirus/antimalware/firewall settings:
C:\Program Files (x86)\Common Files\Apple

C:\Program Files\Common Files\Apple
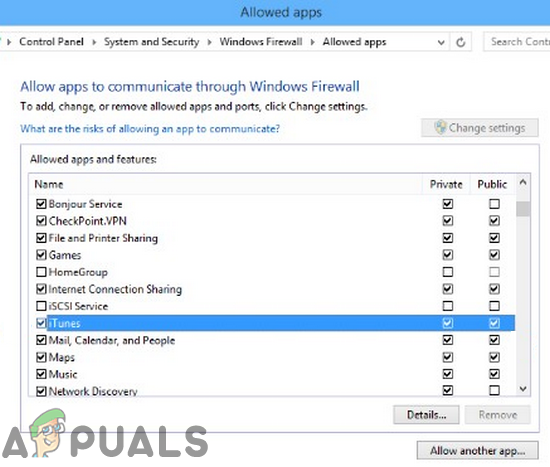
Allow iTunes Through Your Firewall - Also, make sure YSloader.exe is not blocked by any of your security applications especially the firewall.
- Now check if you can complete the backup process.
- If not, temporarily disable your antivirus and firewall. If you are using an antimalware product like Malwarebytes, then disable it as well.
- Moreover, disable ransomware protection of Malwarebytes as it is also known to cause the issue at hand.
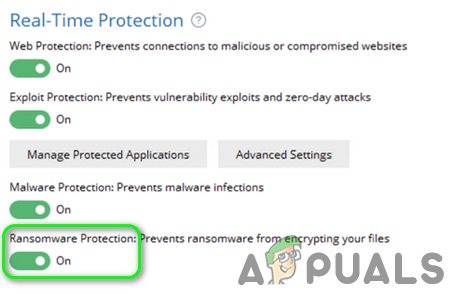
Disable Ransomware Protection of Malwarebytes - Then check if the problem is solved.
- If not, you may have to uninstall antivirus/antimalware/firewall applications and then check if the issue has been resolved.
Solution 3: Add the Computer to the Trusted Devices
You may encounter the error under discussion if the trust relationship between your phone and computer is “broken”. In this case, re-establishing the trust relationship between the devices may solve the problem.
- Disconnect your phone from the computer and then restart your devices.
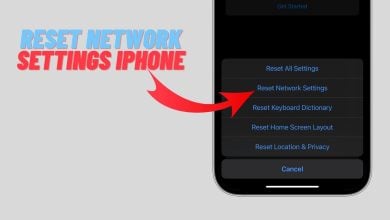
- Upon restart, open Settings of your phone and tap on General.
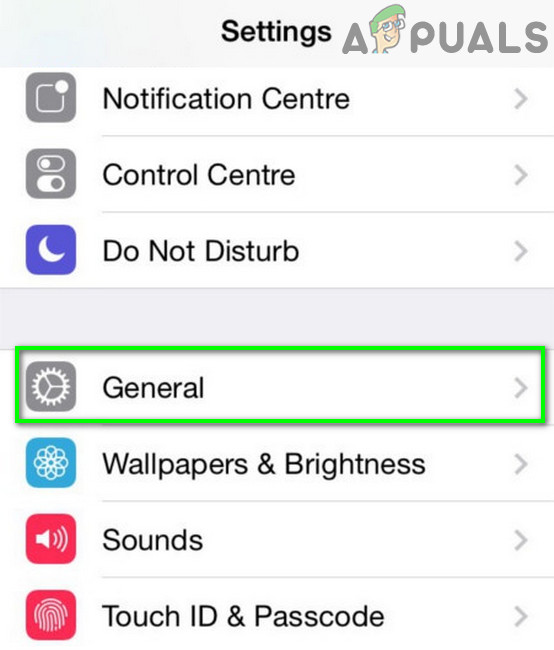
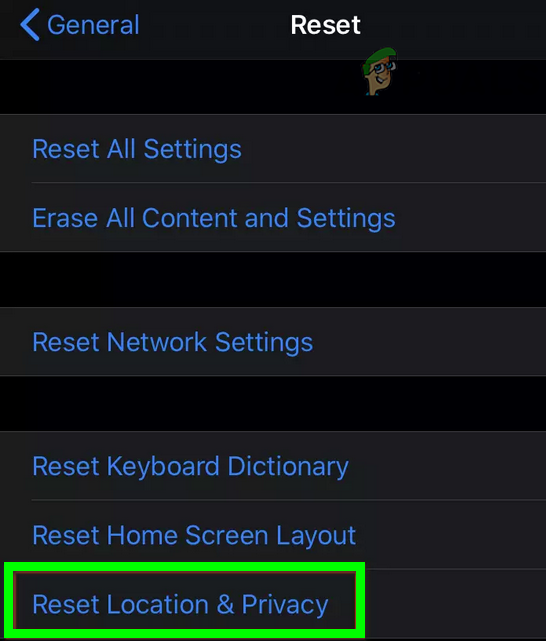
Open General Settings of iPhone - Now tap on Reset and then tap on Reset Location & Privacy.
Reset Location & Privacy of Your iPhone - Then reconnect your phone with the computer and when asked for that you trust this computer, tap on Trust.
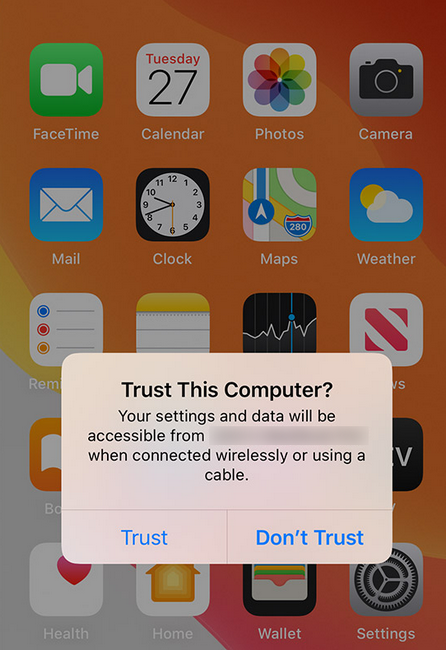
Click on Trust to Add the Computer to the Trusted Devices - Then check if you can complete the backup process.
- If not, then try to backup your phone on another system. If the backup was successful on the other system, then repeat steps 1 to 6 on the main system to check if the backup issue is resolved.
Solution 4: Update the OS of Your System to the Latest Build
The OS of your system is updated to improve performance and cater to technological developments. You may encounter the error at hand if you are using an outdated version of the OS. In this scenario, updating the OS to the latest build may solve the problem. For illustration, we will discuss the process for a Windows PC.
- Update Windows of your system to the latest build.
- Now check if you can backup your Apple device successfully.
Solution 5: Update the iOS of Your Phone to the Latest Build
iOS of your phone is updated regularly to add new features and update security mechanisms. You may encounter the error under discussion if the iOS of your device is not updated to the latest build and is conflicting with the backup system. In this context, updating the iOS of your device to the latest build may solve the problem.
- Exit iTunes on your system and disconnect your phone from the computer.
- Put your phone on charging and connect the phone to a Wi-Fi network.
- Open Settings of your phone and tap on your Apple ID.
- Now tap on iCloud and then tap on iCloud Backup.
- Then tap on the Backup Now button and wait for the completion of the backup process.
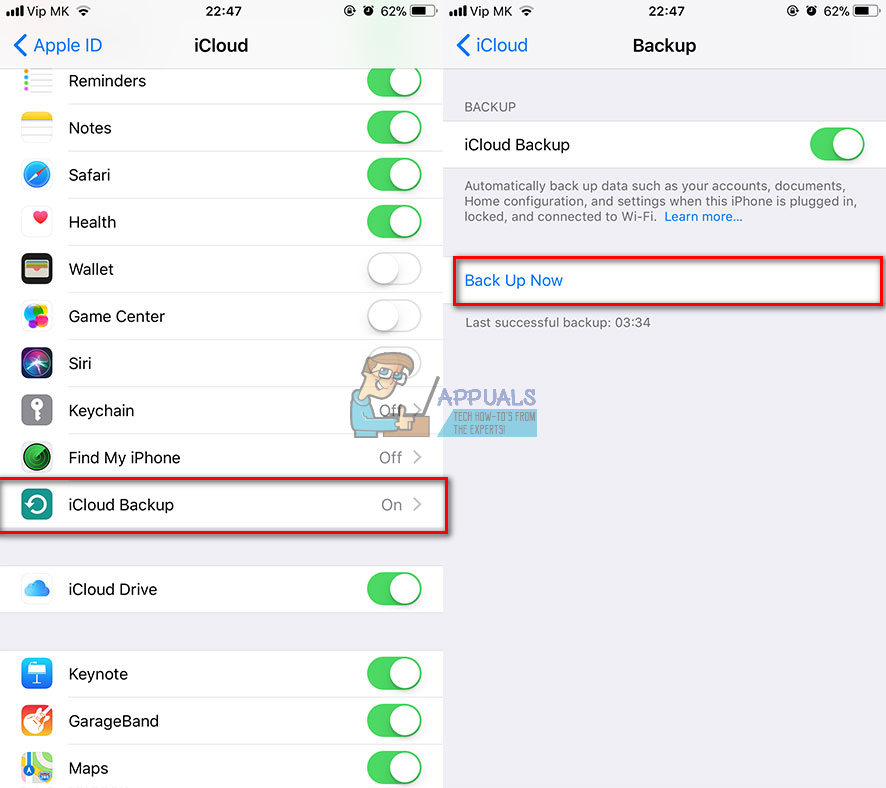
iCloud Backup - After completion of the backup process, open Settings of your phone and then tap on General.
- Now tap on Software Update. If an update of your iOS is available, then download and install it.
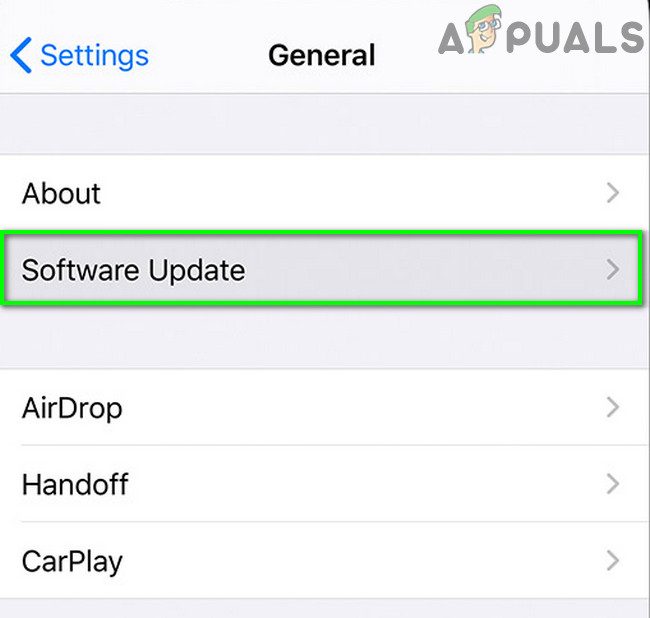
Tap on Software Update - After updating iOS, check if the backup issue is resolved.
Solution 6: Reinstall iTunes
You may encounter the error at hand if the installation of iTunes itself is corrupt. In this case, reinstalling iTunes may solve the problem. For illustration, we will discuss the process for a Windows PC.
- Exit iTunes and disconnect the phone from your computer.
- Right-click on the Windows button and in the menu shown, click on Settings.
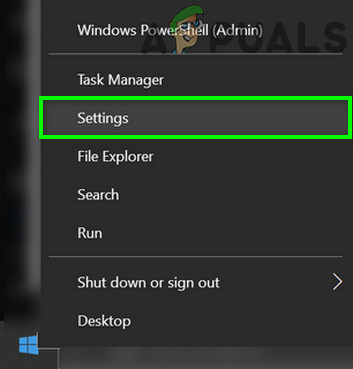
Open Windows Settings - Then click on Apps.
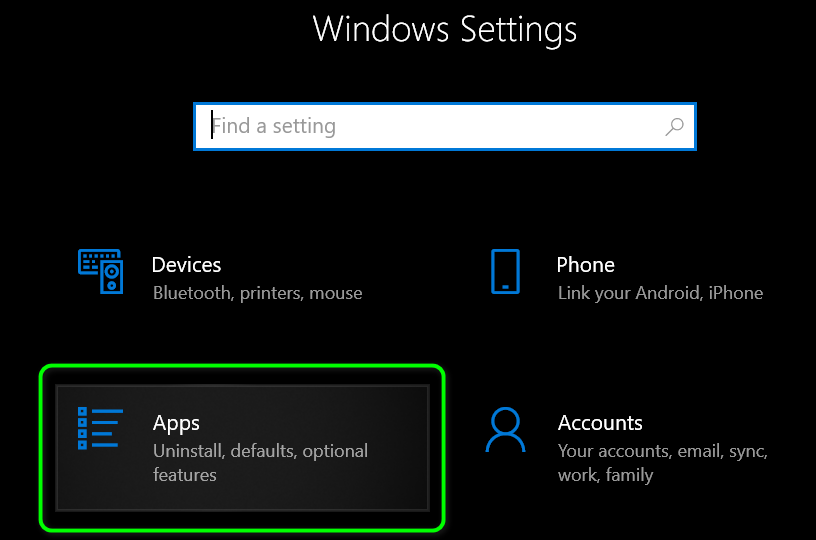
Open Apps in Windows Settings - Now click on iTunes and then click on Advanced Options.
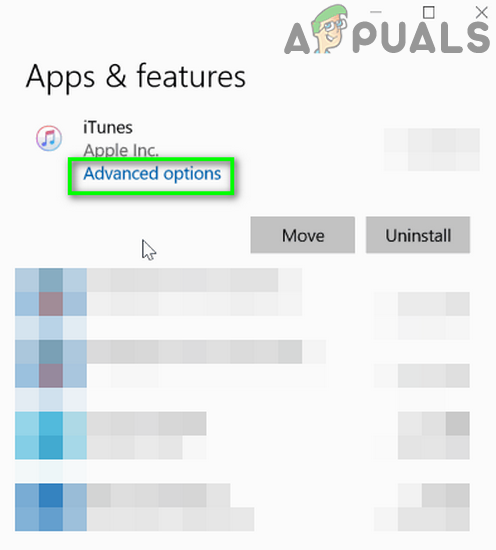
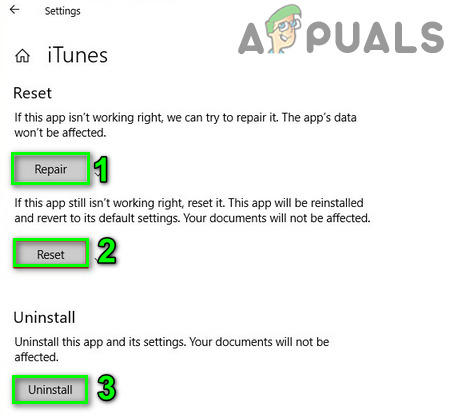
Open Advanced Options of iTunes in Windows Settings - Then click on Repair. Now reconnect the computer and iPhone to check if the backup issue is resolved.
- If not, move the contents of the iTunes backup directory (or any other data that you want to backup) to a safe place. Usually, the directory is located at:
%APPDATA%\Apple Computer\MobileSync
- Then repeat steps 1 to 4 to open Advanced Options of iTunes.
- Now click the Reset button and then try to perform the backup operation to check if the problem is solved.
- If not, repeat steps 1 to 4 to open Advanced Options of iTunes.
- Now click on the Uninstall button and then follow the prompts on your screen to complete the Uninstallation of iTunes.
Uninstall iTunes - Now uninstall the following applications in the order below:
Apple Software Update

Apple Mobile Device Support

Bonjour

Apple Application Support 32-bit

Apple Application Support 64-bit
- Then restart your system.
- Upon restart, launch the Run command box (by press Windows + R keys) and open the following location:
%programfiles%
- Now find and delete the following folders (if present):
iTunes

Bonjour

iPod
- Now open the Common folder in the folder of Program Files.
- Then delete the following folders (if present):
Mobile Device Support

Apple Application Support

CoreFP
- Now open the following folder:
%ProgramFiles(x86)%
- Now find and delete the following folders (if present):
iTunes

Bonjour

iPod
- Now open the Common folder in the folder of Programs Files (X86).
- Then delete the Apple folder.
- Now delete the following folders in the Common folder (if present):
Mobile Device Support

Apple Application Support

CoreFP
- Now empty the recycle bin of your system and then restart your system.
- Upon restart, uninstall any other Apple product (if you are using) and then restart your system.
- Upon restart, install iTunes and check if the backup issue is resolved.
Solution 7: Reset iPhone to the Factory Defaults
The issue could be the result of the corrupt firmware of your Apple device. In this context, resetting your iPhone to the factory defaults may solve the problem.
- Put your iPhone on charging and connect it to a Wi-Fi network.
- Open Settings of your phone and tap on your Apple ID.
- Now tap on iCloud and then tap on iCloud Backup.
- Then tap on the Backup Now button and wait for the completion of the backup process. If you cannot back up using iCloud, then manually backup your data and follow steps 5 to 9 to set-up your phone as new.
- After backing up your device, open the Settings of your phone.
- Now open General and then Reset.
- Then tap on Erase All Content and Settings.

Erase All Content and Settings - Now follow the prompts on your screen to reset the phone.
- After the phone is restarted, set-up the phone as a new (do not restore from the iCloud backup).
- Then check if you can backup the phone through iTunes.
- If so, then again reset your phone to the factory defaults and restore the phone from the iCloud backup.
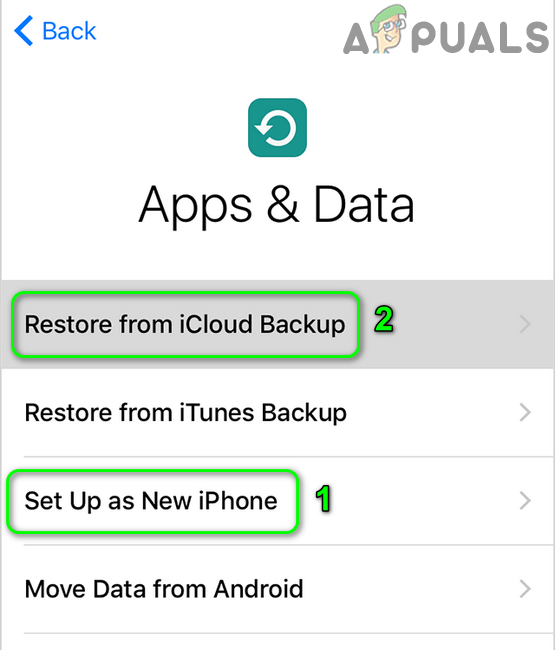
Restore Your iPhone From iCloud Backup - Now check if the backup issue is resolved. If not, then manually backup your essential data and reset the phone.
Solution 8: Reset or Reinstall the OS of Your System
If nothing has helped you so far, then the issue could be a result of the corrupt installation of your OS. In this context, resetting or reinstalling the OS may solve the problem. For illustration, we will discuss the process for a Windows PC.
- Reset your system to factory defaults.
- Then check if the backup issue is resolved.
- If not, then clean install Windows on your system and hopefully the problem is resolved.
- If the issue returns after one or two successful backups of your phone, then try to disable automatic Windows updates.
If the issue is still not resolved, then try to back up your phone with another third-party backup utility.