Fix: WiFI Stops When Mobile Hotspot is Turned On on Windows 11
Some Windows 11 users are reporting that whenever they try to enable the mobile hotspot functionality they lose access to the internet. The weird aspect of this issue is that a lot of users have confirmed that they can access their default search engine, but any other page fails to load. This problem is often reported to appear after the installation of a pending Windows update.
After investigating this issue, it became apparent that there are several different scenarios that might ultimately cause this problem. Here’s a list of potential culprits that you should be aware of:
- Bad update (KB5014699) – As it’s been confirmed by a lot of users, the most likely culprit that might directly cause this problem is yet another Windows Update (KB5014699) that Microsoft was quick to pull. In the event that your PC managed to install this update already, you can either uninstall it (and prevent it from installing again) or you can install the hot-fixed version (automatically or manually).
- Network inconsistency – According to several users that we’re also dealing with this problem, you can also expect to see this behavior due to a network inconsistency. In this scenario, you should deploy a series of Powershell commands in order to refresh Winsock, the IP data, the DNS data & the firewall cache. If this doesn’t work, proceed with a router reset or restart.
- IPV6 is disabled – Keep in mind that the main hotspot component natively available on Windows 11 uses IPv6. One of the reasons why you might expect to see this problem is when IPv6 is disabled for your active network and the hotspot is being forced through IPv4.
- Overprotective 3rd party AV suite – As it turns out, there are a few 3rd party antivirus suites that are known to indirectly cause this behavior after blocking the hotspot due to a false positive. Most commonly, Norton Antivirus is signed out for causing this type of behavior.
- Outdated network adapter – If you are experiencing this issue immediately after upgrading to Windows 11 from Windows 10, the first thing you need to do is make sure that you’re using a network adapter that is compatible with Windows 11. You can update it via Device Manager in case an incompatible version has been migrated from the older Windows version.
- Recent system change – If you recently carried over a driver installation or the update of an existing program that ended up interfering with the Internet connection and you don’t know the exact culprit, one way to revert back to a state in which this problem didn’t occur is to use System Restore.
- System file corruption – As it turns out, there are documented scenarios where this problem occurs due to a prevalent case of system file corruption that is actually inhibiting the hotspot component. In this case, the best course of action would be to deploy a clean install or repair install.
Now that we went over every potential reason why you might be experiencing this problem, let’s get to the fixing part.
Below you’ll find a collection of methods that other affected users have successfully used to get to the bottom of this issue and enable the mobile hotspot functionality while preserving Internet access on the Windows 11 PC.
1. Uninstall the KB5014699 update
Numerous people have confirmed that yet another Windows Update (KB5014699) that Microsoft quickly removed is the most likely offender that could be the root of this issue.
Did your Windows PC install the KB5014699 update recently? If so, uninstall it from your Windows PC and hide it using a specialist program (to prevent a subsequent installation).
Many people who resolved this problem on their own discovered that uninstalling the KB5014699 feature update and restarting their computer helped them resolve the problem.
Notably, this bug has already been fixed by Microsoft, so when WU installs this feature update, it shouldn’t occur again. We’ve also included extra instructions that will let you hide the update and prevent it from running in the future.
The steps listed below can be used to delete the most current Windows feature update:
- Press the Windows key + R to open the Run dialog box, type ‘appwiz.cpl’, and press Enter box to go to the Programs and Features page.
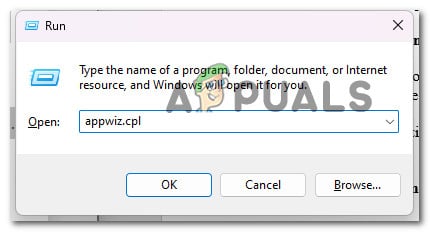
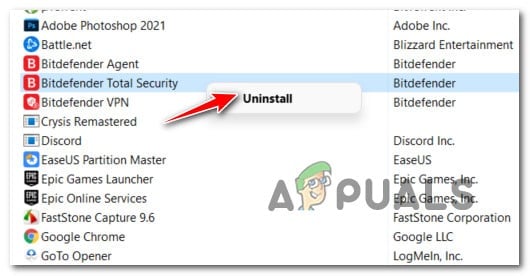
Open up the Programs and Features menu - Select View installed updates from the vertical menu on the left after selecting Programs and Features.
- On the Installed Updates screen, find the most current update and right-click it. From the context menu, choose Uninstall.

Uninstall the problematic update - When prompted for confirmation, click Yes to begin removing the update. Let the uninstalling procedure finish.
- It’s not advised to restart your computer after the update has been deleted. Visit the official download page for the Microsoft Show or Hide troubleshooter instead.
- Immediately, the utility we’ll be utilizing should start downloading. When the procedure is finished, open the .diagcab file and choose Advanced.
- After that, tick the option next to Apply Repairs Automatically before clicking Next.
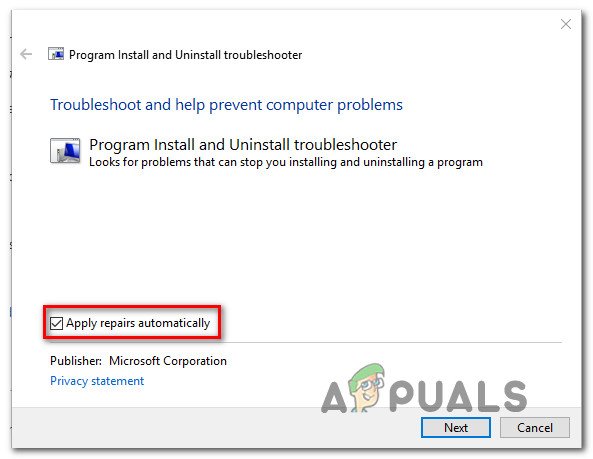
Install and uninstall the troubleshooter - The application will scan your computer to determine which pending updates are not loaded. To conceal updates, select Hide Updates from the menu of options on the following screen.
- Check the box next to the KB5014699 update and then click Next on the following screen.
Note: By doing this, Windows Update won’t attempt to install the update once more in the future. - Reboot your PC one last time to check if the problem has been resolved.
If the same type of issue continues, proceed to the next procedure stated below.
2. Update Windows to install the hotfix
If the method above didn’t work for you or you want to avoid uninstalling a Windows update that has already made its way to your PC, one of the alternatives is to install the hotfix that Microsoft has made available (KB5014668).
Since this update is now part of all channels, the easiest way to install it is by accessing the Windows Update component and installing every pending update automatically
Several users that we’re also dealing with this hotspot issue have confirmed that the issue went away on its own after they made sure they updated Windows 11 to the latest version.
Here’s how to do this:
- Pressing the Windows key and R will bring up the Run dialog box. The Windows Update tab of the Settings program will then appear once you input “ms-settings:windowsupdate” and hit Enter.
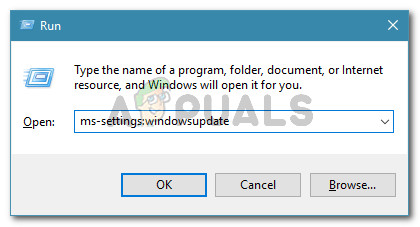
Access the Windows Update menu - After selecting the Windows Update tab, click Check for updates in the right-hand pane. Wait for the initial scan to finish after doing this.

Checking for updates - After the scan is finished, start installing any suggested updates. To install them one at a time, adhere to the on-screen instructions.
Note: Restart your computer if asked to do so if you haven’t yet had a chance to install all of the pending updates. But remember to come back to the same window at the following startup to finish installing every update and bring your Windows build up to date. - Restart your computer once each update has been applied, then check to see if the issue is fixed when the system starts up again.
If the hotspot feature still takes down the internet on your Windows computer, move down to the next method below.
3. Install KB5014668 manually via MUC
There may be situations when Windows Update is irreparably damaged, in which case the hotfix won’t be installed automatically.
You can manually install the hotfix that will repair the problem in your situation using the Microsoft Update Catalog if you don’t want to reinstall your operating system.
You can manually deploy the failing update via the Microsoft Update Catalog if the Windows Update component isn’t working properly and the WU Troubleshooter can’t fix the problem.
You can manually install the incompatible update version from this location using the.ini file after downloading it from here.
For comprehensive instructions on how to manually install the KB5014668 hotfix update, refer to the procedures listed below:
- Launch your preferred browser and navigate to the home page of the Microsoft Update Catalog (MUC) directory.
- To find the update that is failing in your situation, use the search feature in the MUC root directory (for example KB5014668).

Finding the KB5014668 update - Examine the outcomes and, taking into account your current OS architecture and Windows versions, choose the necessary update versions to apply.
- Click the Download icon next to the update after determining which version is appropriate for your computer.
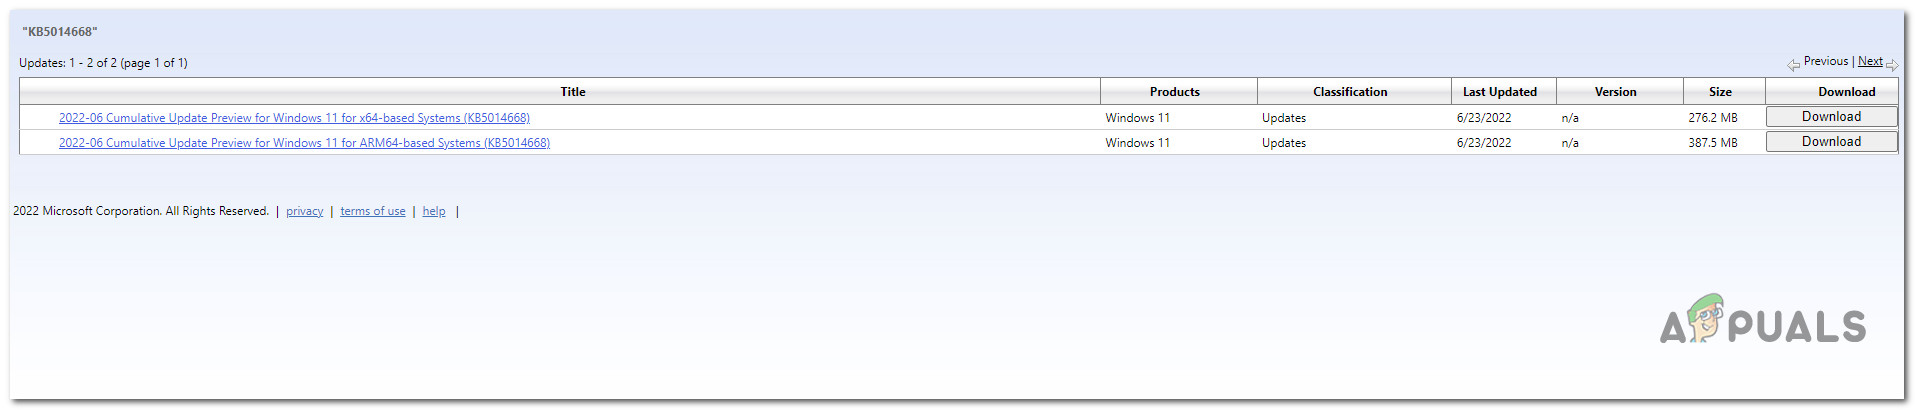
Download the correct update - After the download is finished, use File Explorer and locate the update’s storage location (most likely in the Download folder).
- Following the .ini file’s discovery in the appropriate folder, use the context menu by right-clicking it and choosing Install.
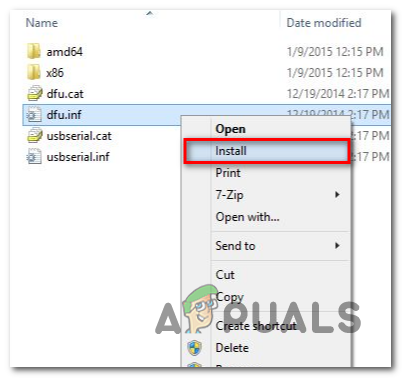
Install the update from the .ini file - Complete the Windows Update installation by following the remaining instructions displayed on the screen.
- To see if the issue has been fixed, restart your computer one final time.
Move on to the following procedure if the issue continues and you keep losing internet access when attempting to set up a mobile hotspot.
4. Reset the network connection
You can anticipate seeing this behavior as a result of a network irregularity, according to a number of users who report that we are also experiencing this issue. A set of Powershell commands should be used in this situation to update Winsock, the IP data, the DNS data, and the firewall cache.
To test if this scenario is true, open up an elevated Powershell command and run a series of commands while pressing Enter after each one.
Here’s how to do this:
- Press Windows key + R to open up a Run dialog box. Next, type ‘powershell’ inside the text box, then press Ctrl + Shift + Enter to open up an elevated Powershell window with admin access.
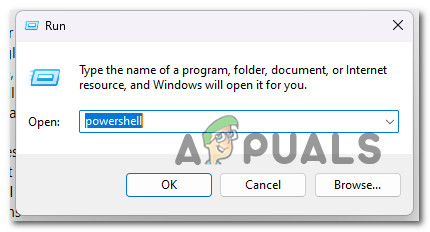
Access the PowerShell window - When you’re prompted by the User Account Control (UAC), click Yes to grant admin access.
- After you’re inside the elevated CMD prompt, type the following commands and press Enter after each Command to effectively update Winsock, the IP data, the DNS data, and the firewall cache on your Windows computer:
netsh winsock reset
netsh int ip reset
netsh advfirewall reset
ipconfig /flushdns
ipconfig /release
ipconfig /renew
- Once you processed every command above properly, reboot your PC and see if the problem is now fixed.
If the problem is still not resolved or you’re using a 3rd party Firewall, move down to the next method below.
5. Disable or Uninstall 3rd party firewall
After blocking the hotspot due to a false positive, it finds out that a few 3rd party antivirus suites are known to indirectly trigger this behavior. Most frequently, Norton Antivirus is to blame for this kind of conduct.
If this applies to you, you can start by turning off your antivirus’ real-time protection. You can usually do this directly from the AV suite’s tray bar icon using third-party antivirus software.
If you have a firewall and believe that this may be the cause of your problems keeping an Internet connection while the hotspot is enabled, turning off real-time protection alone might not be sufficient to solve the issue because the same security rules will still be in effect even when active network filtering is turned off.
The only solution, in this case, is to remove the third-party firewall manually while making sure that no files are left behind that could still result in this problem:
- To open the Programs and Files menu, hit the Windows key + R to bring up the Run dialog box, type “appwiz.cpl,” and then press Enter.

Access the Programs and Features menu - Once inside the Programs and Files menu, go through the list of installed programs until you find the third-party firewall tool that you wish to remove.
- To finalize the uninstallation, right-click on the third-party AV you found and select Uninstall from the newly displayed context menu.
Uninstalling the firewall - You must now follow the removal instructions to the end, then restart your computer to see if the fault persists.
If the problem persists, go on to the next possible solution.
6. Reset or Reset Router
Restarting or resetting your router is another option you can attempt if none of the previously mentioned fixes have worked for you. This problem might be fixed by a straightforward restart or a somewhat more involved reset because it might be brought on by a network discrepancy.
You can reset your network components by performing a straightforward network reboot without changing your login information or other settings. So when you force a network refresh, there is nothing to worry about.
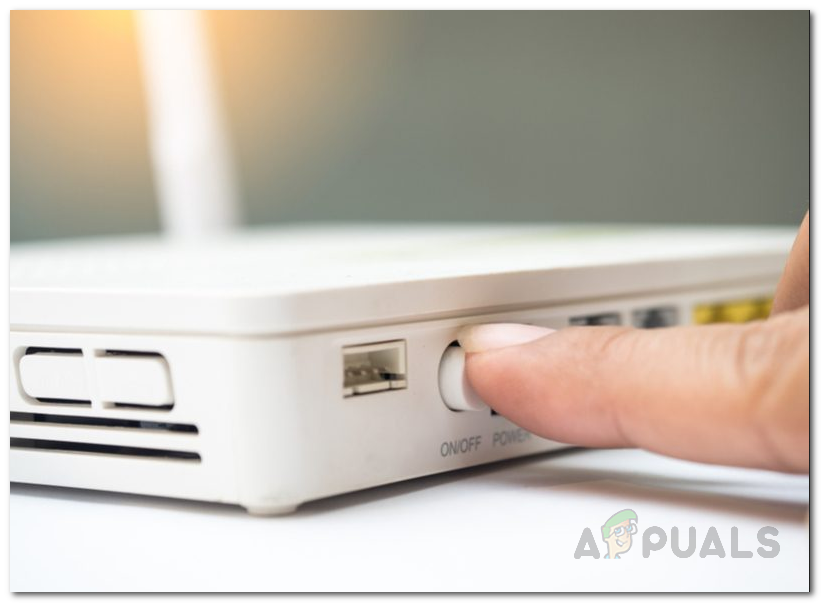
Press the restart (switch) button if you want to restart your router. Use the ON/OFF button and press it twice if this option is not accessible. The identical outcome can be achieved by just unplugging the power wire from the socket.
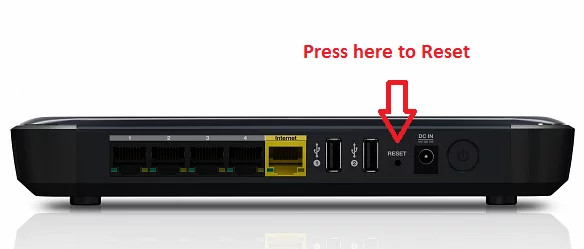
Note: Avoid pressing the RST button, as doing so will start a reset process.
If you’ve already tried this and the problem persists, you can try performing a router reset. However, you should be aware that this process will also reset your modem’s default address and custom credentials.
Notably, your login information will also be changed back to admin for both username and password.
All that’s left to do is press and hold the reset button for at least 10 seconds. Depending on the router model, you might require a small, pointed device to reach the reset button. When the process is finished, the router’s LEDs will begin to sporadically blink.
If your internet access still gets interrupted when you enable the mobile hotspot, move down to the next method below.
7. Update network adapter
Make sure you’re using a network adapter that is compatible with Windows 11 as soon as possible if you have this problem right away after upgrading from Windows 10 to Windows 11. If an incompatible version was transferred from an earlier Windows version, you can upgrade it through Device Manager.
In this situation, you’ll need to restart your computer after using Device Manager to completely delete the active network adapter driver. By doing this, you’ll compel Windows 11 to recognize that a crucial driver is absent and install a generic alternative (one that is totally compatible) the following time your machine boots up.
Follow the steps below for step-by-step instructions on how to do this:
- To bring up the Run dialog box, press Windows key + R. Then, to launch Device Manager, type “devmgmt.msc” into the text box and click Ctrl + Shift + Enter.
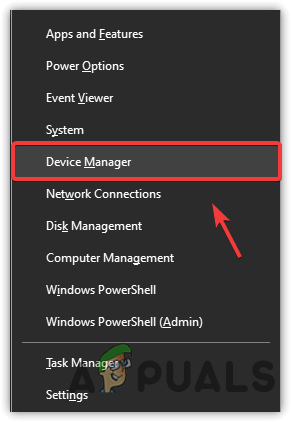
Open Device Manager - Click Yes to grant admin access when the User Account Control prompts you to do so.
- After entering Device Manager, extend the Network Adapters drop-down menu by browsing through the list of devices at the bottom of the page.
- Right-click on the Wireless adapter in the Network Adapters drop-down menu and select Properties from the context menu.
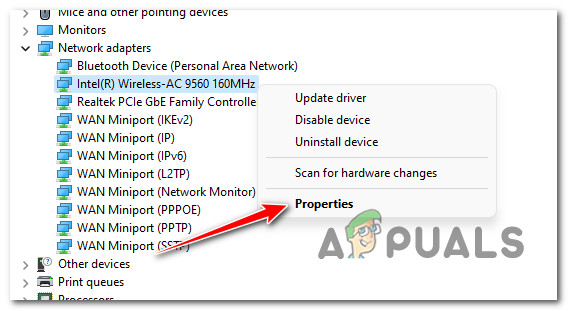
Accessing the Properties screen of the Network adapter - After entering the Network adapter Properties screen, select the Driver tab from the top menu.
- To start the process of uninstalling the active network adapter driver, click Uninstall again after clicking the Uninstall Device button at the bottom of the screen.
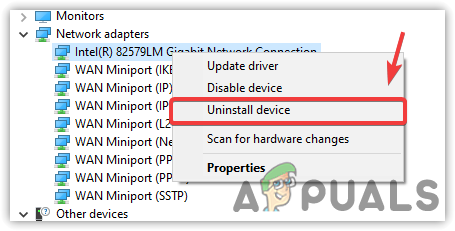
Uninstall the Network adapter Note: Be careful to check the box next to “Attempt to delete the driver for this device” before clicking “Uninstall” to confirm the action.
- You’ll notice that you no longer have network connectivity when the process is finished; this is quite normal. Simply restart your computer if this occurs.
- Your OS will recognize that the network adapter driver is missing during the subsequent system startup and will install a compatible replacement to reestablish Wi-Fi access.
If you’re still having sporadic disconnections while connected to a Wi-Fi network after reinstalling the network adapter, scroll down to the next possible solution below.
8. Enable IPv6
Remember that the primary hotspot feature that comes included with Windows 11 uses IPv6. When IPv6 is disabled for your active network and the hotspot is forced to use IPv4, one scenario where this issue could occur is.
If you only experience this issue when using a certain program, it’s probable because that application was only created to support the new IPv6 protocol. To drive them out of IPv4 in this situation, the only option is to enable IPv6.
For detailed instructions on how to do this, go to the list below:
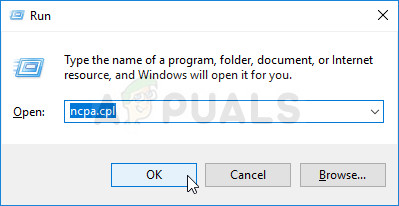
- To bring up the Run dialog box and enable IPv6, type Windows key + R.
- After that, enter “ncpa.cpl” in the text field to open the Network Connections menu.
Access the Network Connections menu - Right-click the network adapter you’re using in the Network Connections menu, and then select Properties from the context menu that displays.
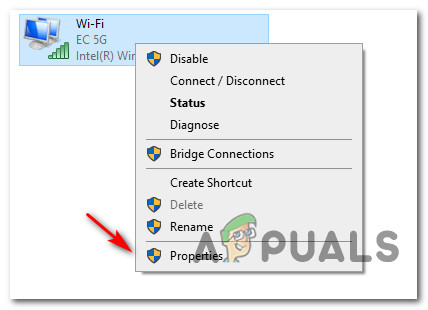
Access the Properties screen Note: To give admin access, select Yes when User Account Control (UAC) asks you to.
- Select the Networking tab on your network adapter’s Properties page.
- Next, select Internet Protocol Version 6 (TCP / IPv6) by checking the box next to it in the list of things at the bottom of the page.
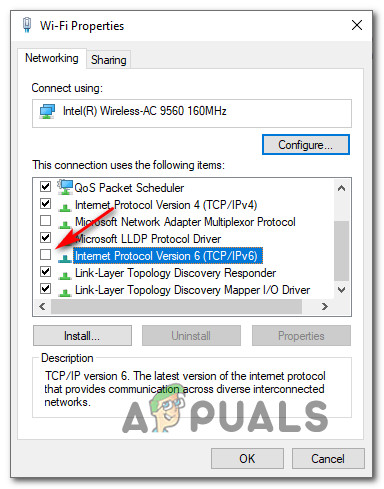
Enable the Ipv6 protocol - After saving your modifications, click Ok to effectively enable the IPv6 protocol. Restart your computer to see if the problem is still there.
Continue to the next method below in case you’re still losing the internet connection while enabling the mobile hotspot functionality.
9. Use System Restore
If you’ve tried all of the methods indicated above to undo a system modification that isn’t disrupting the Internet connection while the mobile hotspot component is activated, your next option is to roll back your machine to a previous system restore point.
Some users have found the issue to be resolved thanks to this.
Note: The System Restore feature of Microsoft Windows allows you to return your machine to a previous state. This can be used to fix problems like faulty systems.
Follow the instructions below to get your computer back to working order:
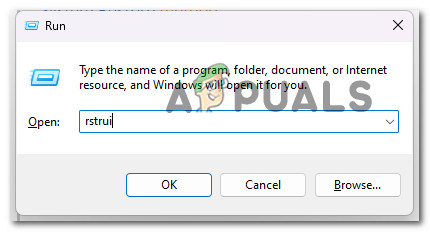
- Press the Windows key + R to open the Run command.
- Type “rstrui” in the Run box and hit Enter to start the System Restore wizard.
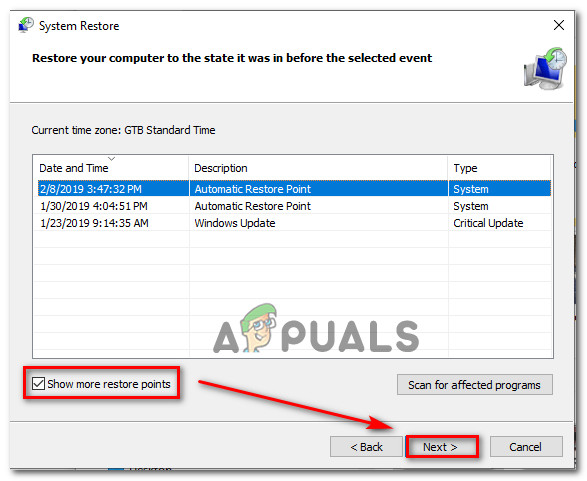
Access the System Restore component - Select On the next screen, select a different restore point, then click the Next button.
- Select a restore point that was established prior to the time when you detected high resource usage, then click Next once more.
Pick a System Restore point - Once the restoration procedure has started, select Finish and wait for your computer to restart.
- Restart your Windows 11 computer to see if the issue has been resolved.
Continue to the following potential remedy below if the same type of issue is still present.
10. Perform a clean install or repair install
The only reason if you’ve reached this point without finding a workable solution is that your system is experiencing some kind of underlying system file corruption that interferes with its capacity to establish and sustain mobile hotspot connections.
The only plausible solution at this stage, assuming you’ve ruled out a signal problem (the router is too far away), is to completely replace each system file with a healthy equivalent.
There are two ways you can accomplish this:
- By performing a fresh install of Windows 11– Expect the process to be as simple as possible if you choose this path. Window 11’s settings menu allows you to initiate a clean install without having to plug in or insert appropriate installation discs. The disadvantage is that you risk losing all of the data stored on the Windows drive if you don’t back it up beforehand.
- By repairing and installing (or upgrading in place) Windows 11 – Deploying a repair install would be a more elegant solution (in-place upgrade). Since this procedure just replaces Windows files, you’ll be able to preserve all of your files, programs, games, and user settings. You must, however, use Windows 11 installation disks that are compatible.


