How to Install Xposed Framework on Android Phones
Xposed Framework makes customization of your Android Phone super-easy; before the creation of Xposed Framework, customization’s and tweaks were not easy since the phone’s Custom ROM had to be flashed. In General, Xposed Framework allows the owner of the Magnificent Android to perform tweaks, and customize widgets without messing up the system files and APKs (Android Package Kit) which makes it easier to remove, disable and make changes without flashing ROMs since they run on memory.
If the above doesn’t makes sense or if your new to all this; let’s explain it in simple terms. Xposed Framework is an add-on that sits on top of your engine (where engine = custom rom, the phone) and add it’s features to the engine, without changing the mechanics of the engine. However, for this to happen, the engine must be unlocked to allow it to let Xposed sit on it; where unlocking is the root access to your phone.
Once you’ve got the phone rooted, and Xposed Framework installed; you can then install the modules as per your choice. The aim of this guide is to show how to install Xposed Framework on a root android phone and use it’s modules. There are around 777 modules that can do almost anything; check them out here.
Before you begin, you must ensure that your Android phone is rooted and the Android Version is 4.0.03 or the later. If it isn’t take a look at our rooting guides, and pick the one that best fits your phone.
Root Samsung | Framaroot (Compatible with Most Phones)
After it has been rooted, we will install the Xposed Framework and then see how to use it to install modules.
Installing Xposed Framework and Modules
Procedure for Android Version 4.0.1 to 5.0.1
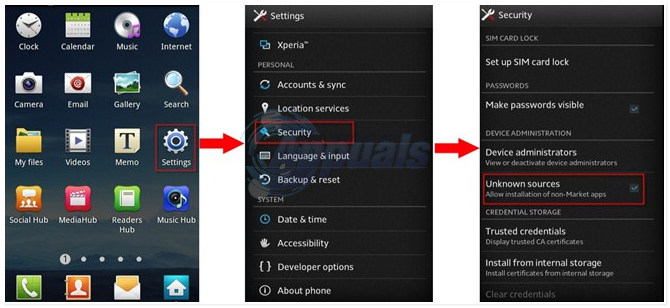
If you are not viewing this page from your phone; then view it now so you can directly and easily perform the steps. Go to Settings -> Security -> Unknown Resources and Enable it.

Then, click here from your phone, to download Xposed Module; after it has been downloaded click on the APK to install it.
Procedure for Android Version 5.0.2 and later
Android Users on 5.0.2 or later versions requires custom recovery installed. [google using your model #, it’s different for every phone so the steps cannot be written – but you can ask us on eQuestions.net/ask ]. Once you have the Custom Recovery Installed, then the next step is to identify which processor architecture your phone is based on, it can be [ARM, ARM64 or X86] in order to download related Xposed Data.
A Google search on your phone’s name + processor architecture will tell.
Hint: If your phone is based on Intel’s processors its x86, if you have a recent flagship (top of the line) phone then its most probably ARM64, if not then it’s ARM.
Now, download this zip file (using your Android phone) based on which architecture your phone is.
Once the above is downloaded, next step is to download Xposed Framework by Clicking Here. Then, boot your phone into custom recovery, this is done by holding VOL UP + Power Button OR VOL DOWN + Power Button, OR VOL DOWN/UP + Power Button + Home Button, depending on your phone, once booted into the custom recovery do the following depending on your Custom Recovery.
For Clockwork Mod Recovery: Install Zip from SD Card then browse the ZIP File (architecture) you downloaded and choose Flash.
For Team Win Recovery: Choose Install -> Choose Zip File and Swipe to Flash
Once done, reboot your phone and install the APK. The Xposed Framework will be ready.