How to Install a Complete Linux Distro on Android
For users who want to experience a complete desktop OS on their Android phone, especially tech-savvy people who don’t want to carry around a laptop or tablet, it’s entirely possible to install a fully-functional Linux OS on your Android phone.
You will need a rooted phone for this operation – you can search Appuals for a root guide for your device if you aren’t already rooted. Once you’re rooted though, the process is fairly simple.
Requirements
BusyBox
VNC Viewer
Linux Deploy
The first thing you’ll want to do is install BusyBox – either directly from Google Play store, or the Magisk BusyBox module if you’re rooted with MagiskSU.
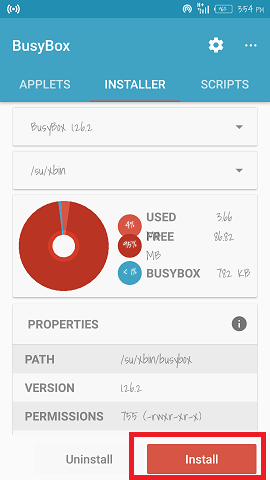
If you install BusyBox from the Google Play store, you just need to download the app, launch it, and hit the “Install” button from inside the app.
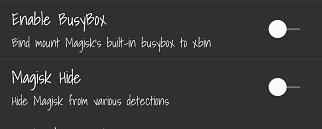
If you’re rooted with MagiskSU, you need to launch Magisk Manager and go to Settings, then enable the “Enable Busybox” button, which will utilize Magisk’s built-in BusyBox for your device.
What BusyBox does is allow your Android system to use Linux commands normally not accessible to you – many root apps depend on this. With BusyBox installed, you’re now going to launch Linux Deploy on your device.
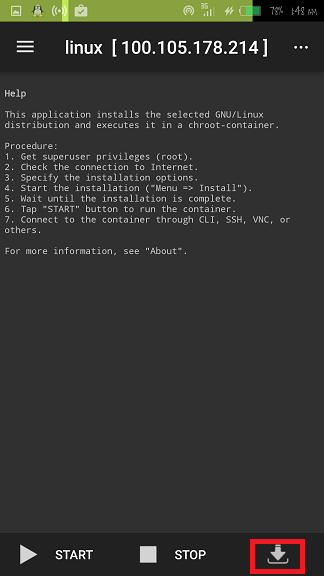
In the Linux Deploy menu, choose “Download”, and then you’ll be presented with an options menu. Here is where you’ll configure your Linux distro before it’s installed, and I’ll explain the important settings:
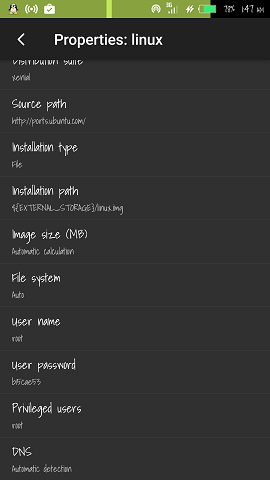
- Distribution – Choose your Linux distro to install. There’s quite a large list, but the most user-friendly would be Ubuntu.
- Distribution suite – Choose a version of the Linux distro you selected above.
- Architecture – Do not change this, it is automatically selected based on your device.
- Image size (MB) – The default is 512, but you should change this to a higher available number. Just don’t enter a number greater than 4095mb.
- SSH Settings – You’ll need to change the default port of 22 here, but Android devices can only use ports about 1024. Most users would opt for port 2222.
- Custom mounts – If you want to access your Android filesystem from within the Linux distro, go to “Mount points” and choose the ones you need. If you cannot enable the internal storage, change the default storage mount /storage/emulated/0 to /data/media/0.
You should set your username to “root” – this will give you permanent super-user access inside the Linux distro. When everything has been configured, press the Install button, and after it’s finished, you may launch the Linux distro with the Start button – but this will launch it in chroot, which is like a command-line terminal. So we need to access the GUI using the VNC Viewer tool.
Launch VNC and set the address to “localhost:5900” and enter your password. You now have a fully-functioning Linux desktop OS on your Android phone. You may want to begin installing Linux apps, which is done through the Linux terminal. Here are a few worth grabbing:
- LibreOffice – apt-get install libreoffice
- Firefox – apt-get install iceweasel
- Python Idle – apt-get install idle
- GIMP – apt-get install gimp
- DropBox – apt-get install nautilus-dropbox
Also check out our guide on installing kali linux on android.