How to Install and Setup BlissOS on PC (UEFI)
- BlissOS is an open-source operating system that brings Android to x86-based PCs, enhancing the Androidx86 project with better optimization, customizations, and a user-friendly interface. It supports Android 11 and 12L, with beta versions for Android 13.
- To install BlissOS, disable Secure Boot and TPM in BIOS, set SATA to AHCI, and create a new partition. Use the Windows Installer for simplicity or Rufus for a bootable USB and follow the prompts to set up BlissOS.
- Designed for developers and users with older PCs, BlissOS offers a full Android experience on desktops and laptops. It's great for media consumption and testing apps but not ideal for gaming compared to emulators like Bluestacks.
BlissOS is a popular open-source operating system used to run Android on x86-based PCs. This project is a fork, or a derivative, of a much larger project called Androidx86. The common goal is to port the Android experience to PC hardware using Intel and AMD x86-based processors.
BlissOS: Requirements and Targeted Audience
As of Q4 2022, BlissOS requires the following hardware at a minimum:
↪ Intel:
- Intel Core i Series (i3/5/7/9) – Fully Supported
- Intel Celeron M – Fully Supported (Kernel 5.4+ recommended)
- Intel Atom – Mostly Supported (Kernel 5.10+ recommended)
- Core2Duo – Not Fully Supported (Needs SSE4.2) (May require 32-bit builds)
↪ AMD:
- A Series – Mostly Supported (Needs SSE4.2) (Kernel 5.10+ recommended)
- Ryzen Series (1k-7k) – Fully Supported (Kernel 5.10+ recommended)
- Athlon Series – Mostly Supported (Needs SSE4.2) (Kernel 5.10+ recommended)
BlissOS is primarily built for low-end devices and is a complete operating system, unlike an app that you’d launch within Windows. These operating systems are intended for developers and users who want something other than basic Windows. BlissOS is not the strongest recommendation for gaming enthusiasts as you’d be better off with something like Bluestacks or Gameloop.
If you have an older laptop or another compatible device, why not consider getting the Android experience with an operating system like BlissOS? Many people prefer Android for media consumption, and for developers, such systems can be invaluable for testing and debugging software without needing a physical mobile device.
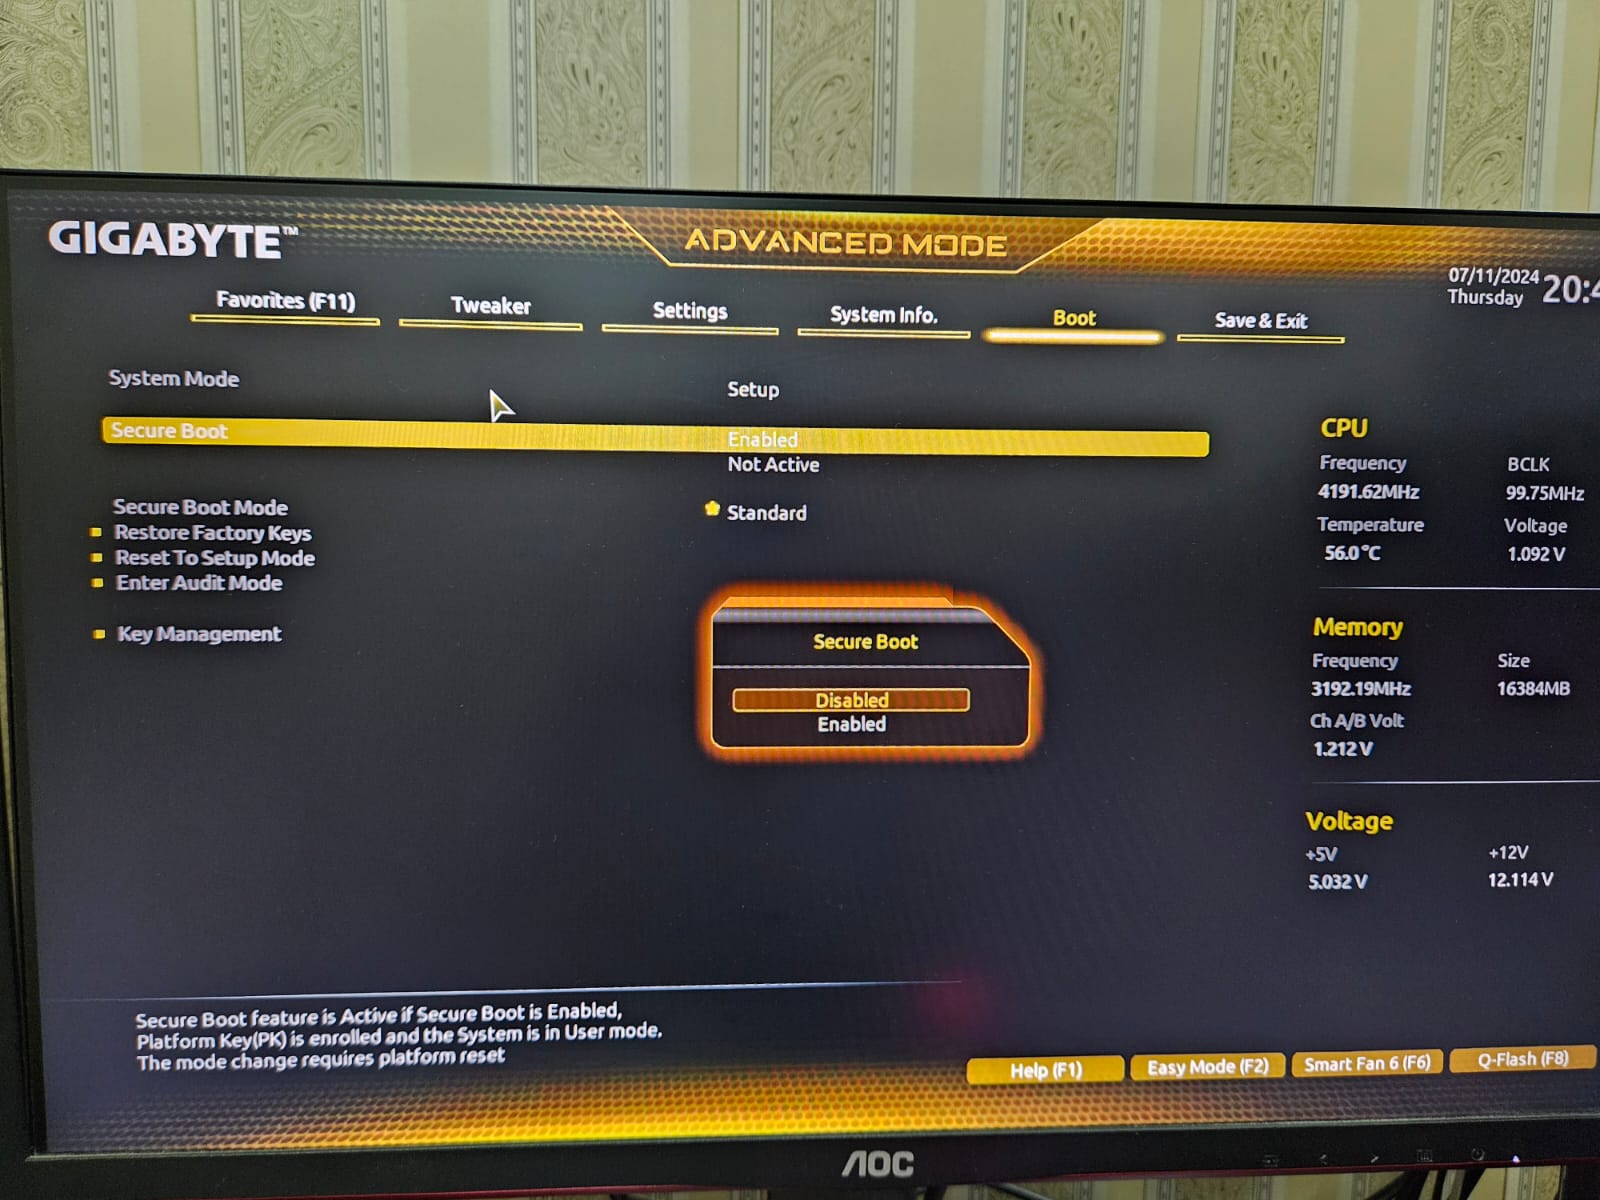
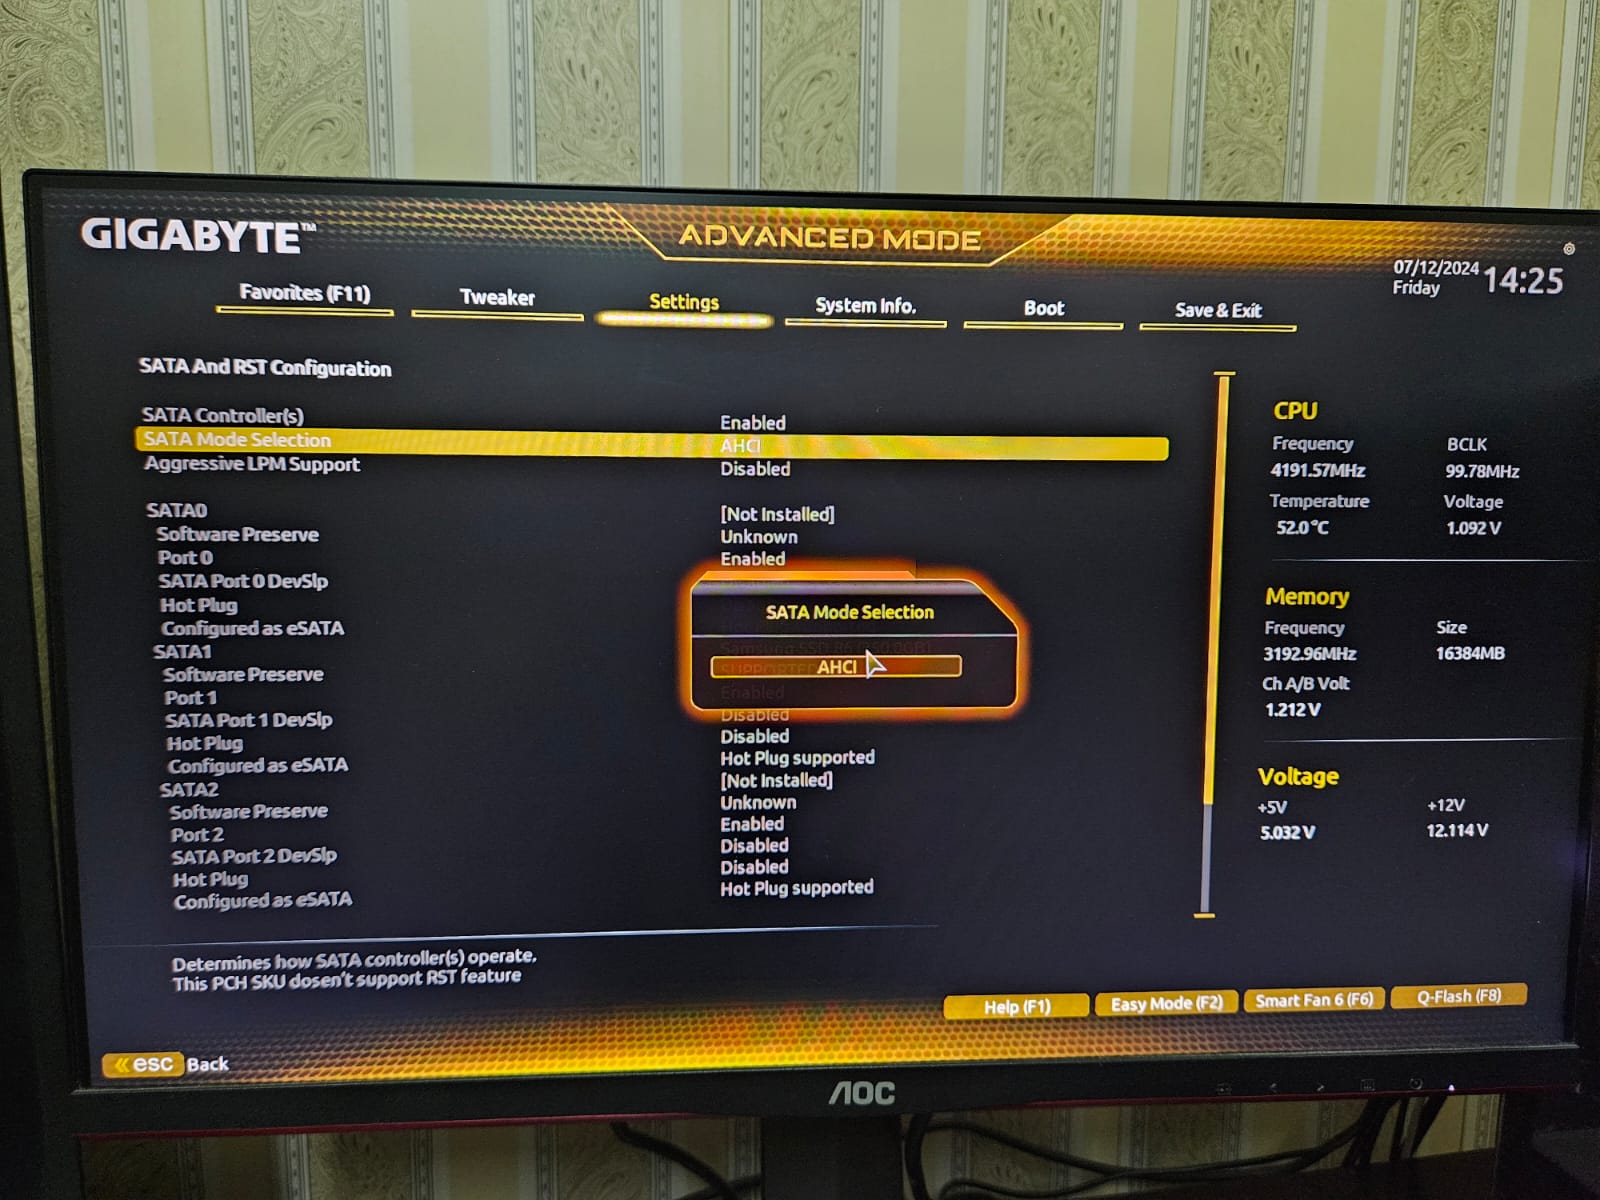
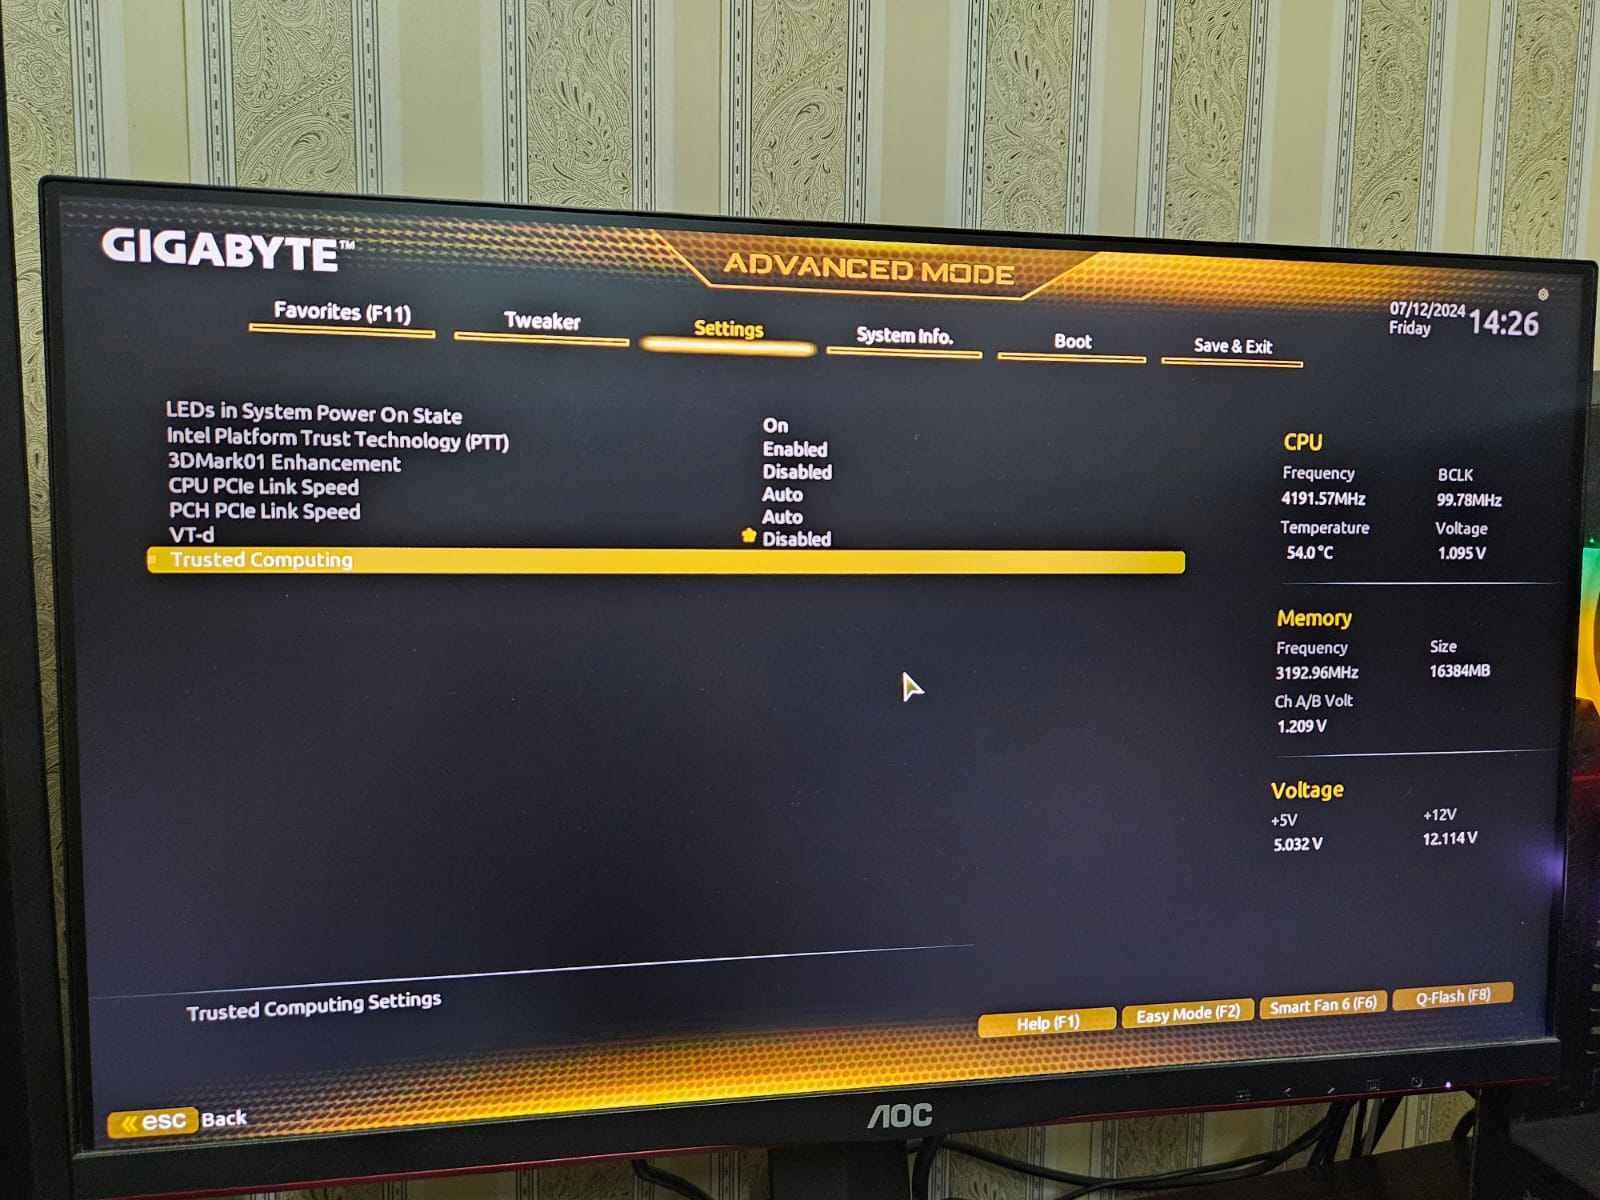
Disabling Secure Boot, TPM, and Setting SATA to AHCI
From the official documentation of BlissOS, you’ll need to change a few settings in your BIOS:
- Disable TPM (drive encryption).
- Disable Secure Boot.
- Make sure drive access is set to AHCI.
- Open the BIOS of your system by pressing the “Delete“, “F1“, “F2” or the “F10” keys.
- Navigate to the “Boot” section, find “Secure Boot” and set it to “Disabled.”
- Next, you need to find the SATA Controller setting which is commonly present in the “Settings” tab. Set the SATA Mode to “AHCI” instead of IDE/RAID.
- Lastly, disable TPM (Trusted Platform Module). Again, find this option in the “Settings” tab under the “Trusted Computing” section. You may want to refer to your motherboard manual for more details.
Installation via the Windows Installer
We believe the reason why BlissOS hasn’t seen widespread adoption is due to its complicated installation procedure. Multibooting Bliss using GRUB requires some experience and know-how about how partitioning works. Luckily for us, BlissOS offers users a Windows Installer, which is much easier than the aforementioned method.
The only caveat is that a standard EFI install is always better in terms of stability, updates, and other features compared to the Windows Installer. If you only wish to boot using Bliss, the process is straightforward. However, complications arise when you dabble into multi-OS territory. We will discuss the EFI method in a later section.
1) Preparing the Windows Installer
- Use the following link to visit the GitHub repository containing the Androidx86 Installer. The latest .exe file usually resides in the /bin/make_installer folder.
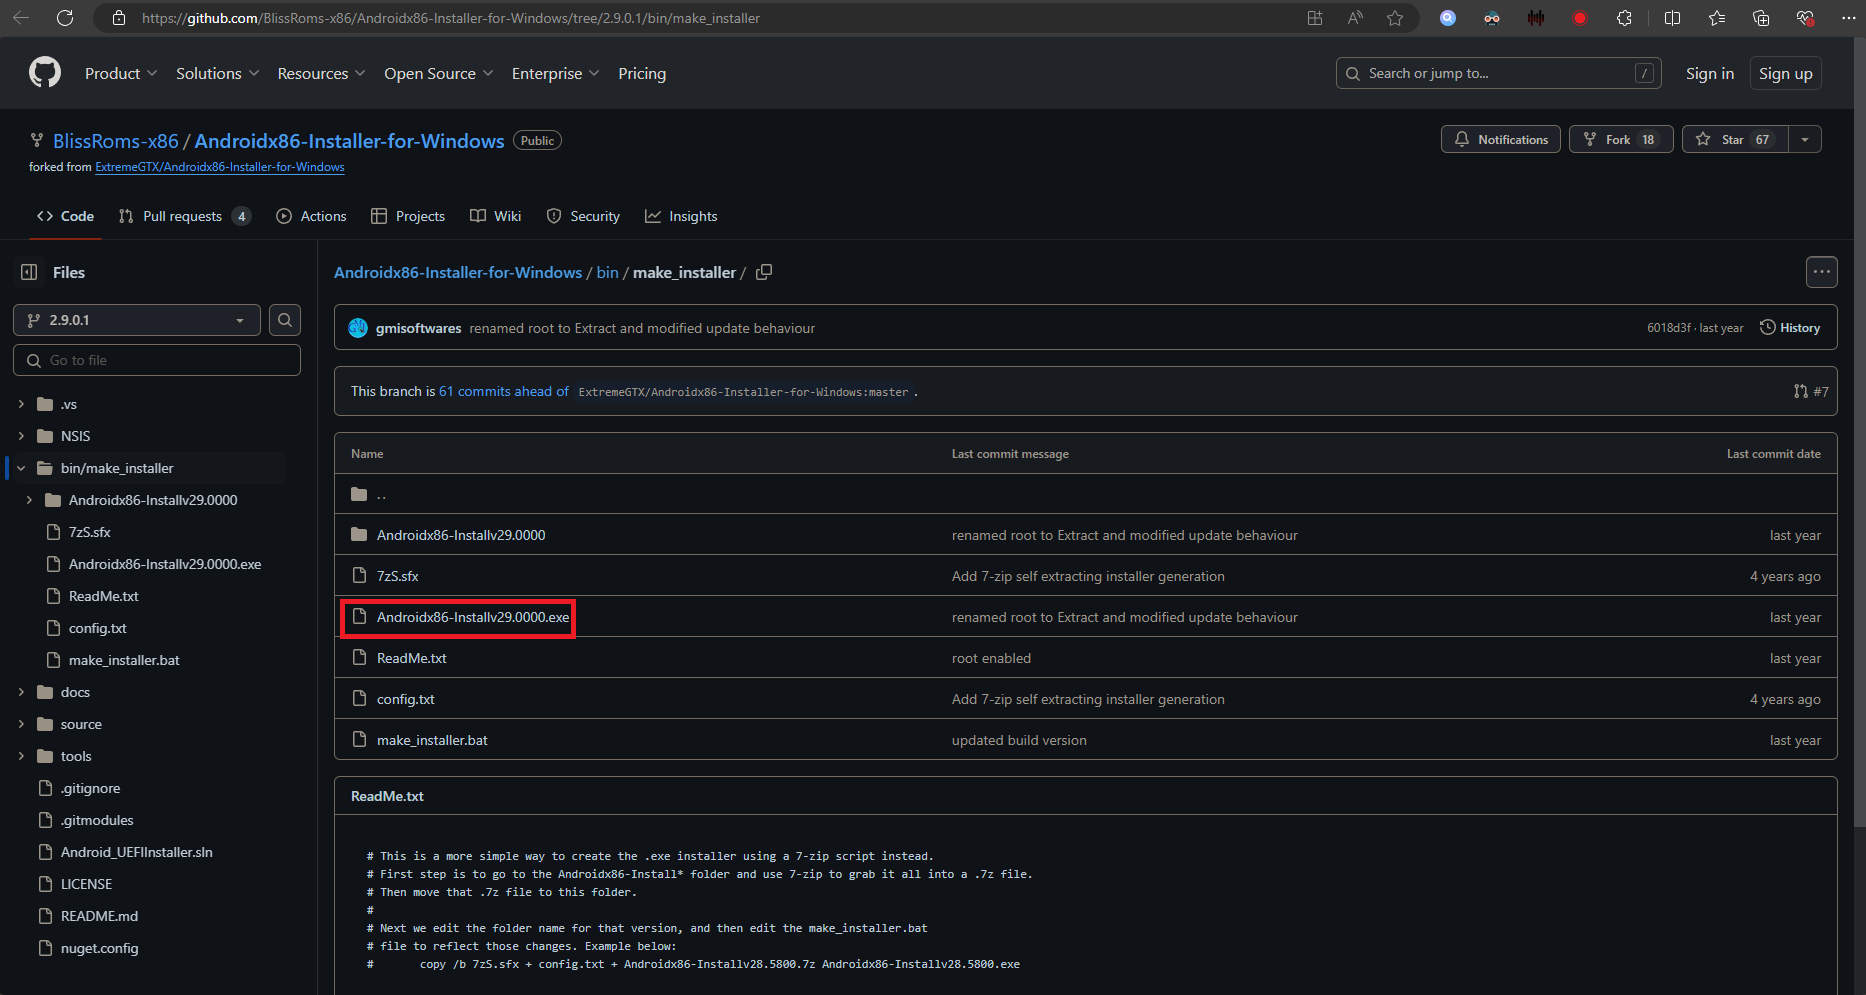
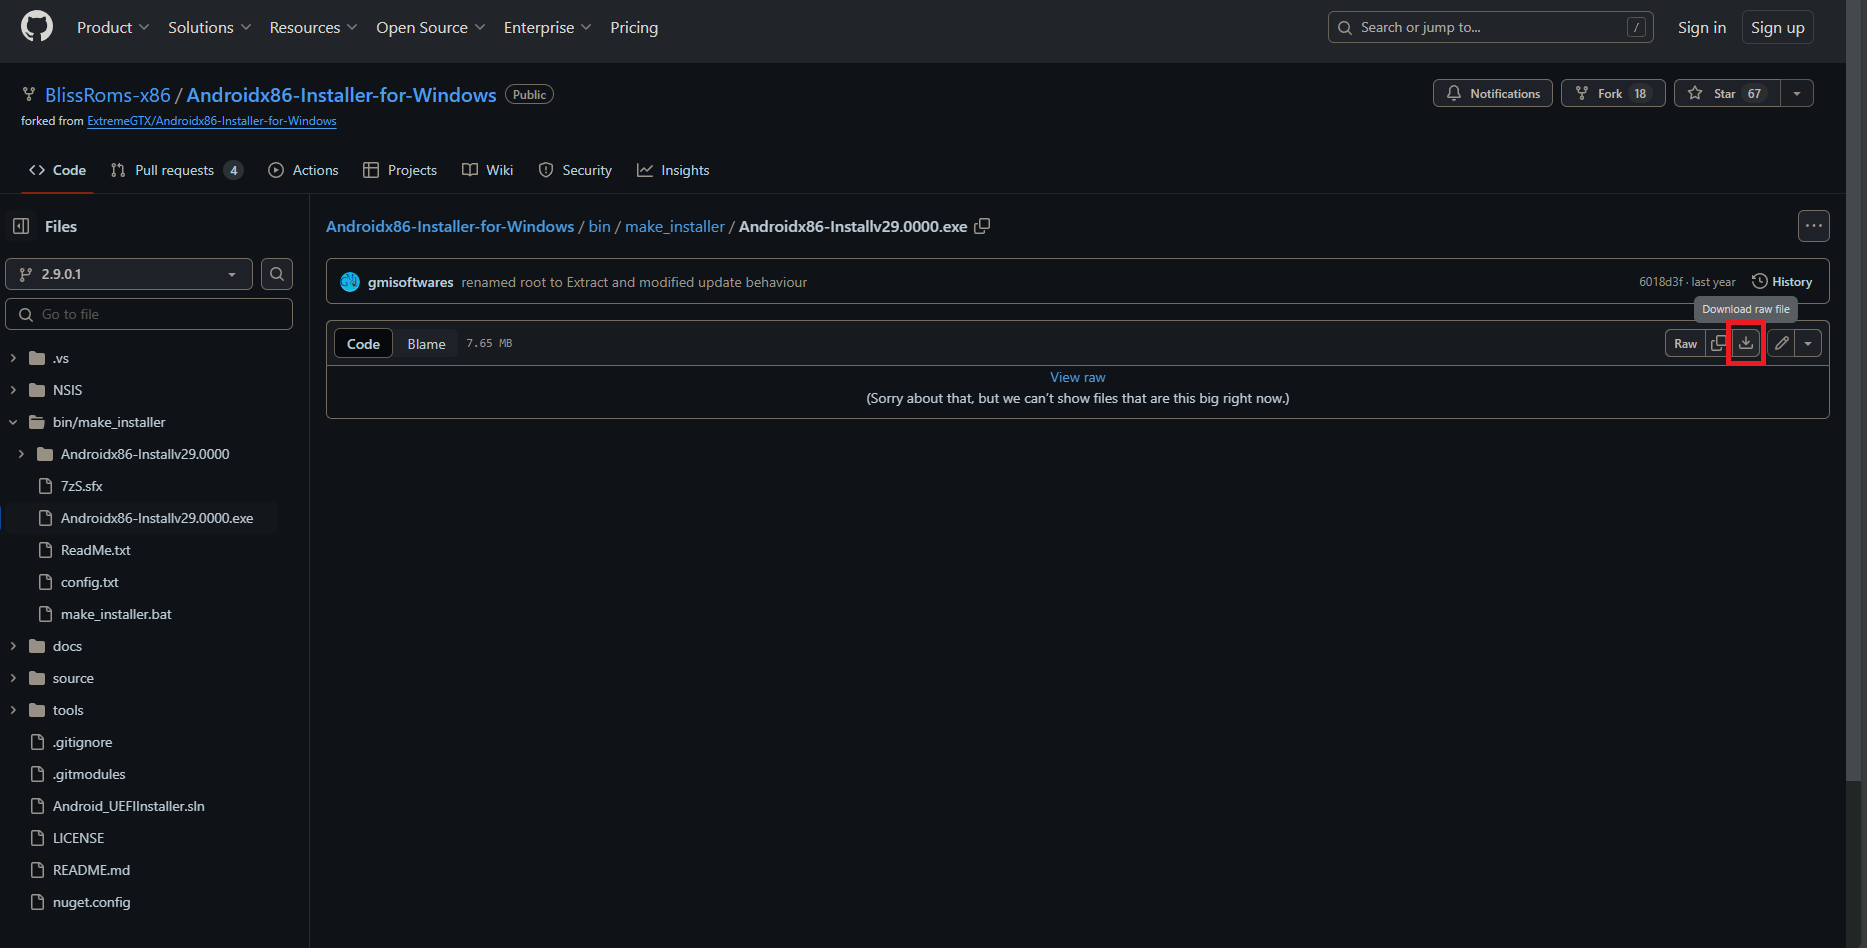
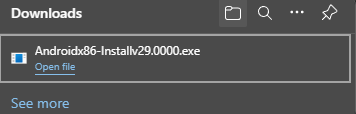
- Afterward, simply click on the highlighted .exe file. This will take you to a page where you can view the file, but due to its size, you will be prompted to download it instead. Click on the “Download raw file” option and the required .exe should start downloading in your browser or any other download management utility.
- Once downloaded, keep this file somewhere you can easily find it, as we’ll proceed to download the main .iso file next.
2) Downloading the Bliss OS .iso File
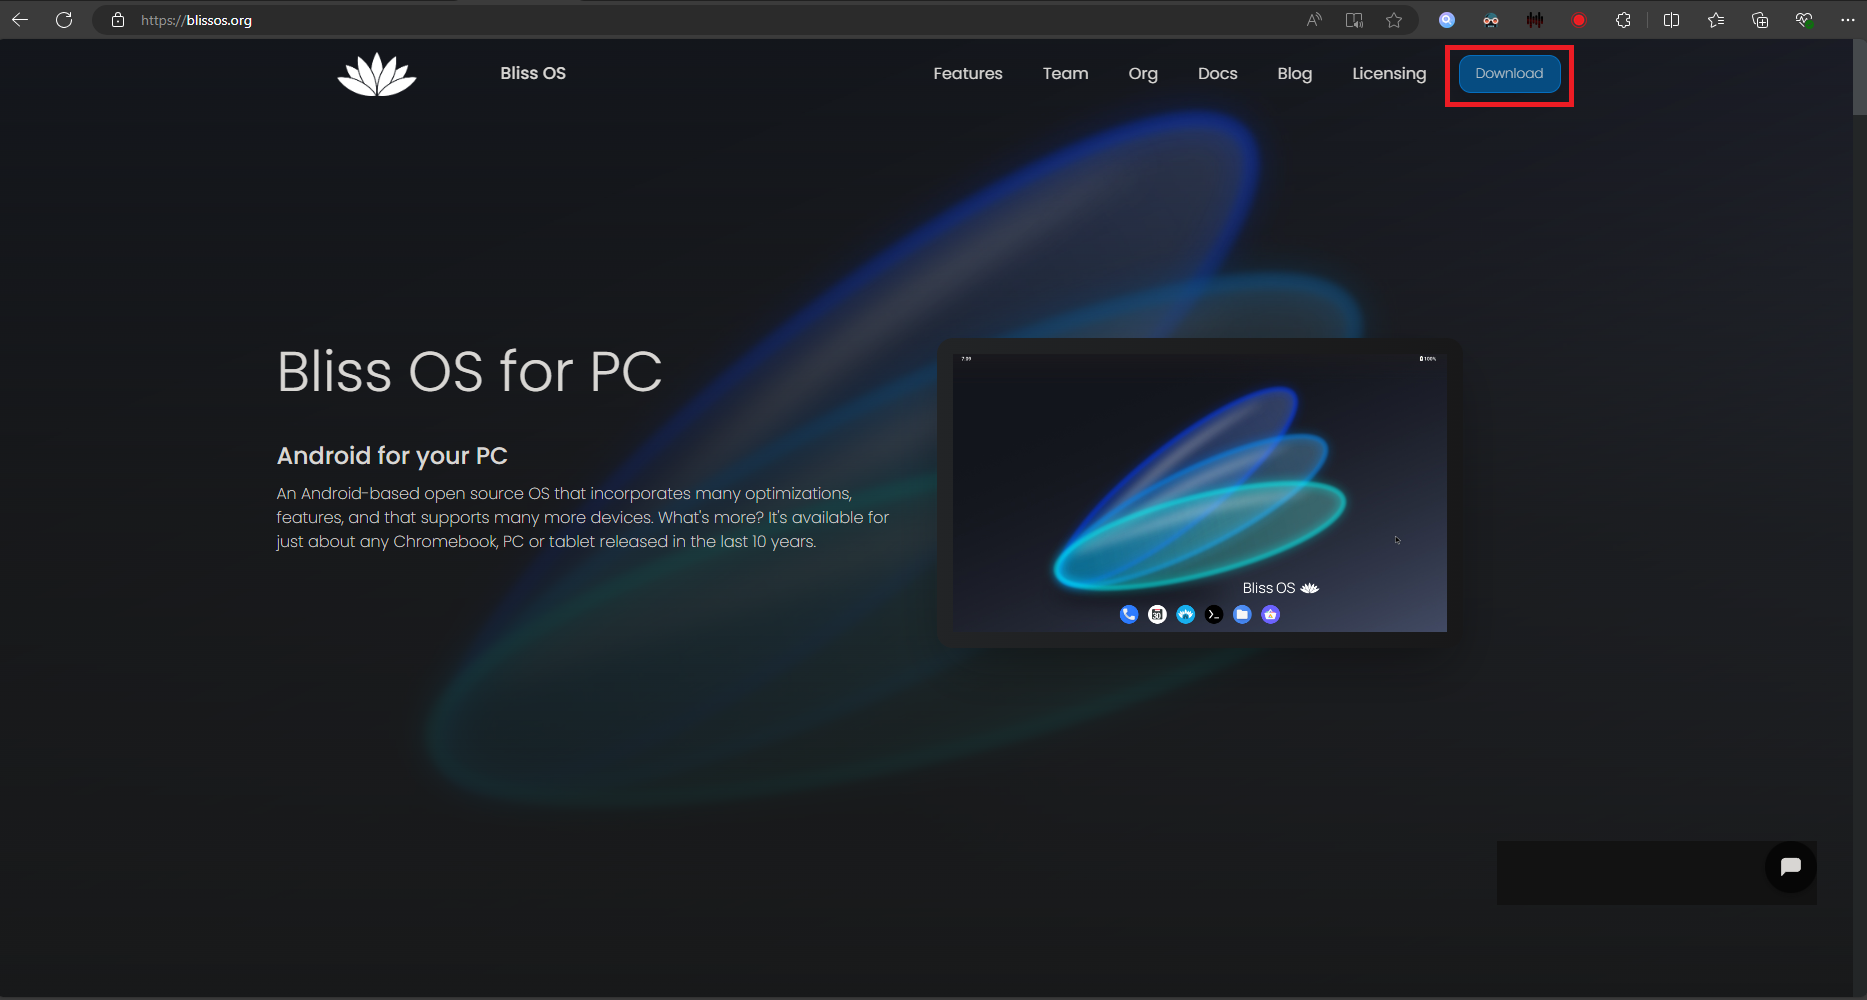
- Visit BlissOS’ website using the following link. Be sure to double-check the URL; “https://blissos.org“. In the top-right corner, you’ll find a “Download” button, click on it and you’ll be taken to another section of the same page.
- As stated above, “Bliss OS 14” and “Bliss OS 15” are the most stable builds. We’ll go with Bliss OS 15 as it is based on the newer Android 12L. Moreover, we’ll select GApps as it is easier to set up than FOSS, which is an open-source alternative. Click on the “SourceForge” button and you will be redirected to a SourceForge page.
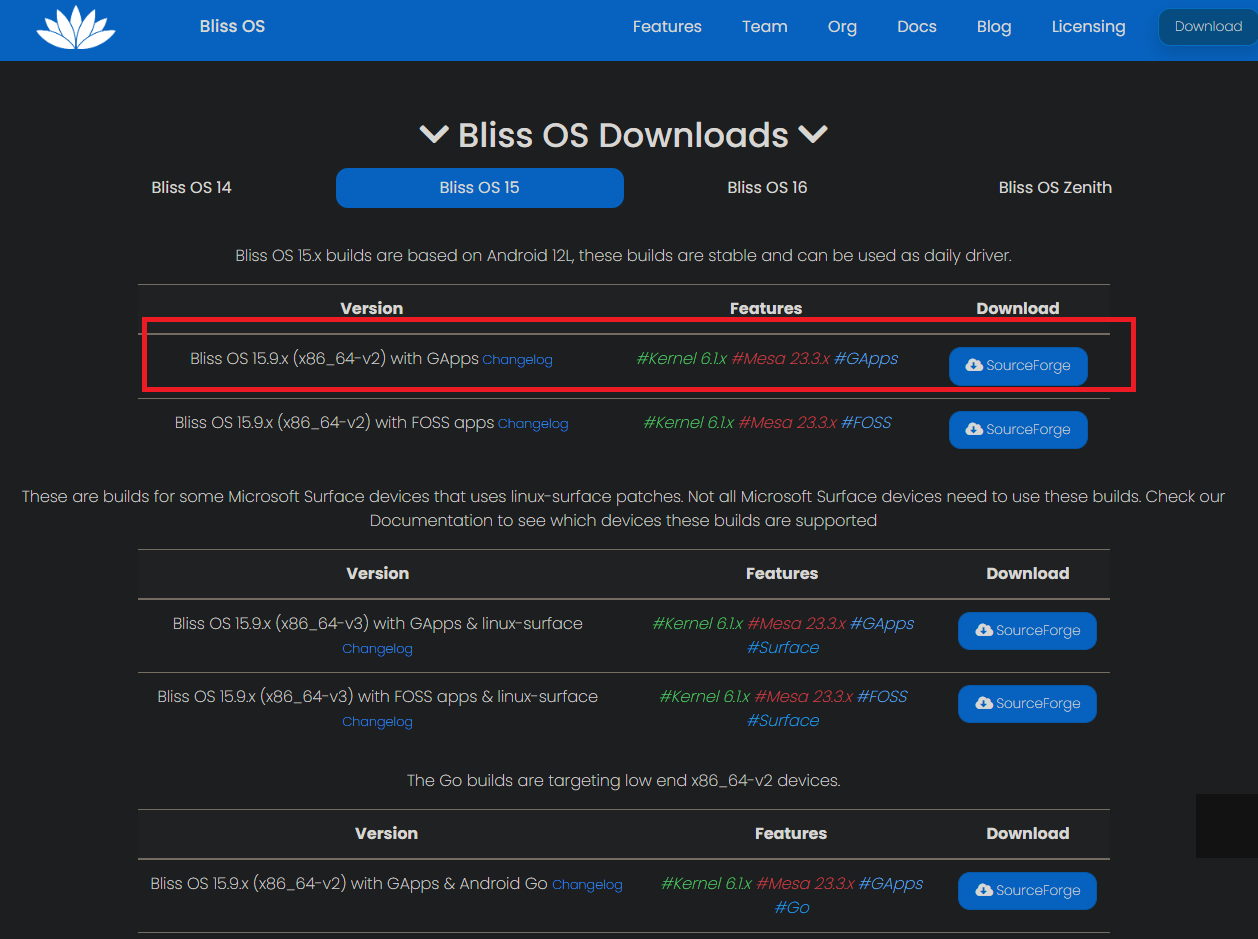
- We’ll install the latest release, which is the version “Bliss-v15.9.1“. Simply click on the highlighted link on the page and it will redirect you to another page, and the download should start automatically. Depending on your Internet speed, this could take a while.

- Once the file has been downloaded, the next step is to set up a partition to install your operating system.
3) Creating the Required Partition
Since we’re not following an EFI install, you must already have Windows installed on your storage device. Therefore, we have to create another partition for BlissOS. You can do so by simply shrinking an existing partition (one in which your Windows is installed) by around 15–20GB. Follow these steps to do so:
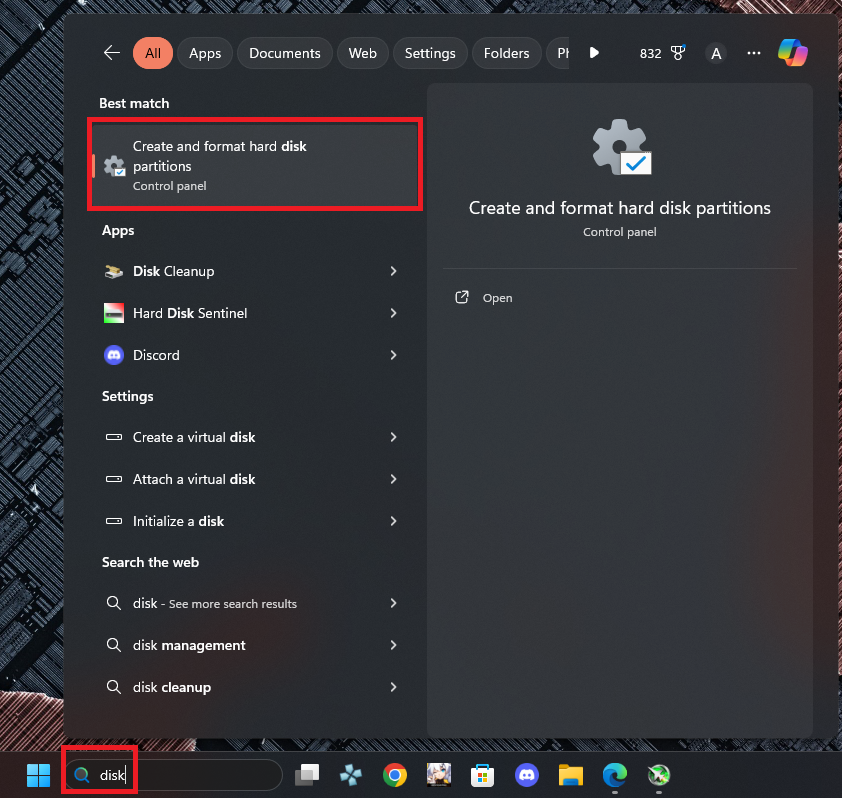
- Open the Windows Search Bar by pressing the Windows icon in your taskbar or the “Win” key on your keyboard. Afterward, type “Disk” in the taskbar and you should see an option that says “Create and format disk partitions“.
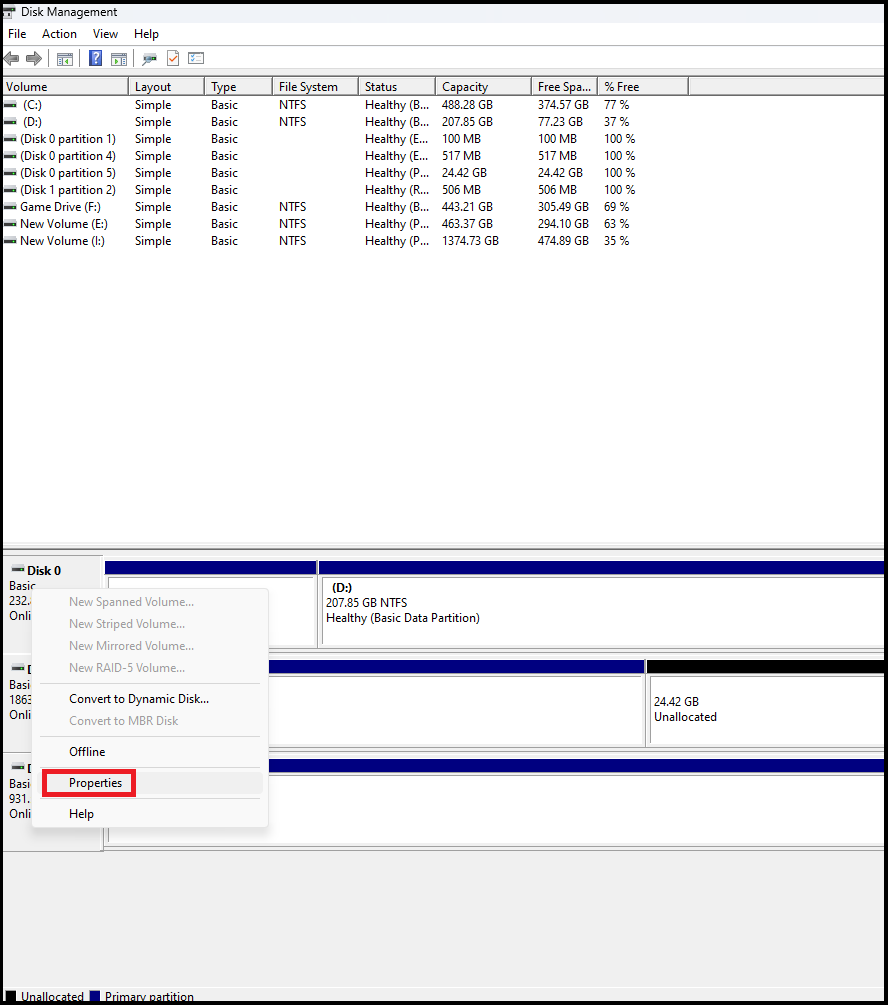
- Click on the given option and the “Disk Management” utility should open, giving you an overview of your installed storage devices and their respective partitions.
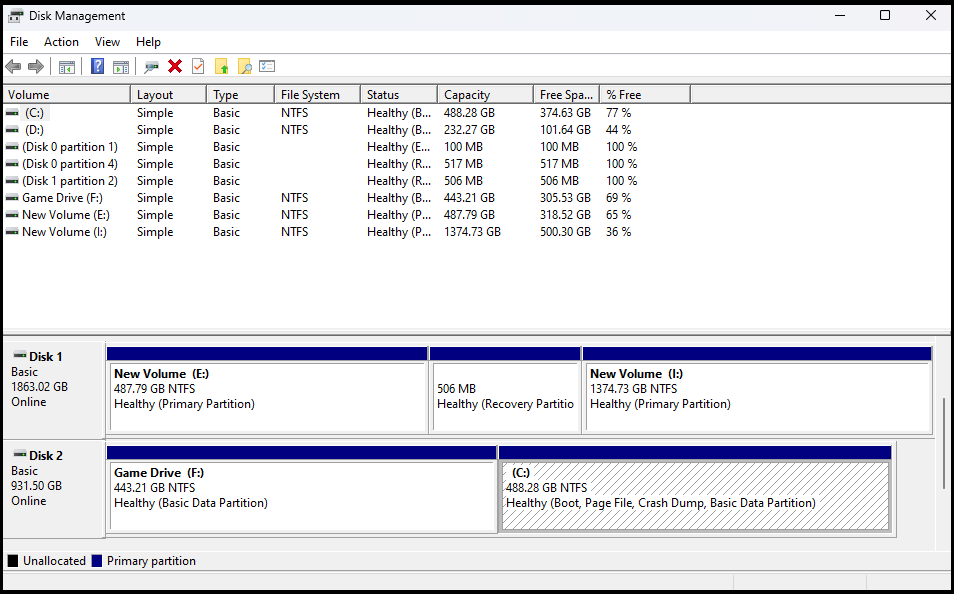
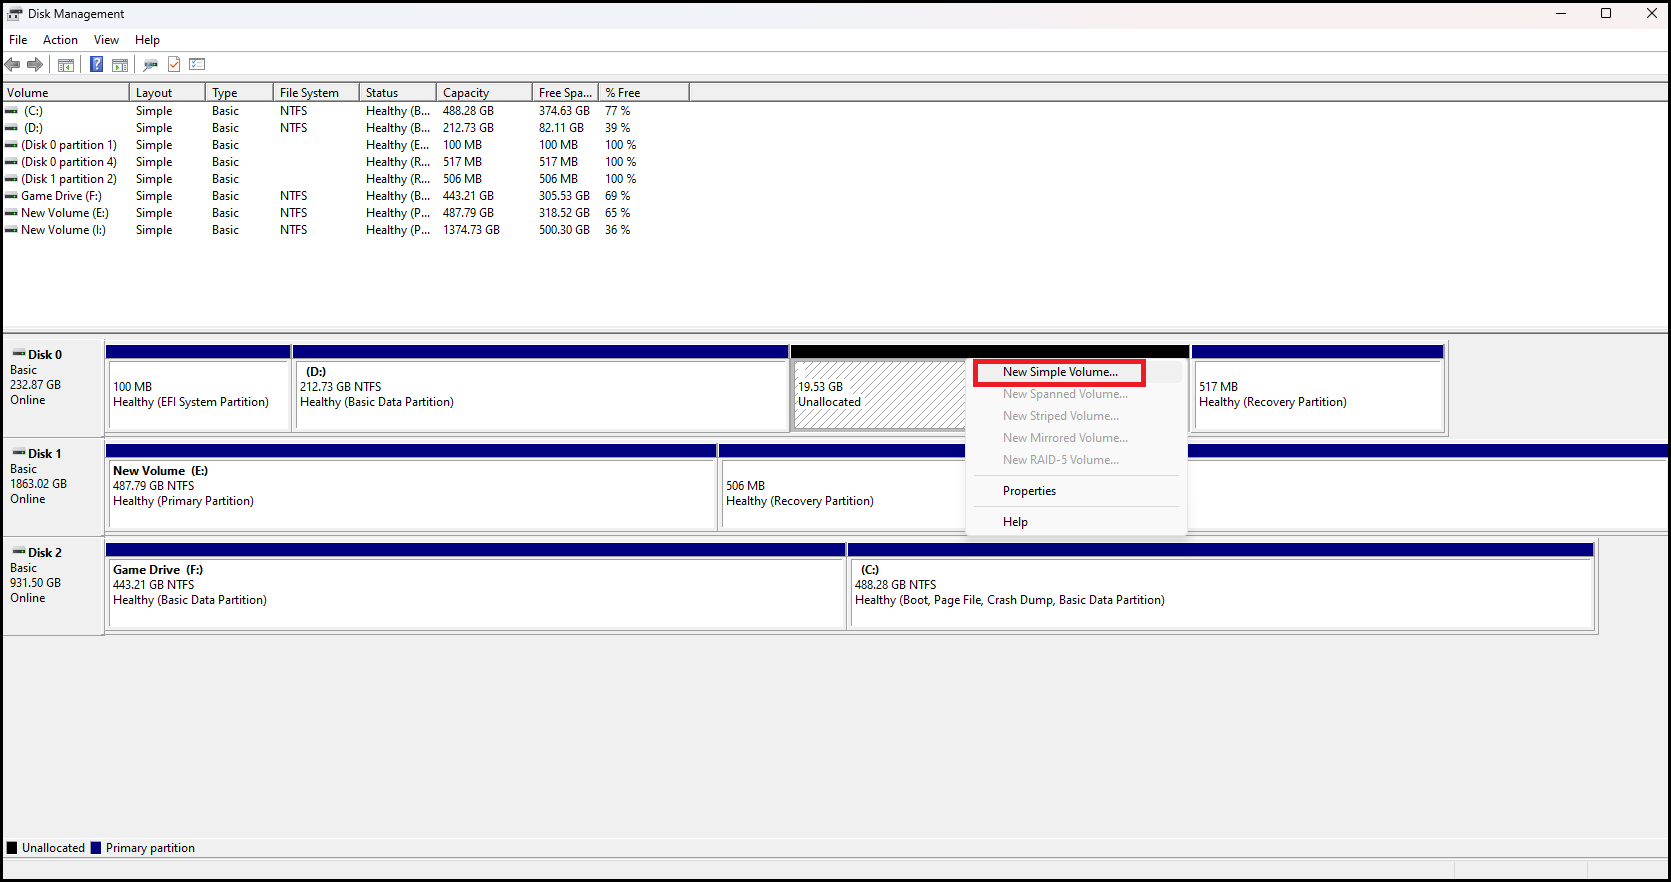
- Choose the Hard Disk/SSD on which you wish to create a new partition. In our case, we shall select “Disk 0” (See the screenshot below).

- If your disk only has 1 partition (like in our case), right-click on it and select “Shrink Volume“. In the case of multiple partitions, select the required one per your preferences; storage etcetera.

- In the “Enter the amount of space to shrink in MB” field, type “20000“, which provides 20GB from your initial partition to a new one. Afterward, click on “Shrink“, and you will see a new unallocated partition.
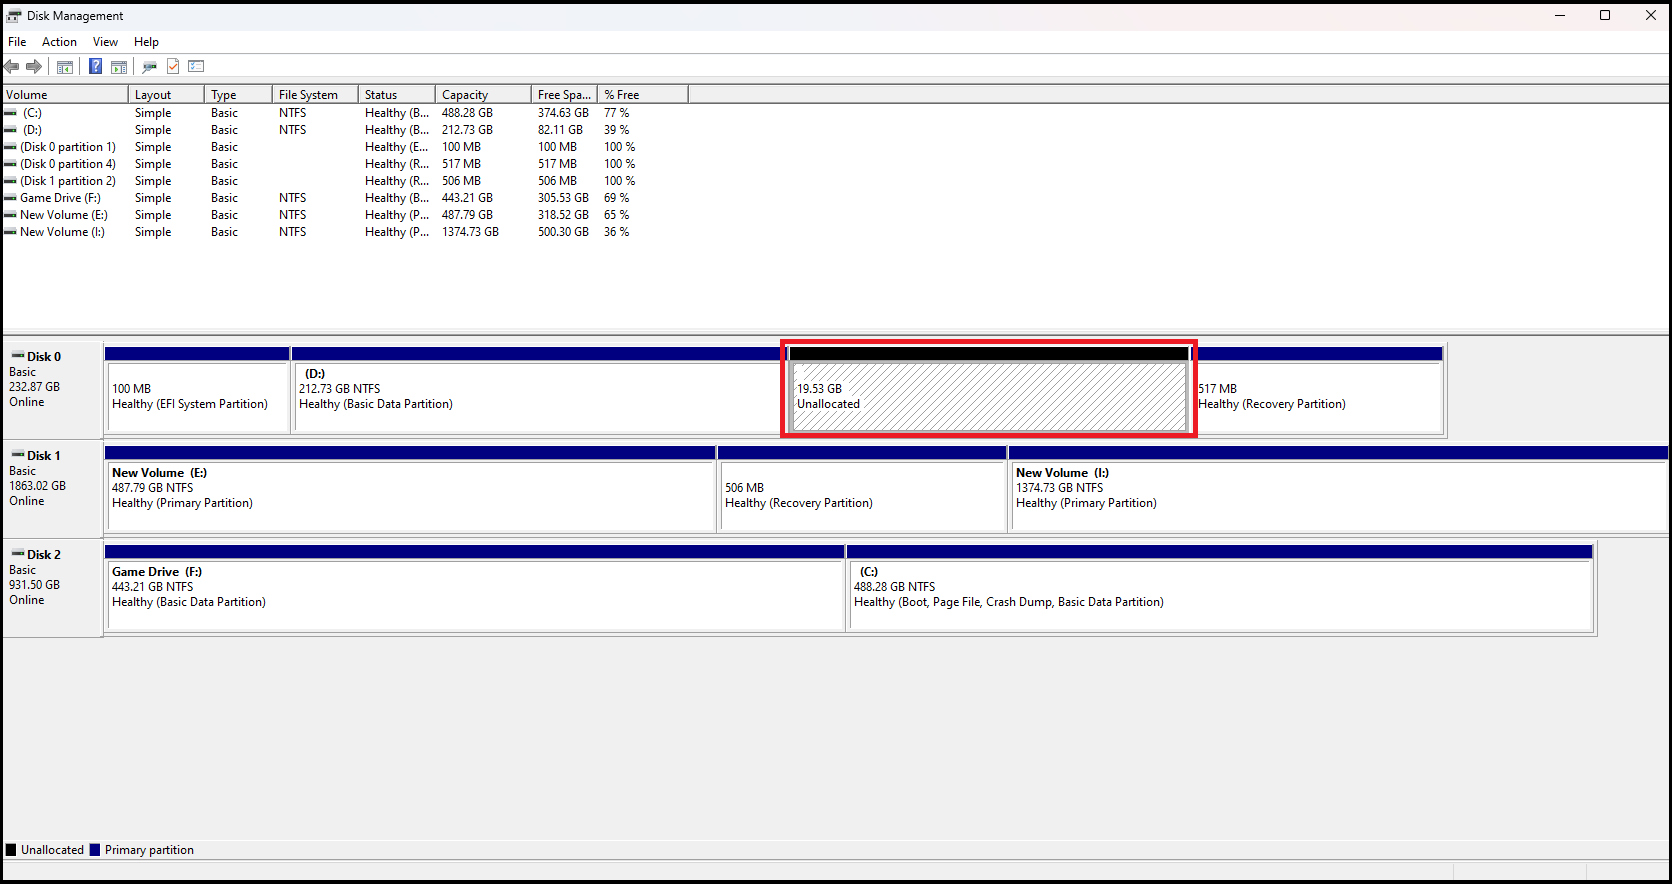
- The next step is to format this new partition as “NTFS“. To do so, right-click on the new unallocated partition, and click on “New Simple Volume“.
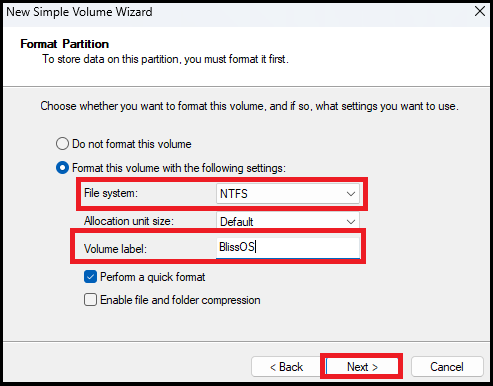
- Follow the Wizard as required by pressing “Next“, in the “Specify Volume Size” page, leave the settings as default, in the “Assign Drive Letter or Path” page, choose a letter of your choice, and in the “Format Partition” page, select the file system type “NTFS“. You may choose a Volume label of your choice.
- After you click on “Finish“, you’ve successfully created a new partition on which we will install BlissOS in the next section.

4) Installing BlissOS
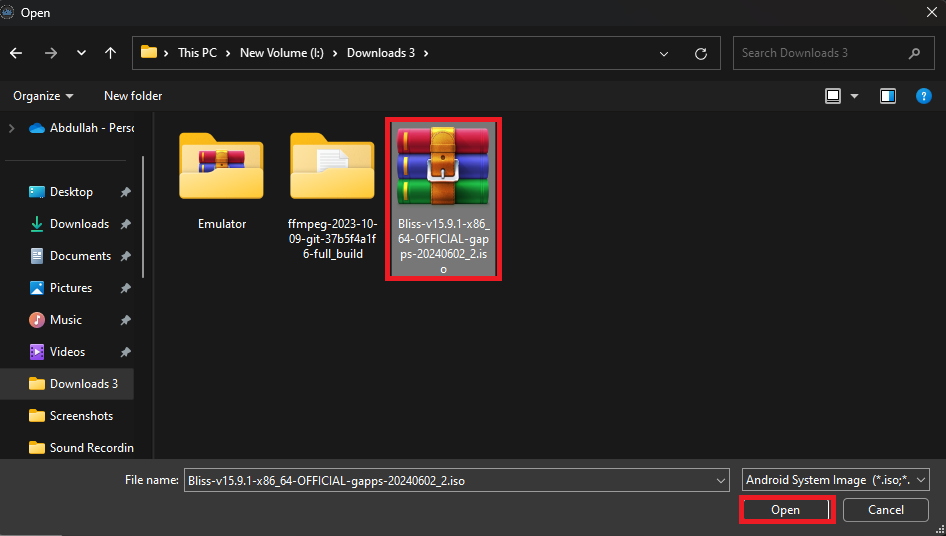
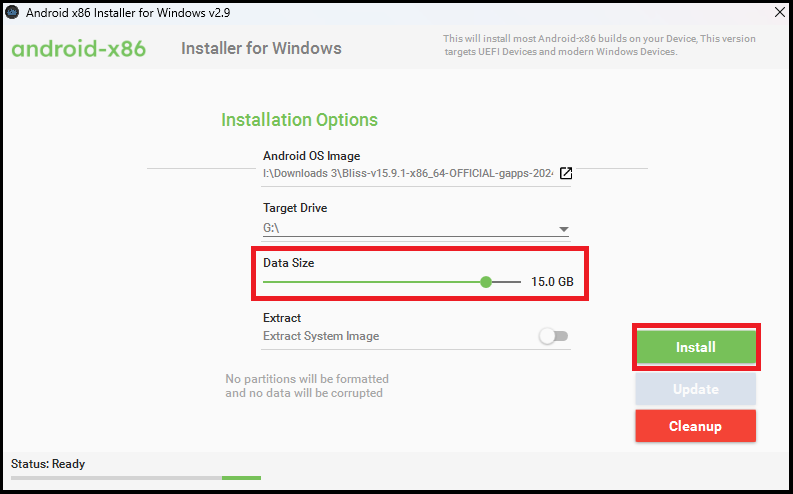
- Once the interface opens, in the “Android OS Image” section, browse and locate where you’ve downloaded the BlissOS .iso file.
- In the “Target Drive” section, choose the new volume you’ve created with the designated drive letter. If you’re unsure or forgot, navigate to the “This PC” folder to see the associated drive letter. In our case, the drive letter is “G“.
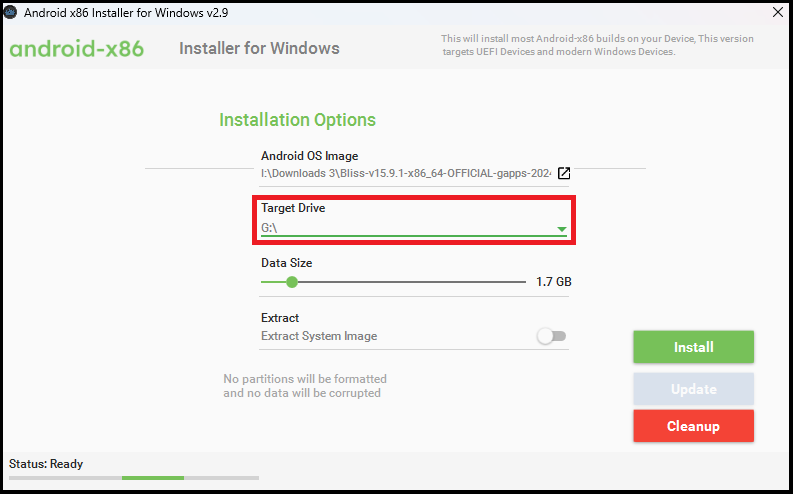
- Increase the “Data Size” to around 15–16GB and click on “Install“. Sit tight until BlissOS is installed.
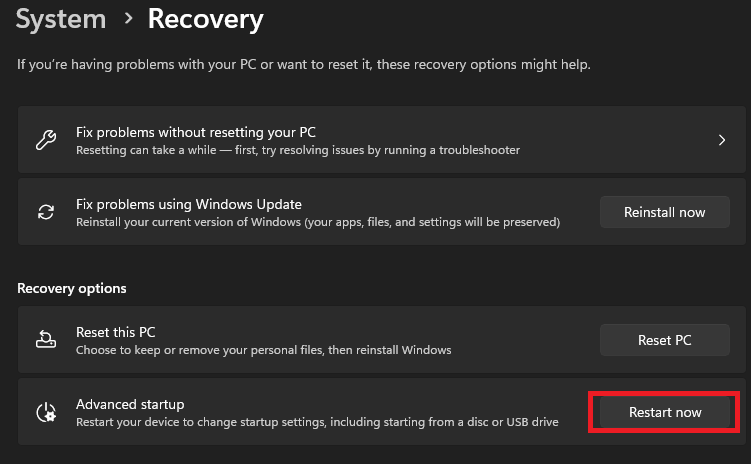
- Once installed, open the Windows Search Bar and type “Advanced Start“. Under “Recovery options“, in the “Advanced startup” menu, select “Restart now“.
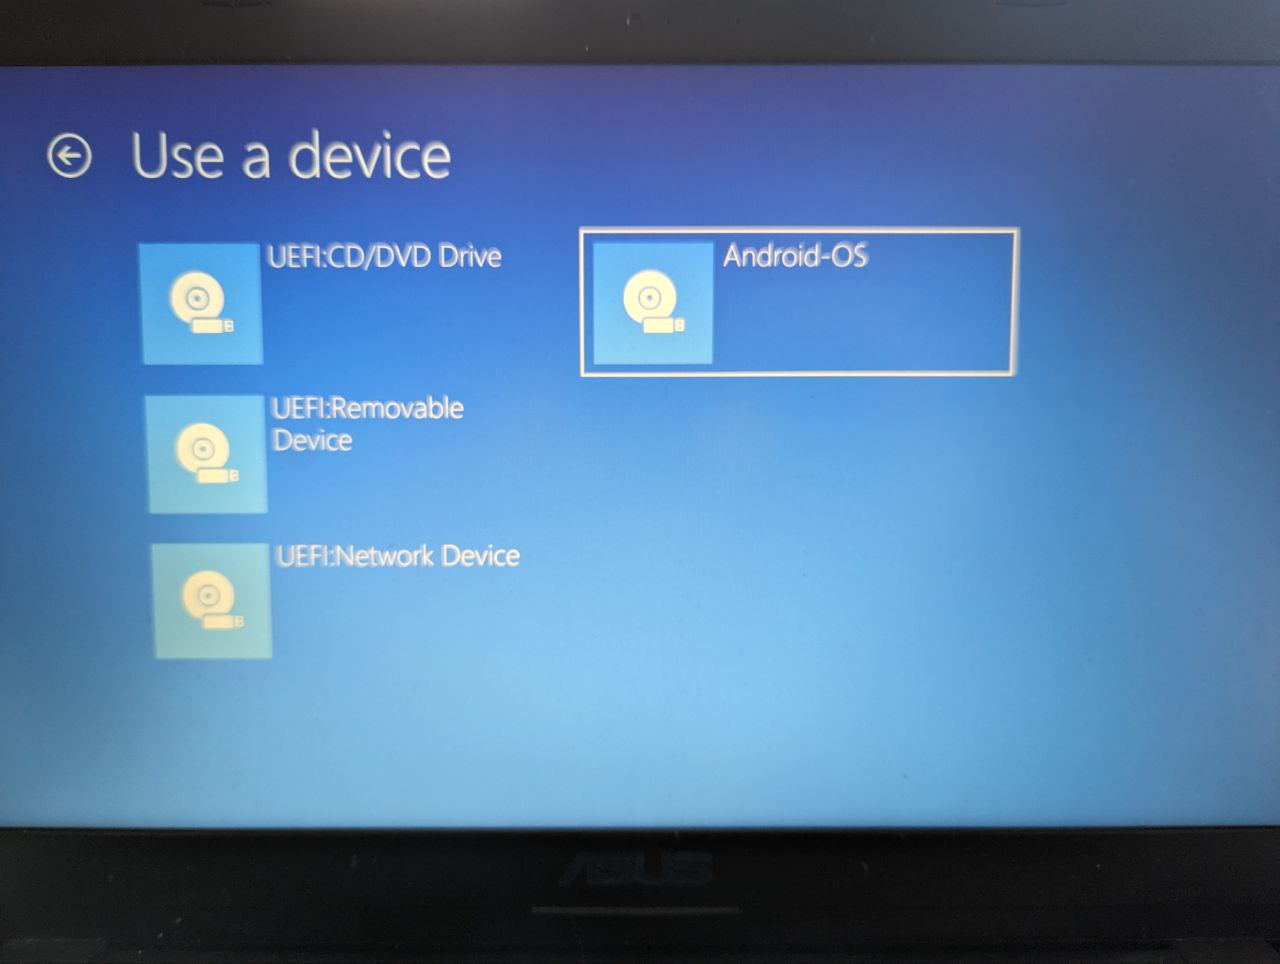
- Click on “Use a device” and on the next page choose “Android-OS“. (Image Credit: BlissOS)
- Now you’ve successfully installed and booted into BlissOS on your system.
EFI Installation
In order to install using a USB bootable drive, we first need to install Rufus and flash the .iso file to our USB drive. Afterward, we need to create an unallocated partition, but this time, we won’t be formatting it. Through the installer, we’ll divide this main partition into two parts.
One part will contain the bulk/main data of our OS, which we’ll refer to as “A“. The second partition will be called “B“, and this will host the “EFI System“.
1) Downloading the Bliss OS .iso File
- To download the appropriate version of BlissOS, visit their website using the following link. Kindly double-check the URL; “https://blissos.org“. Click on the “Download” button in the top-right corner of the page.
- Our primary focus will be stable builds; “Bliss OS 14” and “Bliss OS 15“. Since Bliss OS 15 is the latest edition, based on Android 12L, we shall select this version. It is best to select the GApps variant since it offers ease of use, and you won’t need to install necessities from scratch. Click on the “SourceForge” link next to the version you want to install.
- Once SourceForge opens, select the latest build, indicated by the number of “Downloads/Week“. We will download the version “Bliss-v15.9.1“. Click on the highlighted link, and the .iso should start downloading.
- After you’ve finished downloading, the next step is to create a large partition, but we won’t be formatting it this time.
2) Creating a New Partition
- Open the Windows Search Bar using the “Win” key on your keyboard or by clicking on the Windows icon in the taskbar. Type the term “Disk” in the search box and click on the first option, as shown in the image.
- Once the “Disk Management” utility opens, you should see all your attached devices and their partitions.
- If you have multiple drives, choose the most suitable one for partitioning. We will choose “Disk 0” for the sake of this guide.
- If you have multiple partitions, they all must have their volumes. Choose the one that you’re most comfortable with shrinking. Once you’ve decided, right-click on the chosen partition and select “Shrink Volume“.
- We typically recommend 15–20GB for BlissOS. So, in the “Enter the amount of space to shrink in MB” field, type “20000” (to be on the safe side) since it measures data in MegaBytes. Click on “Shrink“, and a new unallocated partition will be made.
- This time, you won’t need to format the drive as NTFS/FAT32, as we’ll do that step during installation.
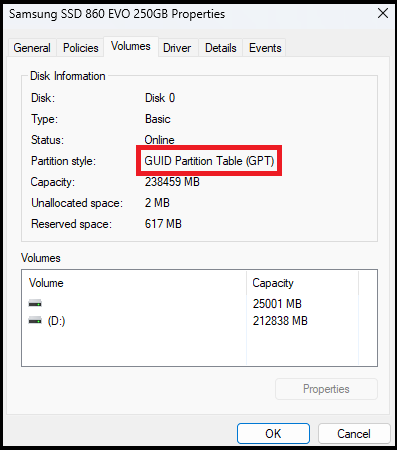
- Lastly, right-click on the drive as shown in the attached image and click on “Properties“.
- Once the Properties panel opens, navigate to the “Volume” tab and check to see if your drive is partitioned as per GPT or MBR.
3) Downloading Rufus and Flashing the OS
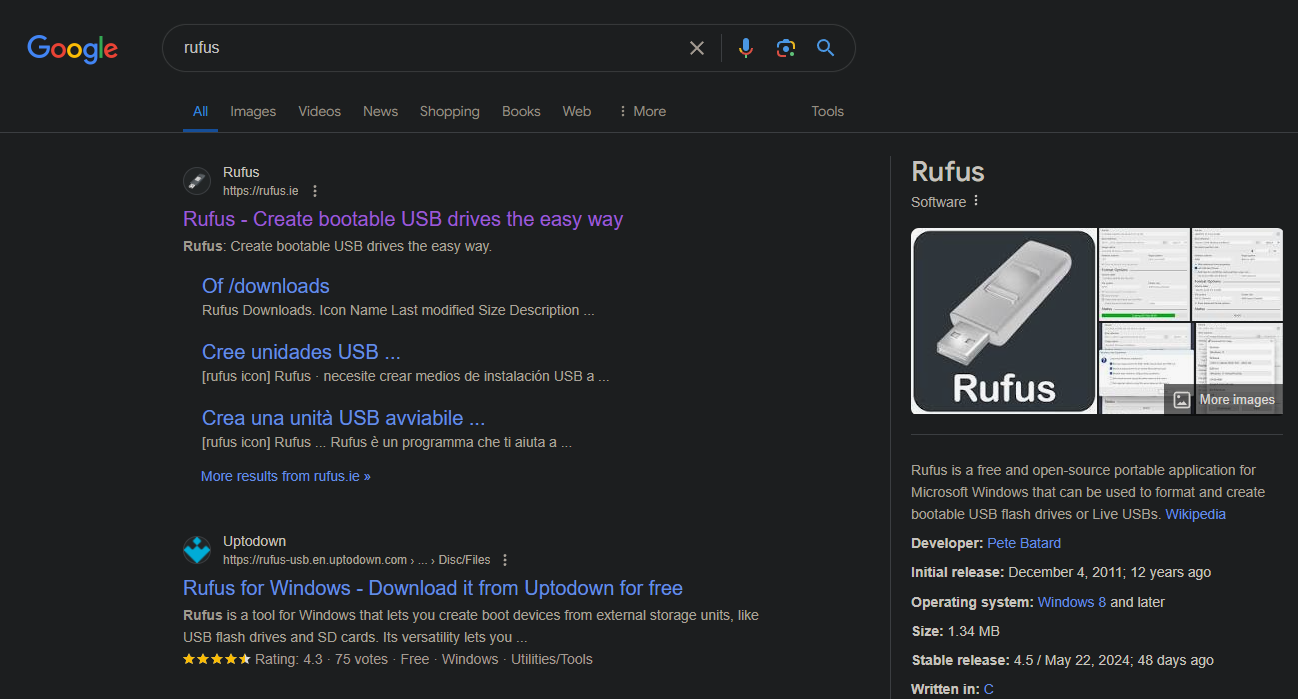
- Type “Rufus” on Google and open the first link. You may also use the provided link. Double-check the URL; “https://rufus.ie/en/“.
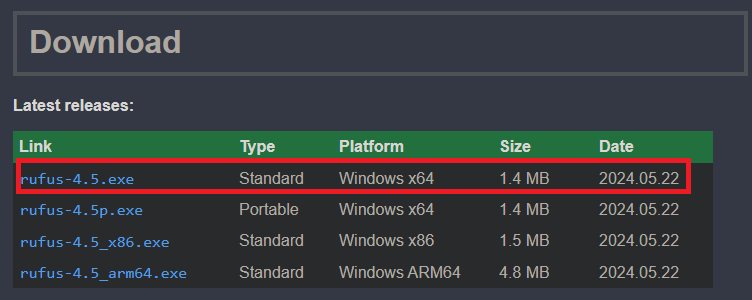
- Scroll down and select the “Standard” version for “Windows x64“.
- After downloading Rufus, double-click on the .exe to open it.
- In the “Device” tab, select your USB flash drive. Moving to the “Boot selection” tab, select the .iso file containing BlissOS that you downloaded in Step 1 from SourceForge. If your selected drive is GPT, set the “Partition scheme” to GPT and vice versa for MBR.
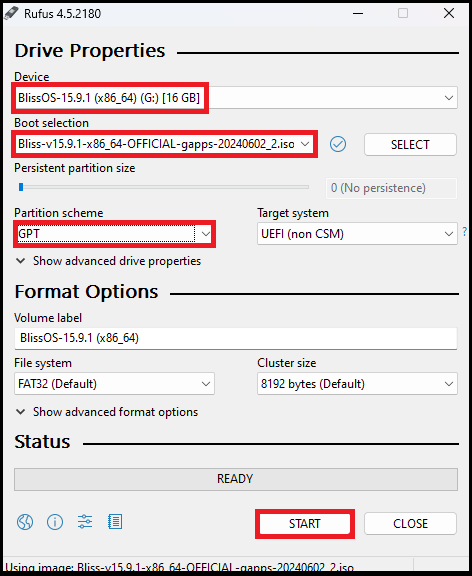
- Click on “START” and wait until the image is flashed to your USB flash drive.
4) Booting From USB
Once you’ve copied the .iso to your flash drive, the last step is to install BlissOS. First, you’ll need to boot your system through the USB drive. To do so, follow these steps:
- Open the BIOS/UEFI of your system by pressing the “Delete“, “F1“, “F2” or the “F10” keys. Once opened, navigate to the “Boot” section or something similar to that. In the Boot Priorities or Boot Option#1, set it to your attached USB drive.

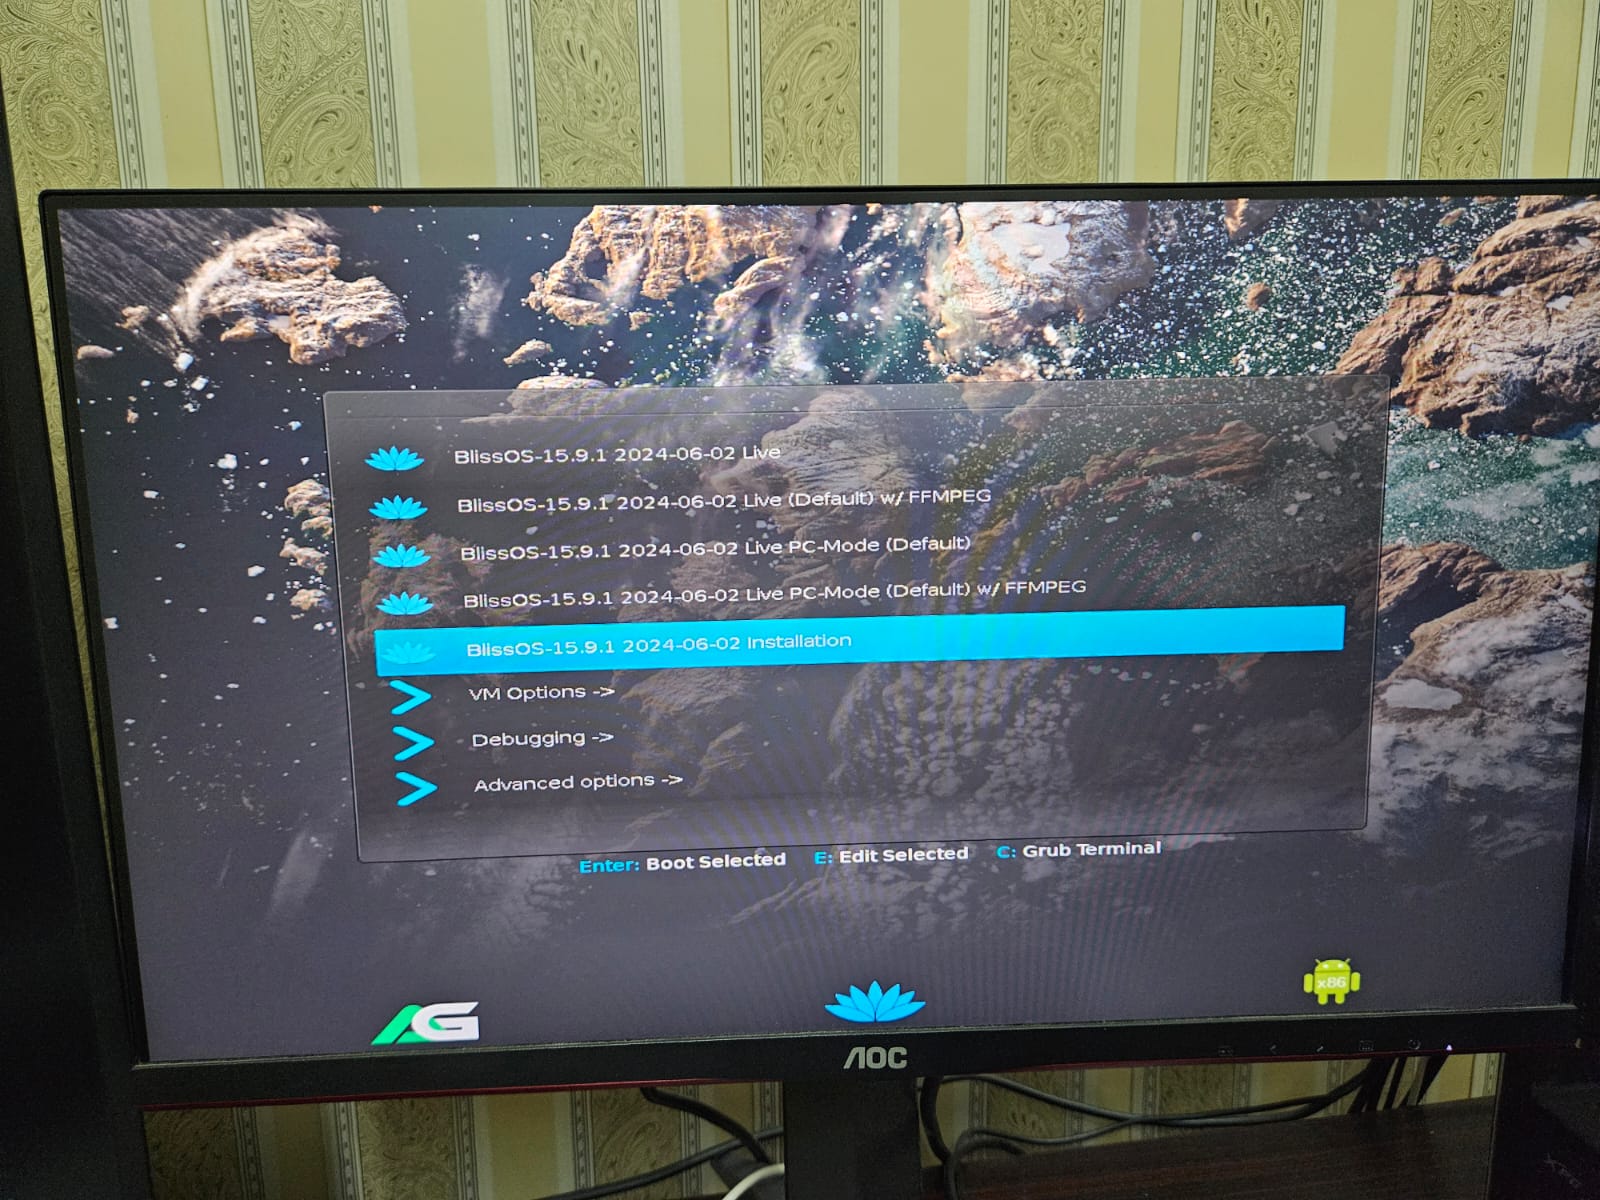
- Your next boot will use data from your USB flash drive. After a while, you should see an interface similar to the one in the image. Click on the “Installation” option.
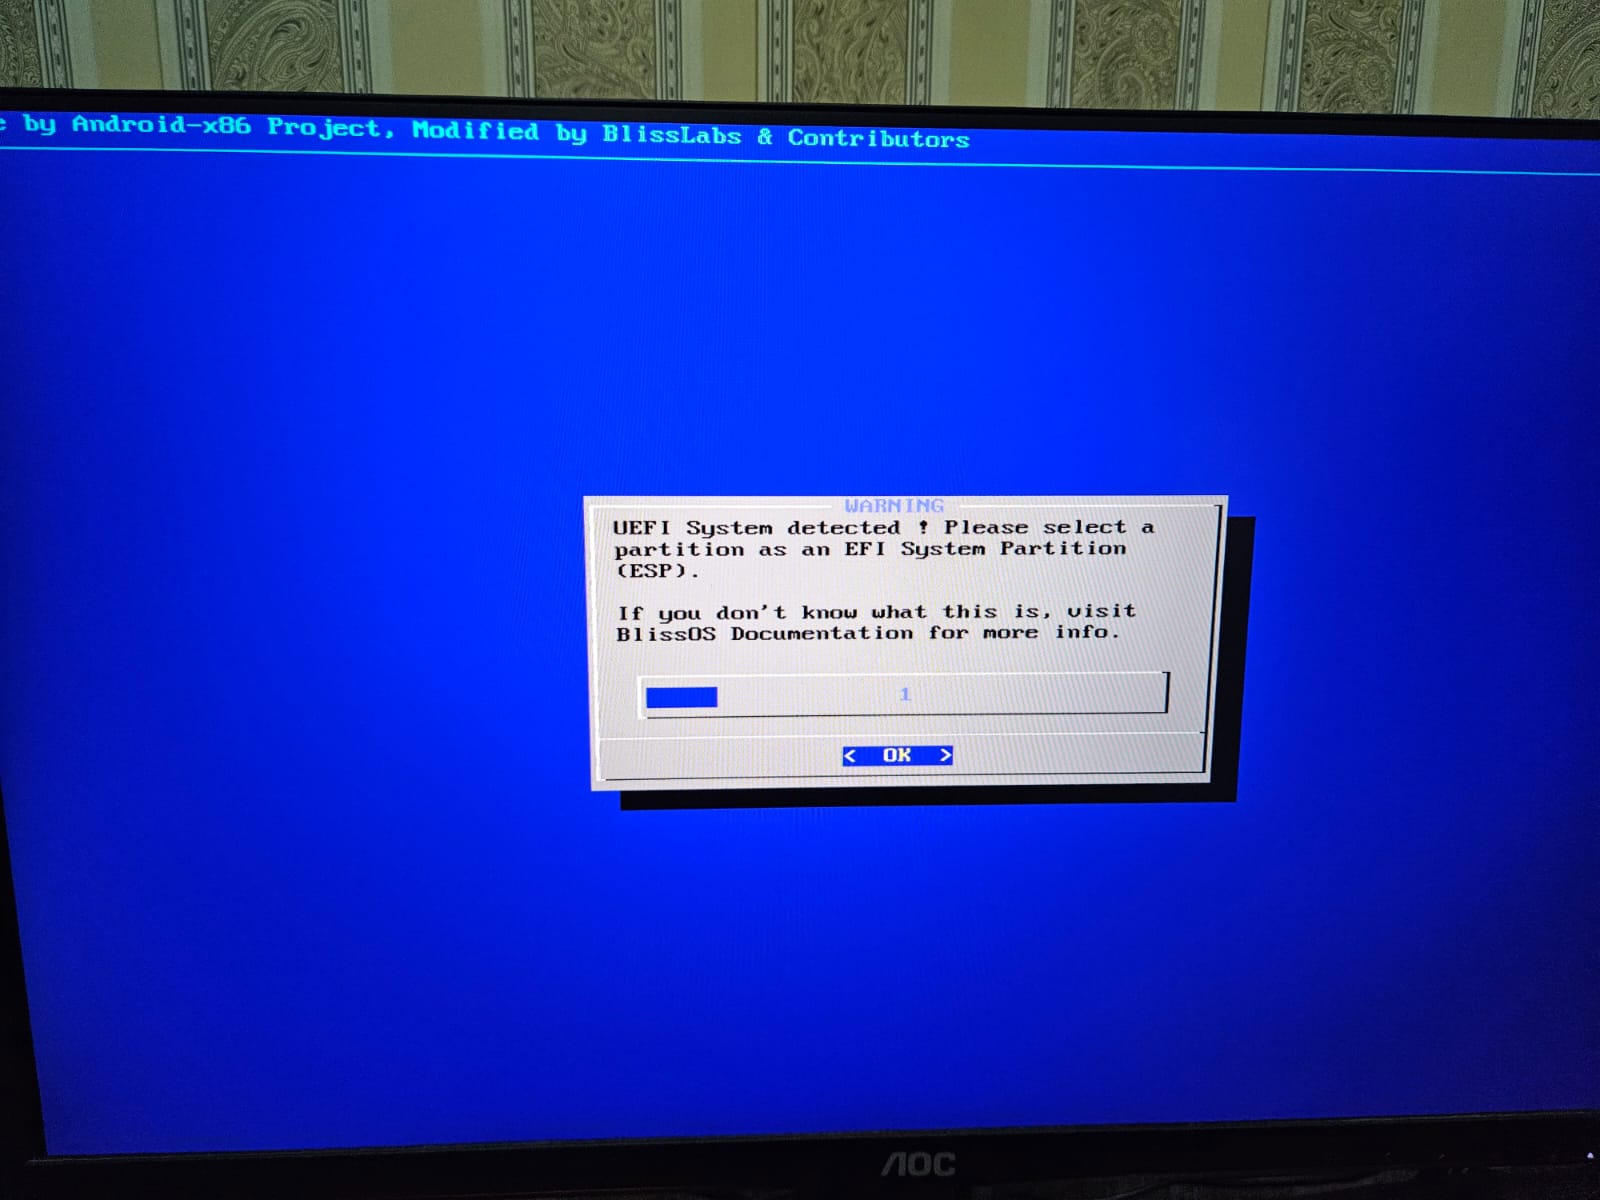
5) Setting Up EFI and OS Partitions
- If it says you have a UEFI-based system, press “Enter“.
- Once the partition selection page pops up, move down until you find the “Create/Modify partitions” setting and press “Enter“.
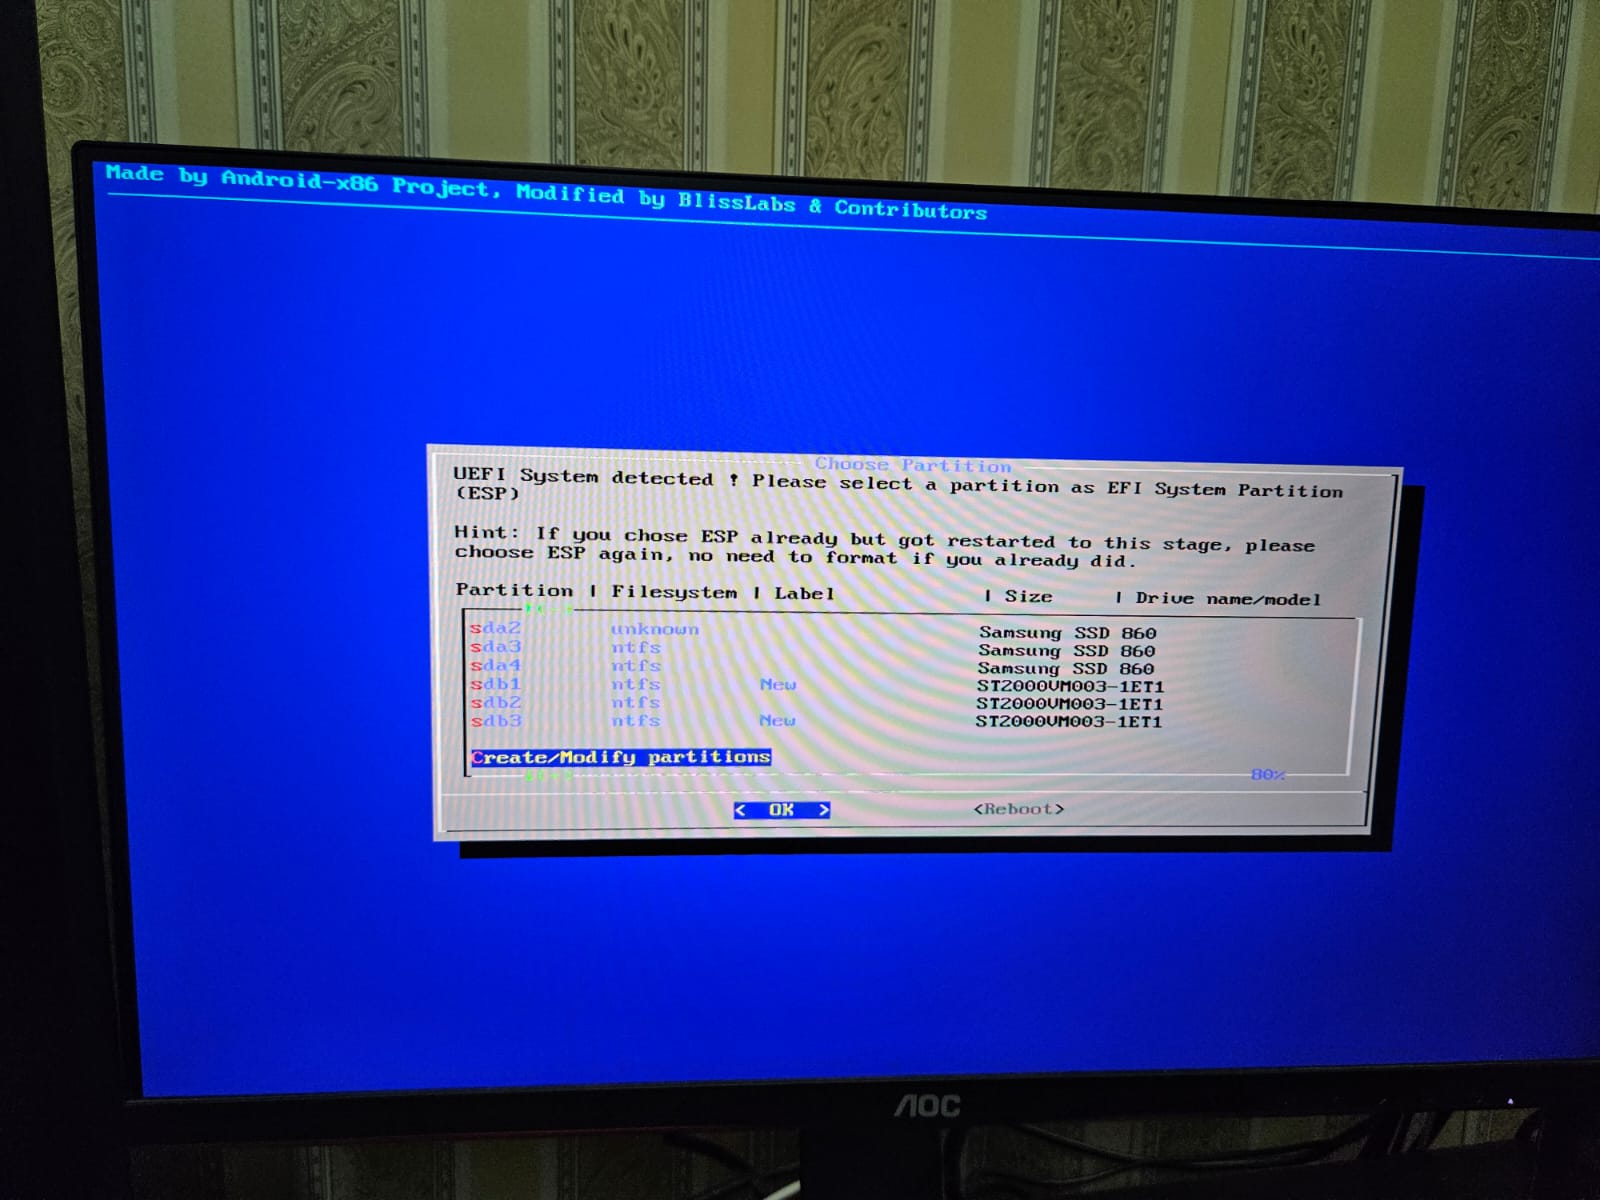
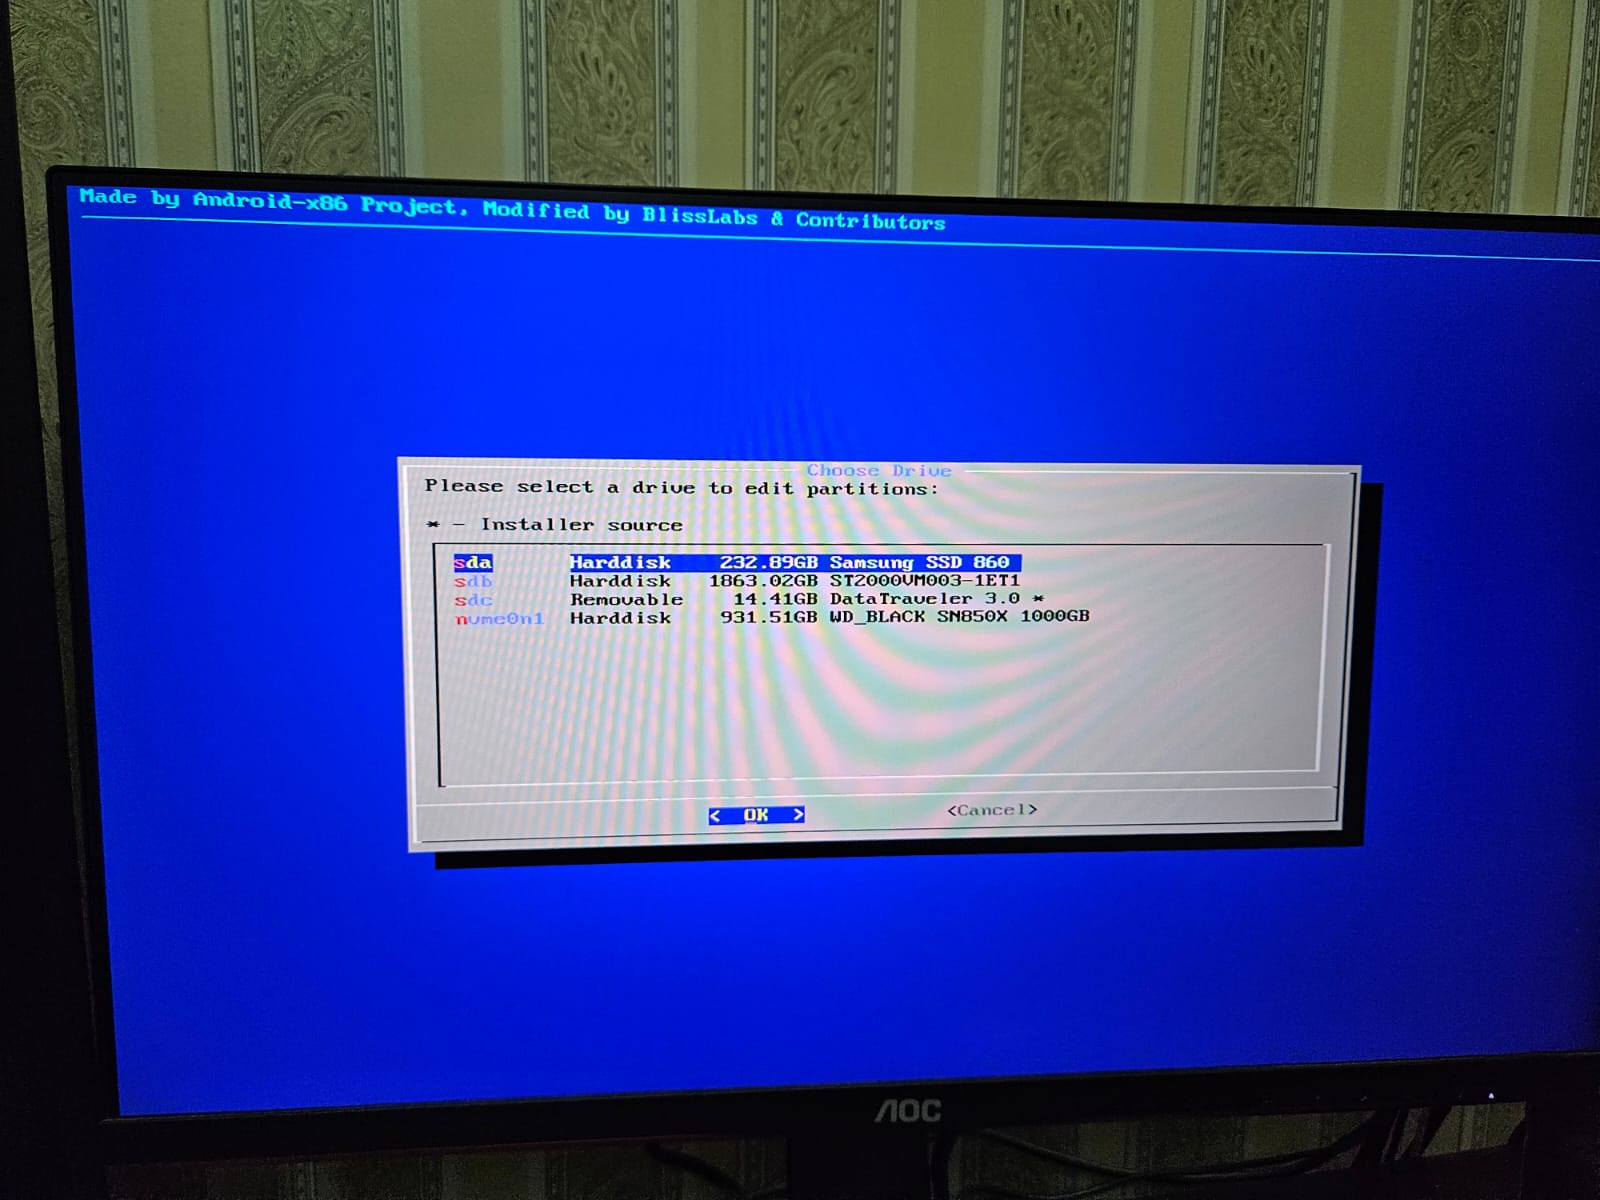
- Select the disk on which you’ve created the unallocated partition.
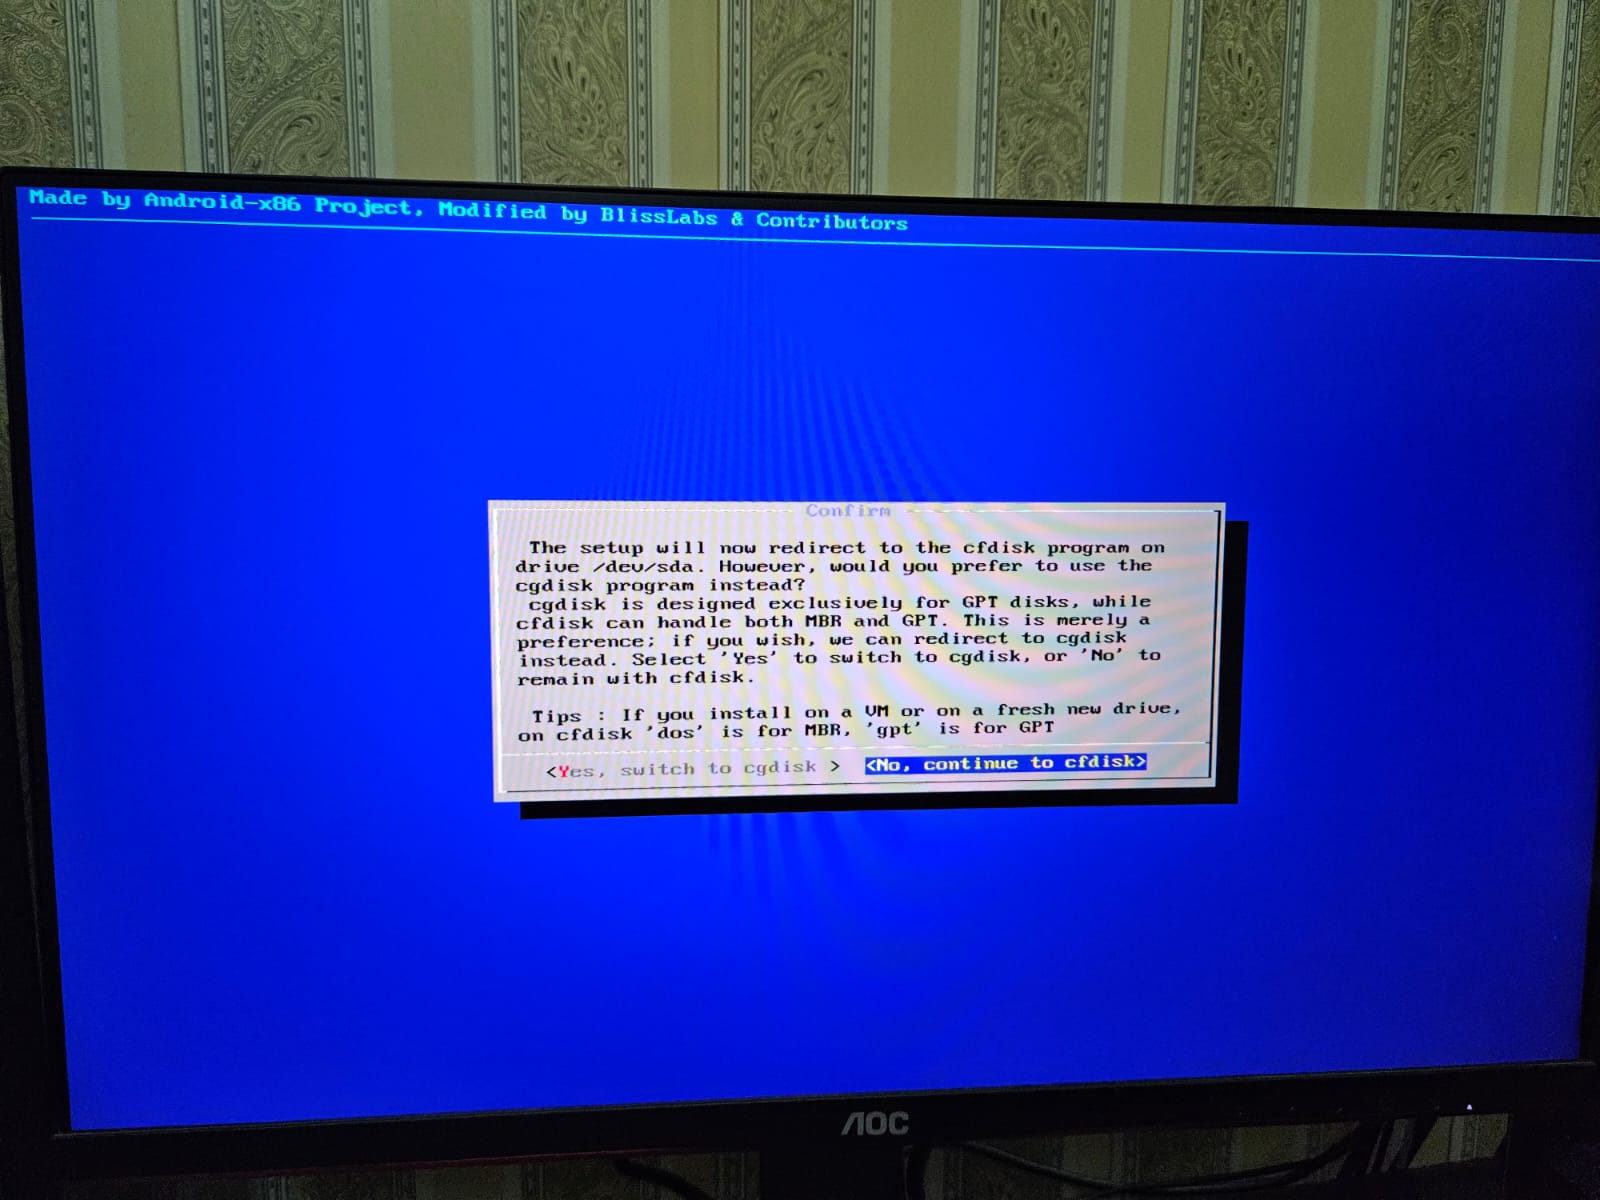
- If you’re prompted to use “cgdisk” instead of “cfdisk“, select “No” and continue with cfdisk.
- In the DOS-looking interface, locate the 20GB partition you created before, indicated with “Free Space“. After selecting that partition, select “New“from the bottom menu.
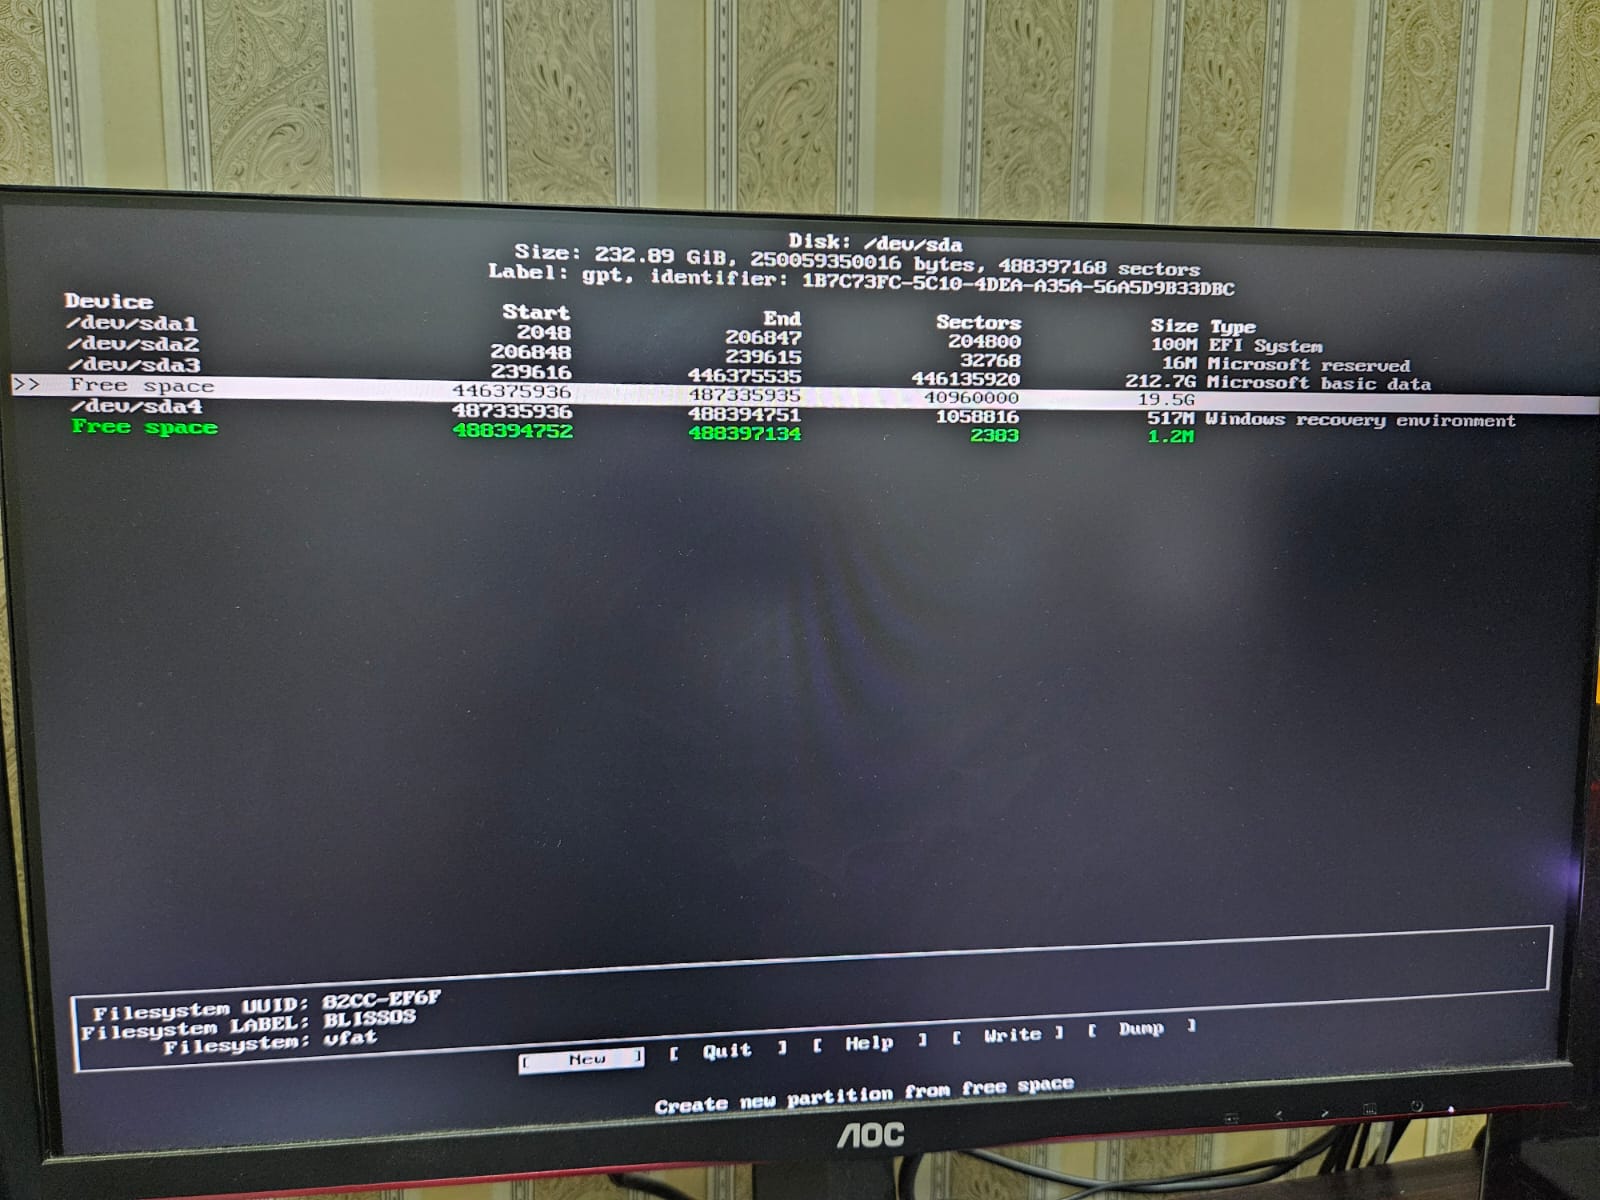
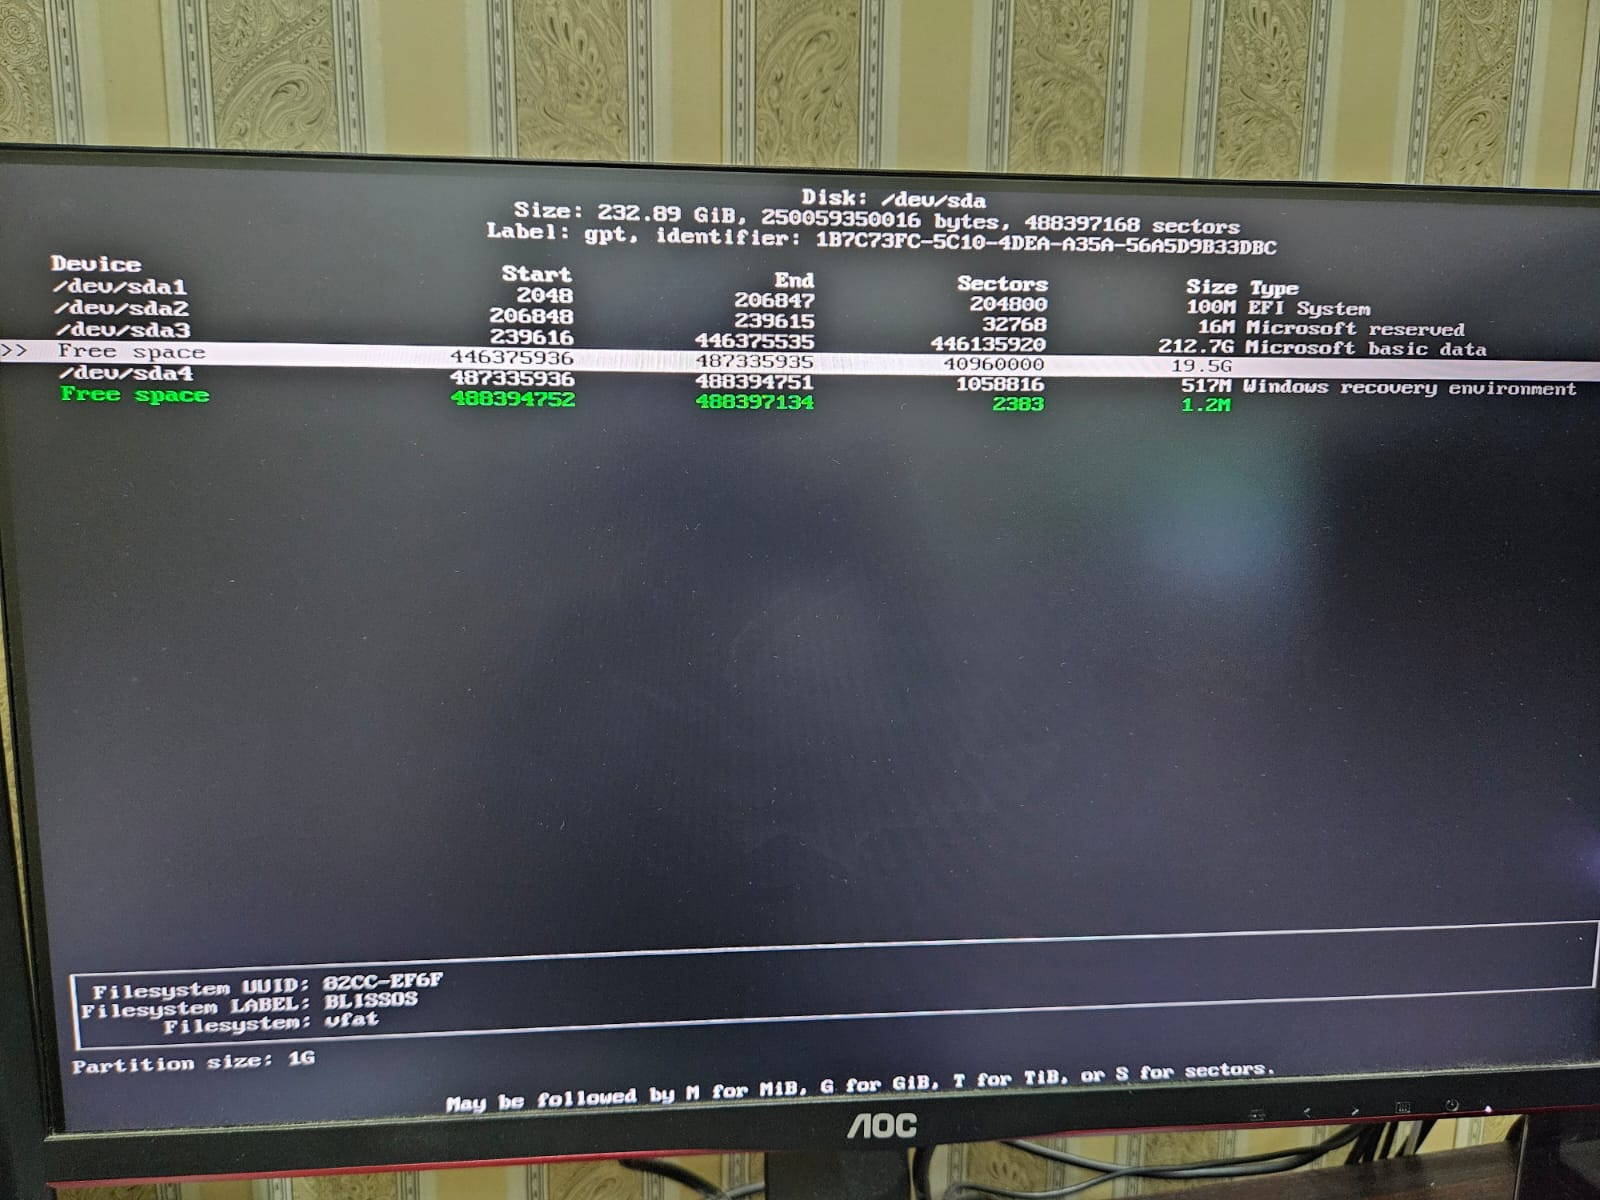
- You will be asked to type a size. We’re creating another partition (B) from your original 20GB partition. B will be the EFI system partition (which contains the bootloader), whereas the bulk of BlissOS will be stored in A. Type “1G“, meaning we’re creating a partition (B) with a size of 1GB, more than enough for the bootloader. Hit “Enter“.
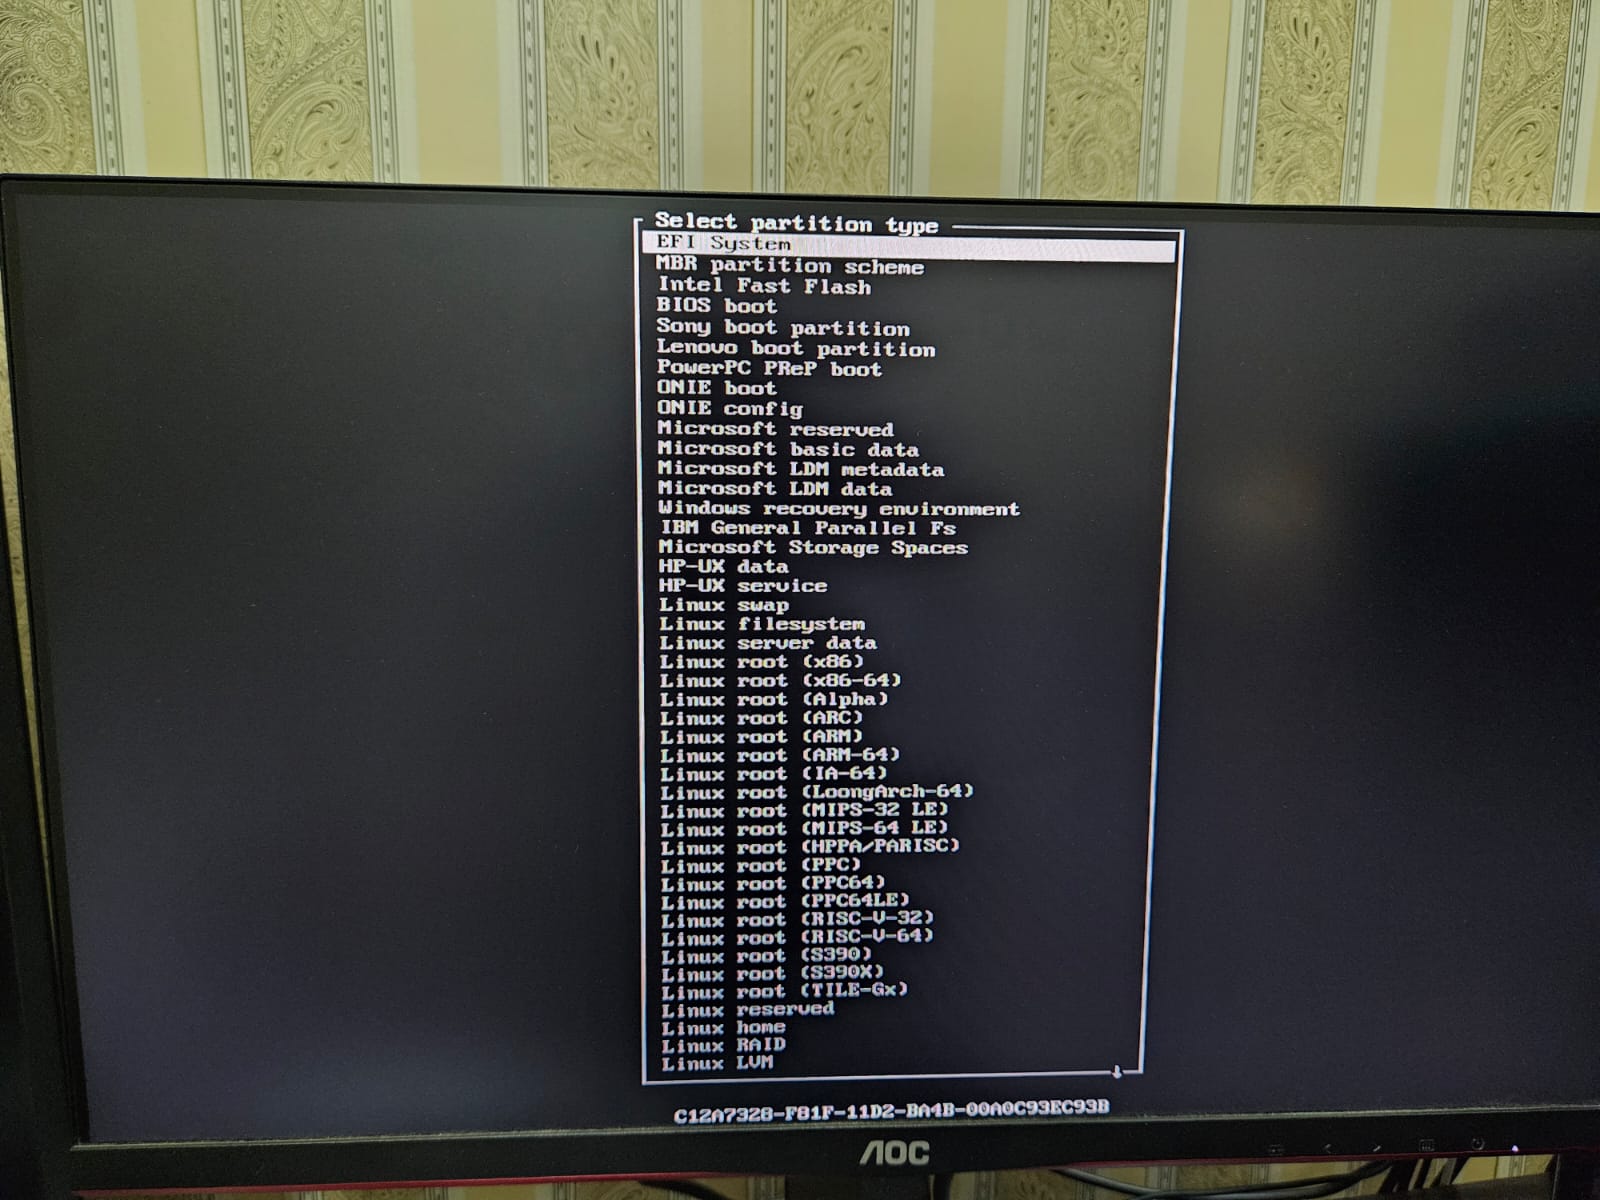
- A new “sda” entry will be created with the size “1G”. We need to change its type to “EFI System“. To do so, select the new entry (B), which in our case is “sda5“, navigate to “Type” in the bottom menu, press “Enter“, move up until you find the “EFI System” file, and press “Enter“.
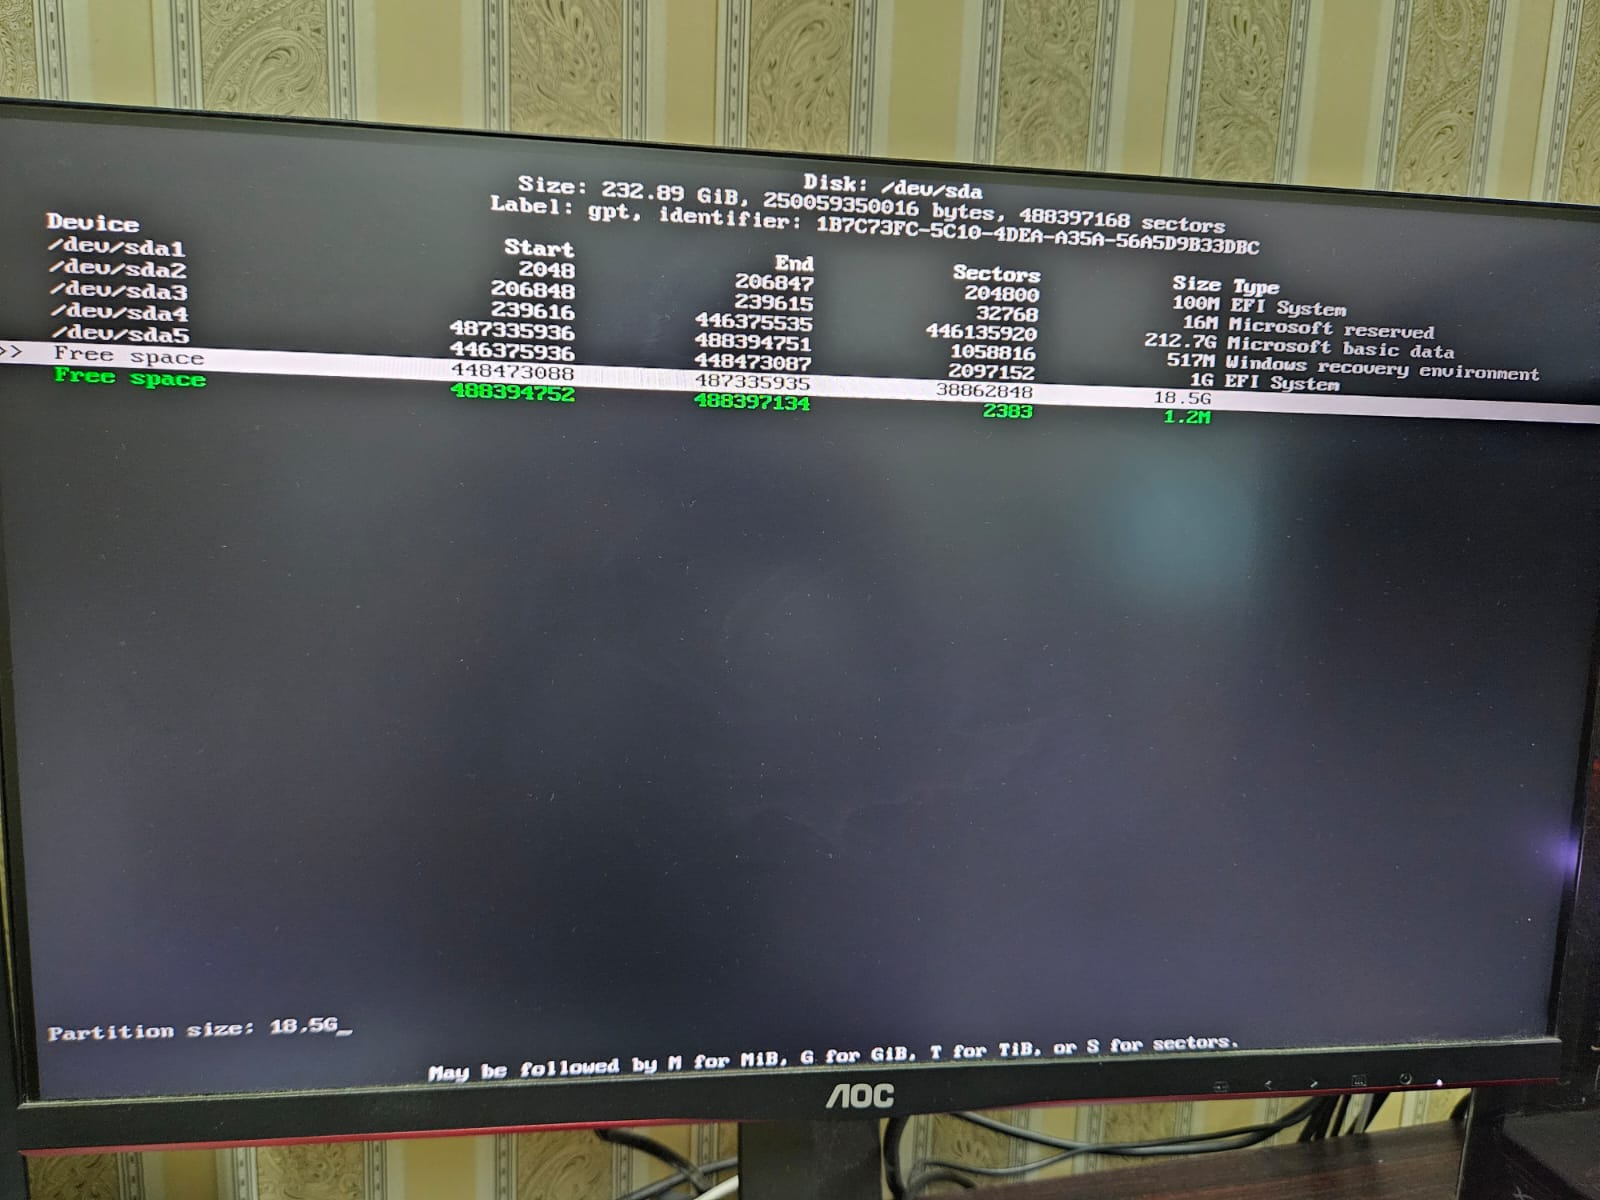
- Next, select “A”, your original file now reduced by 1GB and still in “Free space“. In the bottom tab, select “New” and press “Enter“.
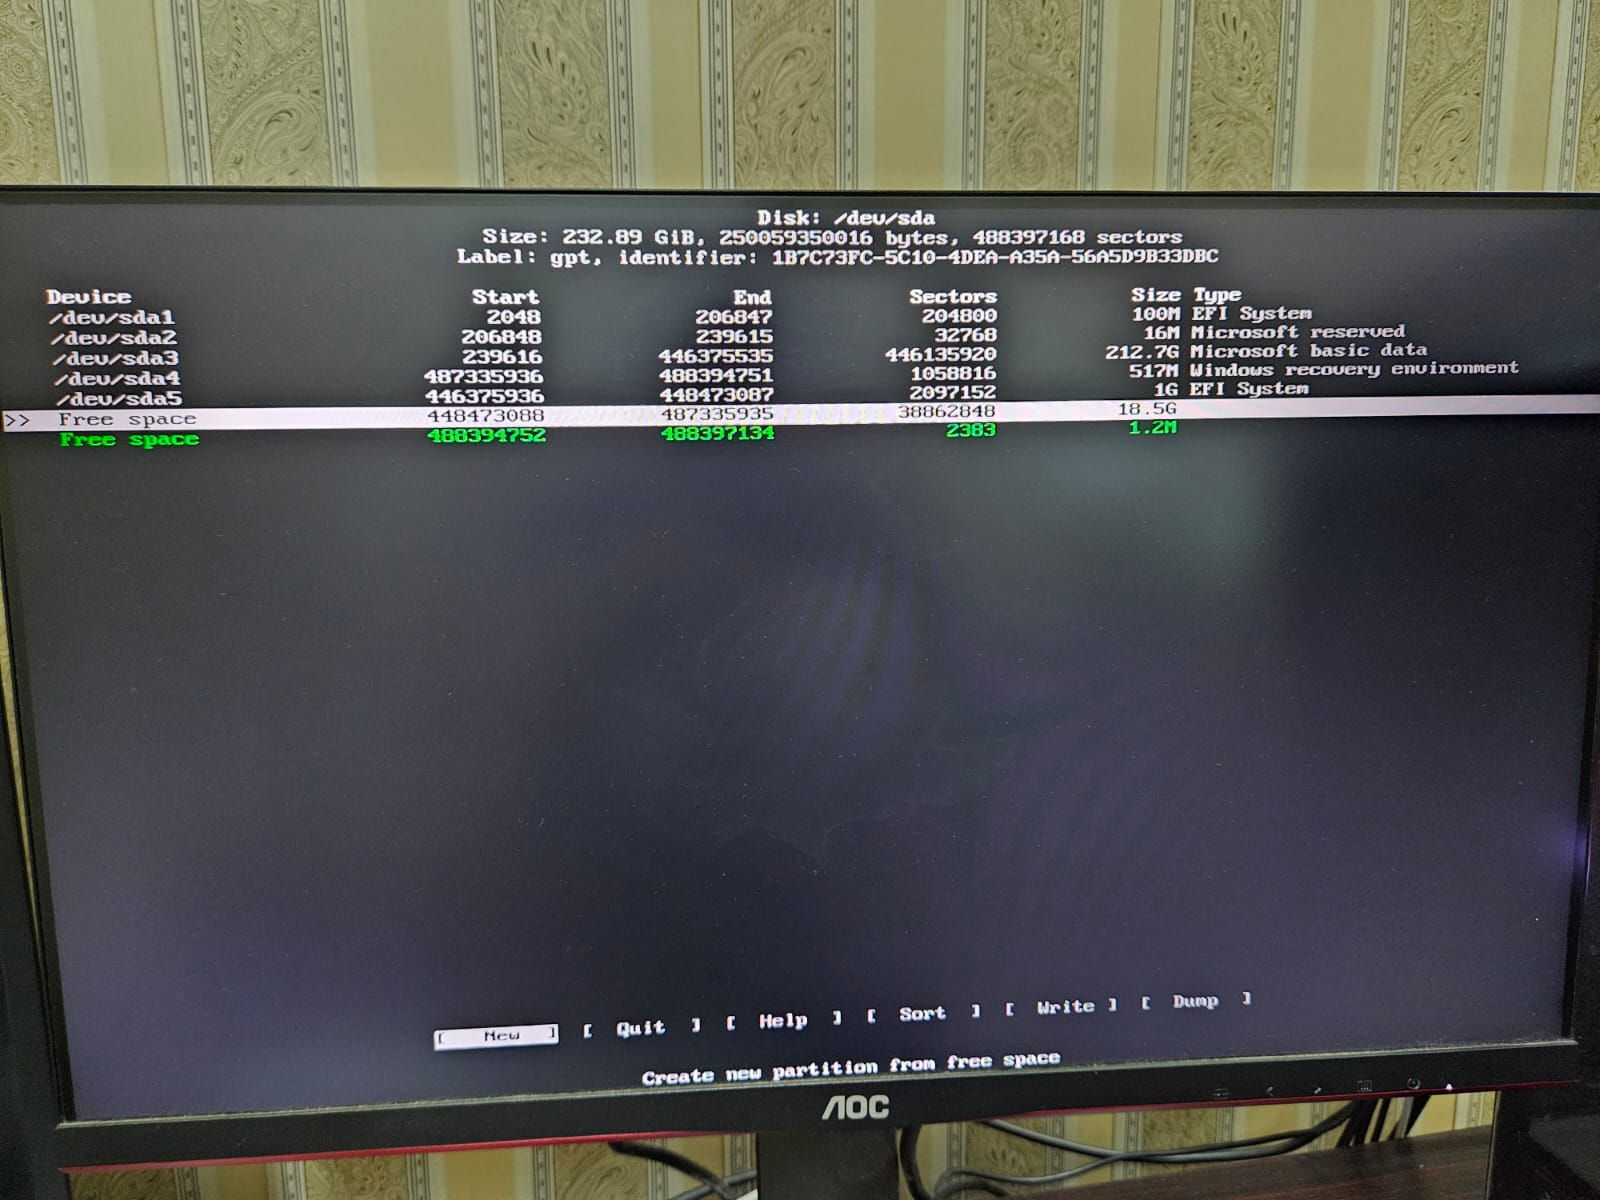
- You will be prompted to enter the size of “A“. Use the default size, which in our case is “18.5G“. Press “Enter“.
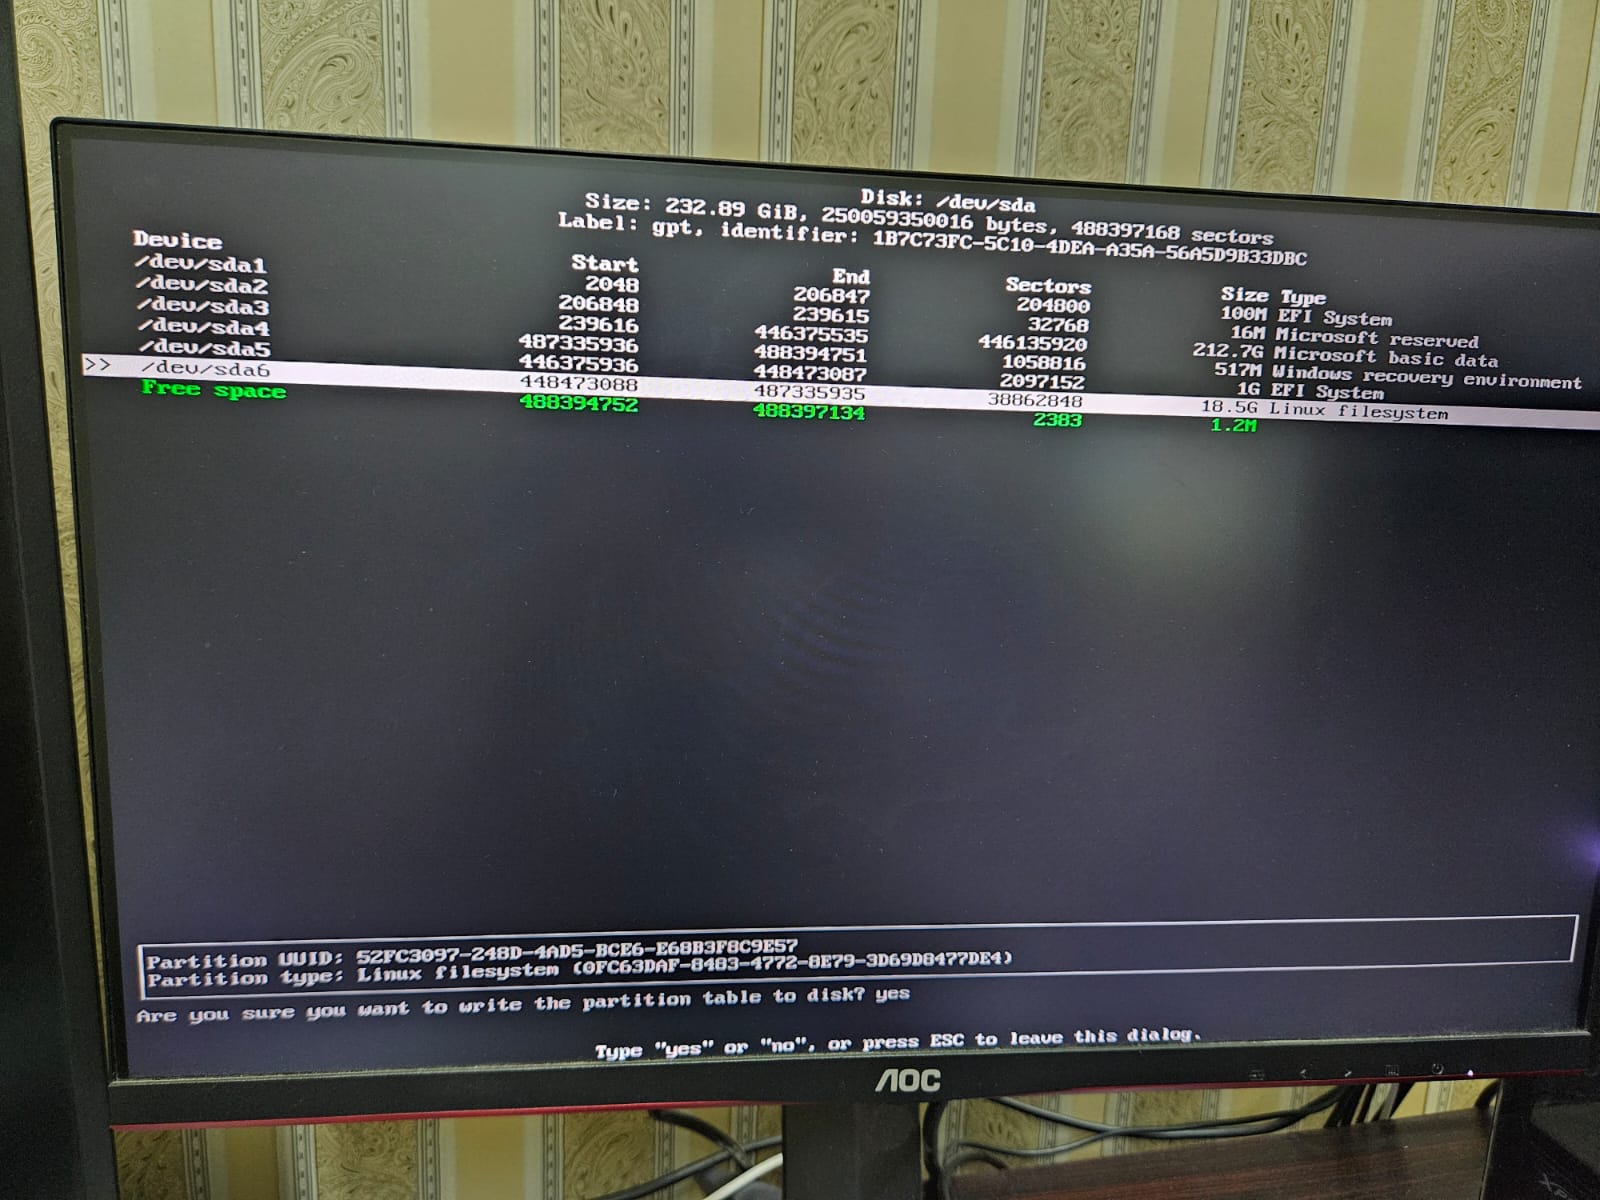
- Once created, remember the sda names. For example, “sda5” is the “EFI System” (B), and “sda6” is the “Bulk of our OS” (A), but this will be different for your system. Select “A” and in the bottom tab, choose the option “Write“, and press “Enter“. You will have to manually type “yes” on the screen for it to proceed further.
- Now select “Quit“, hit “Enter“, and the installer will restart.
6) Installing BlissOS
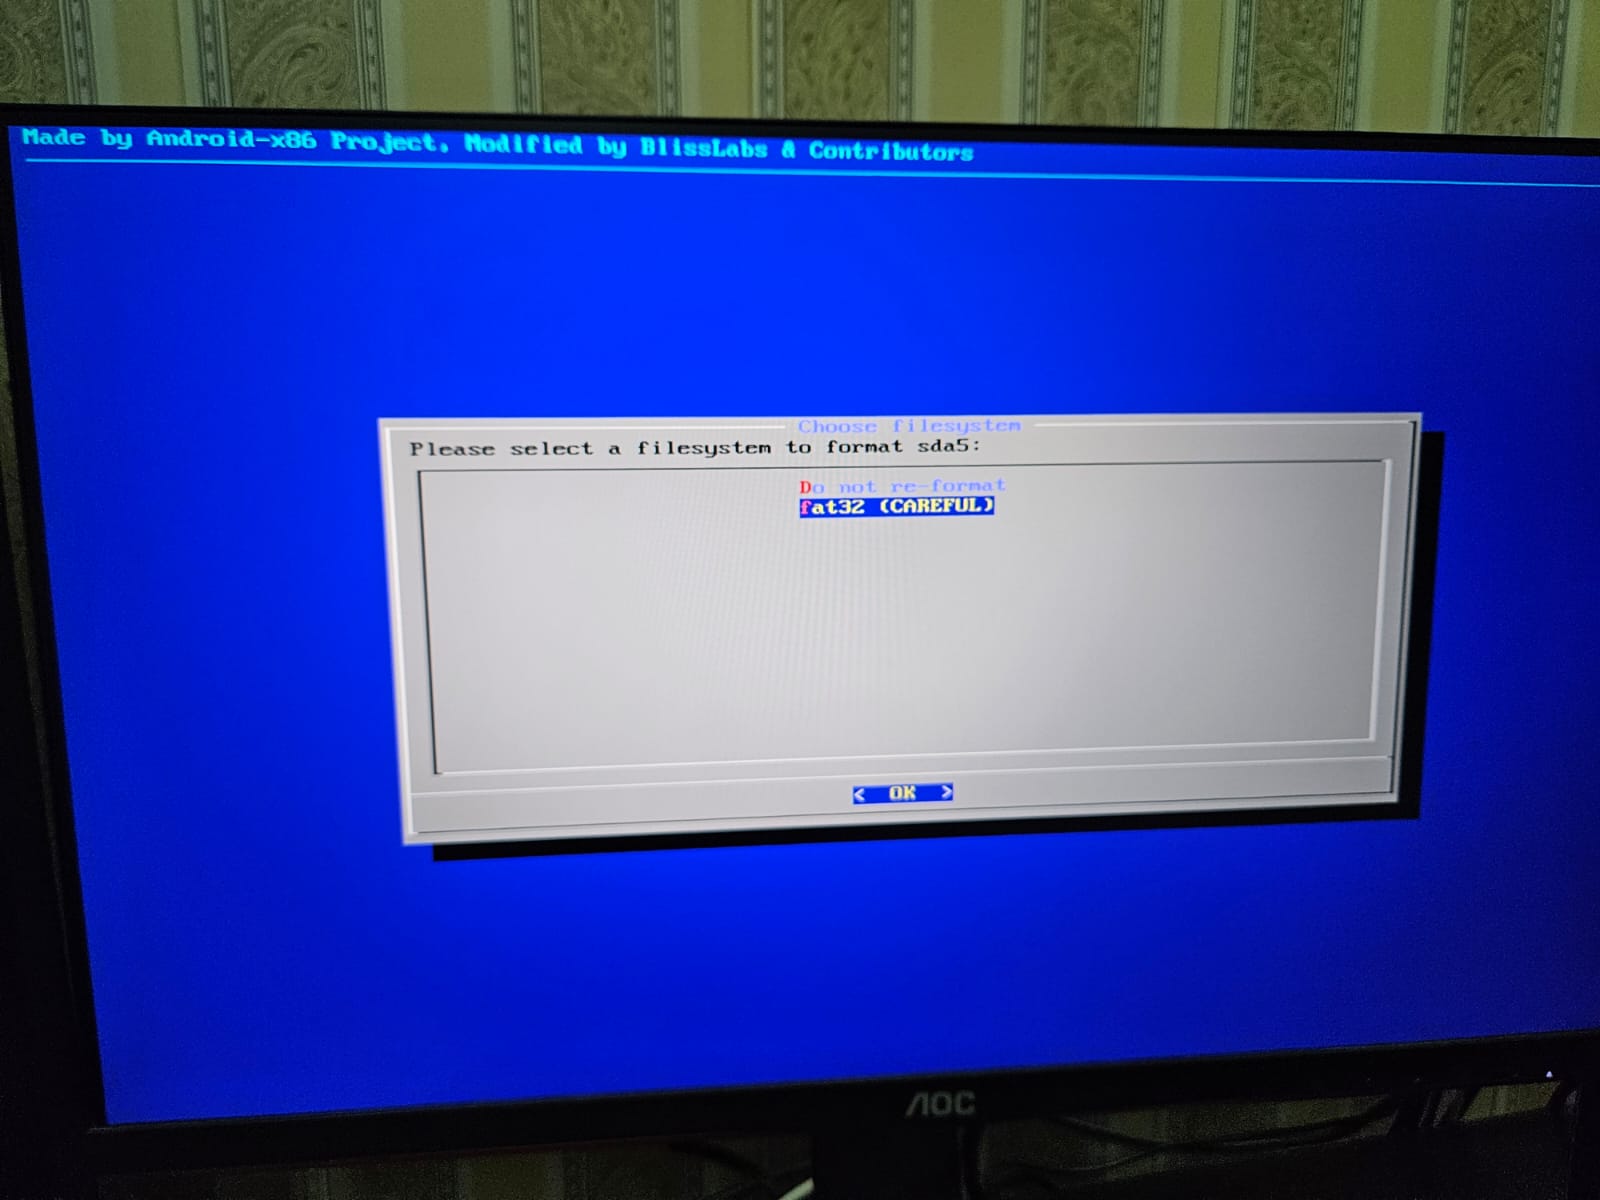
- Once you’re back to the partition selection page, select “B” or the partition having the type “EFI System“, which in our case is “sda5“.
Double-check the drive name on the right.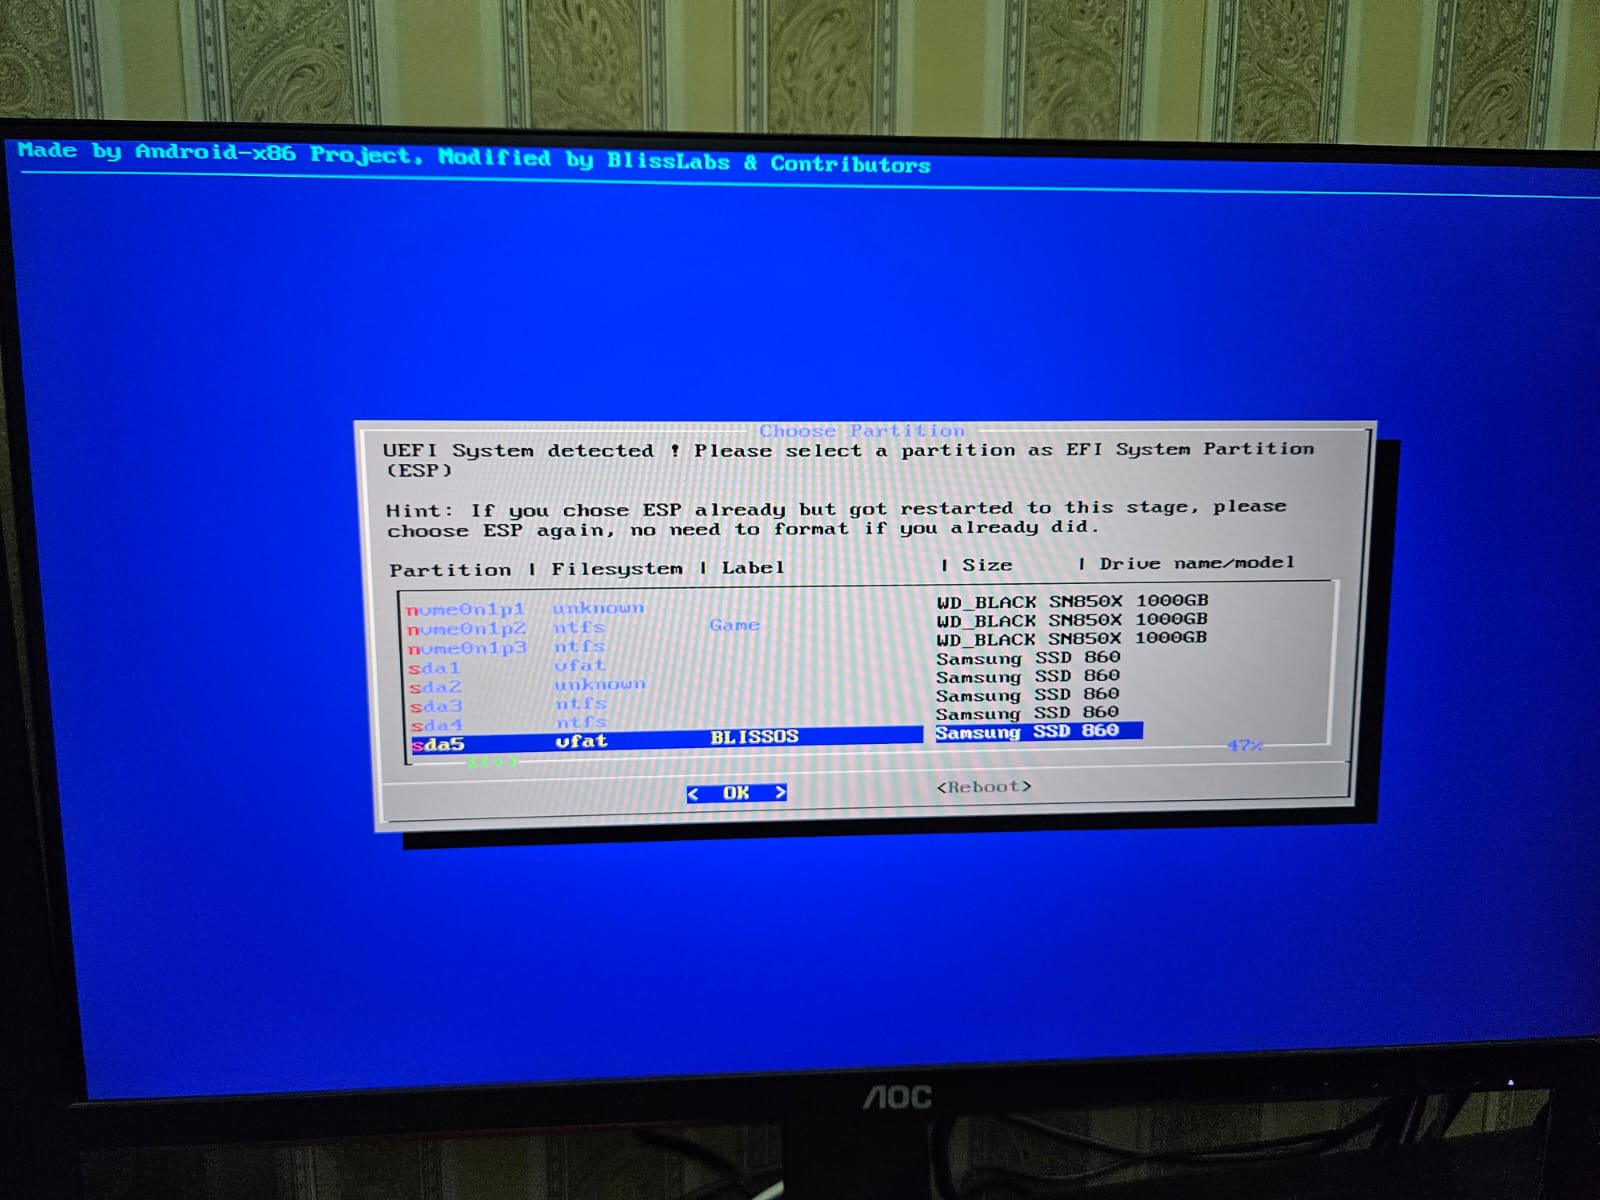
- On the next page, choose “fat32“, but make sure this is the proper partition. You may revisit the “Create/Modify partitions” section to recheck.
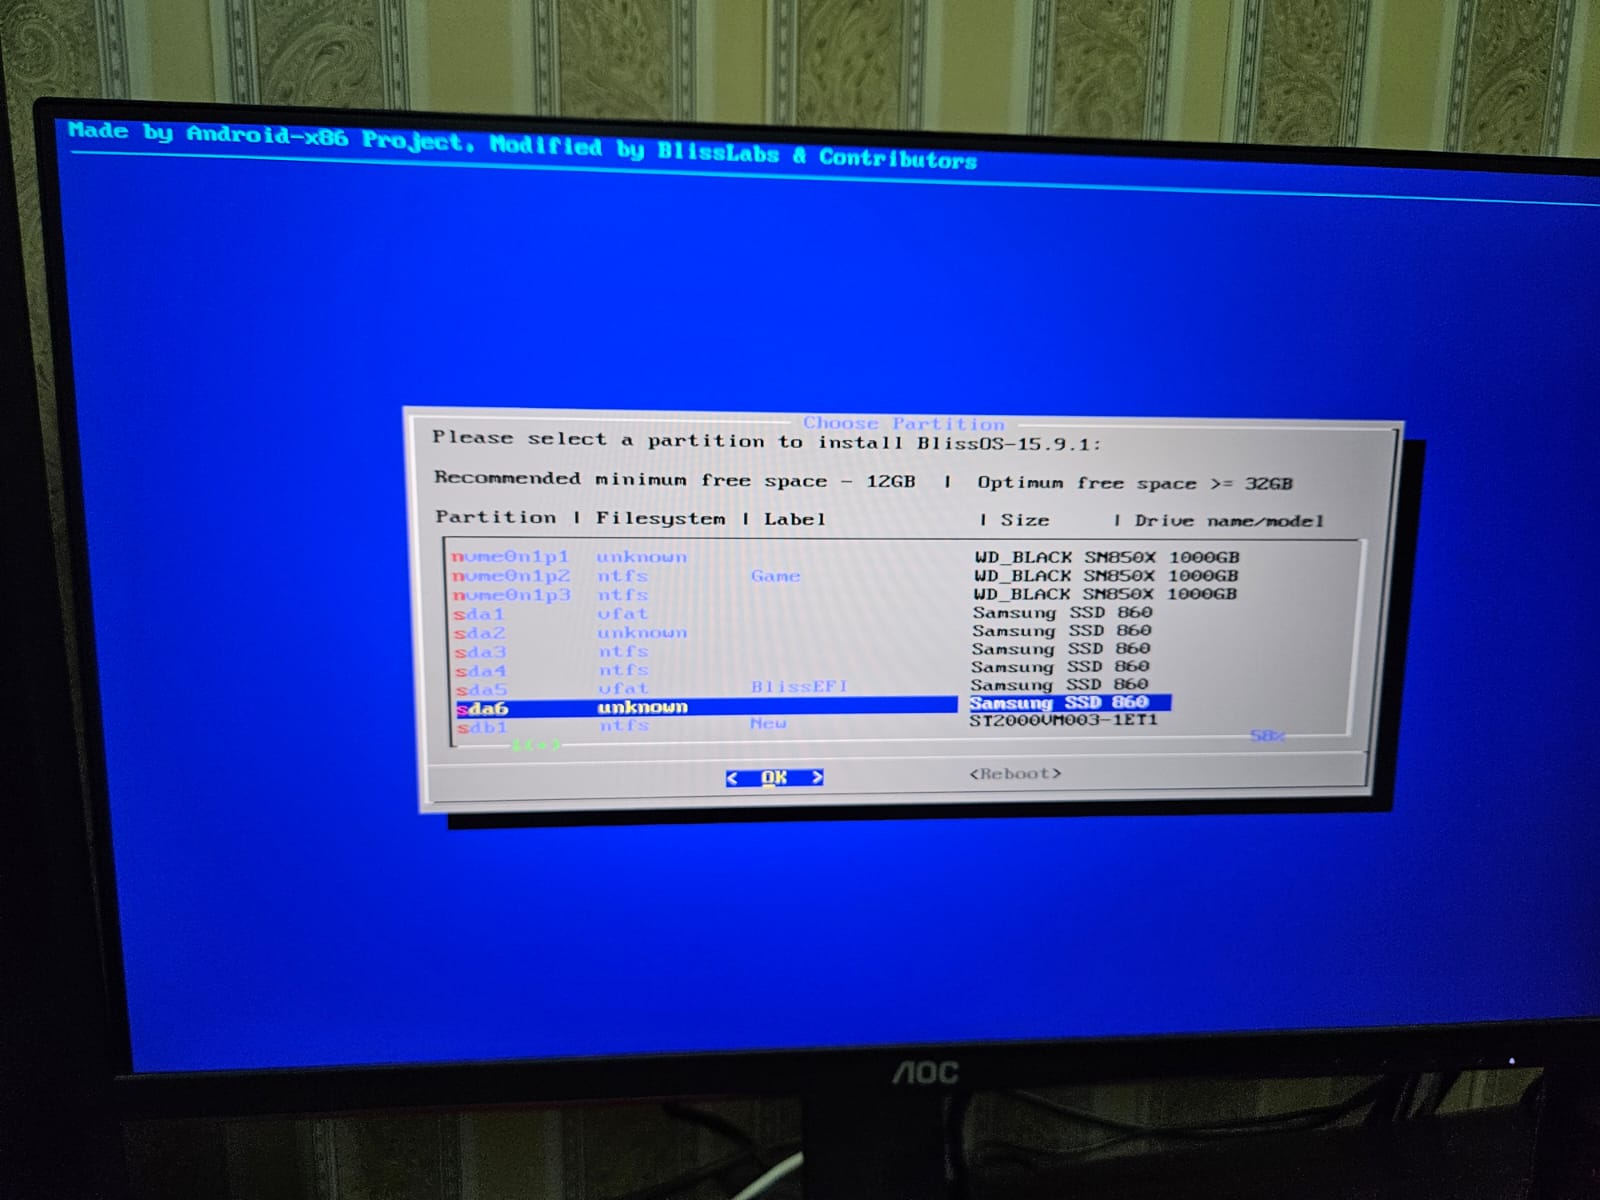
- After formatting, you’ll be back at the partition selection page. This time, we have to select “A“, the large partition, which for us is “sda6“.
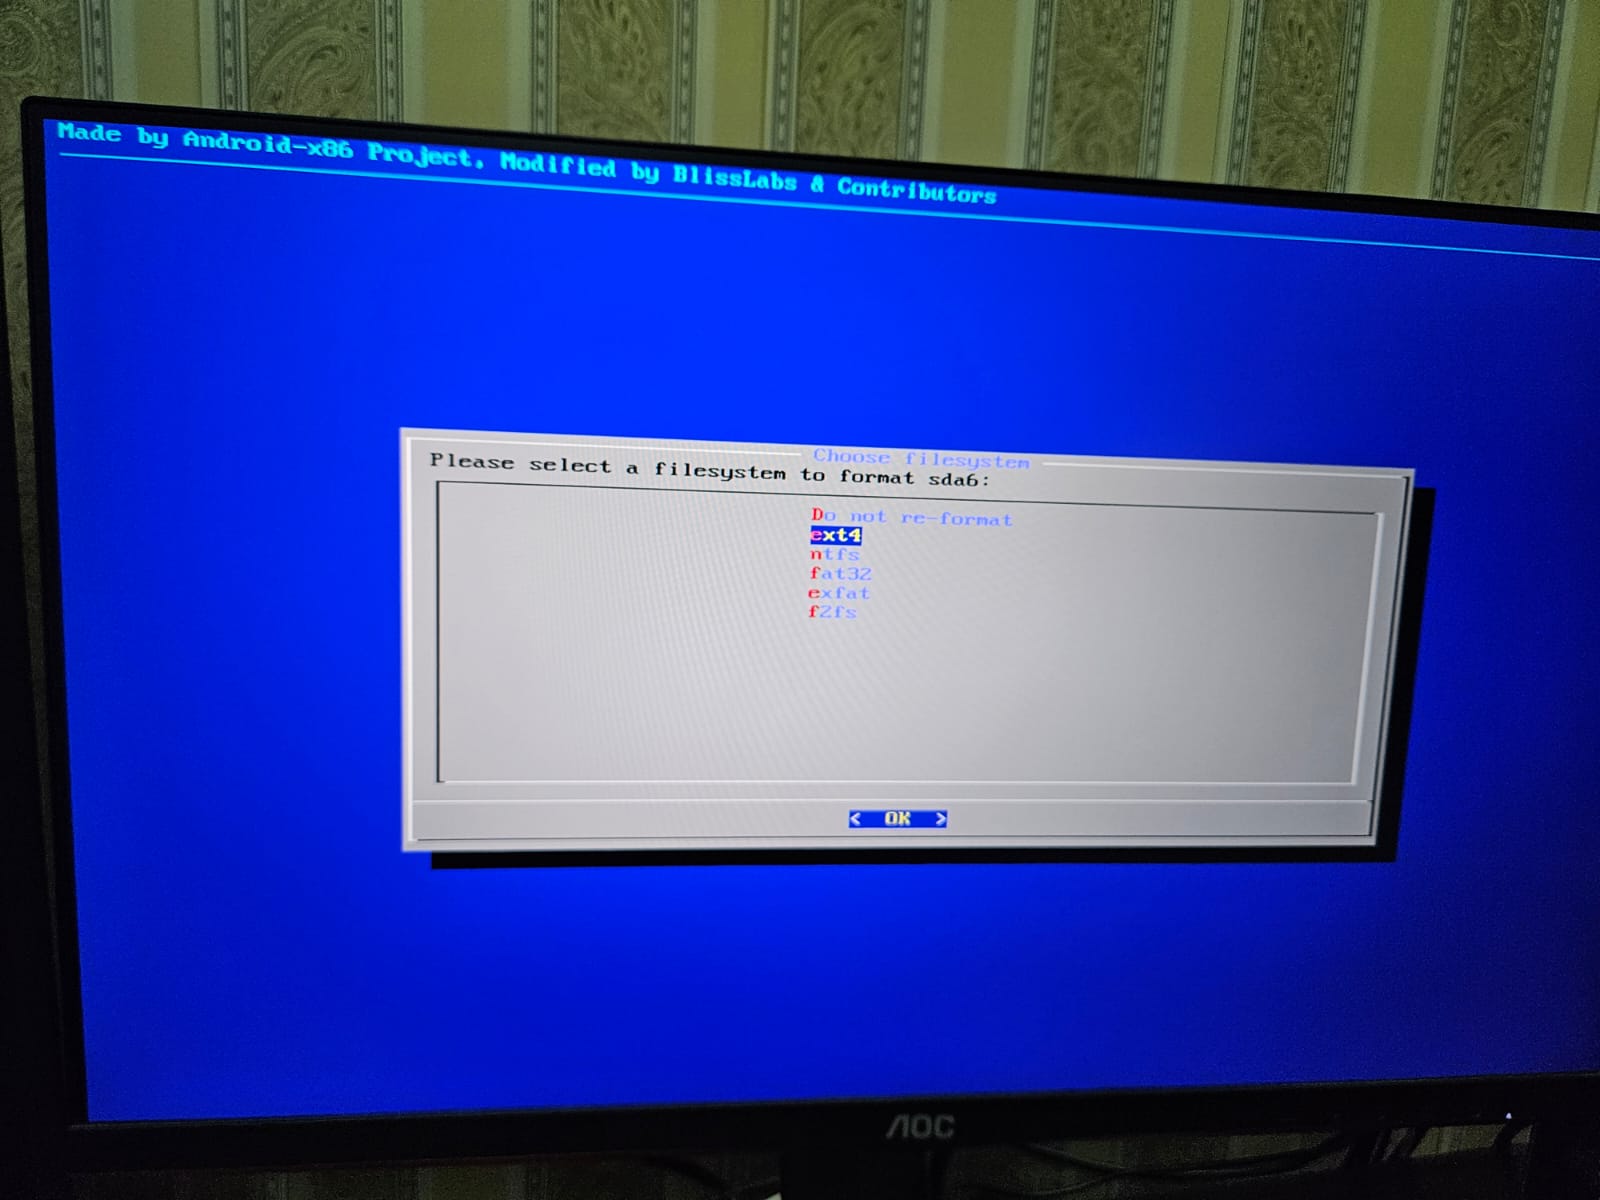
- If asked for the filesystem to format with, select “ext4” as it is the most robust and compatible. You’ll be given a few warnings and might be asked to name the partition.
- Once “A” has been formatted, the installer will ask if you wish to receive “OTA Updates“. Select “Yes” if you have allocated 30GB or more storage, and “No” if you haven’t.
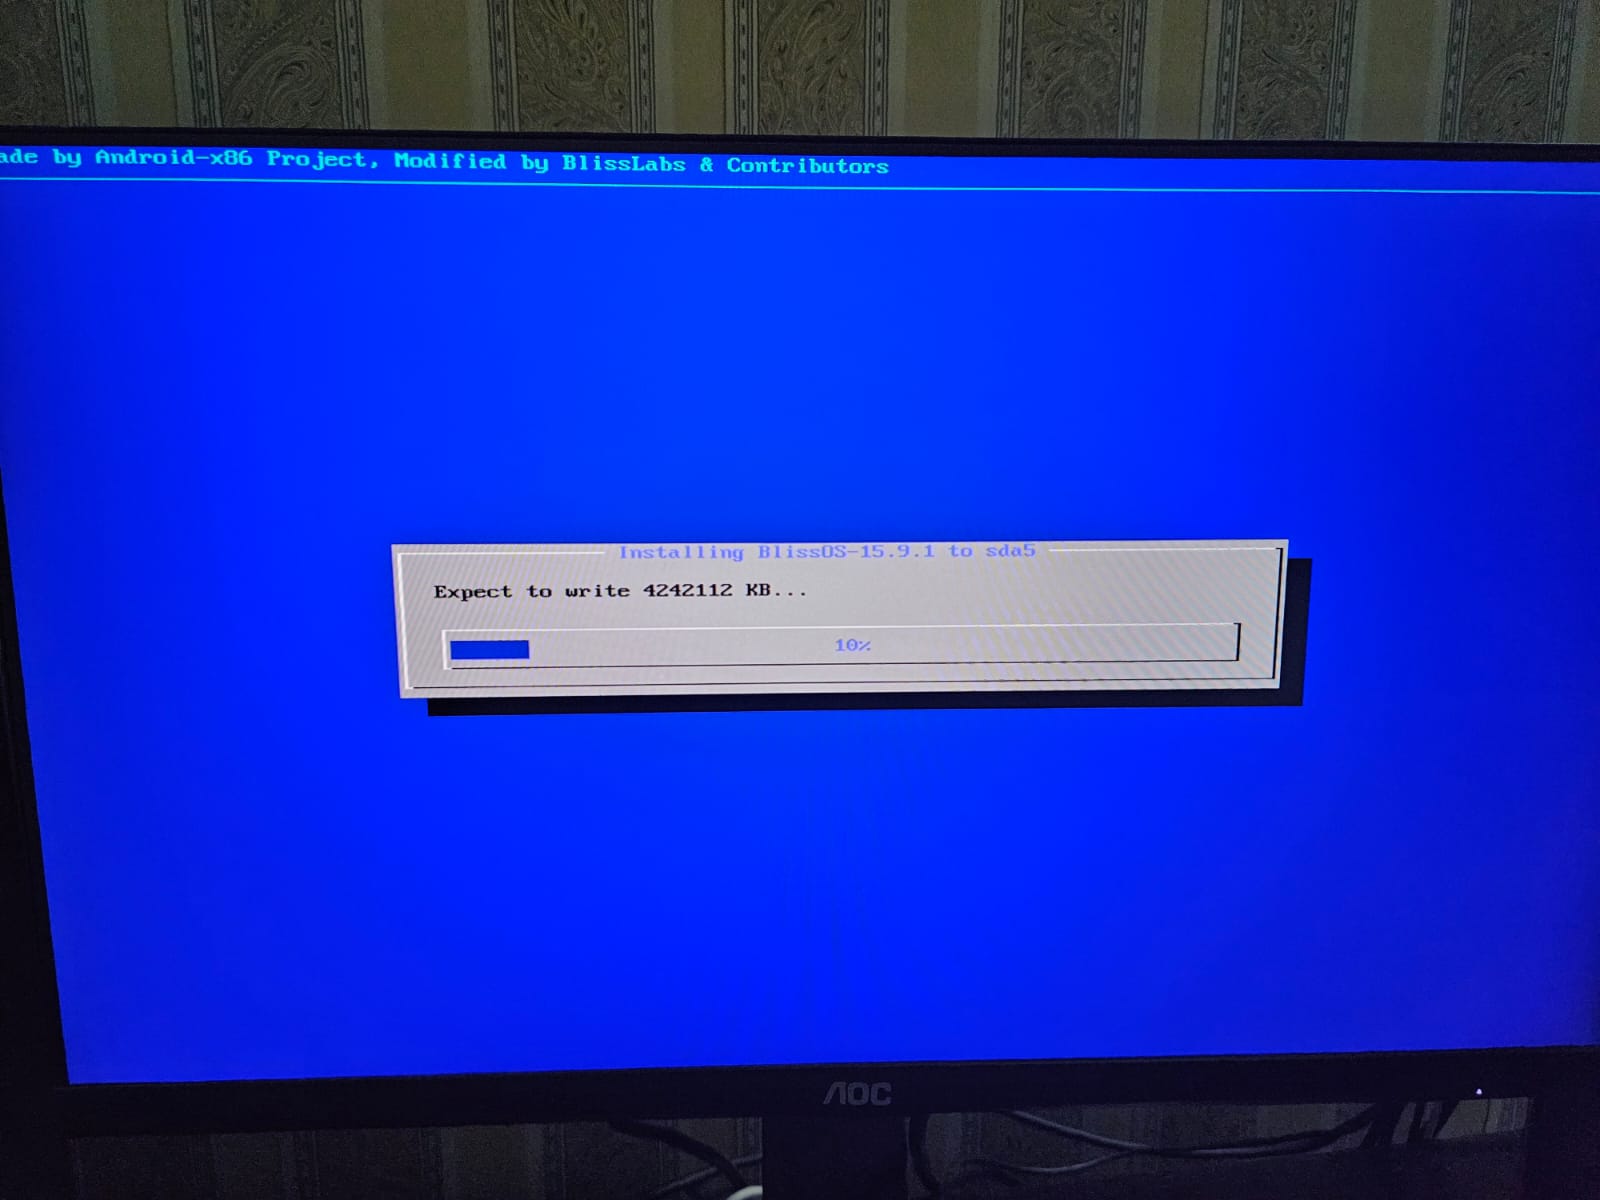
- If the installer asks you about the bootloader you wish to use, choose “Grub2 EFI Bootloader” and wait until it writes some data to “B“.
Setting Up BlissOS
- Navigate to your BIOS on your next startup and in the same boot priority section, choose “Android-OS“.

- Once the PC boots using BlissOS, select the first option, which is based on default settings and without any add-ons.
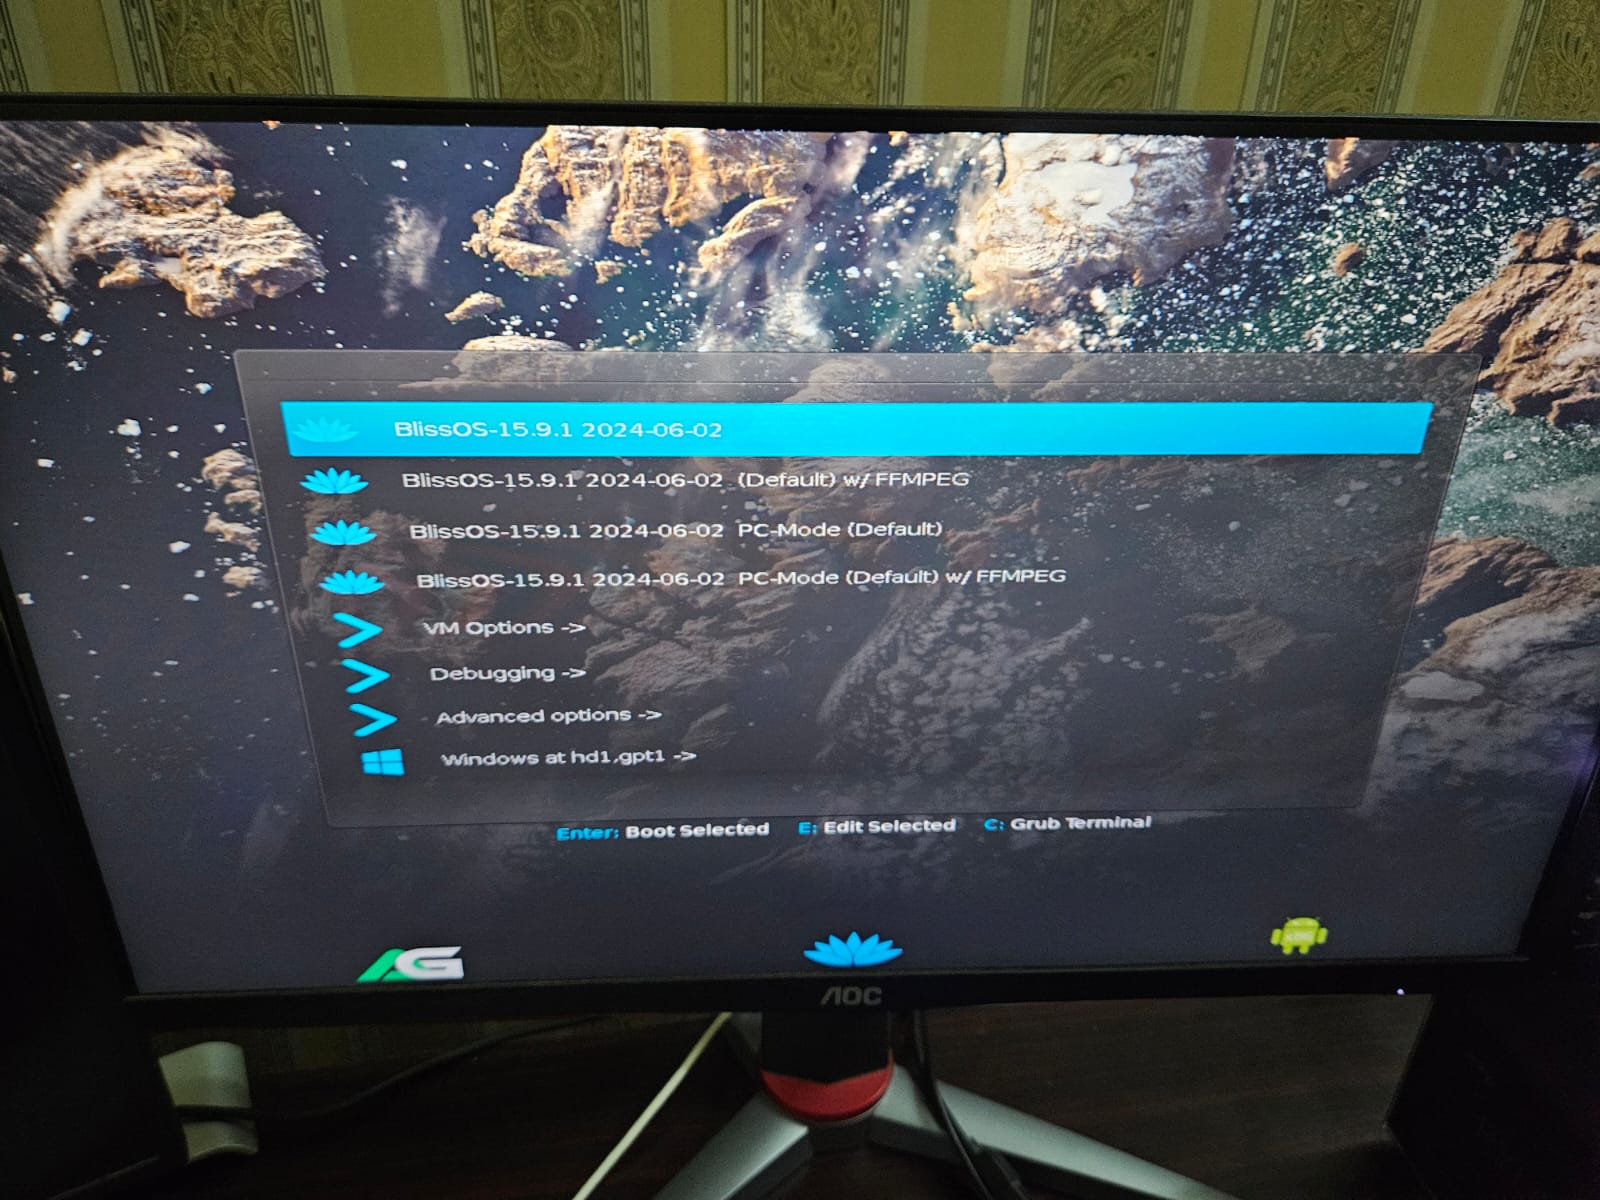
- If, for some reason, you’re stuck on the “have a truly blissful experience” screen, you’ll need to go to “Advanced options” and start the OS without hardware acceleration. We hope the developers address this problem in future builds.
- After the boot-up animation ends, BlissOS will start, and you are now free to explore the OS as per your desires.
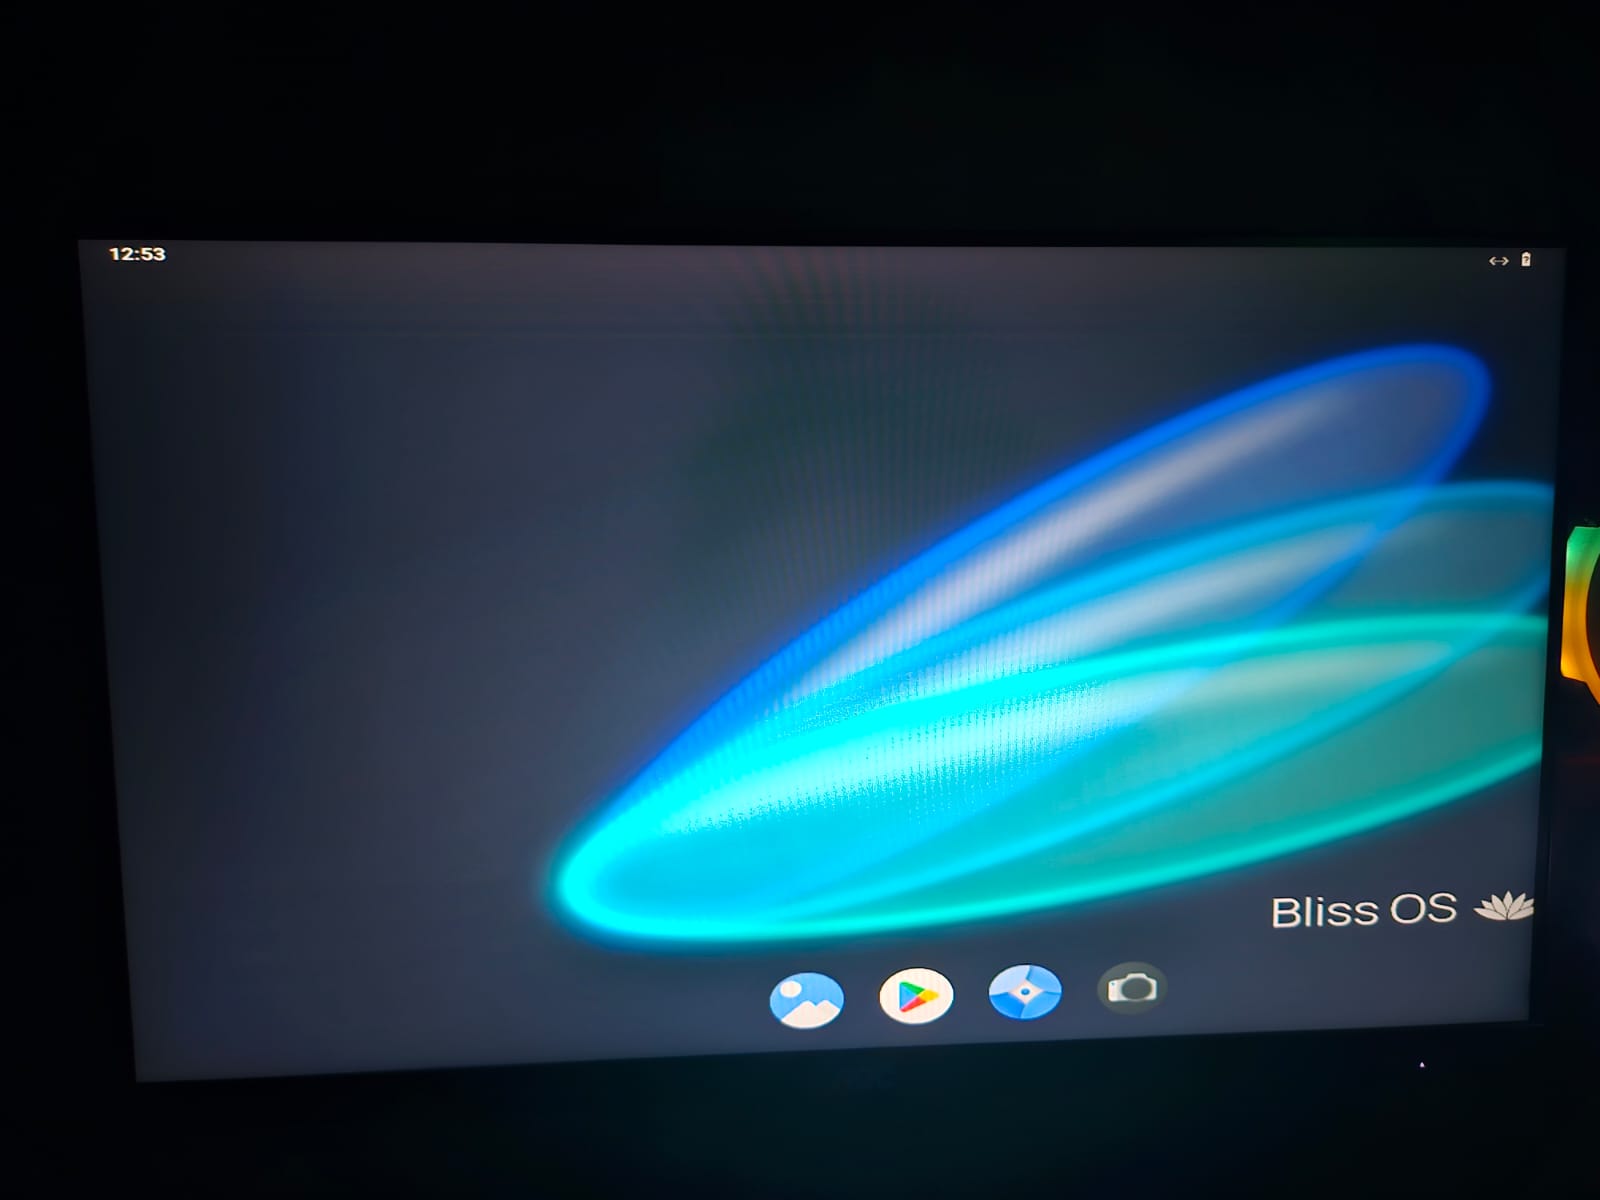
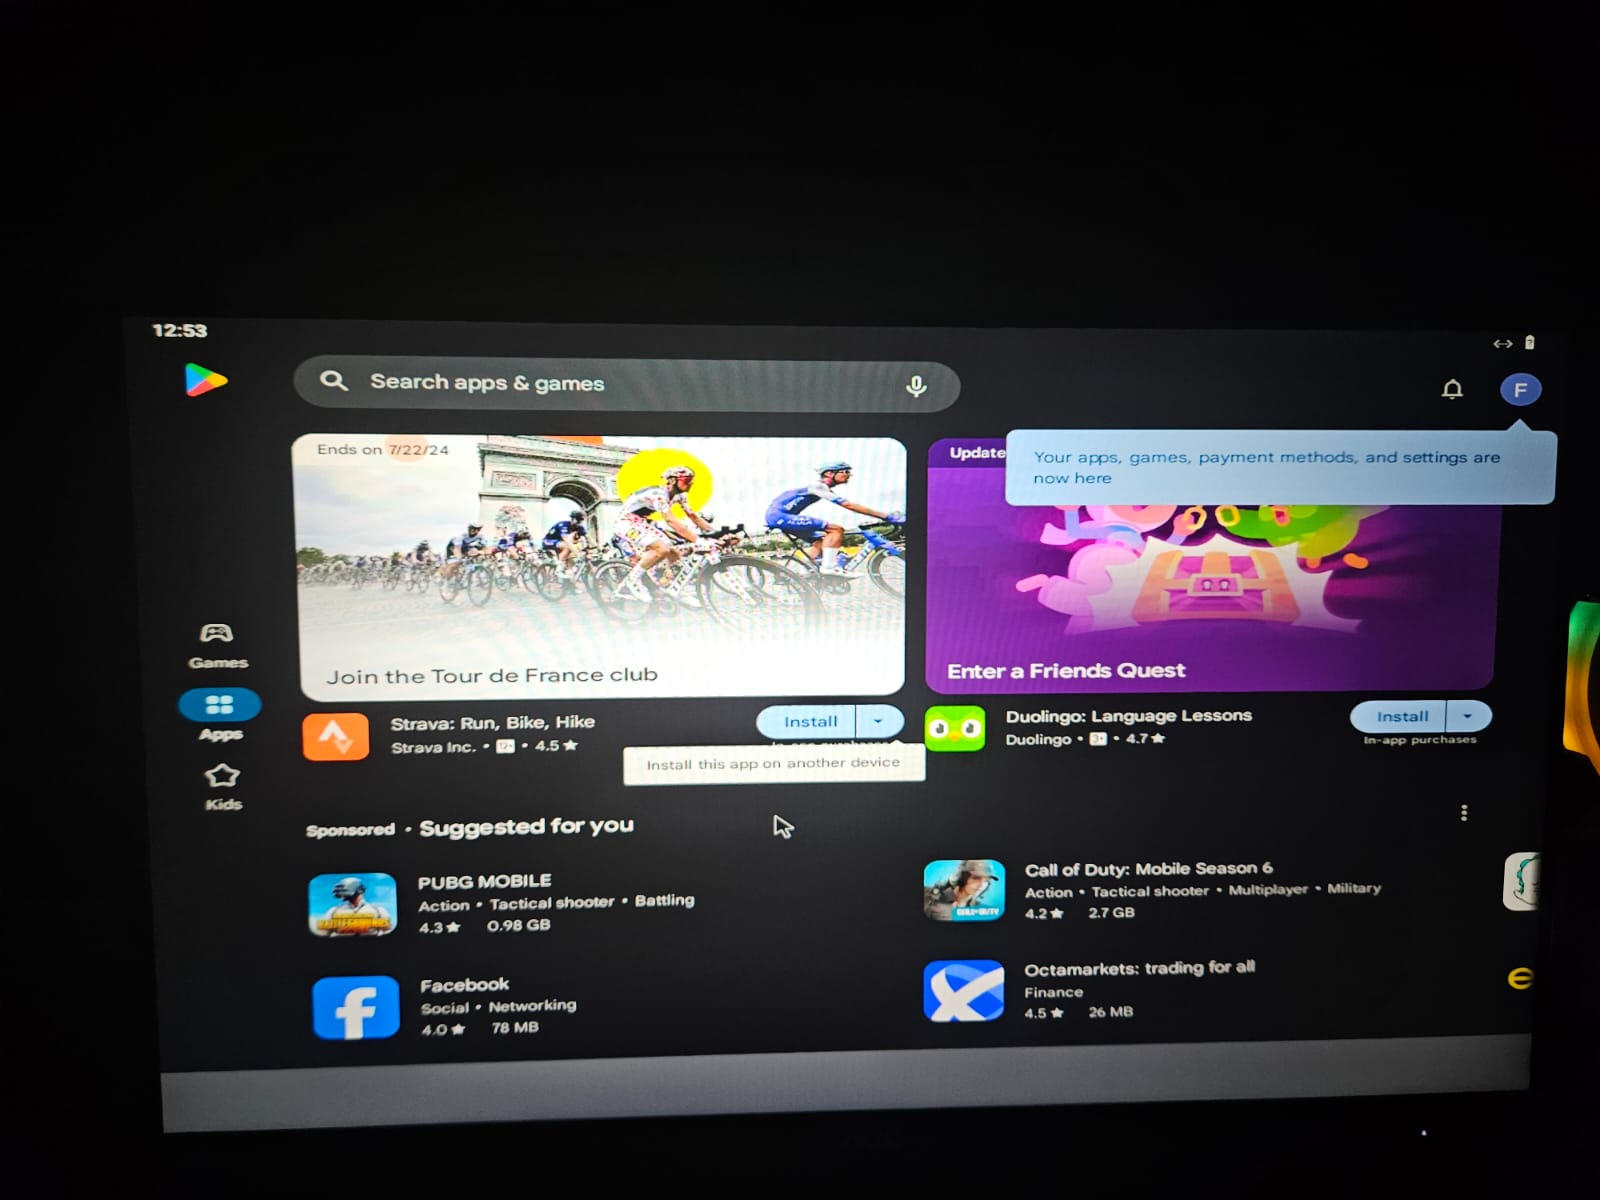
- It is generally recommended to sign in to your Google Account so you can access the Play Store and other features.
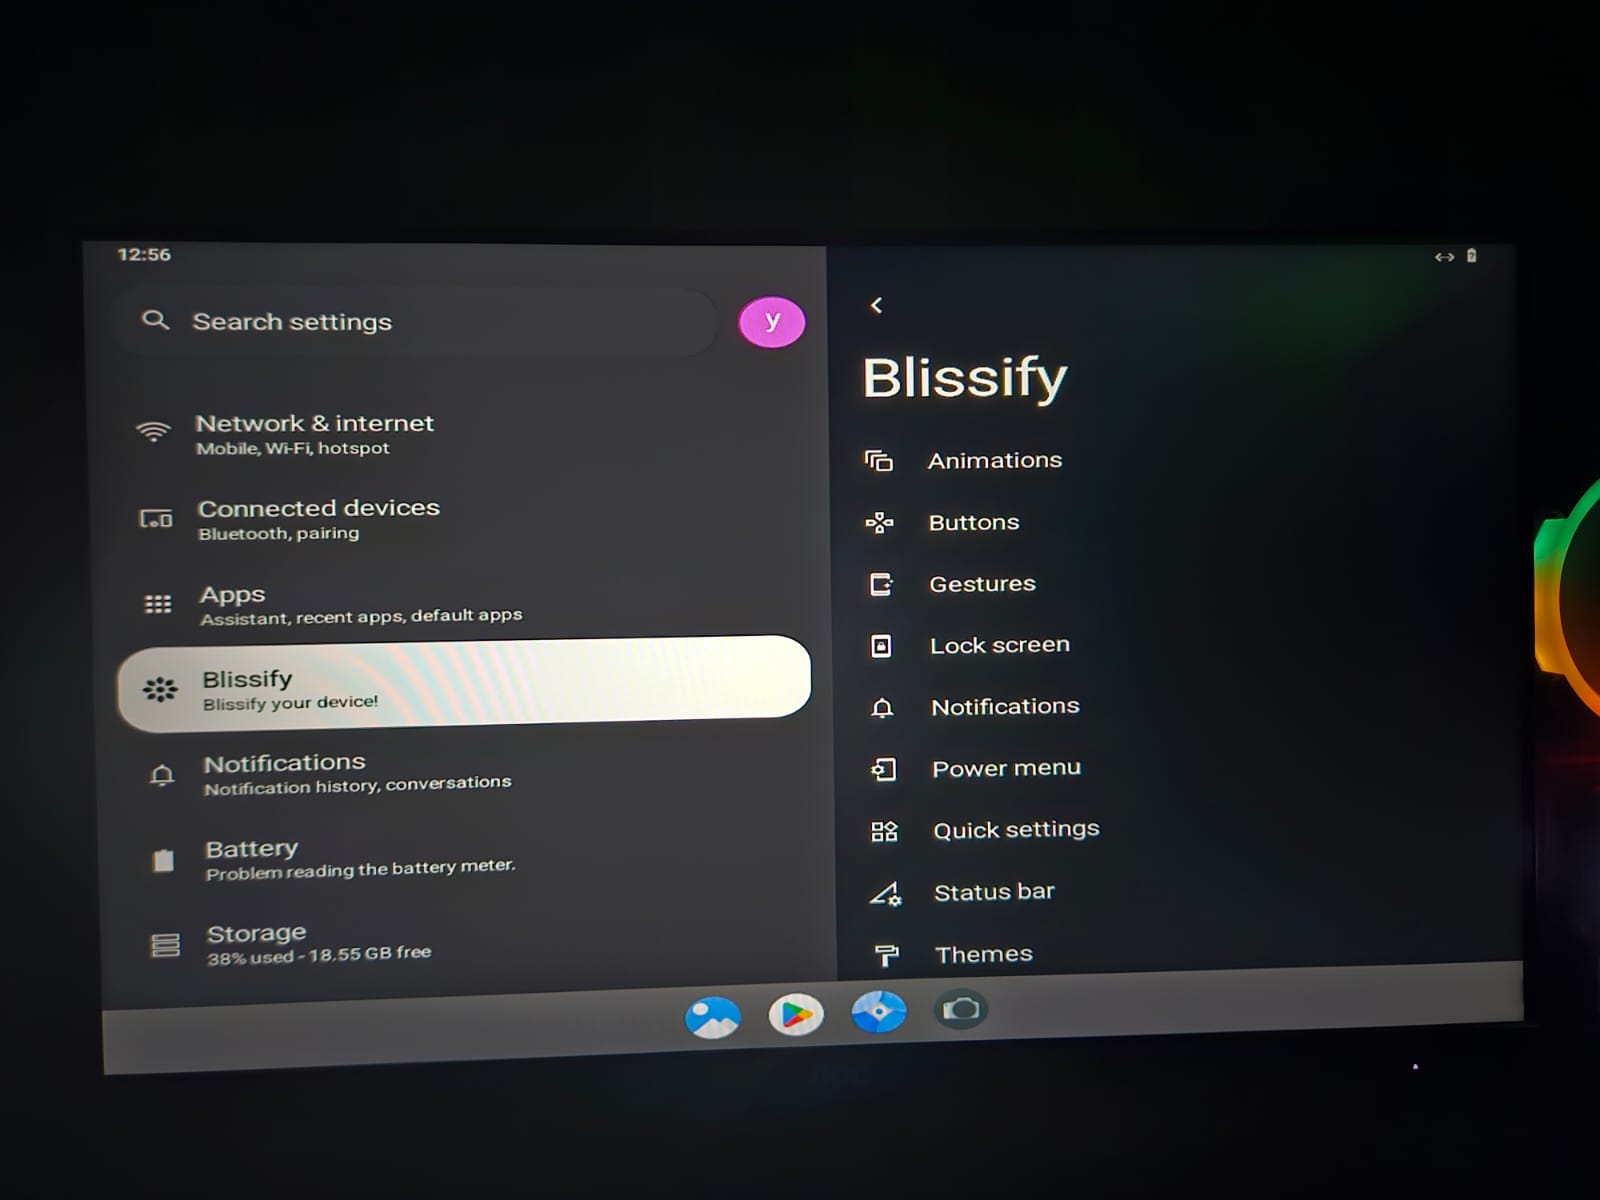
- In the Settings menu, you can use almost every feature you’ll typically find on an Android device. Moreover, BlissOS has its own customization layer with “Blissify“. Don’t worry, we won’t spoil the fun for you.
- Now you can enjoy the native Android experience on your PC/Laptop. You may play games from the Play Store but make sure to check with the developers to see if they allow an OS like this or key mapping tools.
BlissOS is one of many builds that are derived from Androidx86, porting Android to x86-based systems. While not as intuitive to install as, say, Windows, it can give you some experience if you want to install Linux or another OS later on.
Let’s address the elephant in the room. BlissOS is not as stable as Windows and you shouldn’t expect it to be. In our experience, we found multiple infuriating issues. A community over at Reddit does exist, but you’ll often find yourself stranded if you encounter a “not so common” problem.