How to Use Virtual Desktops on Chrome OS
A Chromebook is a laptop or tablet running the Chrome OS as its operating system. Chrome OS is designed by Google on basis of the Linux kernel. It is derived from Chromium OS and uses Google Chrome as its main user interface. So, Chrome OS primarily supports web applications, in which data is mainly stored in the Cloud. Google has been updating its Chrome OS with new features ever since its release.
Lastly Google is has added Virtual Desktops in the arsenal of Chromebook features with the release of Chrome OS version 76, this feature has been part of other major operating systems for ages. The functionality has been in testing for several months and is now available for the Stable channel.
By default, all Chrome installations are on the stable channel regardless of the OS because Google wants everyone to have the best possible experience of its web browser. There are 3 release channels of chrome 1. Stable 2. Beta and 3. Developer.
How To Use Virtual Desktops On Chrome OS
Virtual desktops, which are called Virtual Desks by Google, is a feature by which you can separate the desktop into multiple workspaces to organize applications, windows, and data. A Chrome OS user can have up to four Desks at the same time and you can quickly switch between them.
Step 1: Update to Latest Chrome OS
Chrome OS is usually updated every six weeks whereas security patches come more frequently. Chrome OS usually Updates itself automatically by downloading and installing updates in the background. Usually, a user gets a notification whenever an update has been downloaded and installed, as the user has to restart the system to complete the update.
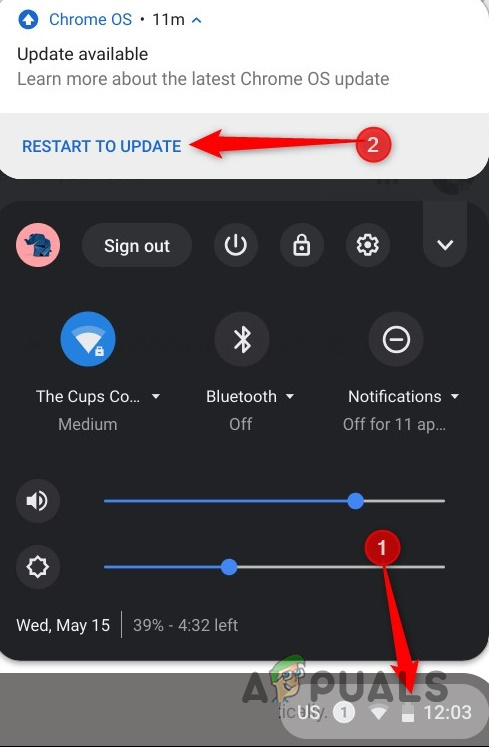
- In the bottom right of the Chromebook screen, click on the clock icon to open the system tray and notification panel. If there is an update available, a notification would be visible at the top of the menu and you have to “Restart to Update.”
- Make sure you save your current word before restarting the Chromebook. Any unsaved data could be lost when the Chromebook restarts.
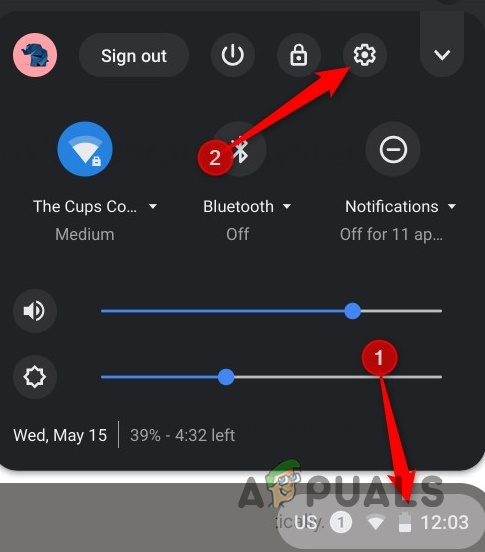
3. If you don’t see this notification, click the Settings cog.
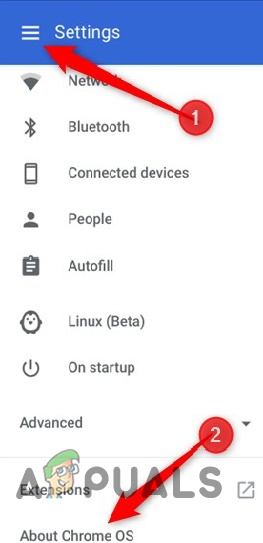
4. Next, click the Hamburger menu, and then click on “About Chrome OS” at the bottom of the menu.
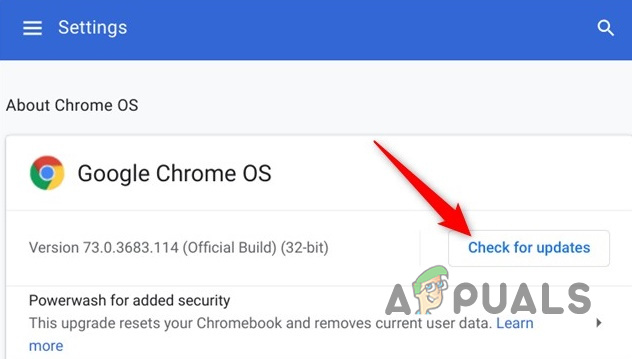
5. Click “Check for Updates.” If your Chromebook finds an update, it will start to download automatically.
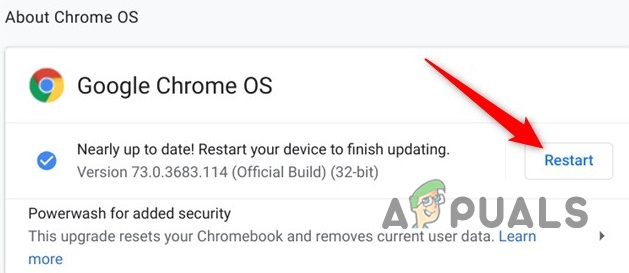
6. After the update downloads, you will need to restart your device to complete the process. Click “Restart.”
7. If you want to restart your Chromebook later simply close the menu and the Chromebook will install the update the next time it is started.
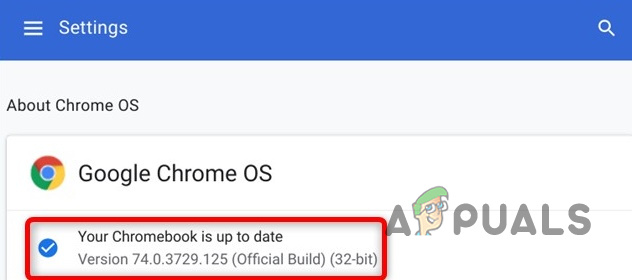
8. To verify your Chromebook is up to date after it restarts, head back to the “About Chrome OS” page, or type the following into the Chrome browser Omnibox. And you will see the message that “Your Chromebook is up to date”.
chrome://settings/help
Step 2. Enable Virtual Desks
if no Virtual Desks are shown i.e. the +New Desk button when you press the Overview key which indicates that the feature is hidden behind a flag that has to be enabled before being accessed. When anythings is enabled from
chrome://flags
you’re using experimental features that haven’t been tested across the board. You may run into bugs, so be careful when dealing with the flags.
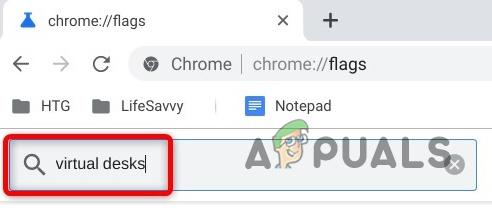
Fire up Chrome, type chrome://flags into the Omnibox, hit the Enter key, and then type “Virtual desks” into the search bar.
Alternatively, paste
chrome://flags/#enable-virtual-desks
into the Omnibox and hit Enter to go directly there.
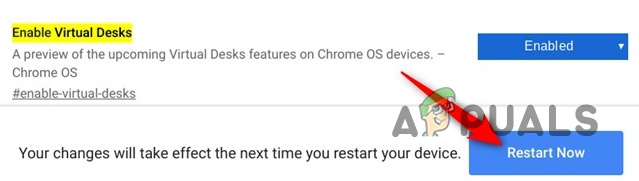
Click the drop-down box next to “Enable Virtual Desks” flag and then select “Enabled.”
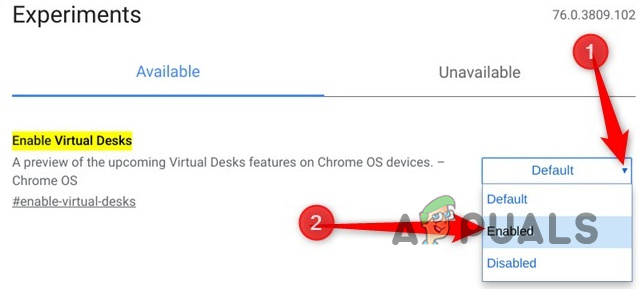
For changes to take effect, Chromebook must be restarted. Click the “Restart Now” button.
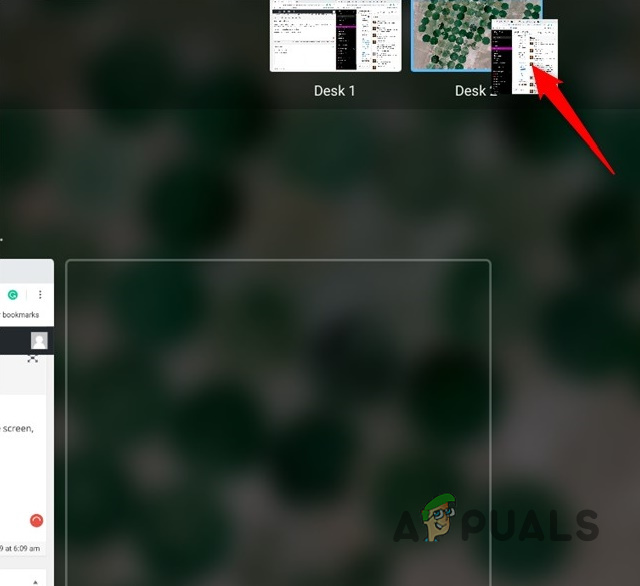
Step 3. Add Virtual Desks
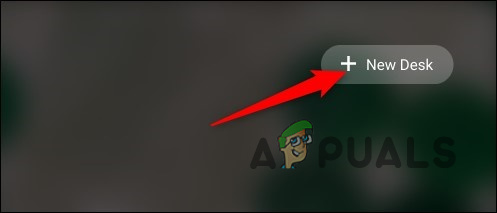
Now that the Virtual Desks feature is working on your computer, press the Overview key on your keyboard to see all active windows. At the top of the screen locate the “+ New desk” icon and press it to add a new virtual desktop.
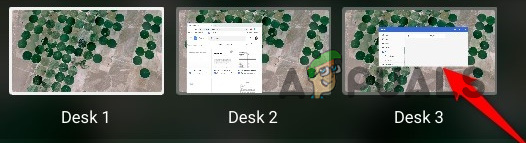
You can add and use up to four Desks at a time.

Step 4. Switch Between Virtual Desks
Virtual Desks are great for applications that you can leave open without minimizing it to the tray. The application lives there, waiting for your return. You can have social apps on one Desk and a word processor on the other, for example.
Whenever you want to switch between desktops and use apps that you’ve dedicated to them, you can do this in a couple of ways.
The first way to switch Desks is to press the Overview key and then click on a desktop at the top of the screen to switch to it immediately. As long as you remember what apps are in which Virtual Desk, moving between them is fast and simple.
The second method lets you snap directly to the application that you’re looking for without having to guess which desktop it’s on. Every app that’s currently open has an icon that appears on the shelf. So, click on the application to snap it directly to that desktop. If the app is minimized, selecting the app icon also maximizes it.
Step 5. Move Applications Between Virtual Desks
Once you open an app on a specific Desk, it doesn’t have to spend the entirety of its life there. Instead, you can move it between desktops. This feature is handy if you accidentally opened an app on the wrong Desk and want to move it without killing it.
Press the Overview key while viewing the Virtual Desks with the app you want to move, click and drag the window to the middle of the screen, and then drag and drop it on to the desktop you want
Note:
Make sure to drag the application to the middle first. Chrome OS replicates Android and will kill the app when the app is dragged straight up or down from sides.
Keyboard Shortcuts for Virtual Desks are Coming Soon
Currently, Chrome OS doesn’t have shortcuts to navigate through virtual desktops however, keyboard shortcuts are coming soon.