How to Unlock and Root the Motorola Edge Plus
The Motorola Edge+ is a high-end premium flagship phone from Motorola, and boasts powerful specs that justify the high price. Packing a Snapdragon 865 chipset with 12GB of RAM, this phone can handle anything you throw at it.
Please note that this root guide is only for the EU/Global version (XT2061-3) of the Motorola Edge+. It is exclusive to Verizon in the US, and Verizon is known for permanently locking bootloaders. If you live in the US, it is best to buy the Moto Edge+ through a European website for an unlockable version of this device.
Warning: Disable any fingerprint unlock you have on your phone before we proceed. Rooting the Moto Edge+ will disable fingerprint scanning, and you can lock yourself out of your phone. After root method, we provide a method for re-enabling fingerprint scanning.
Requirements:
- ADB & Fastboot (see Appual’s guide “How to install ADB on Windows”)
- EU/Global Motorola Edge+ (XT2061-3) firmware
- A Motorola account
- Magisk Manager apk
Unlocking the Moto Edge+ bootloader
Motorola offers a bootloader unlocking program for qualified phones. You need to provide them with an identifier token from your device, and they will provide you with an unlock key.
- So first start by heading over to the Motorola bootloader unlock request page and follow the instructions. It will at some point ask for your identifier token.
- Turn off your phone. Press and hold the Volume Down button, then hold the Power button until “Fastboot Flash mode” appears on your screen.

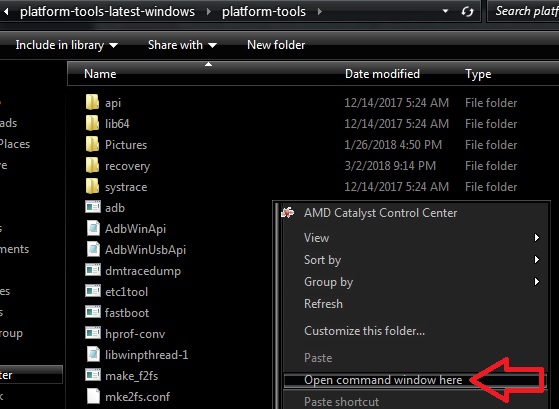
- Now connect your Moto Edge+ to your PC via USB, and launch an ADB terminal on your PC (hold Shift + right click inside the main ADB folder and choose “Open a command window here”).
- In the ADB terminal, type:
fastboot oem get_unlock_data
- This will give you a long string of numbers in the ADB window.
- Copypaste this string into the Motorola bootloader request page where it asks for it, and submit.
- Wait until Motorola sends you an official unlock token in your email. It can take anywhere from a day to a week.
- Once you have the key, put your phone back into fastboot mode and connect it to your PC.
- Launch an ADB terminal and type:
fastboot oem unlock UNIQUE_KEY
- Replace UNIQUE_KEY with the actual key you received from Motorola.
- Your Moto Edge+ will confirm the bootloader unlock, and proceed to factory reset your device and wipe your data. Once it is done, it will reboot directly into the Android setup wizard.
Rooting the Moto Edge+ with Magisk
- Install the Magisk Manager app on your Moto Edge+.
- Download the official EU firmware onto your PC, and extract the file called boot.img from it.
- Place the boot.img on your phone’s storage, and launch Magisk Manager.

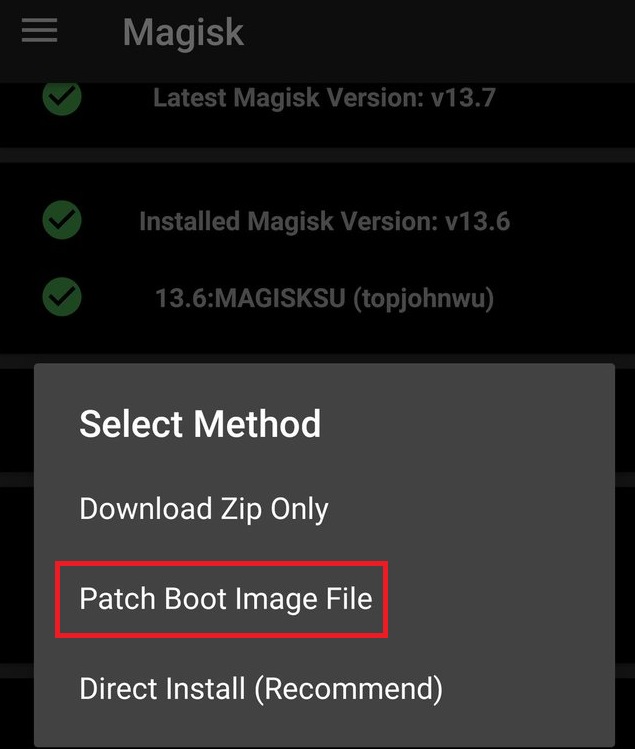
- In Magisk, tap Install > Patch Boot Image File, and choose the boot.img file on your device’s storage.
- When it is done, you will have a new file on your device called magisk_patched.img. Transfer this back to your PC, and place it in your main ADB folder.
- Reboot your Moto Edge+ into fastboot mode and launch a new ADB window.
- In the ADB terminal, type:
fastboot flash boot magisk_patched.img
- After it has successfully flashed the patched boot.img, you can reboot your phone back to Android with:
fastboot reboot
- Launch the Magisk Manager app to verify that you have root status.
Reactivate Moto Edge+ fingerprint scanner after root
- Launch your phone app and dial *#*#2486#*#*
- This will launch a CQA testapp. Allow all requests from it.

- Tap on CQA-Test in Menu Mode > Sensor > G5SPMT Test
- Start the test. It will ask you to place your finger over the fingerprint scanner.
- Next it will ask “Put the Black Flat”, so lay your device down flat to cover the fingerprint scanner and tap next.
- Next it will ask “Put the Flesh Chart Flat”, you can press your fingernail or something against the sensor. It may give an error code, but you should be able to create a new fingerprint in your security settings.


