How to Stop Google Chrome from Opening on Startup in Windows?
Is Google Chrome launching automatically every time you start your Windows computer? This can be frustrating, especially when it slows down your startup process. Fortunately, you can stop Chrome from opening on startup with a few simple steps. In this guide, we will walk you through multiple methods to prevent Google Chrome from launching automatically, ensuring your system starts up faster and only runs the programs you need.
Note: All the methods below can be replicated on Chromium-based browsers.
Method 1: Disable Chrome’s Startup Entry
- Press Ctrl + Shift + Esc to open the Task Manager directly.
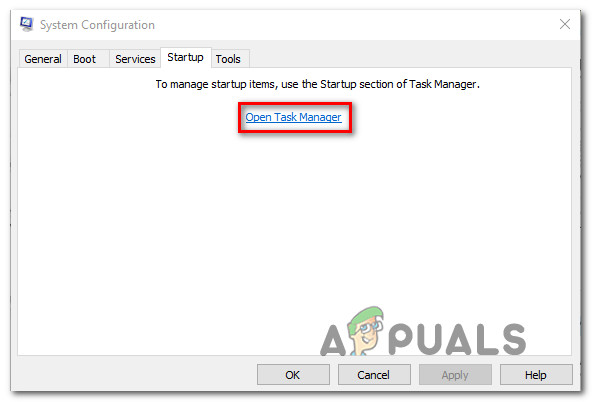
- Click on the Startup tab.
- Scroll down to Google Chrome, right-click it, and select Disable to prevent it from launching at the next system startup.
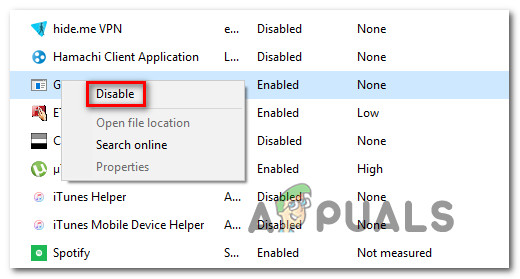
Right-click Google Chrome in the Startup tab and select ‘Disable’ to prevent it from launching automatically - Close the Task Manager.
Method 2: Disable Chrome from Running Apps in Background
If you’re not actually seeing Google tabs popping up automatically but you know that a Chrome background process is running because you see that your system resources are kept busy, you can resolve the issue very easily by preventing the browser from running background apps when it’s closed.
- Open Google Chrome.
- Click the menu button (three vertical dots) in the top-right corner.
- Select Settings.
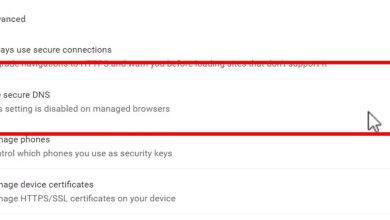
- Scroll to the bottom and click Advanced.
- Find the System section and toggle off Continue running background apps when Google Chrome is closed.
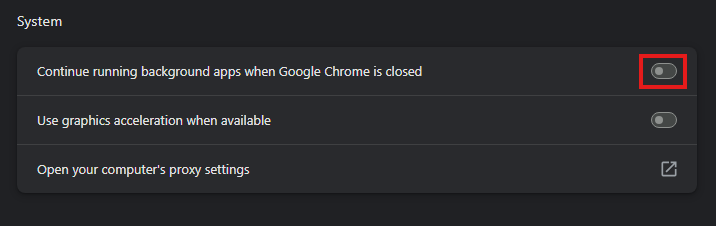
Locate the ‘Continue running background apps when Google Chrome is closed’ toggle switch and turn it off in Chrome’s Advanced Settings. - Restart your computer to ensure changes take effect.
Method 3: Delete Startup Entry from Registry
In most cases, the reason why Google Chrome insists on auto-starting even when instructed to do otherwise is likely caused by one or several Startup Approved items from Google Chrome AutoLaunch.
Chances are your Google Chrome AutoLaunch folder contains some websites enforced by some PUPs (Potentially Unwanted Programs) that try to redirect to certain websites.
- Press Windows key + R, type “regedit”, and press Enter to open Registry Editor. Click Yes when prompted by UAC.
- Navigate to:
Computer\HKEY_CURRENT_USER\Software\Microsoft\Windows\CurrentVersion\Explorer\StartupApproved\Run
(You can also paste this location in the navigation bar and press Enter).
- In the right pane, inspect any unrecognized items. Right-click > Delete for Google Chrome.
- Next, go to:
Computer\HKEY_CURRENT_USER\Software\Microsoft\Windows\CurrentVersion\Run
- Close Registry Editor, restart your computer, and check if Google Chrome stops opening automatically.
Delete any unrecognized or Google Chrome entries under the specified registry paths to stop Chrome from opening automatically
Hello Kevin.
Thank you very much for this text. I watched many videos and read a lot of “how to” texts at internet, but yours is the best and the most complete I found. I tried all methods you gave, except the last one and 6th worked (task killer…). Keep it up!