How to Show Network Icon on Taskbar in Windows 7, 8 or 10
You might wonder where the network connection icon in your notifications tray went. When this happens, you usually have an internet connection but can’t see the Wi-Fi signal bar, Ethernet icon, or connection status icon. Sometimes, you can’t access the internet, and there’s no icon to access the Network and Sharing Center.
This can be caused by several reasons: the network connection status icon is missing, the network service isn’t running, or an issue with Windows Explorer. In most cases, the missing icon can be brought back by enabling it in the notification tray settings. If that doesn’t work, try the other methods in this guide.
Method 1: Enabling the Networking Icon in the Notifications Area
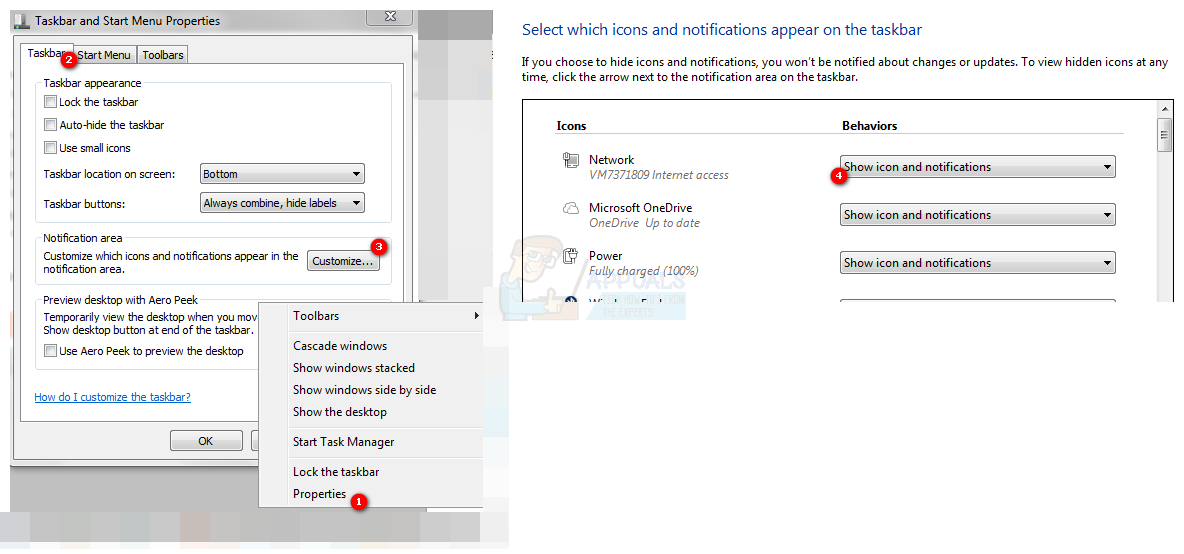
Windows 7:
- Right-click on the taskbar and choose Properties.
- In the Taskbar tab, find the Notification Area section and click on Customize.
- Select Turn system icons on or off.
Make sure the Network option under Icons and Behaviors is set to Show icon and notifications. - Find Network under System Icons and choose On from the Behaviors drop-down menu.
- Click OK to finish.

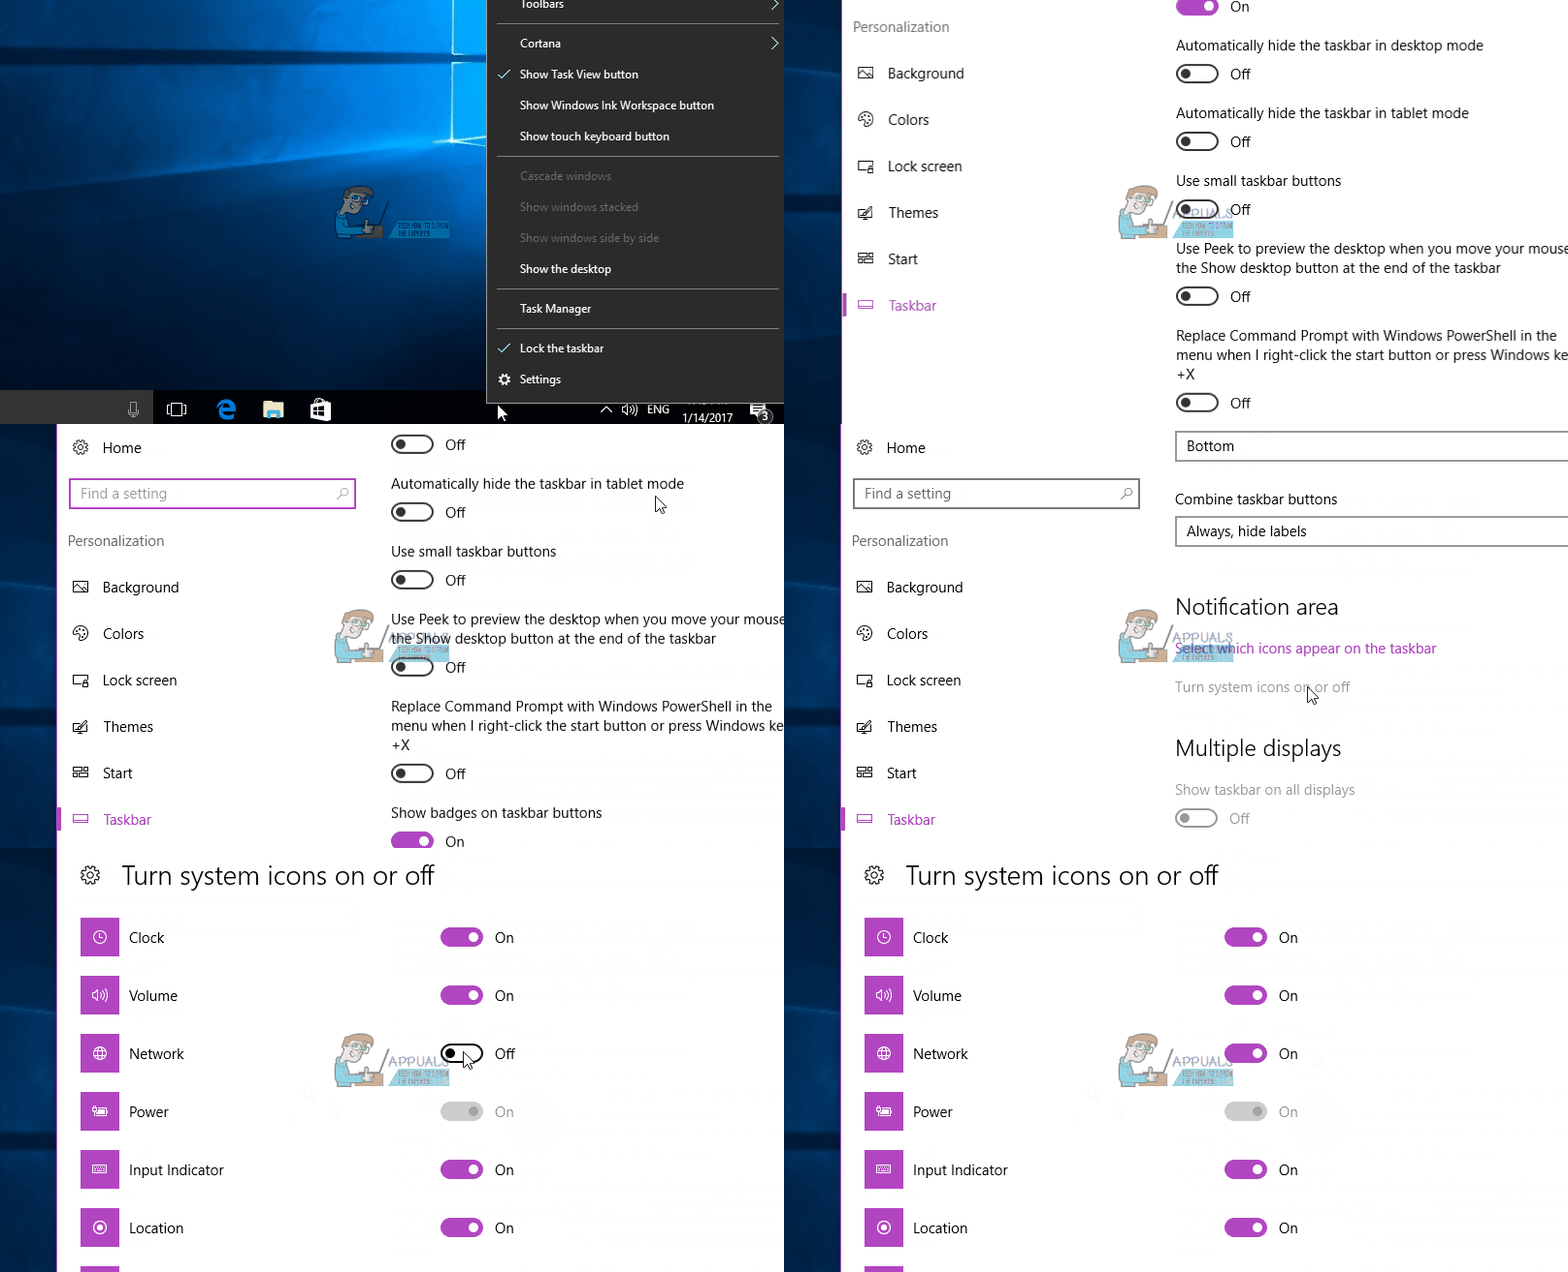
Windows 8 / 8.1 / 10:
- Right-click on the taskbar and choose Settings.
- Scroll down until you find the Notification area section. Click on ‘Turn system icons on or off’.
- Locate the option for Network and toggle the switch next to it to on.

Method 2: Restarting the Network Services
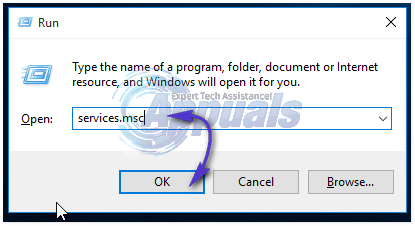
- Press Windows + R, type ‘services.msc’ and hit Enter

- Look for the following services:
Remote procedure call - This service must be started for other services to work.
Network Connections - This service depends on RPC to work
Plug and Play
Com+ Event System - This service depends on RPC to work
Remote Access Connection Manager - This service depends on Telephony to work
Telephony - This service depends on RPC and the PnP services to work
- Ensure these services are started by right-clicking the service name and clicking Start.
Method 3: Restarting Windows Explorer
- Open Windows Task Manager by pressing Ctrl + Shift + Esc on your keyboard, or by right-clicking the taskbar and selecting ‘Task Manager’.
- Go to the ‘Processes’ or ‘Details’ tab and look for ‘Explorer’ or ‘explorer.exe’.
- Right-click on ‘Windows Explorer’ or ‘explorer.exe’, then click on Restart. (For Windows 7, click on ‘End Process’ instead).
- In Task Manager, click on File > Create New Task or New Task.
- Type “explorer.exe” into the field and press Enter.

Method 4: Resetting the Icon Cache
- Right-click on an empty space on your desktop.
- Select Display Properties from the menu.
- In the Display Properties window, locate the option for Color Quality.
- Change the Color Quality setting from 32 bit to 16 bit.
- Click the Apply button to save the changes.
- Now, change the Color Quality setting back to 32 bit.
- Click Apply again.
- Restart your computer to apply the changes.
Method 5: Using the Registry
Proceed with this step only if you’ve tried the earlier methods or you’re conversant with the Windows registry.
- Press Windows + R to open the Run dialog box, type ‘regedit‘, and then press Enter. This will open the registry editor.
- In the registry editor, navigate to the following registry key:
HKEY_LOCAL-MACHINE\SYSTEM\CurrentControlSet\Control\Network
- Under this key, locate the Config entry, right-click on it and delete it. Don’t panic if you don’t see this entry; it’s perfectly fine.
- Restart your computer. When your computer reboots, the Config entry will be automatically re-created.
If you don’t see Config, ignore this method because it is for those who have their settings customized manually or by a third-party program.
Method 6: Forcefully Restarting Explorer.exe and Changing Registry
If none of the above methods work, as a last resort, try deleting some registry keys and force restarting Explorer.exe from the command prompt.
- Press Windows + R to open the Run dialog box.
- Type ‘command’ and press Enter.
- In the search results, right-click on “Command Prompt” and select ‘Run as administrator’.
- Execute the following commands one by one in the Command Prompt window:
REG DELETE "HKCU\Software\Microsoft\Windows\CurrentVersion\Policies\Explorer" /V HideSCANetwork /F

REG DELETE "HKLM\SOFTWARE\Microsoft\Windows\CurrentVersion\Policies\Explorer" /V HideSCANetwork /F

taskkill /f /im explorer.exe

start explorer.exe
- Check if you can now access the network icon to see if the issue is resolved.