How to: Root Nvidia Shield Android TV
The nVidia Shield TV is a top of the line android TV set that works for both home entertainment and gaming, it is big on both performance and looks, Powering it is a 1.9 ghz octa core processor and a 3GB of RAM, it can output a whopping 4K Resolution content to your TV through the HDMI output, Shield TV comes with either a 16GB SSD or a 500 GB HDD storage and extra external storage can be accessed from the SDCX slot. It has a plethora of features such as USB 3.0 ports, gigabit Ethernet, IR blaster for remote controlling, dual band Wi-Fi and bluetooth 4.1, It was released in May 2015 and it is the third generation Shield hardware device. Today we are going to show how to root your shield tv, once rooted you can use ad blocking, have a custom recovery for backups and all necessary features, flash custom cyanogens mod ROMs and use Xposed modules. Rooting your shield TV gives you an overall freedom of choice in using it the way you like.
Please note that during this process all your data will be lost (The ones on the internal storage, not the external storage data) so you should take necessary backups of all your data.
Before you start rooting, you will need these:
- Your Shield connected to a TV.
- A laptop with internet connection and a USB port
- A USB cable
- These files downloaded to your PC ( Shield PC drivers, Super SU , TWRP recovery , Minimal adb and fastboot )
- A USB mouse
Firstly on your computer install the minimal adb and fast boot .exe file you downloaded , and then extract the Shield drivers to your desktop, Extract the TWRP recovery image to your fast boot and adb folder which is usually c:\program files(x86)\Minimal ADB and Fast boot\ and copy the Super SU zip file into the same folder. On your shield TV enable the developer mode (Go to Settings ->About-> Build, tap 7 times until your are presented with a you are a developer message, now close the settings screen and reopen it, you will find a Developer menu which you will need to press on and search for ‘Enable ADB debugging and press on that to enable, a popup should appear asking for this PC’s authorization. Allow it) Now use the USB cable to connect the Shield TV to your PC, go to your adb and fastboot folder and launch the program, type in “adb devices” and see if the Nvidia shield appears.
Note: If the Nvidia shield did not appear you will need to update its drivers, go to the Desktop and right click on my computer then click on ‘Device manager’, Find the Yellow (!) ADB device, right click on it and select Update Driver, Browse to your desktop (where you should habe your Shield Family Drivers folder) and point to it, install the drivers.
Now go to your minimal ADB and fast boot DOS box and retype “adb devices” it should appear. Type in ‘ adb reboot bootloader’, the shield TV should now be rebooting to a boot loader screen, Type in ‘Fastboot devices’, if you see your android tv skip this note.
Note: If it did not appear, repeat the same process above, but instead of seeing a Yellow (!) ADB you will see a yellow (!) that mentions FASTBOOT, update the drivers using the same method and recheck that your TV is well connected by retyping ‘Fastboot devices’
Type in ‘fastboot oem unlock’ and hit enter, you will see a please wait message appearing on the Shield TV screen, this process will take several minutes on the 16GB version and up to two hours for the 500GB version, so please be patient during this process.
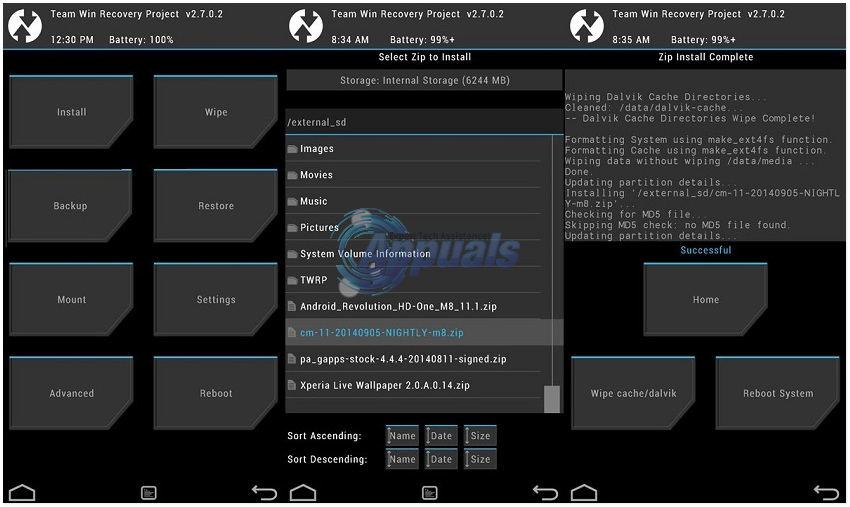
Once the boot loader is unlocked reboot your Shield TV and return to the main screen, you will need to Re enable Developer options and USB Debugging, the process is mentioned above in braces. Once you re enable them return to your minimal adb and Fast boot window and type in “adb push supersu.zip /sdcard/” and you should see a text that mentions that the file was copied correctly, Next type in “adb reboot bootloader” and hit enter, you should see the Shield TV rebooting into boot loader mode. Now we will flash the TWRP recovery image, type iin ‘fastboot devices’ and check that the Nvidia shield is correctly connected, next type in ‘fastboot flash recovery twrp-shieldtv.img’ and hit enter, for this method to work you will need to be on Version 1.4 update, if you have 1.3 you can do a temporary reboot in TWRP using ‘fastboot boot twrp-shieldtv.img’ and then select Boot Recovery Kernel in the fastboot menu, on your TV you should see a TWRP recovery screen like this one (although scaled to your TV)
if you are asked if you want to preserve the Read only, Allow it, now plug in your mouse to your shield TV and install super user by pressing ‘install’, Navigate to your /sdcard/ on which you put the supersu.zip before, select the zip file and swipe to flash, once the flashing is done reboot your system from the TWRP menu, if you are asked to restore the root or anything similar press NO. Once rebooted (first reboot can take some time) run your supersu application from the application menu and update the binaries if it asks you to, use Normal. Your shield TV is now rooted and ready! Congratulations!
when i try this it asks me to confirm in shield but i cant use buttons