How to Recover a Soft Bricked Google Pixel 3 XL
If your Google Pixel 3 XL somehow became soft-bricked, and your bootloader has already been unlocked, we have the perfect guide for bringing it back to life.
Please make sure you know the difference between a soft and hard brick. A soft brick is corrupted software – typically a root procedure gone bad (surely not by following our Pixel 3 XL unlock and root guide), or other software malfunction. Your device will typically refuse to boot into Android, but you can still get into the recovery mode.
A hard brick is when your device refuses to turn on at all, due to a hardware problem. With that out of the way, if your Pixel 3 XL is experiencing a soft brick, follow our guide for bringing it back to life. Please be aware this guide requires your bootloader has already been unlocked! If your bootloader was not previously unlocked and you have no working recovery mode, this guide will be no help to you!
Requirements
- Latest Google USB driver
- Latest ADB & Fastboot (see Appuals guide How to Install ADB on Windows)
- Latest Pixel 3 XL factory image
- Start by downloading and installing the Google USB driver. Extract the .zip, and in the extracted folder, right click “Android Bootloader Interface” and choose “Update Driver”.
- Choose “Search Local Computer” and “Let me pick from a list of available drivers on my computer”. Then un-check the box for “Show compatible hardware”, and choose “Android ADB interface” followed by “Have Disk”.
- Choose the .inf file located in \latest_usb_driver_windows\usb_driver in the extracted folder.
- Now choose the file “android_winusb.inf” and click Open > OK > Next > Install.
- This will completely update the Android Bootloader interface. If you already have ADB & Fastboot on your PC, it will update that as well. This is necessary because older ADB versions don’t work nicely with Android 9 Pie.
- Now download the latest version of ADB & Fastboot, and extract the .zip to your C:\ (important). Allow it to overwrite if you already have a C:\platform-tools. Remember, we are completely updating everything important for the latest Android Pie.
- Now download the latest Google Pixel 3 XL factory image. Extract it on your PC.
- Navigate to the second subfolder – it should be named something like “crosshatch-pq1a.181205.006”, depending on the version. Either way, its two subfolders deep.
- Now copy all of the contents from your C:\ platform-tools folder into the crosshatch folder.
- Power off your Google Pixel 3 XL, let it sit for half a minute.
- Press and hold Power + Volume Up to get into the bootloader, and immediately release the hardware buttons.
- Plug your Pixel 3 XL into your PC via USB, and your PC should immediately recognize and load the drivers.
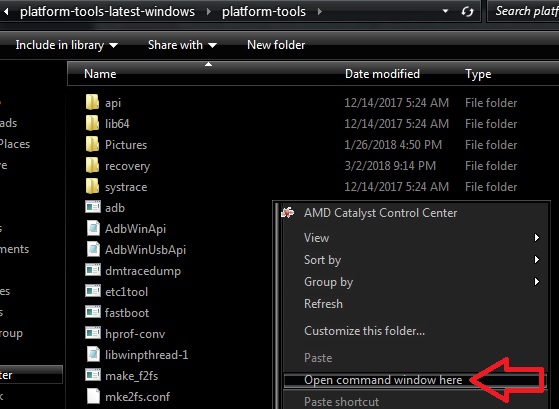
- Hold Shift + right click inside the crosshatch folder with all the ADB files, and choose “Open a Command Window here”.
- Type the following commands in the ADB terminal:
fastboot erase system_a
fastboot erase system_b
fastboot erase boot_a
fastboot erase boot_b
fastboot reboot-bootloader - Now launch the flash-all.bat file. You might get a pop-up warning, just click “Run anyway”.
- Now wait around 10 minutes for the script to fully do its job. You’ll know it is done when your Pixel 3 XL reboots itself.


