Ultimate Google Pixel 3 Unlock and Root Guide
The Google Pixel 3 is the latest device in the Pixel lineup from Google, and its one of the best pure Android experiences available. In this Appuals guide, we are going to show you how to root and unlock the Pixel 3 using a variety of methods you can choose from – we will also show you how to flash custom kernels, and some additional recommendations.
This guide is for the Pixel 3 and Pixel XL, with an aim towards the November 2018 Security Patch, though the downloads for each device may be different. This guide is not intended for the Pixel / Pixel XL / Pixel 2 / Pixel 2 XL phones! Proceed at your own risk!
Requirements
- The latest Android 9.0.0 (Pie) Factory or OTA image “crosshatch” for Pixel 3 XL
- Factory Image: 9.0.0 (PQ1A.181105.017.A1, Nov 2018)
- OTA Image: 9.0.0 (PQ1A.181105.017.A1, Nov 2018)
- ADB & Fastboot (see Appuals guide How to Install ADB on Windows)
Unlocking the Bootloader
It is highly recommended to backup your data before proceeding, as unlocking the bootloader will erase all of your user data from your Pixel 3 device!
- Enable Developer Mode by going into Settings > System > About Phone > tap Build Number (7 times) until you see Developer Mode has been activated.
- Now go into Settings > Developer Options > enable both OEM Unlock and USB Debugging.
- Connect the phone to your computer via USB cable.
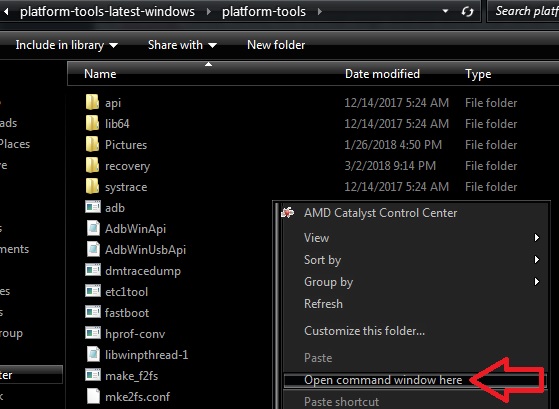
- Launch an ADB terminal (hold Shift + right click in your main ADB folder and choose ‘Open a Command Window here’).
- To make sure your Pixel 3 is recognized by ADB, type in the terminal: adb devices
- This should display your device’s serial number in the output prompt – if it says your device is not recognized, device offline, or displays no device at all, you may need to try reconnecting the USB, or troubleshooting your USB drivers (also accept the ADB pairing dialogue on your Pixel 3 screen).
- If your device is successfully recognized by ADB, type the following command into ADB terminal: adb reboot bootloader
- When your Pixel 3 device boots into Bootloader Mode, you can then type into ADB terminal: fastboot flashing unlock
- Then just follow the on-screen instructions to unlock your bootloader, and remember, all of your user-data will be reset!
- When the process is done, you type into ADB terminal: fastboot reboot
Root Downloads:
- TWRP
- TWRP 3.2.3-1 for Pixel 3 XL by Dees_Troy
- TWRP 3.2.3-1 for Google Pixel XL
- twrp-3.2.3-1-crosshatch.img – Download to your computer
- twrp-pixel3-installer-crosshatch-3.2.3-1.zip – Download to your phone
- Magisk – Download to your phone
- [2018.10.22] Magisk v17.3 – Root & Universal Systemless Interface
[Android 5.0+] by topjohnwu - The latest Magisk Uninstaller
- Custom kernels – Download to your phone
- [KERNEL]Despair Kernel by DespairFactor
- [Kernel][21.11.2018][4.9.138] Kirisakura 1.7.2 for Pixel 3/XL aka Bluecross by Freak07
- [Kernel] HTML5 Kernel by _LLJY
- [KERNEL]P3XL[4.9.137]Franken by dabug123
- [KERNEL] [November 20] Pixel 3 XL ElementalX 1.01 by flar2
- KERNEL ❯ PIXEL 3/XL ❯❯❯ Proton Kernel • v2 • November 18 by kdrag0n
- Kernel Managers – Download to your phone
- EX Kernel Manager
- FK Kernel Manager
Root Pixel 3 with Magisk, Pass SafetyNet with TWRP
Important: Set a security PIN before installing TWRP (Settings > Security & location > Screen lock > PIN).
- Reboot your Pixel 3 to the Bootloader as we showed you in the unlocking guide above.
- Connect your USB cable and launch an ADB terminal.
- Copy twrp-3.2.3-1-crosshatch.img to the platform-tools folder (ADB) folder and rename it twrp.img, and also copy the TWRP installer.zip to your SD card.
- In the ADB terminal type: fastboot boot twrp.img
- When TWRP boots, disconnect the phone from your computer.
- If requested, swipe to allow modifications.
- Tap ‘Install’ and select twrp-pixel-installer-marlin-3.2.3-1.zip, swipe the slider to install.
- After TWRP has successfully flashed, choose ‘Reboot Recovery’.
- If you are re-rooting your Pixel 3, tap Install, select Magisk’s uninstaller.zip, and swipe the slider to install.
(Optional) If You Will Install a Custom Kernel
Despair
- Tap Install, select Despair R7(Pie).zip or Despair RB7(Boost).zip
- Tap Add more Zips, select Magisk-v17.3.zip – BETA
- Swipe Slider to Install
- Save Log
- Reboot System
Kirisakura_Bluecross
Note: You can install this kernel with ElementalX or Franco’s Kernel Manager. If you flash the kernel zip with ElementalX or Franco’s Kernel Manager, do not reboot automatically afterwards. Launch the Magisk Manager App and flash magisk.zip.
- Tap Install, select Kirisakura_Bluecross_1.7.2_Release.zip
- Tap Add more Zips, select Magisk-v17.3.zip – BETA
- Swipe Slider to Install
- Save Log
- Reboot System
HTML5
- Tap Install, select HTML5_V52.zip
- Tap Add more zips, select Magisk-v17.3.zip – BETA
- Swipe Slider to Install
- Save Log
- Reboot System
Franken
- Tap Install, select FrankenKernel.P3XL.R2.zip
- Tap Add more Zips, select Magisk-v17.3.zip – BETA
- Swipe Slider to Install
- Save Log
- Reboot System
ElementalX
- Tap Install, select ElementalX-P3-1.01.zip
- Tap Add more Zips, select Magisk-v17.3.zip – BETA
- Swipe Slider to Install
- Save Log
- Reboot System
Proton
- Tap Install, select ProtonKernel-pixel3-v2.zip
- Tap Add more Zips, select Magisk-v17.3.zip – BETA
- Swipe Slider to Install
- Save Log
- Reboot System
If You Will Not Install a Custom Kernel
- Tap Install, select Magisk-v17.3.zip – BETA
- Swipe Slider to Install
- Save Log
- Reboot System
Root/Reroot with Magisk – Pass SafetyNet with T.W.R.P, without installing it
Do not download twrp-pixel3-installer-crosshatch-3.2.3-1.zip!
- Reboot to Bootloader.
- Connect the phone to the Computer with USB cord.
- Copy twrp-3.2.3-1-crosshatch.img to the platform-tools folder or folder that has fastboot in it and rename it twrp.img.
- Open an ADB terminal on your computer.
- At the ADB terminal type: fastboot boot twrp.img
- When TWRP boots, disconnect the phone from computer.
- Swipe to allow modifications.
- If you are rerooting, tap Install, select Magisk’s uninstaller.zip, Swipe the slider to install.
Root/Reroot with Magisk – Pass SafetyNet With patched_boot.img
Note: This method requires you have extracted and patched your boot.img!
- Use a File Explorer to extract the boot.img from the Factory Image.
- Extract the Factory Image file (crosshatch-pda1a.999999.999-factory-99a9a99a.zip) to a folder.
- Open the folder and, extract the Image file (image-crosshatch-aa9a.999999.999.zip).
- Copy the boot.img to your SD card.
- Activate Developer Mode.
- Install latest Magisk Manager APK.
- Launch Magisk Manager and go to Settings.
- Set the update channel to the version of Magisk you are going to install, for example, Magisk-17.3.zip – set the channel to Beta, Magisk-17.4.zip – set the channel to Canary, etc.
- Connect to mobile data or WiFi.
- When you see the Install prompt, tap Install until you see ‘Patch Boot Image’. Tap Patch Boot Image.
- Select the boot.img you extracted from the latest Factory Image
- When it finishes, copy the patched_boot.img to your main ADB folder.
- Reboot your Pixel 3 to the Bootloader Mode.
- Open an ADB terminal on you computer and type: fastboot flash boot –slot a patched_boot.img
- When it finishes, type: fastboot flash boot –slot b patched_boot.img
- Reboot your Phone.
Returning Pixel 3 to Stock and Re-Locking Bootloader
Warning! Do not re-lock your bootloader until after you have already returned your Pixel 3 to stock!
Return Phone to Stock
- Backup your data
- Backup your data/Internal storage
- Settings > System > Advanced > Reset Options > Erase all data (factory reset)
Lock Bootloader (Google Pixel 3 XL)
- Reboot to Bootloader.
- Open an ADB terminal and type this at the prompt: fastboot flashing lock
- You should see a request for confirmation on your phone, use the volume keys to scroll and the power key to select.
- Allow the process to complete, then type this at the ADB terminal: fastboot reboot
- Enable Developer Options: Settings > System > About phone > tap ‘Build Number’ 7 times.
- Go to Settings > Developer Options > disable OEM Unlock.
- Install Factory Image keep or wipe data
- Backup your data
- Download the appropriate “crosshatch” factory image for Pixel 3 XL to your computer.
- Extract the factory Image to your ADB platform-tools folder.
If You Will Keep Data
- Open the folder you extracted the factory image to and edit the flash-all.bat file to remove -w from this command: fastboot -w update image-crosshatch-aa9a.999999.999.zip
Warning: If you do not remove the -w, your phone’s data will not only be erased, but also your internal storage! - Reboot to your bootloader and connect your Pixel 3 to your PC via ADB.
- Open an ADB terminal on your computer and type: flash-all
- Reboot your Pixel 3 when the process is complete.


FAILED (remote: ‘flashing unlock is not allowed’) for Pixel 3. Any workarounds,yet?