How to Fix USB Error Digital Signature (Code 52) Error
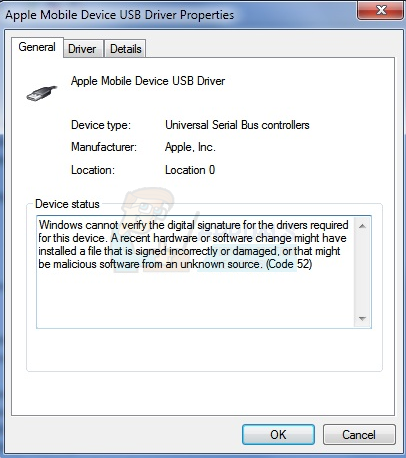
Error Code 52 in either the device manager or DXDiag tells you that Windows can’t verify the digital signature for the drivers for a specific device. You won’t be able to install drivers for the device, and it might just as well stop functioning.
This issue happens for a lot of users, especially with Windows 7. There is no clear root cause for the error, but some users began seeing it after installing a specific update, and the update was different, meaning there are a few of them that might have caused the issue. It basically indicates a driver failure, and Microsoft would recommend either running the troubleshooter or updating the drivers manually.
However, if you’ve ever encountered issues with drivers, you’ll know that the aforementioned solutions seldom work. Fortunately, we have several other strategies for you that should assist in resolving the issue. These have been confirmed to work for a number of users experiencing this problem. The first method is universal, catering to almost any device facing this issue, as does the second one. The final method specifically targets issues with USB drivers. Select the one that most closely aligns with your situation and proceed.
Method 1: Delete the USB Upper Filter and Lower Filter entries (only applies if the problematic devices are the USB drivers)
Here are two registry entries known as UpperFilters and LowerFilters that can cause these types of issues. Oftentimes, deleting them is the solution. However, note that editing your registry can cause numerous problems if done incorrectly, so double-check before proceeding with each step of the method.
- Press the Windows and R keys on your keyboard simultaneously. Type ‘regedit‘ into the Run dialogue window, and press Enter. If you receive a UAC prompt, accept it.
- In the Registry Editor, use the left side navigation pane to navigate to the following folder:
HKEY_LOCAL_MACHINE\SYSTEM\CurrentControlSet\Control\Class\{36FC9E60-C465-11CF-8056-444553540000}
- Find the UpperFilters and LowerFilters. Select one, then from the Edit menu on the top toolbar, select Delete and click OK. Repeat the process for the other value.
- Close the Registry Editor and reboot your computer.
At this point, you have three possible solutions for your problem. However, not each one can be used in all situations, so it is advised that you read through all of them and see which one fits your situation best. Then, go ahead and use it to solve your Code 52 issue.
Method 2: Use an elevated command prompt to disable integrity checks
The issue appears when Windows tries to verify the digital signature and integrity of a device, and disabling that option may allow you to install the drivers for it. The steps are as follows:
- Press the Windows key on your keyboard, then type in. Right-click the result and choose ‘Run as administrator.’
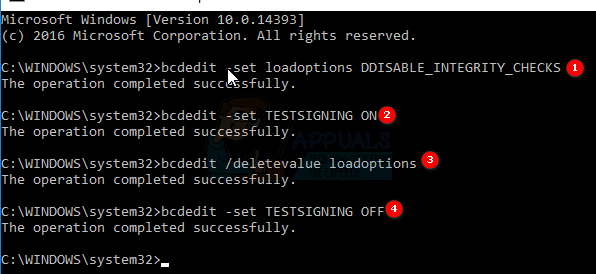
- In the Command Prompt, type in the following commands, and press Enter on your keyboard after each one to execute them:
bcdedit -set loadoptions DDISABLE_INTEGRITY_CHECKS
bcdedit -set TESTSIGNING ON
- If you get a UAC prompt, click YES/ALLOW/OK
If this doesn’t work, there is another set of commands that you can use. Follow step 1 of the method to open the Command Prompt, and in step 2, replace the aforementioned commands with the following ones:
bcdedit /deletevalue loadoptions
bcdedit -set TESTSIGNING OFF
You shouldn’t be getting the Code 52 error at this point, but if you are, proceed with the next method.
Method 3: Disable Driver Signing Checking from the Advanced Boot Options (Windows 8 and 10) Only
This method will let you disable driver signing checking before Windows boots, which can allow you to install the drivers for the problematic devices without Windows checking for the signatures.
- Before Windows starts, repeatedly press F8 or Shift–F8 on your keyboard to access the Advanced Boot Options. If this doesn’t resolve your issue, begin starting your system. Interrupt the process by pressing the Power button to restart it. You may need to do this three or more times until the advanced menu appears.
- Click Choose an Option -> Advanced Options -> Startup Settings -> Restart. After the System Restart choose option 7.

- When Windows boots up, you can try updating the drivers from the Device Manager. The steps to do so are as follows, and you should repeat them for each problematic device, one by one.
- Simultaneously press the Windows and R keys on your keyboard. In the Run dialogue box, type in ‘devmgmt.msc‘, then hit Enter.
- In the Device Manager, find the problematic device. You will recognize it by the yellow exclamation mark next to its name.
- Right-click the device and choose Update Driver Software. Follow the wizard until the driver is installed, and reboot your device if necessary.
- Repeat this process for every device you see an exclamation mark next to.
In method #2 there’s a typo with the command bcedit, should be bcdedit which is shown in the cmd graphic below it.