How to Fix the Twitch Constantly Buffering Error on Windows?
The Twitch buffering problem occurs quite randomly and it occurs even to people with a good Internet connection. Twitch seems to be the only place where users experience constant buffering and it really makes the whole website unusable. If Twitch is the only website you struggle with, this article is for you to check out.
If you are having problems with other websites as well, the problem is probably related to your Internet connection settings and you should look for help elsewhere. Here we have provided several methods which have helped other people deal with the problem so make sure you check them out!
What Causes Twitch to Buffer Constantly on Windows?
If we rule out Internet connection problems as a possible cause, there are still different issues which may affect Twitch without affecting other website or online services. Some causes are more universal than others but it’s nice to check out the list in order to pinpoint your own scenario:
- Hardware acceleration – Hardware acceleration is used to transfer some tasks over to the GPU but it causes problems with video buffering and it should be disabled in this scenario.
- DNS address issues – If your DNS address is to blame for Twitch problems, you can always change it to free ones provided by Google or OpenDNS.
- Browsing data – Accumulation of browsing data is always bad news for the browser and you should clear it as soon as possible.
Solution 1: Disable Hardware Acceleration (Google Chrome Users)
If you are using Google Chrome to connect to Twitch, you might want to consider disabling hardware acceleration in Chrome settings as that simple tweak was able to help plenty of users get rid of the Twitch buffering problem once and for all. Hardware acceleration passes the most graphically intensive tasks over to your GPU in order to speed up your browser. However, it sometimes causes issues such as this one so it’s better to disable it for some time.
- Open the Google Chrome browser on your computer by double-clicking its shortcut from the Desktop or by searching for it in the Start menu.
- Click the three horizontal dots at the top right part of the browser’s window. It should say Customize and control Google Chrome when you hover above them. This will open a dropdown menu.

- Click the Settings option near the bottom of the dropdown menu and scroll down to the bottom of this page until you reach the Advanced button. Make sure you click it.
- Scroll to the bottom of the new page again until you reach the System section. Uncheck the box next to the Use hardware acceleration entry in order to disable hardware acceleration in Google Chrome.

- Make sure you restart your browser by closing and reopening Google Chrome and check to see if Twitch is constantly buffering when you try to watch a live stream!
Solution 2: Change Your DNS Server
The problem is often caused by a faulty DNS setup which is simply not accepted by Twitch or its servers. The problem can be resolved easily by changing the DNS address you use to the ones provided by OpenDNS or Google. This can be done easily using Control Panel so make sure you try this and follow the steps below carefully.
- Use the Windows + R key combination which should open the Run dialog box where you can type ‘cpl’ in the text box and click OK in order to open the Internet Connection Settings item in Control Panel.
- The same thing can also be achieved by manually opening Control Panel. Switch the View by option at the top right section of the window to Category and click on Network and Internet at the top. Click the Network and Sharing Center button in order to open it before trying to locate the Change adapter settings button at the left menu and click on it.
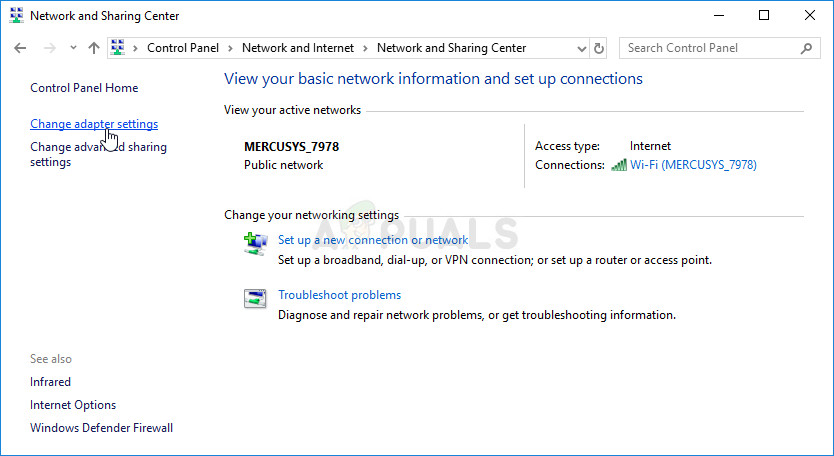
- Now that the Internet Connection window is open using any method above, double-click on your active network adapter (connection you are using to connect to the Internet) and click on the Properties button below if you have admin permissions.
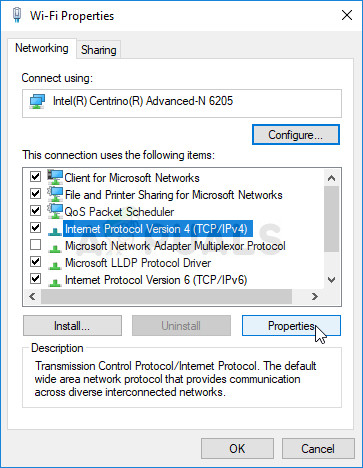
- Locate the Internet Protocol Version 4 (TCP/IPv4) item on the list. Click on it in order to select it and click the Properties button below.
- Stay in the General tab and switch the radio button in the Properties window to “Use the following DNS server addresses” if it was set to something else.
- Set Preferred DNS server to be 8.8.8.8 and the Alternate DNS server to be 8.8.4.4.
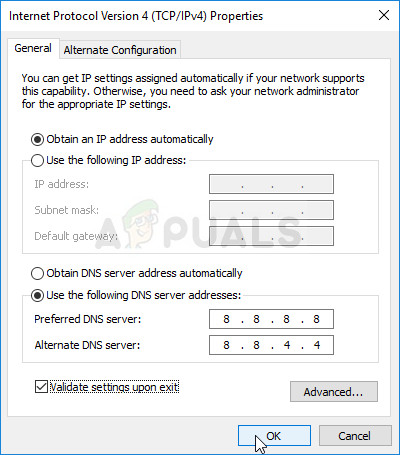
- Keep the “Validate settings upon exit” option checked and click OK in order to apply the changes immediately. Check to see if Twitch keeps buffering constantly!
Solution 3: Clear Your Cache and Cookies
No matter what browser you are using, accumulating cache and cookies is never going to do your browser any good. Too many accumulated data can slow down your browser and cause Twitch to buffer constantly and ruin your experience. This can be resolved rather easily by deleting the accumulated cache and cookies data!
Google Chrome:
- Clear the browsing data in Google Chrome by clicking the three vertical dots in the top right corner of the browser. After that, click on More Tools and then Clear browsing data. In order to clear everything, choose the beginning of time as the time period and select what data you wish to get rid of. We recommend you clear out the cache and cookies.
- In order to get rid of ALL cookies, again click on the three dots and select Settings. Scroll down to the bottom and expand the Advanced section.
- Open Content settings and scroll down to the list of all cookies that remained after you have already deleted them in Step 1. Delete either all cookies you find there.
- Restart your computer again and check if constant buffering still occurs when watching a stream on Twitch.
Mozilla Firefox:
- Open the Mozilla Firefox browser by double-clicking its icon on your Desktop or by searching for it in the Start menu.
- Click on the library-like button located at the upper right part of the browser’s window (left from the menu button) and navigate to History >> Clear Recent History…
- There are quite a few options for you to manage now. Under the Time range to clear setting, choose “Everything” by clicking the arrow which will open the dropdown menu.
- Click on the arrow next to Details where you can see just what will be deleted when you select the Clear history option as the meaning is not the same as on other browsers and it includes all types of browsing data.
- We recommend you choose Cookies before you click on Clear Now. Wait for the process to finish and restart your browser. Check to see if the problem is gone now.
Microsoft Edge:
- Open your Edge browser by either clicking its icon at the taskbar or by searching for it in the Start menu.
- After the browser opens, click on the three horizontal dots located at the top right part of the browser and select Settings. Navigate to the Privacy & security tab inside Settings.
- Under Clear Browsing Data section, click on Choose What To Clear.
- Keep the first four options checked and clear this data. Check to see if the buffering problem persists!