How to Fix Plex Remote Access not Working
Plex is a client-server media stream and software suite. It has a Plex Media Server desktop application which is available on Windows, Ubuntu, and macOS. This applications allows you to organize different media files in your computer and allows players over the internet to access them if given the correct credentials. This is a great feature which has gained a lot of traction over time.
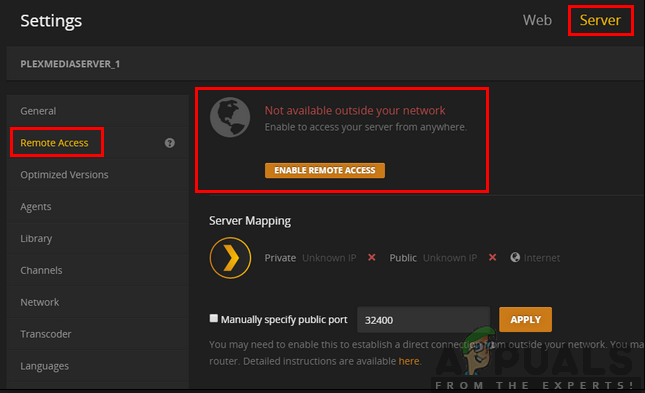
Even though the application is great, it is somewhat complex with a lot of parameters to look out for. This is the reason why several people experience issues where they cannot access Plex or get the error message ‘Plex not available outside your network’. This is a very common issue so there is nothing to worry about.
In this solution, we will go through all the causes as to why this issue occurs and what you can do to solve the error. The solutions are listed according to the increasing order of complexity and usefulness. Make sure you start with the first one and work your way down.
What causes Plex Remote Access not to Work?
We analyzed several different user cases and analyzed their situation. According to the data we gathered and the reports we got, we compiled together a list of causes which might be responsible for the issue:
- NAT/UPnP Compatibility: Either NAT or UPnP (depending on your router model) need to be enabled in order for port forwarding to work properly. If these are not enabled or have different configurations set than required, Plex Remote Access will not work.
- Double NAT: NAT (Network address translation) handles the task of managing all network requests coming into your public IP against all the internal IPs. There are situations where a ‘double’ NAT occurs which causes a lot of issues and causes Plex Remote Access not to work.
- Outdated Plex Version: Plex Media Server releases frequent updates every now and then to fix bugs or introduce new features into the application. There might be cases where your Plex application is outdated, hence, you should update it to make it work right.
- Slow internet connection: Many users reached out to us informing us of the ‘buffering’ issue. This usually occurs if your internet connection is either very slow or is having interference. You might need to look into the network to fix this problem.
- Firewall: There might be instances where your Firewall might be blocking the communication between Plex Media Server. Usually, ‘advanced’ firewalls are responsible for this kind of behavior.
- VPN access required: There are some ISPs who have issues in using media servers like Plex just because of permissions etc. Here you can try using a VPN and see how it goes.
- Glitch: There might be a network glitch at the server side or the service might be down due to network interference. There is nothing more you can do except power cycling your computer.
Solution 1: Updating to the Latest Version
There are many instances where several bugs are induced into the Plex application which causes it not to work as expected. Software all around us get updates every once in a while and sometimes these updates are not compatible with Plex. Hence its engineers roll out an update targeting this issue solely.
If you have an outdated version of Plex Media Server, it is recommended that you update it as soon as possible without any delays. This is very important especially if you are using Plex as a service.
Normally, Plex’s web application updates itself over time as you use it. The case is different in case of Ubuntu or other platforms where Plex is running. Below is the method on how to update Plex on an Ubuntu machine. You can easily google other methods for updating if you have it running on another platform.
- Navigate (here) and find the URL for the latest Plex Media Package.
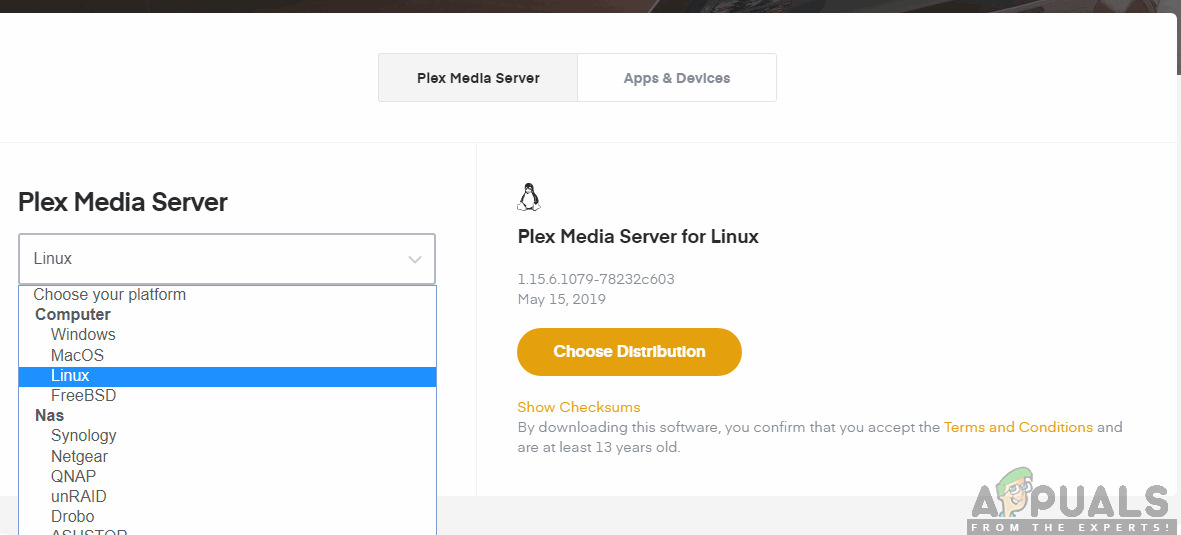
Downloading Latest Version of Plex
Note: In case of Windows desktop application, you can download the installation file to an accessible location.
- SSH into your server. For the following steps, make sure you replace the URLs and packages with the latest release.
- Now run the following command to download the latest package:
wget https://downloads.plex.tv/plex-media-server/0.9.12.4.1192-9a47d21/plexmediaserver_0.9.12.4.1192-9a47d21_amd64.deb
- Next, we will install the package with the following command:
sudo dpkg -i plexmediaserver_0.9.12.4.1192–9a47d21_amd64.deb
- After we are done with the installation, the following command will remove the installation file:
rm plexmediaserver_0.9.12.4.1192–9a47d21_amd64.debrm plexmediaserver_0.9.12.4.1192–9a47d21_amd64.deb
- Restart your machine and try running Plex Media Server. Check if the issue is resolved.
Solution 2: Power cycling for Glitch Resolution
Another interesting scenario which occurs quite frequently is where the server goes into an error/glitched state. This usually occurs because Plex is a heavy application with numerous parameters going on simultaneously. If any one of these gets into an error state or load a bad configuration, it might be unusable.
There are also network related issues which might prevent you from accessing your Plex server from other devices. Now there are two ways we go about this; either you can power cycle your server machine and the target machine or you can wait the issue out for the network to return to its normal state. For power cycling, follow the steps below:
- Turn off both your computers (target and service).
- Take out the power cable of each computer. Now press and hold the power button of each computer for around 4 seconds so all the energy is drained.
Taking out Power Cable of Computer - Now, wait 2-3 minutes before plugging everything back in. Now start your computer again and launch the Plex media server.
- Wait for the server to be initialized properly before checking if this resolved the issue.
Solution 3: Fixing Slow Internet Connection
We came across the issue where the media streamed through Plex Media Server seemed to buffer a lot and caused frustration to users. This scenario usually occurs when your internet connection is not sound which forces the server to use less bandwidth in order to provide access to the media.
The same scenario also applies to the requesting computer; if you do not have a stable internet connection, you will not be able to request and stream media efficiently. First, you should check the number of devices running on your network (both the server and requesting computer). If they are large in number (+6), you might experience a bottleneck condition.
Furthermore, you should also check the overall bandwidth of your connection. It should have decent numbers in order to completely eradicate the buffering issue. You should also consider power cycling your router using the method as in the last solution.
Solution 4: Disabling Advanced Firewalls
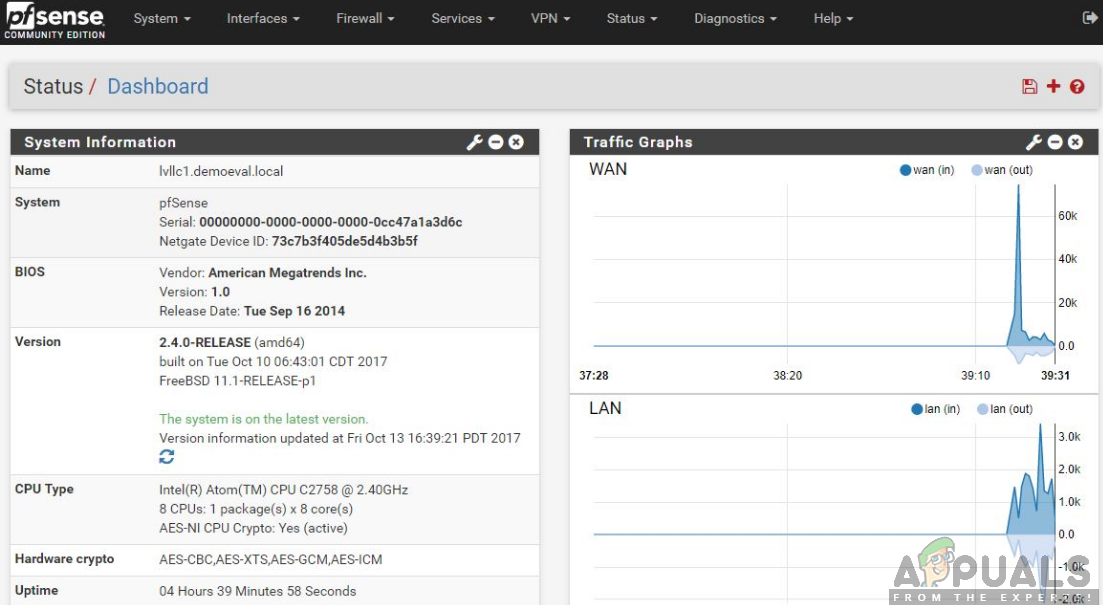
Like mentioned before in the causes, advanced firewalls are notorious for blocking connection streams which are sent by Plex media server and are necessary in order for it to work properly. These advanced firewalls include pfsense or similar products.
Now there are two ways to bypass this issue; either you can disable your firewall and then try accessing the server or you can make sure that the following IP addresses are not being blocked:
34.245.172.51

34.248.59.52

52.49.250.227

54.171.49.143

63.34.171.72
You can open the settings of your firewall and check each of these IP addresses against the ones which are being screened. If you find any, whitelist them and after restarting Plex and your computer, check if the issue is resolved.
Solution 5: Checking the Automatic Configuration
There are two ways through which you can configure the Plex server; either you can use the ‘automatic’ configuration method where after enabling few options, Plex configures everything itself or you can manually set all the values and parameters.
Since the manual configuration is a little tedious, we will go through the automatic configuration first. Your router should have uPnP or NAT-PMP auto-configured. These settings allow Plex to automatically configure a forwarded port on the router without you having to partake any additional steps. Not all routers have this so follow the method below to check whether it is enabled or not.
- Enter the IP address associated with your router into the address field in your browser (it is something like 192.168.8.1).
- Now navigate to your router settings (settings button might be different for each router).
- Now look for the options of uPnP or NAT-PMP. Make sure that either of these is enabled.

Enabling uPnP - If they are already enabled, disable them, save changes, and then enable them again.
- Save changes and exit. Now restart your computer and check if the issue is resolved.
Solution 6: Manually Forwarding Port
If the port isn’t being forwarded automatically, we have no option other than manually forwarding the port which Plex will use. Usually, the need for manual port forwarding arises when uPnP or NAT-PMP is not enabled on your router. This method is quite straightforward and isn’t as intimidating as it seems. Make sure that you make a backup of all your configurations just in case or note them down before changing anything in case you need to change later on.
First things first, you should make sure that your server’s Local IP Address is Static. When we forward a port, we need to know where we want to forward it. In our scenario, we need to know the local IP address of the computer which is running the Plex Media Server. There are two general approaches to this:
Assign a Static IP to the computer
In this case, we will be manually assigning the network information rather than letting it be automatically configured. Here is the method to set a static IP on your computer:
- Press Windows + R, type “ncpa.cpl” in the dialogue box and press Enter.
- Now a list of all the adapters/networks will come forward. Select the adapter to which you want to set the static IP to, right-click on it and select Properties.
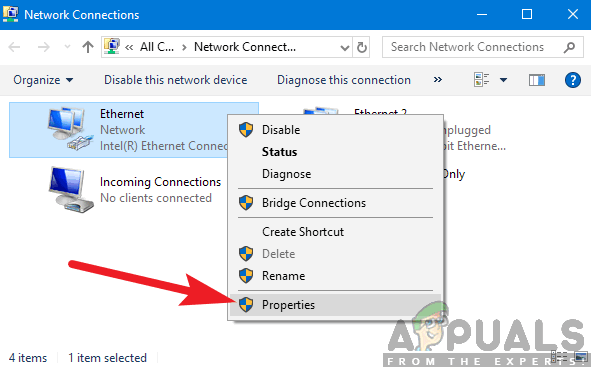
Properties of the selected adapter - When the properties open up, navigate to the option “Internet Protocol Version 4 (TCP/IPv4)”. Now click on the Properties button present underneath it after selecting the option.
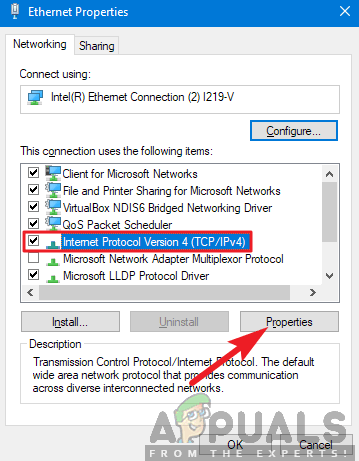
Properties of IPv4 - Now instead of obtaining the IP address automatically, select the option Use the following IP address. Now enter the IP address which you want to be set and also the default gateway which corresponds. Then you can also add the preferred DNS server (mostly use Google’s DNS services as shown below.
Reserving IP in Router
If you prefer to make changes in the router instead of the computer, you can manually reserve an IP in your router. This means that the IP will stay static and there will be no shuffling. Follow the method below to reserve an IP address:
- Open your browser which is connected to the network. Now enter the credentials of your router page (this is usually at the backside of your router like 192.168.9.100).
- You can check the status of ipconfig in a Command Prompt, or head to System Preferences > Network on a Mac.
- Now comes a little technical part; you need to look for DHCP or DHCP reservation settings. Every router has its own different options so you can adjust the solutions accordingly.
- Now we need the MAC address of the server computer (which is hosting Plex). You can easily do that by pressing Windows + S, typing command prompt, right-clicking on it and select Run as administrator. Now type in ipconfig in the dialogue box and press Enter.
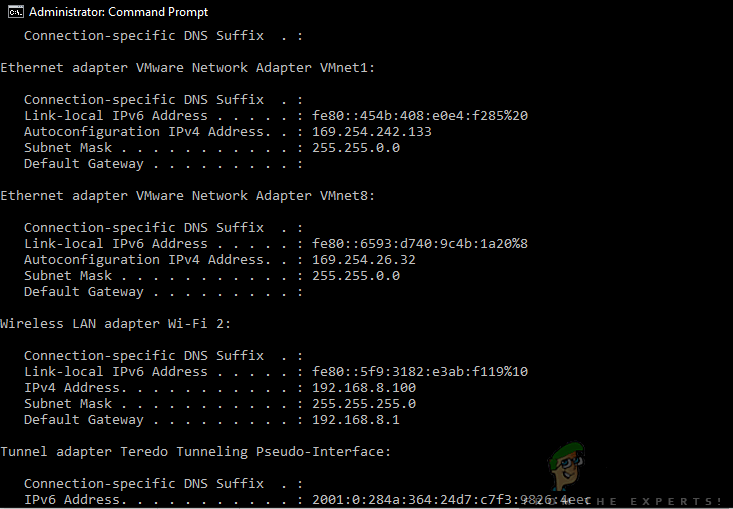
Running ipconfig command in hosting computer - From here you can note down the Mac address of your device. The address will be in 12 digits.
Note: Make sure that you are aware of the fact that the Wi-Fi card and Ethernet port have several different MAC addresses so choose the one which you think is primary.
- Now enter the MAC addresses which you just noted down into the first entry of DHCP Reservation Setting. You can then enter your IP address which you want to reserve and press Apply to save changes.
Forwarding Port in Router
Now that we have made sure that the IP is static, we can move on to port forwarding. Here is the list of variables which are needed to forward the port manually in the router:
- WAN/External Port: Port 32400 (TCP) is the default, but you can generally use any available port in the 20,000 to 50,000 range.
- LAN/Internal Port: This will always be 32400.
- IP Address: The local IP Address of the computer running the Plex Media Server. This is what you did above.
You need to map the WAN/External Port (TCP) which you have chosen so that it points to LAN/Internal Port 32400 (TCP) for the server’s local IP address. Now that you know all the information, you can consult your router or our other articles to forward the port properly.
Setting Plex Media Server to Utilize the Port
Now that we are forwarding the port, we will configure our Plex Media Server to utilize it. To do that, follow the steps below:
- Open the Plex Web Application and make sure that your Plex Account is signed in under:
Settings > Server > General
- Now navigate to the following path:
Settings > Server > Remote Access
- If you don’t see many options available, toggle the Show Advanced
- Now check the Manually Specify Public Port.
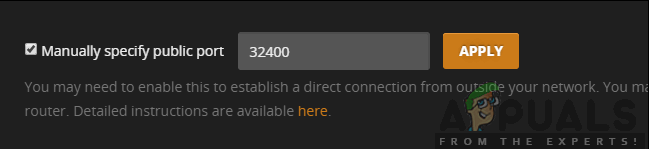
Enabling Manually Specify Public Port option - Now you need to enter the External Port/WAN which we previously set up.
- Now click on the Retry or Apply
Now you can test and check whether the server is accessible without any issues.
Solution 7: Manually Port Forwarding Multiple Servers
The above scenario is perfect and complete if you are only using a single Plex server. However, if you are using multiple servers, the outline will still be the same but some amendments will need to be done. You have to perform the following steps:
- You need to choose unique different port numbers for each of your servers.
Remember that you need to use different external port/WAN for each server connection which you are establishing. For example, you can use the ports 32405, 32404, etc.
- You need to forward the external port number to internal port number/LAN 32400 for the local IP of the corresponding computer which is hosting the Plex Media Server.
Let’s take an example here. Suppose you have two computers from which you are hosting Plex Media Servers. Their internal IPs are the following:
192.168.2.12

192.168.2.22
In this situation, you will configure the forwarding mechanism as:
Server 1

IP Address: 192.168.2.12

WAN/External Port: 32401

LAN/Internal Port: 32400
Server 2

IP Address: 192.168.2.22

WAN/External Port: 32402

LAN/Internal Port: 32400
Solution 8: Enabling Bridge Mode (For Double-NAT Scenarios)
NAT is usually used for sharing an internet connection with more than one computers. It is used in small and large scale alike. If you are manually forwarding port, you might have a conflict of Double-NAT, for example, you have a router plugged into a modem provided to you by your service provider. Here both, the modem and the router are providing NAT services.
Double-NAT basically interferes with the server which is trying to create automatic connections. This might also occur if the public IP assigned to you by your ISP is itself also using NAT services.
Detecting a Double-NAT
Before we start fixing the double-NAT condition, you need to make sure that you even have a Double-NAT. Here, you will need to first look in the settings in your router to which your computer/server is connected to.
Note: Do note that you will be looking at your router’s settings, not your ISPs modem settings.
- Find and note down your router’s External IPv4 address/WAN. You can easily find this in the status page present in your router settings.
- Now navigate to (this) site. Here note down the IPv4 address
If both the IPs don’t match, you don’t have Double-NAT.
If they match, you are probably experiencing it.
Fixing Double-NAT
Fixing a Double-NAT scenario is very easy and straightforward. You will be using the bridge mode in one of the devices so instead of two, only one device is providing the NAT services. There is also the option of setting up a port forward on all the NAT devices so the network requests are properly tailored and sent through.
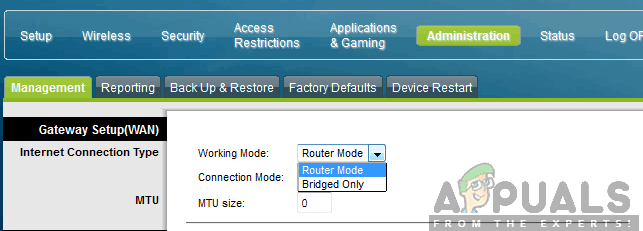
The best and easy solution here is to call your ISP and ask them to set up the Bridge mode for you. You can attempt at doing this by yourself using endless tutorials online but asking the ISP to do it will take less time with no errors.
Note: If you are set in using a Carrier Grade NAT, you might need to ask your ISP to purchase a static IP on your behalf so you can use it.


use the following link from plex, they maintain a live text file of the worker IPs polling server statushttps://support.plex.tv/art…