Antimalware Service Executable High CPU Usage Solved for Windows 11/10
Some Windows users report an issue where the primary Antimalware Service Executable (MsMpEng) unusually utilizes over 80% of the available CPU processing power, particularly on Windows 10 and 11.

What is the Antimalware Service Executable (msmpeng.exe)?
The Microsoft Malware Protection Engine, Msmpeng.exe, is the primary executable for the built-in antivirus program in Windows 10 and 11.
The Antimalware Service Executable, a background program, scans your computer for threats like harmful software, viruses, and worms, and quarantines or deletes them upon detection.
What causes msmpeng.exe to use high CPU?
After investigating, we found the issue originates from several potential factors. Here are scenarios where you may experience unusually high CPU usage due to the MsMpEng component:
- File Corruption Impacting Windows Defender – If excessive CPU usage seems to be due to corruption impacting Windows Defender, start your troubleshooting there. You can choose to use either a third-party repair utility or initiate a repair install to fix the problem.
- The MsMpEng task frequency is excessively high b Many reported cases indicate that this typically occurs when an administrative task related to MsMpEng runs too frequently. To resolve this, utilize the Task Scheduler to decrease the frequency of the task that triggers the MsMpEng process.
- Windows Defender interference – This issue can occur when Windows Defender conflicts with an active third-party antivirus, usually from a smaller, unverified company. It necessitates the forceful disabling of Windows Defender, either via the Local Group Policy Editor or the Registry Editor.
- The antispyware function is activated – Many experts in the Windows 10 community believe the issue could stem from a Registry key remaining disabled, even when Windows Defender isn’t the active antivirus. To solve this, you need to open the Registry Editor and adjust the value data of the DisableAntiSpyware key.
- Internal Windows Defender Conflict – This may sound unusual, but adding MsMpEng.exe to the Windows Defender exclusion list can significantly reduce CPU usage. Many users confirm this solution is particularly effective when Windows Defender is reactivated following a prolonged period of using a different third-party antivirus
- Malware Infection – Ironically, increased CPU usage by the security file MsMpEng.exe could indicate a virus infection. This file could be malware disguised as a system process to access the system’s resources. To confirm, perform a comprehensive scan using a capable anti-malware utility.
- Incorrect Windows update: The history of Windows Defender includes several instances of inaccurate virus definition updates leading to false positives (legitimate files flagged as malware or adware). If you’re confident you don’t have a virus, resolve this by removing the faulty update via an elevated CMD prompt.
- Looping Process Mitigation – This error occasionally occurs when the process mitigation feature unintentionally triggers a relentless Exploit Protection loop. Windows Defender persistently tries to inhibit a folder or program’s activity, leading to high CPU usage due to repeated attempts.
- Windows Defender is inefficient – If all other solutions in this article fail, you can permanently resolve this by using an alternative antivirus. Proceed with this option if you’re ready to leave the built-in Windows Defender suite.
How to Quickly Fix High CPU Usage by Antimalware Service Executable?
Now that we went over every potential cause that might be facilitating this behavior, let’s get to the part where we get to the bottom of this issue and fix it.
Below you’ll find a collection of verified methods that other affected users have successfully used to treat a scenario where the MsMpEng process takes up an unusually high amount of CPU resources.
1. Address system file corruption issues
The first step in troubleshooting this issue is to check for any corrupted system files.
To ensure that, you have two options:
- Proceed with the Windows 10 repair install procedure to efficiently replace all corrupted system files, keeping your applications, games, personal media, and documents untouched.
If you’ve tested the option above and found no system file corruption causing high MsMpEng.exe usage, proceed to the next method.
2. Decrease the frequency of tasks related to MsMpEng.exe.
Many users who are impacted by this behavior report that it is often caused by an administrative task related to MsMpEng running at very frequent intervals.
To resolve this issue, you can use Task Scheduler to reduce the frequency of the task that launches the MsMpEng process.
In order to do this, you’ll need to access the Task Scheduler utility, which is under Administrative Tools. Then, modify the Windows Defender Scheduled Scan task, found under Windows Defender, so that it only occurs either once a week or once a month—based on your preference.
Note: This will help tremendously in scenarios where you are running Windows 10 on a low-end PC with not a lot of CPU processing power available.
For detailed guidance on how to reduce the frequency of MsMpEng.exe tasks, please follow the steps below:
- Press Windows key + R to open up a Run dialog box.
- Next, type ‘taskschd.msc’ inside the Run box, then press Ctrl + Shift + Enter to open up Task Scheduler with admin access.

Opening the Task Scheduler - At the User Account Control prompt, click Yes to grant admin access.
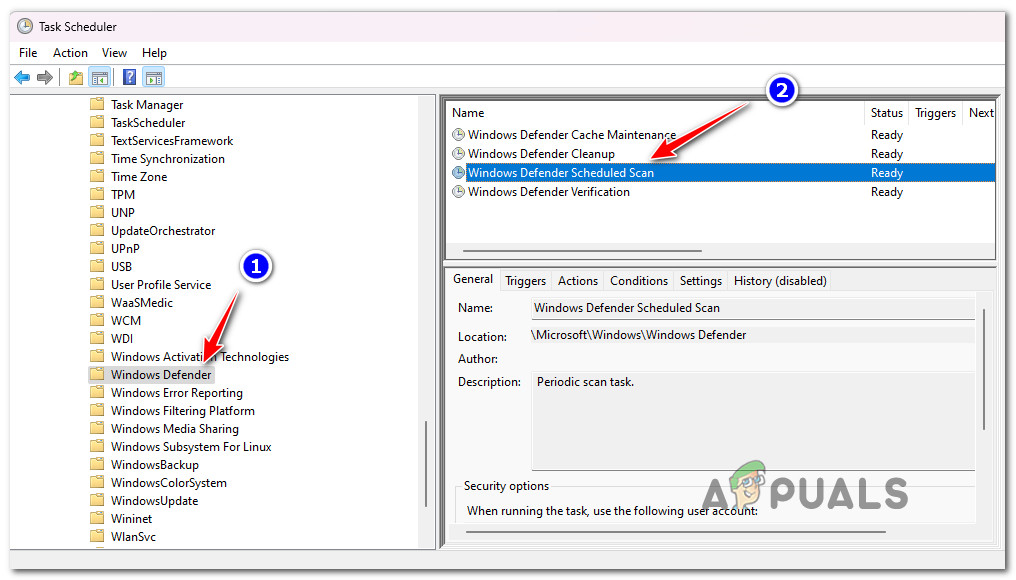
- Once you’re finally inside Task Scheduler, use the side menu on the left to navigate to the following location:
Microsoft > Windows > Windows Defender
- With the Windows Defender folder selected from the side menu on the left, move over to the central pane and double-click on Windows Defender Scheduled Scan.
Accessing the Windows Defender Scheduled Scan - From the Windows Defender Scheduled Scan Properties window, access the General tab and uncheck the box associated with ‘Run with Highest Privileges‘.
- Next, access the Conditions tab and uncheck all the options under Idle, Power, and Network before clicking on Ok to save the changes.
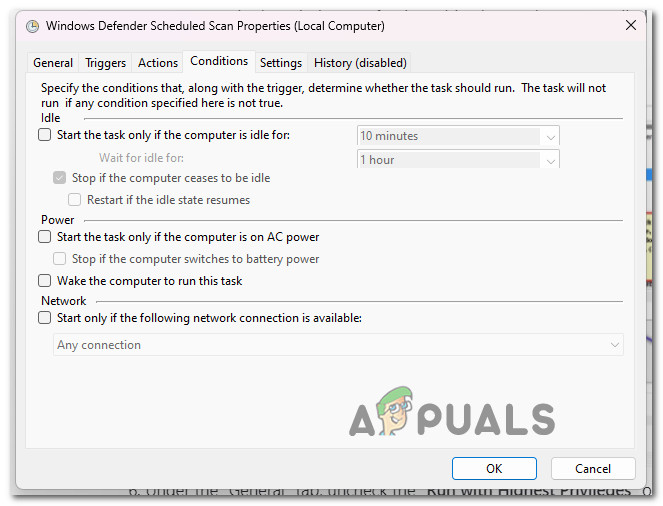
Unchecking all the options Note: Don’t worry as this is only temporary – we will schedule them properly in the steps below.
- Now, let’s move to the rescheduling part. Access the Triggers tab and click on New. Here, choose either the Weekly or Monthly option, as per your preference. Then, choose the Day, click OK, and make sure that the box related to Enabled is checked at the bottom of the screen.
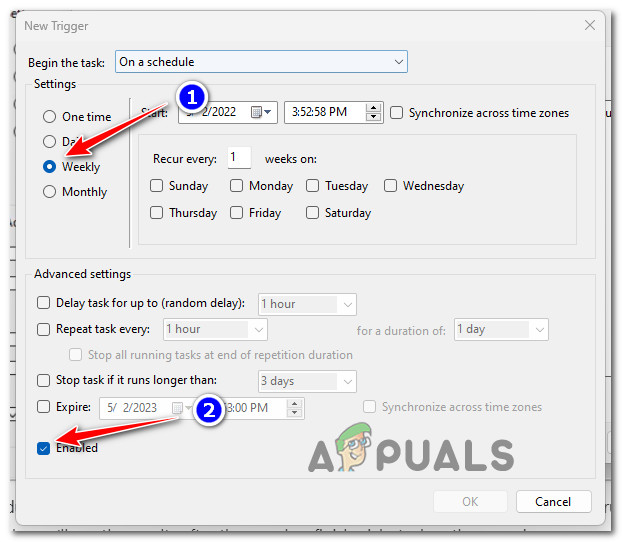
Lessening the frequency of the task Note: This action will reschedule Windows Defender to regulate the scan frequency. If a scan was previously running, you should wait for it to complete. Once finished, you’ll see the results. However, even when the scan runs as per your defined schedule, you may still encounter high CPU usage.
- Repeat the same for the three other schedules – Windows Defender Cache Maintenance, Windows Defender Cleanup, Windows Defender Verification
In case the same problem is still occurring despite the fact that you’ve just reconfigured the frequency of the scan, move down to the next method below.
3. Disable overlapping Windows Defender.
It seems that this problem can also occur when Windows Defender is running at the same time as another third-party antivirus. This often happens when you’re using a security solution from a smaller company that isn’t verified by Microsoft.
In this case, you’ll need to forcibly turn off Windows Defender. The best way to do it is via the Local Group Policy Editor.
Note: This method works on the Enterprise and Pro Editions of Windows 10, as well as more advanced versions of earlier operating systems. If you cannot use the Local Group Policy Editor, then revert directly to the Registry tweak.
Here’s what you need to do in order to disable a potential Windows Defender overlap:
- Press the Windows Key + R. Then, type ‘gpedit.msc’ into the Run dialog box.

Open the Gpedit utility - Next, press Ctrl + Shift + Enter to open up the Local Group Policy Editor with admin access.
- Once you’re inside the home screen of the Local Group Policy Editor, navigate to the following location using the side menu on the left:
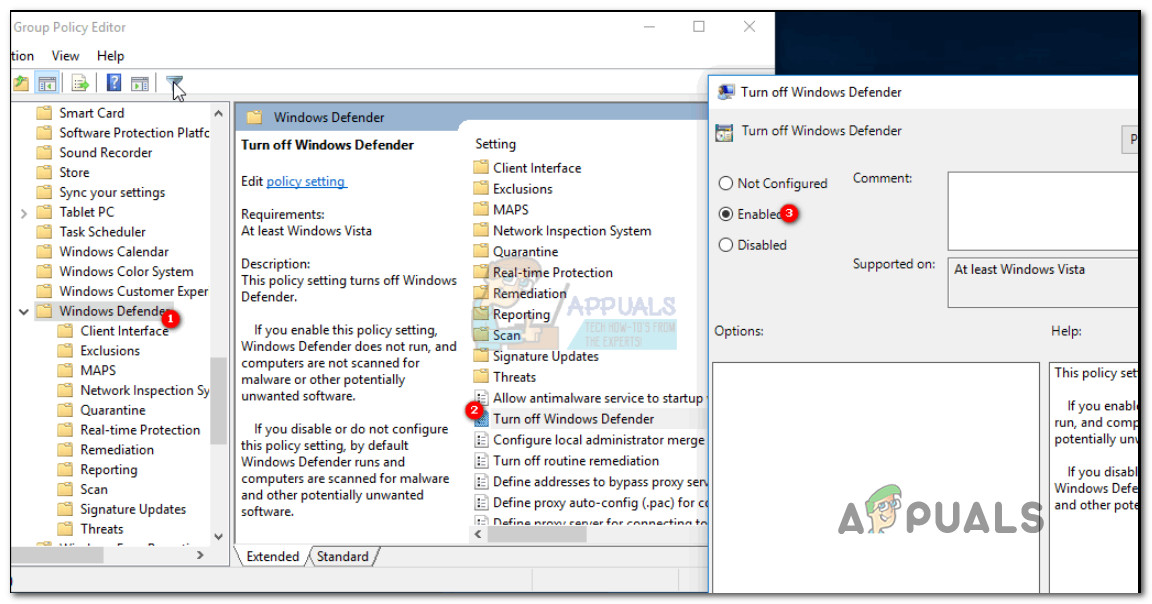
Computer Configuration > Administrative Templates > Windows Components > Windows Defender
- After you’re inside the correct Group Policy path, select “Windows Defender,” then move to the central pane and look for the setting named “Turn off Windows Defender.” Double click it. Select the “Enabled” option to disable Windows Defender. Click “Apply,” followed by “OK.
Disabling Windows Defender via the Local Group Policy Editor - After you do this, the Windows Defender will instantly be Disabled. Now all that’s left to do is perform a simple restart.
- Check Task Manager and you should notice that MsMpEng is no longer appearing among the system processes.
In case this method didn’t work in your case or you’re looking for a different approach, move down to the next method below.
4. Disable the AntiSpyware function.
Insiders of the Windows 10 community say that this issue might be caused by a Registry key that is still disabled even though Windows Defender is no longer the active antivirus.
To fix this problem, you will need to open the Registry Editor and change the value data of the DisableAntiSpyware key.
Note: This method will only work if Windows Defender is currently active as your computer’s antivirus (AV) solution, or if it was recently disabled without being replaced by a different AV suite. Generally, once a new third-party antivirus replaces Windows Defender, the AntiSpyware function of Windows Defender is usually disabled automatically.
To investigate whether this scenario is applicable or not, follow the instructions below to use the Registry Editor to disable the antispyware function if applicable:
- Start by opening a Run box by pressing the Windows key + R.
- Next, inside the Run box, type ‘regedit’ and press Ctrl + Shift + Enter to open up the Registry Editor with administrative privileges.

Accessing the regedit menu - When you see the User Account Control (UAC) prompt, click Yes to grant admin access.
- Once you’re finally inside the Registry Editor, use the menu on the left to navigate to the following location:
HKEY_LOCAL_MACHINE\SOFTWARE\Policies\Microsoft\Windows Defender
Note: You can either navigate to this location manually or you can paste the path above directly into the navigation bar and hit Enter to get there instantly.
- If you are inside the correct location, move over to the right-hand pane and double-click on the registry entry named DisableAntiSpyware.
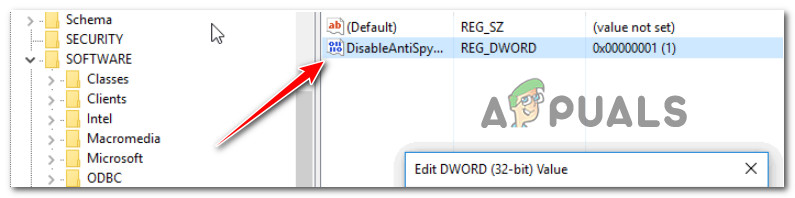
Accessing the DisableAntiSpyware key Note: In case the Registry key is missing from the Windows Defender folder, you can download and apply this registry file on your PC in order to automatically add it to your registry.
- Once you’re inside the Edit World (32-bit) Value window for DisableAntiSpyware, set the Base to Hexadecimal and the Value data to 1 in order to ensure that the Anti Spyware function remains disabled.
- Close the Registry Editor and reboot your PC to implement the changes you just made.
- After your PC boots back up, check to see if you’re still experiencing the same kind of High CPU usage by Msmpeng.exe.
If the problem still persists despite following the above instructions, please proceed to the next method below.
5. Scan for Malware
While it may sound ironic, a high CPU usage by the security file MsMPEng.exe can also indicate a virus infection. The MsMpEng.exe file might actually be malware in disguise, posing as a system process in order to gain access to the system’s resources.
To be sure that this is not the case, you should run a deep scan with a reliable anti-malware program.
There are a lot of options available when it comes to doing this, but our recommendation is to deploy a deep Malwarebytes scan since it’s one of the most robust security scanners that’s just as effective with malware as it is with adware.
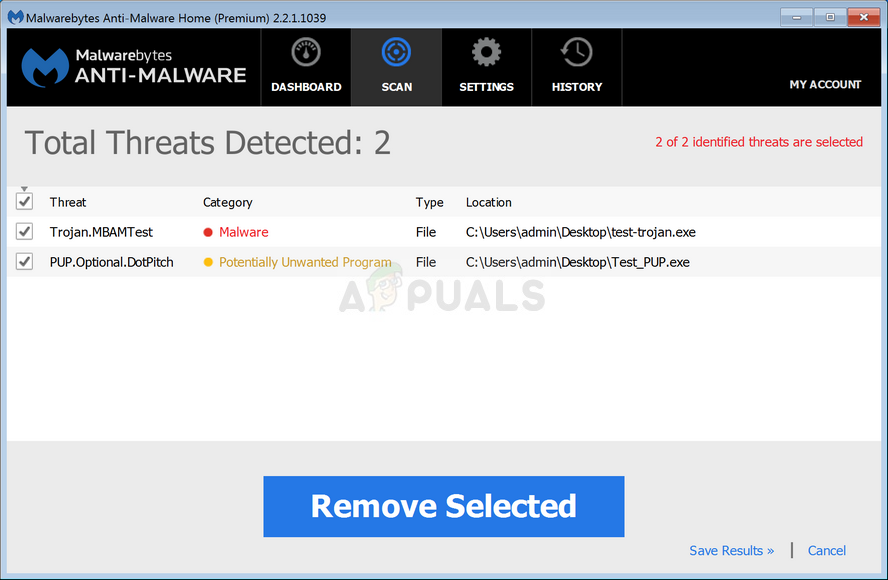
After completing the scan, remove every infected instance as instructed. Then restart your PC and open the Task Manager again (Ctrl + Shift + Esc) to see if the CPU consumption related to MsMpEng.exe has reduced.
If the same kind of issue is still ongoing, move down to the next method below.
6. Adding Msmpeng.exe to the Windows Defender Exclusion list (if applicable)
This could appear to be a strange fix, but a number of users have testified that after they added MsMpEng.exe to the exemption list of Windows Defender, the CPU utilization decreased noticeably.
This will work in cases where Windows Defender was enabled again after a prolonged period during which another 3rd party antivirus was turned on.
Note: Since some malicious programs are known to disguise themselves as the Msmpeng executable in order to avoid being detected by security suites like Windows Defender, there’s also a possibility that Windows Defender (or a different 3rd party antivirus) will end up scanning the file continuously due to a false positive.
If you previously followed Method 5 and ensured that your computer is not infected, you have nothing to worry about and this is probably just a false positive that is somewhat common on Windows 10 (when Windows Defender is being used by default).
If this scenario is applicable, you can simply add the MsMpEng.exe file to the exclusion list, and you’ll notice an immediate reduction in CPU consumption.
Here’s what you need to do:
- Press Ctrl + ALT + Del on your keyboard and open the Windows Task Manager.

Accessing the More details menu Note: If the simple interface opens by default, click on ‘More Details’ to bring up the expert interface.
- In the list of processes, look for the Antimalware Service Executable process.
- Next, once you’re inside the Expert interface, click on the Processes tab, then look for the Antimalware Service Executable (MsMpEng.exe).
- When you see it, simply right-click on it and click on Open File Location to see the full path of the executable. You will see the file MsMpEng highlighted. Click on the address bar and copy the location of this file path.
- Next, hold the Windows Key and press ‘I’. Choose ‘Update and Security’. Then select ‘Windows Defender’ from the left pane. Scroll down and select ‘Add an exclusion’ under ‘exclusion’. Exclude a .exe, .com, or .scr process or FileType. Lastly, paste the path to MsMpEng.exe.
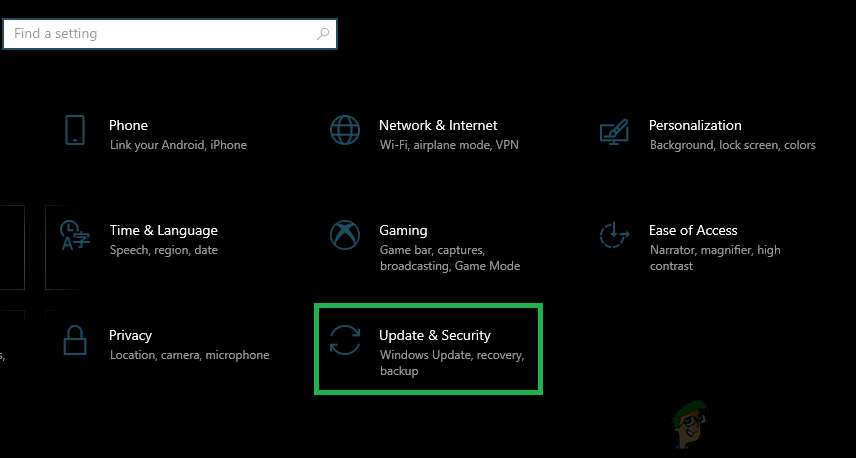
Accessing the Update and Security Menu - Once you’ve done this, restart your PC and see if the CPU resource consumption goes down by a lot after your PC boots back up.
If the resource consumption is still high or Windows Defender is not your active antivirus, move down to the next method below.
7. Reverting a Bad Windows Defender Definition Update
Windows Defender has a long history of bad virus definition updates that can cause false positives. If you’re sure you don’t have a virus infection, you can remove the bad update by opening an elevated CMD prompt.
Note: Strangely enough, this problem is almost exclusive to Windows 10 as Microsoft seems to have fixed this issue for their latest OS. Regardless, we’re still regularly seeing bad Windows Defender definition updates coming on Windows 10.
If this scenario is applicable and you suspect that you’re experiencing this high CPU usage by MsMpEng.exe, the quickest way to fix it is to use an elevated Command Prompt interface to remove the bad update.
Important: Keep in mind that this method assumes that you are actively using Windows Defender as the default security suite.
For step by step instructions on how to do this, follow the instructions below:
- Start by pressing the Windows key + R to open up a Run dialog box.
- Next, type ‘cmd’ inside the Run text box, then press Ctrl + Shift + Enter at the same time to open a Command Prompt window with admin access.

Open an elevated CMD window - When you’re prompted by the User Account Control (UAC), click Yes to grant admin access.
- Once you’re inside the elevated CMD prompt, type the following command to remove all the definitions currently associated with WindowsDefender:
"%PROGRAMFILES%\Windows Defender\MPCMDRUN.exe" -RemoveDefinitions -All
Note: It’s important to keep all the commas inside the command, otherwise it won’t work.
- Once the first command is processed successfully, type in the second command and press Enter in order to update the fleet of virus signatures for Windows Defender:
"%PROGRAMFILES%\Windows Defender\MPCMDRUN.exe" -SignatureUpdate
- Wait until the second command is processed successfully, then restart your PC and open up Task Manager to see if the CPU consumption went down.
In case the same type of issue is still occurring, move down to the next method below.
8. Fixing the Process Mitigation Loop
A less common cause of this error is a scenario where the process mitigation feature actually causes an Exploit Protection loop. It’s possible that Windows Defender is continuously trying to disable the activity of a folder or program, but upon failing, it will try again endlessly. This facilitates High CPU usage.
If this scenario is applicable, the proper fix is to address the process mitigation loop – this will stop the Exploit Protection Service which can drastically help you reduce CPU Usage.
Note: Exploit Protection can cause a Loop where Windows Defender is trying to disable the activity of a folder/program but when it’s not successful it tries to do it again and again which ends up in High CPU Usage.
In order to deploy this particular fix, follow the instructions below:
- Press Windows key + R to open up a Run dialog box.
- Next, inside the Run dialog box that just appeared, type ‘powershell’ inside the text box, then press Ctrl + Shift + Enter to open up an elevated Powershell window with admin access.

Accessing the PowerShell menu - At the User Account Control, click Yes to grant admin access and open an elevated Powershell window with admin access.
- Once you’re inside the Elevated Powershell window, type or paste the following command to effectively disable the Exploit Protection and prevent the process mitigation loop:
powershell “ForEach($v in (Get-Command -Name \”Set-ProcessMitigation\”).Parameters[\”Disable\”].Attributes.ValidValues){Set-ProcessMitigation -System -Disable $v.ToString().Replace(\” \”, \”\”).Replace(\”`n\”, \”\”) -ErrorAction SilentlyContinue}” - You will most likely get some warning, but ignore them and wait until the process is complete.
- After the command is processed successfully, restart your PC and open Task Manager once the next startup is complete by checking if the usage by the Antimalware Service Executable (MsMpEng) is still high.
If the problem is still not resolved or this method is not applicable to your particular scenario, move down to the final potential fix below.
9. Using a different antivirus
If none of the methods above have worked, one surefire way of getting rid of this issue permanently is to simply use an alternative antivirus. Go this route if every other fix featured in this article doesn’t work for you and you’re prepared to move away from the built-in Windows Defender suite.
You can try to use an alternative AV scanner engine frequently such as “Malwarebytes”, but you still need a real-time antivirus that is less aggressive.
Here are a few variants that you should consider:
- BitDefender
- Norton 360
- Intrusta
- Webroot
If you’re trying to figure out which of these options are right for you, consult this article where we analyze the 5 best antivirus suites for Windows 10.
Note: Using another antivirus essentially disables Windows Defender, employing its own processes to defend your computer. Consequently, your computer usage will increase. Nevertheless, you will remain protected and your issue will be resolved.
Holy cow, I am glad I got my computer back! The first option fixes it!