How to Fix Error Code 4 on Spotify
Spotify Error Code 4
Spotify is probably the most popular online music streaming service and millions of people are using it every day to stream and download songs from their favorite artists after paying a monthly subscription. Still, the player has some issues such as the Spotify error code 4 which appears to users randomly.
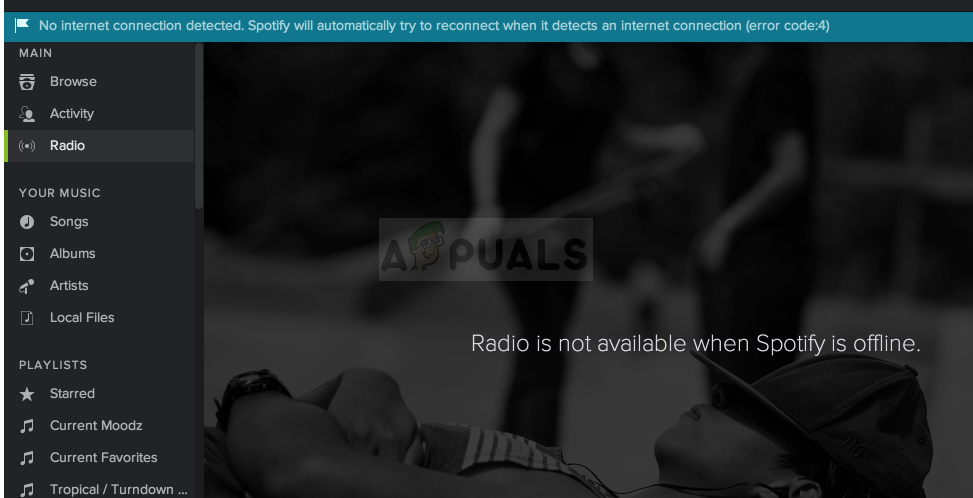
It’s a large problem for casual users who just want the simplest way possible to listen to music on their PC without having to do anything besides clicking the play button. The message which appears along goes like: “No internet connection detected. Spotify will automatically try to reconnect when it detects an internet connection (error code: 4).”
What Causes Spotify Error Code 4?
The error is often causes by improper Internet connection settings which can often be fixed easily by using different DNS settings. Also, the Spotify client has some connection settings such as the Proxy type which you can tweak in order to solve the problem.
The problem can also be caused by your antivirus tool which blocks the client from connecting to the Internet. You should add Spotify as an exclusion or replace the tool.
Solution 1: Use a Different DNS
The problem is often caused by a faulty Internet connection which is simply not accepted by Spotify servers or its service. The problem can be resolved easily by changing your default DNS settings to use the ones provided by OpenDNS or Google. This can be done easily in Control Panel so make sure you follow the steps below carefully.
- Use the Windows + R key combo which should immediately open the Run dialog box where you should type ‘ncpa.cpl’ in the bar and click OK in order to open the Internet Connection settings item in Control Panel.
- The same process can also be done by manually Control Panel. Switch the View by setting at the top right section of the window to Category and click on Network and Internet at the top. Click the Network and Sharing center button in order to open it. Try to locate the Change adapter settings button at the left menu and click on it.
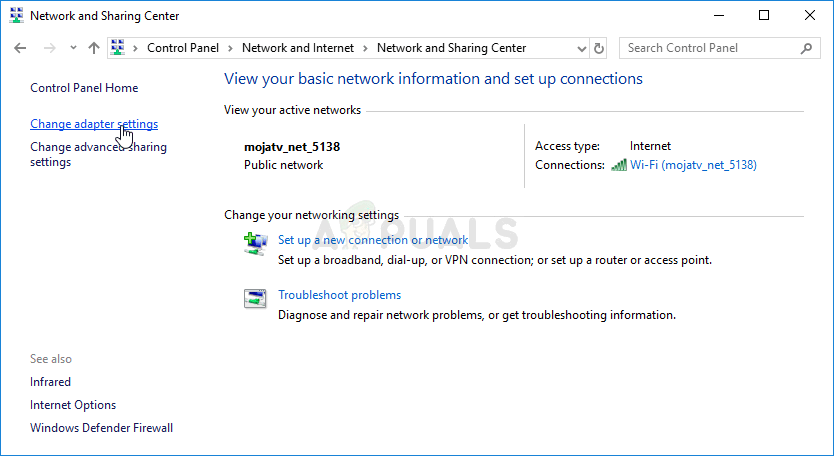
- Now that the Internet Connection window is open using any method above, double-click on your active Network Adapter and click on the Properties button below if you have admin permissions.
- Locate the Internet Protocol Version 4 (TCP/IPv4) item on the list. Click on it in order to select it and click the Properties button below.
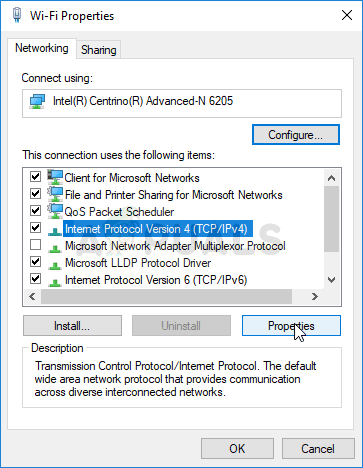
- Stay in the General tab and switch the radio button in the Properties window to “Use the following DNS server addresses” if it was set to something else.
- Set Preferred DNS server to be 8.8.8.8 and the Alternate DNS server to be 8.8.4.4
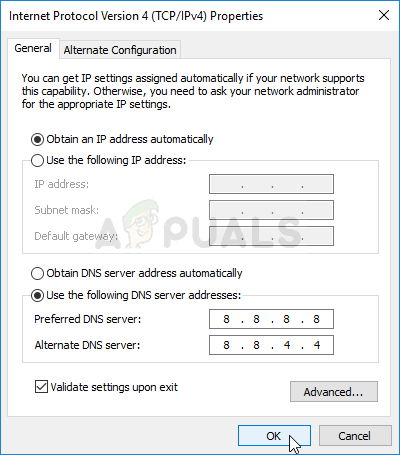
- Keep the “Validate settings upon exit” option checked and click OK in order to apply the changes immediately. Check to see if the Spotify error code 4 still appears!
Solution 2: Change the Proxy Type in Spotify Settings
Changing the proxy Spotify uses to connect your client to the Internet is always a viable solution to the problem but there is no strict rule which will deduct which option from the menu to choose. The option which usually solved the problem is “HTTPS” but Auto-Detect tends to work often as well. Make sure you try multiple entries from the list before giving up.
- Open Spotify by double-clicking its shortcut on the Desktop or by searching for Spotify in the Start menu and clicking the first available result.
- From the failed login page where you should see the Spotify error code 4, open the Settings by locating its button anywhere around the window. In Settings, under the Proxy type option, click on the drop-down menu and choose an option from it.
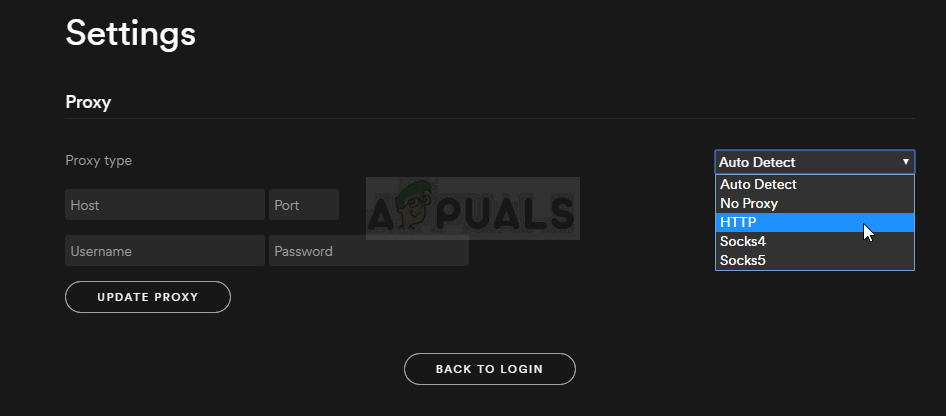
- Apply the changes and check if the error code 4 is gone now. If it’s not, try out different options from the drop-down menu before giving up!
Solution 3: Add Spotify to Antivirus Exceptions
Unfortunately, this problem is often tied with antivirus incompatibilities as they often tend to block Spotify from connecting to the Internet properly. In some extreme cases, users even had to uninstall the antivirus they use because nothing else could help.
Still, you should always be able to simply add the Spotify executable as the exception in your antivirus.
- Open the antivirus user interface by double-clicking on its icon at the system tray (right part of the taskbar at the bottom of the window) or by searching for it in the Start menu.
- The Exception setting is located in different spots with respect to different antivirus tools. It can often be found simply without much hassle but here are some quick guides on how to find it in the most popular antivirus tools:
Kaspersky Internet Security: Home >> Settings >> Additional >> Threats and Exclusions >> Exclusions >> Specify Trusted Applications >> Add.
AVG: Home >> Settings >> Components >> Web Shield >> Exceptions.
Avast: Home >> Settings >> General >> Exclusions.
- You will need to add the Spotify executable file. in the box which will appear prompting you to navigate to the file. The best way to locate Spotify is by right-clicking its shortcut on the Desktop and choosing the Open file location option from the context menu.
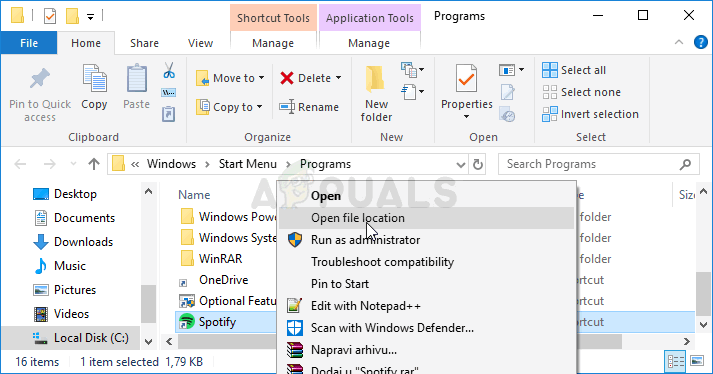
Spotify – Open file location - Check to see if you are now able use the program without receiving the Spotify error code 4! If the error still appears, you might consider using a different antivirus or firewall tool, especially if the one giving you the problems is free!


