Fix: DISM Error 0x800f0906 “The source file could not be downloaded”
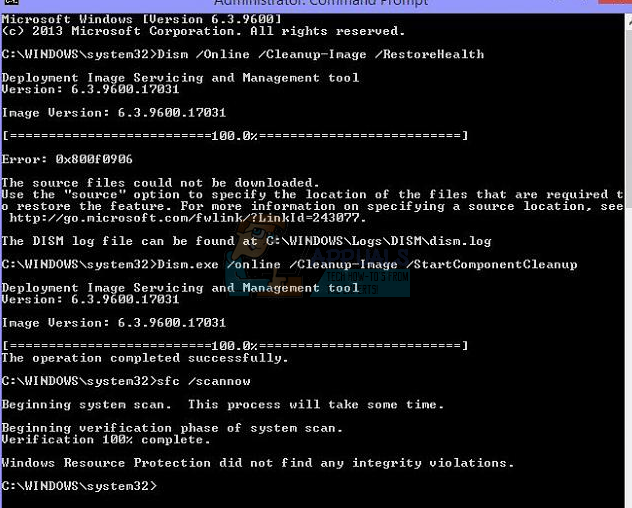
Numerous Windows 10 users have reported seeing error code 0x800f0906 when running the following command in an elevated Command Prompt: Dism.exe /Online /Cleanup-Image /RestoreHealth
The DISM (Deployment Image Servicing and Management) command-line utility is an incredibly nifty little tool that can be used to service and repair a Windows installation. The DISM.exe command failing can be a pretty significant issue, especially if this happens when you desperately need the utility to work its magic. When the DISM command-line tool fails with error code 0x800f0906, the accompanying error message either states that the source files could not be downloaded or that the files required to repair the store could not be found.
In most cases, this issue is either caused by some kind of a corruption or, in some cases, one or more of the latest Windows updates available for the affected computer not being installed. Thankfully, though, there is a lot you can do to try and fix this problem. The following are the most effective solutions that you can use to try and get rid of this issue and get the DISM tool to successfully perform repairs:
Solution 1: Uninstall the KB3022345 Update
Getting a 0x800f0906 error when you’re trying to use the Deployment Image Servicing and Management tool’s restore health function happens for users with the KB3022345 update, due to a bug that is well known to Microsoft, and allegedly fixed in later updates.
The KB3022345 update broke both DISM and SFC for users of Windows, causing them to give this kind of errors all the time when you try to use them. Solving this issue is as easy as uninstalling the update, so read on to see how you can do this in a fairly simple way, and use DISM and SFC again when you need them.

- Press the Windows key on your keyboard to open the Start menu, and either click Control Panel, or type in Control Panel and open the result, depending on which version of Windows you’re using.
- Switch to Icons view, in the top right corner of Control Panel, and open Programs and Features from the list.
- On the left side, click on the View installed updates
- You will see a search box in the top right corner, type KB3022345 to find the update with less effort.
- When you’ve found it, right-click it, and choose
- Once everything is done, reboot your device.
Even though updates are supposed to bring fixes and improvements, it often happens that an update breaks something instead of fixing it, or fixes one thing and breaks three others. Fortunately, pinpointing which update caused this issue was easy, and Microsoft confirmed that this is the case, so if you simply follow the steps above to uninstalling the update, you won’t have this issue with the Deployment Image Servicing and Management tool anymore.
Solution 2: Run an SFC scan
Since corruptions are some of the most common causes of this issue, running an SFC scan is most definitely a good idea. An SFC scan is capable of scanning all of the system files on your computer for corruptions and fixing any that it finds. To run an SFC scan on a Windows 10 computer, you can use this guide.
Solution 3: Manually repair corruptions
- Right-click on the Start Menu button to open the WinX Menu.
- Click on Command Prompt (Admin) in the WinX Menu to launch an elevated Command Prompt.
- One by one, type each of the following commands into the elevated Command Prompt, pressing Enter after typing in each command and waiting for one command to be fully executed before typing in the next one:
net stop wuauserv
cd %systemroot%\SoftwareDistribution
ren Download Download.old
net start wuauserv
net stop bits
net start bits
net stop cryptsvc
cd %systemroot%\system32
ren catroot2 catroot2old
net start cryptsvc
- Close the elevated Command Prompt.
- Restart your computer.
- When your computer boots up, try running the DISM utility and see if it runs successfully.
Solution 4: Install any and all available Windows updates for your computer
If you are suffering from this issue because one or more of the Windows updates available for your computer is not installed, you can resolve this issue by simply installing any and all available Windows updates for your computer. In order to do so, you need to:
- Open the Start Menu.
- Click on Settings.
- Click on Update & security.
- Click on Windows Update in the left pane.
- In the right pane, click on Check for updates.
- Wait for Windows Update to check for and retrieve any and all available updates for your computer.
- If there are any updates available for your computer, download and install them.
Once all available updates for your computer have been successfully installed, restart the computer. As soon as the computer boots up, try running the DISM utility and check to see whether or not the problem has been fixed.