‘169.254.X.X – Invalid IP Config’ Error Solved in 4 Verified Solutions
169.254.x.x is a private IP addressing space reserved by Microsoft, which it assigns automatically to your network adapter if the adapter cannot obtain an IP address from the DHCP server. Since the address is assigned directly by Windows itself, the issue could either reside with the network adapter or with your router/modem.
In this guide, we will troubleshoot the issue to diagnose the cause and then fix it. Since the issue could be originating from the modem or from within the PC, we will start with the PC.
Here are a few methods that will fix this problem. Method 1 solves the problem almost all the time so try Method 1 first. If it doesn’t solve the problem then go to Method 2, 3, or 4.
Method 1: Reboot the PC
- Hold Windows key and press R
- Type shutdown /r /f /t 0
OR
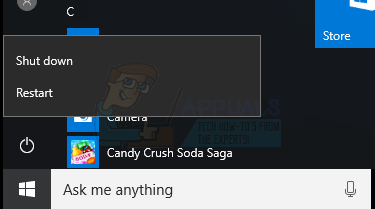
- Press and hold Shift
- Click Start > Shutdown. Keep the Shift key pressed until your computer restarts
Method 2: Fix through IP Config Renewal
- Hold Windows key and press R
- Type compmgmt.msc then press Enter
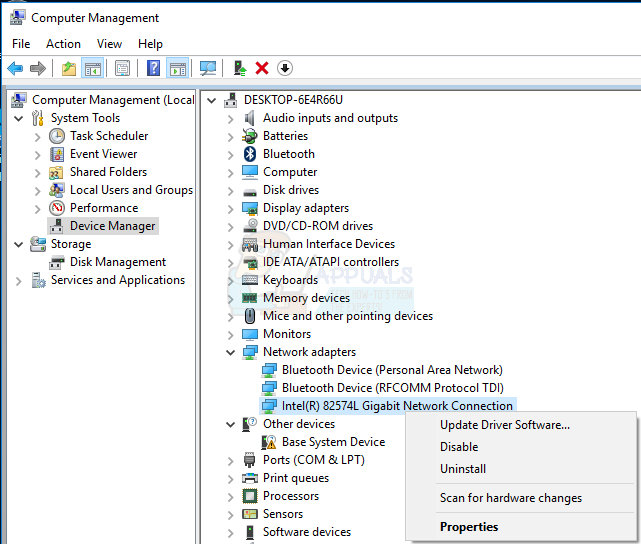
- Select Device Manager > Expand Network Adapters.
- Right-click on the Ethernet or Wireless Adapter that has the issue. You can identify it by the exclamation mark or error mark on the left side. Then, click ‘Uninstall‘
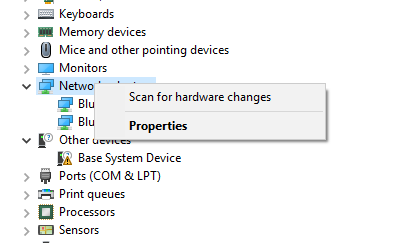
- Right click Network Adapters > Scan for Hardware Changes
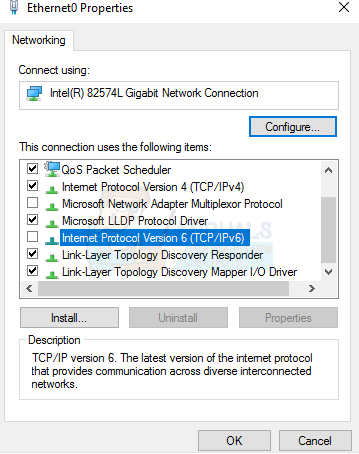
- Hold the Windows Key and press ‘R‘. Type ‘ncpa.cpl‘ and click ‘OK‘. Right-click the network adapter in question and choose ‘Properties’. Then, uncheck ‘Internet Protocol Version 6 (TCP/IPv6)‘ and click ‘OK‘.
- Hold the Windows key, press X, and choose Command Prompt (Admin). For Windows 7, click Start, type cmd, right-click on cmd, and choose Run as Administrator.
- In the black command prompt window that opens up, type ‘netsh winsock reset catalog‘ and then press Enter.
- Type ‘netsh int ip reset reset.log‘ and then press Enter.
- Type ipconfig /release press Enter
- Type ipconfig /renew press Enter
- Restart your computer
Method 3: Unchecking Fast Reboot option (Temporary)
- Hold Windows Key > Press X (release Windows Key) > Power options for Window 8 and 10. For Windows 7 click Start > Control Panel > Hardware and Sound > Power Options
- Select Change what the Power buttons do > Change settings that are currently unavailable (if Fast Startup option is greyed out).
- Uncheck Turn on Fast Startup
- Click Save Changes
Method 4: Restart DNS client
- Hold the Windows Key and press ‘R‘. Type ‘services.msc‘ and click ‘OK‘. Scroll down the Services tab and choose ‘DNS Client‘. Right-click on it and choose ‘Restart‘.
If the issue is not yet resolved, please reboot your modem/router; it’s best to power them off for 5 minutes and then turn them back on.
Hi Kevin
I have tried these, method seems to get closest but after typing “pconfig /release” my computer says “no changes to bluetooth or wifi can be made whilst the wifi is disconnected” or something similar. I have also tried the two AVG removal tools which caused the problem but hey require access to the internet