How to Enable Intel XMP to Get the Most Out of Your RAM
No matter what speeds your RAM module promises in advertisement, it runs on some standard specified speeds as dictated by the Joint Electron Device Engineering Council (JEDEC). If you’ve got a RAM module that’s capable of strong performance at its advertised capacities, you may choose to overclock it to unleash its full potential and push it to the settings advertised. This will max out your CPU’s performance because while processor overclocking can increase your device’s computational speeds, your performance is crippled if you’ve got a limiting memory module alongside. The two go hand-in-hand to speed up your system and given that your memory module has a better built-in advertised capacity, it only makes sense to operate it at the levels you’re paying for.
Tech enthusiasts often jump into making hardcore manual adjustments to their memory base clock, multiplier, timing parameters, and voltage settings when it comes to memory overclocking. To get to the advertised capacities, however, Intel gives you some pre-defined profiles already stored onto your RAM modules that your BIOS can load up and apply through just some clicks. These one or two Extreme Memory Profiles (XMP) stored on your RAM will configure the module through your computer’s BIOS to run at the parameters that provide optimal performance as advertised for the RAM device that you are running.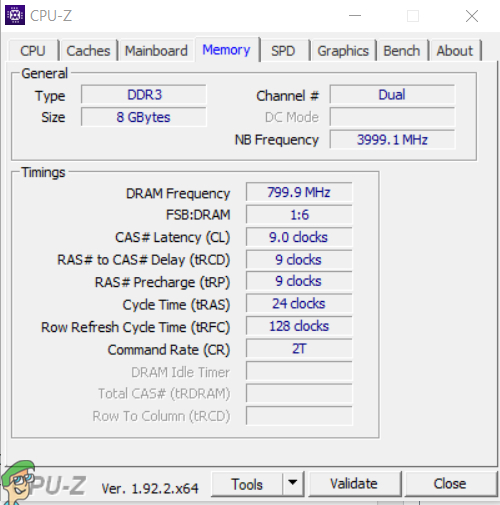
Before getting into the RAM overclocking and applying the extreme memory profiles, as with any form of overclocking, it’s always a good idea to get a glimpse of the currently set parameters before performing any changes or manipulations to the standard operating values. CPU-Z is a handy freeware to download that lets you see your RAM timings through the clock, speed, voltage, and frequency values of your CPU, memory module, graphics, mainboard, and more. Looking under the memory tab will show you these values for your memory module specifically. You should compare these values against the RAM advertised values to see if you’re already operating at them (if your XMP profiles are already enabled). Sometimes, especially for more hardcore computing devices that are specifically designed for heavy processing or gaming, these XMP profiles are already enabled. If you verify the values and find that you’re not running at max capacity, then you can proceed with applying your Intel XMP profile through your device’s BIOS startup navigation.
The Intel XMP profiles are designed to help you get the most out of your DDR3 or DDR4 RAM memory module device, particularly for those who seek the extra boost in performance for CPU resource-heavy applications or gaming. The profiles are ready-made for your particular memory module and do not require any manual parameter adjustment in the BIOS for trading up your performance.

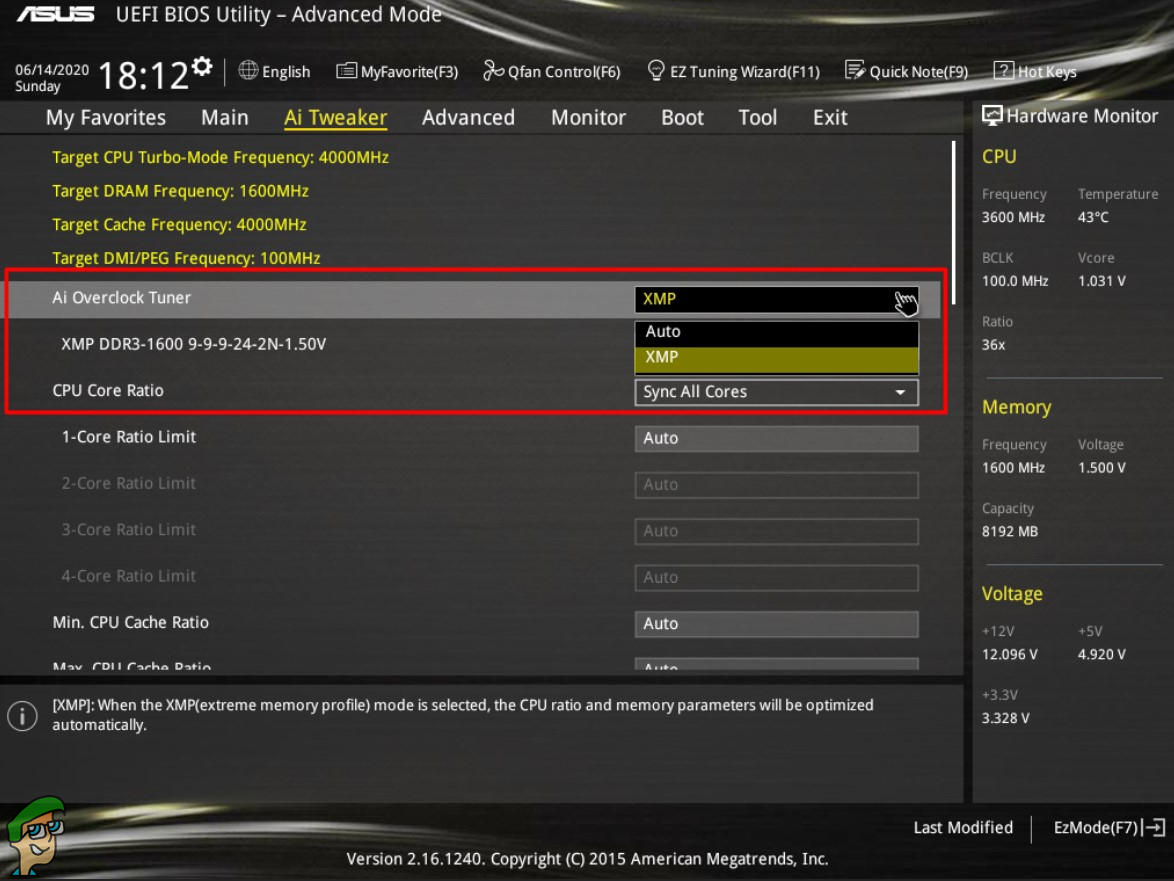
Now that you’ve conducted your preliminary system analysis to see where you stand, enter your computer’s BIOS by restarting your device and pressing the specified key during boot up. This key is usually the F2/Delete button on most devices, but it will be specified on the screen during the boot process regardless.
There will be an XMP option in your BIOS boot up. It may be visible directly or maybe nested under an overclocking section depending upon the board that you’ve got installed. Navigate to find the XMP profile and activate it. If there are multiple XMP profiles configured, you can apply each to see which gives you better performance. Boot up and use the CPU-Z freeware specified earlier to check your memory parameters after applying each profile to decide which one is providing a better boost. You’ll have to re-enter the BIOS interface after applying each profile to apply the next one.
This isn’t a difficult procedure to carry out. It doesn’t require any manual adjustments to the memory catering parameters. Often times, however, those who have not heard of Intel’s XMP profiles do not know about this and miss out on the potential that their memory modules can deliver. For tech enthusiasts who know how to go about overclocking their memory modules manually, this will save them a lot of time and push their modules to advertised capacities. For those who do not know how to proceed with any such sort of hardware manipulations, Intel makes it easy by reducing it down to just a few clicks. All in all, no matter who you are and what level of background experience you possess, overclocking your memory module could not be easier owing to the pre-configured Intel Extreme Memory Profiles. Lastly, if you’re in the market for a new pair of DDR3 RAM check out this article.