‘OTA updates on rooted Xiaomi Mi A2 with Magisk’ [Full Guide]
Applying OTA updates to rooted Xiaomi Mi A2 can be a massive headache, as it can involve un-rooting your device and going through all the steps to root it all over again. Fortunately there is a method to install Magisk that supports OTA updates.
So if you want to root the Xiaomi Mi A2 while being able to apply OTA updates without unrooting your device, follow our simple guide below carefully.
Requirements:
- ADB and Fastboot (See Appual’s guide How to Install ADB on Windows)
- MiFlash Tool
First you need to have your bootloader unlocked – but you need to be very careful, and also be aware that Xiaomi bootloader unlock program has become very slow lately. It may take weeks to receive a bootloader unlock code. You should also be aware of ARB (Anti-rollback protection mechanism) in Xiaomi devices.
If your device’s bootloader is already unlocked, great! We can continue.
Go to Settings > System > About Phone > tap ‘Build Number’ 7 times until Developer Mode is unlocked.
Now go to Settings > Developer Options > enable OEM Unlocking.
Now shutdown your device, and hold Volume Down + power button. Release the buttons when you enter the Fastboot menu.
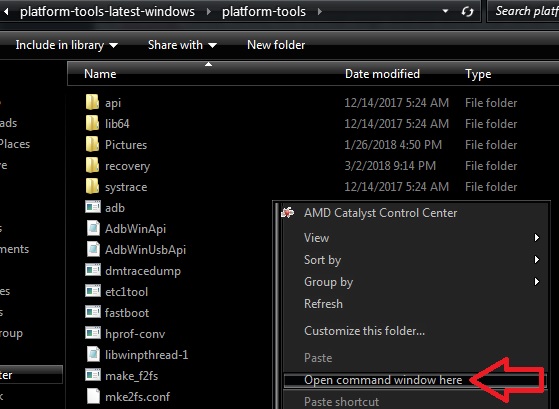
Connect your Xiaomi Mi A2 to your PC via USB, and launch an ADB terminal (hold Shift + right click in your main ADB folder, and choose ‘Open a command window here’).
In the ADB terminal, type this command: fastboot oem unlock
This will reboot your phone and erase all of your data while unlocking your bootloader.
Installing Magisk
Download and install the latest version of Magisk Manager APK on your phone.
Now download a patched boot.img from the following downloads – alternatively, we’ll show you how to patch an original boot.img by yourself underneath the list of boot.img downloads.
When downloading a patched boot.img, you have to be entirely sure it contains the same build number you are on. So check your Build Number in Settings > About Phone before proceeding, and do not flash the file directly on the phone’s memory, because Magisk will not work properly. Follow our instructions very carefully and exactly as they are written.
You should download the patched boot.img to your ADB folder on your PC.
In case you accidentally flash the wrong boot.img, you can flash an original boot.img from the list below:
Please be aware that if doing a manual boot.img patch, you’ll need your original boot.img – you can find it inside the official fastboot ROM zip file for daisy. But make sure that the downloaded ROM version has the same Build Number as the one on your phone. So either download the original boot.img with the same Build Number as your phone, or update/downgrade your version.
After you have the original boot.img (extracted from the official fastboot ROM zip), you need to copy it to your phone’s external memory (SD card).
Now open the Magisk Manager app, and it will ask if you want to install Magisk – accept the installation, then “Patch Boot Image File” and choose the boot.img file you transferred over.
The process should take around 1 minute to complete, so close it when it is done. In your phone memory in the Download directory, you should find a file called “patched_boot.img”, which you need to transfer to your PC. Place it inside your main ADB folder.
Now reboot your device into Fastboot Mode (remember, Power + Volume Down) and launch an ADB terminal on your PC.
In the ADB terminal, type the following command: fastboot boot patched_boot.img
Your phone should now boot normally. When you are back in the Android system, open the Magisk Manager app and it will ask once again to install Magisk. Go ahead and choose Install > Direct Install, and reboot when its done.
Now as a precaution for future OTA updates, go to Settings > System > Developer Options > disable Automatic system updates. You should only choose to install OTA updates manually. Never allow automatic OTA on a rooted Android device.
How to Apply Future OTA Updates
Please be aware that OTA updates will only work if all the partitions on the device are untouched! Magisk is able to restore your original boot.img, but if you modified the /system partition in any way, such as manually editing build.prop, the OTA will refuse to install.
You can try to apply OTA updates without needing to flash an entire original fastboot ROM if you flash only the modified partitions, such as flashing only the /system partition from an original fastboot ROM, using the proper .img file from the original ROM .zip file.
So when a new OTA update becomes available that you want to install, you need to launch Magisk Manager and tap “Uninstall > Restore Images”, but do not reboot the device yet.
Close Magisk and go into your device’s Settings > System > System update, and install the OTA update. When the update has downloaded, it will begin a two-stage update. We recommend putting on a pot of coffee, and maybe enjoying a quick game of Madalin Stunt Cars 2, or trying your best at The Impossible Quiz (good luck!)
After the update stages are complete, it will ask to restart. Do not restart your device. Launch Magisk Manager once again, then tap Install > Install > Install to Inactive Slot (After OTA), and only then may you proced to Reboot.
After your Xiaomi Mi A2 has rebooted, you should have the updated Android version with Magisk still inact.
Troubleshooting
Note: Before proceeding with any of these operations, you need to disable any screen security you have on your device (screen lock, PIN, password, fingerprint, etc) because you risk encryption issues with your data. It is highly recommended to create a backup first.
If you did not follow this guide meticulously, you may encounter some problems.
When a new version is found, the updater will check if all the partitions on the device are untouched. If there is a partition that has been modified, the OTA updater will not proceed with the installation;
Typically, the two partitions commonly modified by user modding are the boot partition (that’s where Magisk and TWRP are installed) and the system partition (when you change a config file, add or remove a system app, etc.)
A system partition modified only by using Magisk modules is effectively untouched, because Magisk register all changes to /system in a file in the /data partition and then trick Android to believe those changes are really applied to /system;
Boot partition instead is really modified, but if you install Magisk following this guide, Magisk will save a copy of the untouched boot partition, and restoring it before applying OTA update will make the update work.
Now, if you didn’t follow this guide to install Magisk and you installed it in other ways, Magisk could alert you that it cannot restore the original boot.img (the boot partition) when you try to apply the OTA update.
To fix this, you can flash directly the vanilla (original, unmodified, untouched) boot.img taken from the point 6 of this guide, using those commands:
fastboot getvar current-slot

fastboot flash boot_? boot.img
The first command will tell you what is the current slot in use (a or b), the second command will flash the original boot into the phone, but you have to change the “?” in the command with a or b (i.e. the current slot that the first command provided).
Remember that the boot.img file version must correspond to the Android build version currently running in your phone.
If the OTA update will still refuse to apply, probably you changed something directly in the /system partition (for example you changed something in the build.prop without using a Magisk module to do this).
In this case you have to flash the original system.img in the phone with those commands:
fastboot getvar current-slot

fastboot flash system_? system.img
and as before, the first command will tell you the right slot to use instead of the “?” in the second command.
Here you can find the system.img extracted from the OTA updates zip (along with every other .img file inside that):
If you want to obtain the system.img by yourself, you can find it inside the fastboot images but usually they are not updated monthly like OTA updates. But you can extract the system.img directly from the OTA update zips found in this thread, using the Python scripts found here.
To make the Python scripts work in Debian/Ubuntu and derivatives, you have to download both “extract_android_ota_payload.py” and “update_metadata_pb2.py”, give them execution property and then install the package “python-protobuf”. After this you can give this command to unpack the payload.bin file (that you must extract from the OTA update zip):
./extract_android_ota_payload.py /path/to/payload.bin
This will extract in the current directory all the .img files inside payload.bin, including the system.img
I don’t know how to proceed in Windows, probably you only need to install the latest Python2 release and the script will work.
As the last resort, you can flash directly with MiFlash the latest fastboot image available (even if older than your current version). Use the “flash_all.bat” script but before take a backup of your data, because the phone will be fully reset.
If you don’t want to take the risk of not doing a backup, use the script “flash_all_except_storage.bat” when flashing, so you will keep all your data, but be warned that sometimes you will not be able to access the data anymore, because of encryption problems.
Right after the flash, you can start following the guide from point 5 or 6.
It should not be a problem downgrading the build version via fastboot, as long as the Android main version remain the same (Oreo 8.1 at the moment).
Patched and original boot files for Mi A2 jasmine (not for use with Mi A2 Lite daisy, you can find the files for daisy in the first section of this guide).