How to stop ‘Windows 10 installing Realtek Drivers automatically’
Previously one would choose the settings to update windows and device drivers. However, after the release of Windows 10, most updates are forced on your system. Apart from the Windows Build updates and forced hot fixes, Windows 10 now updates your device drivers in order to keep your system working at the highest efficiency. This is because Microsoft noticed that most problems on Windows 10 were caused by bad or outdated drivers.
This has brought to the problem of installing driver applications to manage the driver options. One such complaint is the updating of Realtek audio drivers which then installs the application to manage it. This application might not function properly in some systems. On tenforums.com, a user complained that: “I don’t want the Realtek audio drivers as it completely messes with my audio and also doesn’t correctly switch when I plug in headphones for example. It also doesn’t allow for the ‘speaker fill’ enhancement to be used when playing stereo content through surround sound. Windows itself does a far better job as opposed to Realtek. Every time I uninstall Realtek it automatically gets reinstalled. Sorry Microsoft, you don’t know best.” There have also been several complaints from Reddit users.
Realtek drivers are sound drivers for your PC. The Realtek Audio Manager is supplied by Realtek and it allows you to manage your connection and improve sound stability and sound quality. Your motherboard may have an on-board sound built into it because of which you have the Realtek audio manager installed on your computer. However, it looks like Realtek Audio Manager doesn’t seem to work very well in Windows 10, thus generating a lot of complaints. It seems that every time windows finds that your Realtek drivers are not up to date, it updates them and gives you the Realtek Audio Manager application. Uninstalling the application from the uninstaller will just create a loop because doing that also uninstalls the latest sound drivers.
For some people, the Realtek sound manager can be annoying and not actually work for them. If it unappealing to you, here is our guide on how to get rid of it and still have your soundcard working.
Removing Realtek Sound Manager
Method 1: Prevent Automatic Installation, Reinstall windows manually and Change the bit rate settings
The idea is to disable automatic installations and delete the already updated drivers. We will then install new drivers manually. Since the system is denied from making changes to the driver, it will now not be able to install Realtek Audio Manager.
- Let the driver install and take over.
- Go to Control Panel > System and Security > Advanced System Settings > Hardware tab. Click on Device Installation Settings and choose ‘No (your device might not work as expected)’ to prevent Windows from automatically downloading device drivers.
- Go to Device Manager by: pressing Windows/Start Key + R and type devmgmt.msc in the run box and hit enter. Right-click Realtek HD Audio Device from (the sounds video and game controller expansion) and choose ‘Disable’.
- Right-click Realtek HD Audio Device again and this time choose ‘Update Driver’.
- A Dialogue will appear with options to automatically search for the driver online, search on disk or select from a list. Choose to select from a list. A list will appear containing the Realtek driver and the Microsoft generic driver. Select the Microsoft driver (High Definition Audio Device) and OK. You will get a warning about compatibility but ignore it.
- Restart. When the system comes back up open the sound mixer. You should see in the window title bar that it is using the High Definition Audio Device.
- Just one more thing to do. Right-click the speaker icon in the task bar and chose Playback devices. Select Speakers then click on Properties. Go to the Advanced tab and change the sample rate and bit depth to the highest possible on your system.
Method 2: Uninstall Realtek Audio Manager, install new drivers and deny the system the permissions to the Realtek system folder
This method will reinstall the drivers back to the drivers that were installed before Realtek Audio manager was installed on your PC. On every restart/reboot Windows would try to install the driver, but fail because folder access was denied. It will instead re-install the Microsoft driver and continue with the boot (this information can be seen from the Event Logs). This might slightly extend the boot time.
- Press Windows/Start Key + R to open Run
- Type appwiz.cpl on the run textbox and hit enter.
- From the Programs and Features window, double click on Realtek HD Audio Manager to uninstall the program. This will also uninstall the sound drivers, so we will need to reinstall them.
- Go to Device Manager by: pressing Windows/Start Key + R and type devmgmt.msc in the run box and hit enter. Right-click Realtek HD Audio Device from (the sounds video and game controller expansion) and choose “Update Driver’.
- A Dialogue will appear with options to automatically search for the driver online, search on disk or select from a list. Choose to select from a list. A list will appear containing the Realtek driver and the Microsoft generic driver. Select the Microsoft driver (High Definition Audio Device) and OK. You will get a warning about compatibility but ignore it.
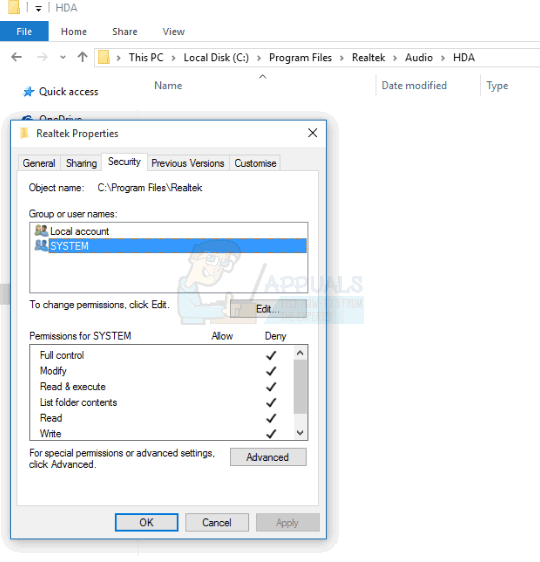
- Go to this local disk C: path: C:\Program Files\Realtek\Audio\HDA
- Right click anywhere that is blank and choose properties.
- Go the security tab and click on Edit
- Select “SYSTEM” by clicking on it on the Group or user names options.
- In the Permissions for SYSTEM, check the deny checkbox in the full control option.
- Press OK twice to accept these changes
- Restart your computer
Method 3: Roll back drivers
Rolling back your driver will install the driver that you were using before the Realtek Audio Manager got installed. Simply:
- Go to Device Manager by: pressing Windows/Start Key + R and type devmgmt.msc in the run box and hit enter.
- Right-click Realtek HD Audio Device from (the sounds video and game controller expansion) and choose “Roll Back Driver’.
Windows 10 remembers this action and no longer tries to reinstall the driver.
I tried this but it JUST KEEPS REINSTALLING ITSELF!!!!!
The Realtek HD Audio Driver makes my music and videos sound like CRAP!!!!
Why is Windows 10 forcing this driver to keep reinstalling?
How can PC manufacturers get away with this???