Fix: No Playback Devices Windows 10
We all have come across the situation where our computer fails to detect any playback devices on our devices which causes the loss of sound. This error is widespread and is only caused by bad configurations on your computer.
There is nothing to worry about. Just follow the simple fixes listed below and if they don’t work, we have listed down a number of different articles for you to follow and implement on your system.
Solution 1: Displaying hidden devices
The most common solution to the ‘No playback devices’ on your computer is to display the hidden devices at your command prompt and then either updating them or uninstalling them. Device manager tends to hide devices which are either not working or not compatible on your computer. These steps will fix that.
- Press Windows + R, type “command prompt” in the dialogue box, right-click on the application and select “Run as administrator”.
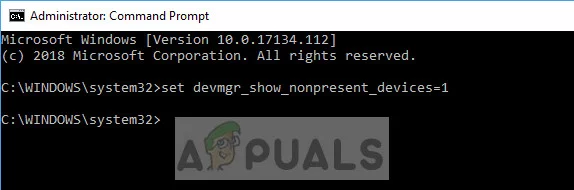
- Once in the command prompt, execute the following command:
set devmgr_show_nonpresent_devices=1
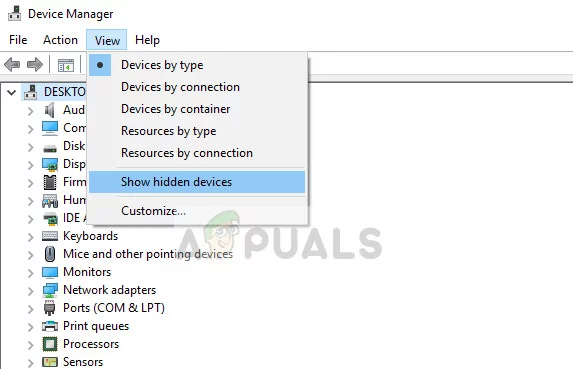
- Now while on the same terminal, type “devmgmt.msc” and press Enter. This should launch the device manager.
- Now while in device manager, click on View and select Show hidden devices.
- Now as you expand different driver categories, you will not only find devices which are currently installed on your PC but also devices which were either loaded in the past but were not uninstalled or not currently started. You can see the offending device from here, right-click on it and select “Uninstall”.
Some of the devices which you might consider uninstalling are:
Audio Codecs

Legacy Audio Drivers

Legacy Video Capture Drivers

Media Control Drivers

Video Codecs
Note: Greyed out devices doesn’t mean that you have to uninstall all of them. Only uninstall the devices which you know for certain that you don’t need. If you do remove that many devices, it may induce a problem in Windows and you might have to reactivate it.
Solution 2: Installing High Definition Audio Device instead of default one
Many users reported that installing High Definition Audio Device driver instead of IDT High Definition Audio CODEC or Realtek High Definition Audio etc. solved the problem for them. The sound quality of both the drivers is pretty much the same. The only loss of functionality which you will notice is the control panel which only Realtek provides.
- Now press Windows + X to launch the quick start menu and select “Device Manager” from the list of options available.
- Once in the Device manager, expand “Sound, video and game controllers” category.
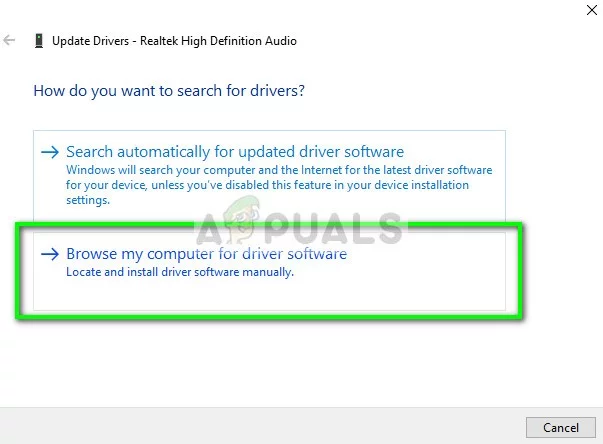
- Right-click on your sound device and select “Update Driver”. Now an option will come forth whether to install the drivers automatically or manually. Select “Browse my computer for driver software”.
- Now select “Let me pick from a list of available drivers on my computer”.
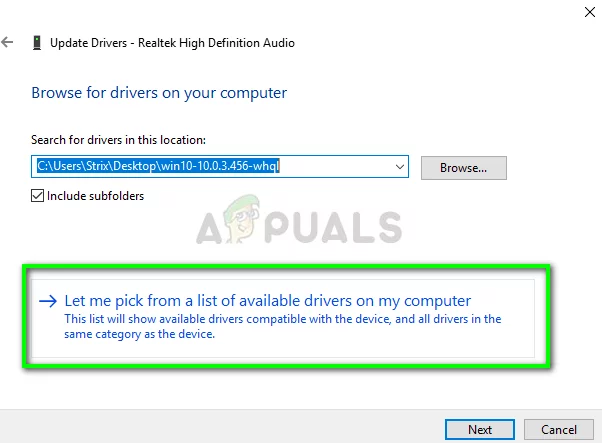
- Uncheck the option “show compatible hardware” to ensure that all the results are listed in your drivers Navigate to Microsoft and then until you find “High Definition Audio Device”. Select it and press Next.
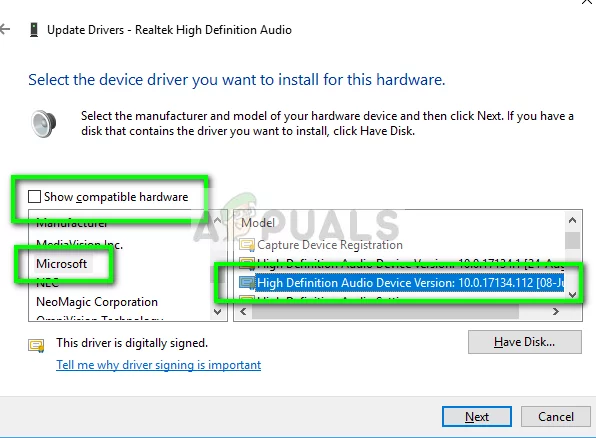
- Follow the on-screen instructions to complete the installation. Restart your computer and check if the problem is solved.
Note: If this doesn’t work, try downloading the drivers from your manufacturer’s website and install them using the method listed above. In most cases, this also solved the problem.
Solution 3: Restarting Audio Services
Windows has an Audio service on its system to handle and manage all the audio transmission. If these audio services are not running or are not started by the operating system properly, it might induce problems like displaying the error message under discussion. We will make sure that Windows Audio is up and running.
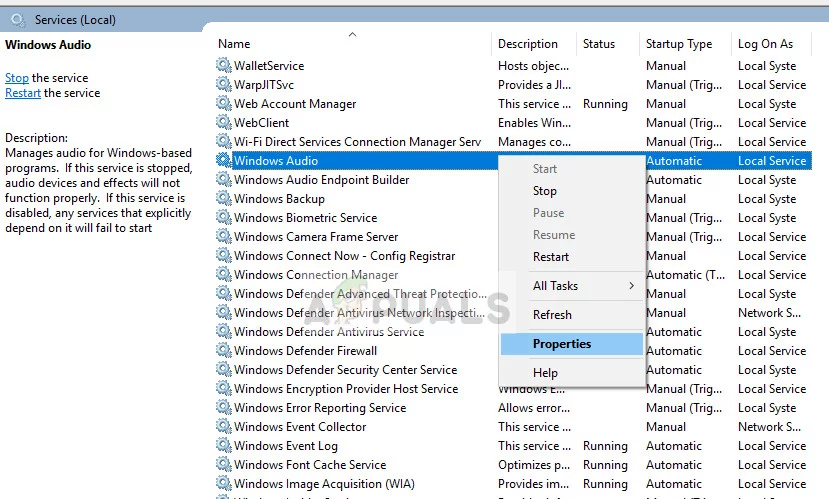
- Press Windows + R, type “devmgmt.msc”, and press Enter.
- Once in services, navigate through all the entries until you find “Windows Audio”. Right-click on it and select “Restart”.
- Now right-click the entry again and select “Properties”. Set the startup type as “Automatic”. Press Apply to save changes and exit.
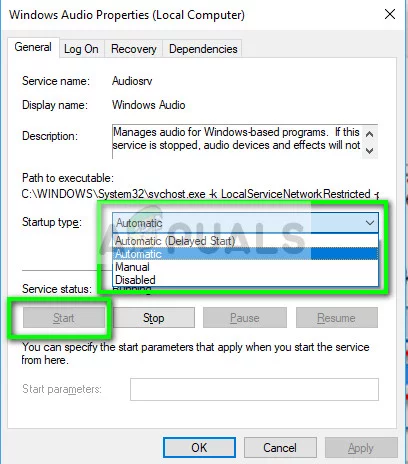
- Restart your computer and check if the sound is outputting as expected.
Note: You can also make sure that the service Windows Audio Endpoint Builder is working perfectly.
In addition to the above solutions, you can also check out our other articles which also address the same problem. Maybe you will some solution there which works for your situation.


You sir are a god. Solution 2 was exactly what I was looking for. Very much thanks….